Table of Contents
Advertisement
OWNER'S
MANUAL
COLOR TV/VCR/DVD TRIPLE COMBO
SSF420TR
INSTRUCCIONES EN ESPAÑOL INCLUIDAS.
As an E
S
NERGY
TAR
Partner, our company has
determined that this product meets
the E
S
®
guidelines for
NERGY
TAR
energy efficiency. E
S
NERGY
is a U.S. registered mark.
®
If you need additional operating assistance after reading this owner's
manual, please call
®
TOLL FREE : 1-800-968-3429.
TAR
(20 inch)
Please read before using this equipment
SUPPLIED ACCESSORIES
ACCESSORIES
Remote Control Unit
NE236UD
Batteries
2 AA Batteries
Owner's Manual
1EMN20126
PART NO.
Advertisement
Table of Contents

Related Manuals for SUPERSCAN SuperScan SSF420TR


Summary of Contents for SUPERSCAN SuperScan SSF420TR
- Page 1 OWNER’S MANUAL COLOR TV/VCR/DVD TRIPLE COMBO SSF420TR (20 inch) SUPPLIED ACCESSORIES ACCESSORIES PART NO. Remote Control Unit NE236UD Batteries 2 AA Batteries INSTRUCCIONES EN ESPAÑOL INCLUIDAS. Owner’s Manual 1EMN20126 ® As an E NERGY Partner, our company has If you need additional operating assistance after reading this owner’s determined that this product meets manual, please call the E...
-
Page 2: C Important Safeguards
WARNING: TO REDUCE THE RISK OF FIRE OR ELECTRIC SHOCK, DO NOT EXPOSE THIS APPLIANCE TO RAIN OR MOISTURE. THIS SYMBOL INDICATES THAT DAN- CAUTION GEROUS VOLTAGE CONSTITUTING A RISK OF ELECTRIC SHOCK IS PRESENT RISK OF ELECTRIC SHOCK WITHIN THIS UNIT. DO NOT OPEN THIS SYMBOL INDICATES THAT THERE CAUTION: TO REDUCE THE RISK OF ELECTRIC... - Page 3 F IGURE A EXAMPLE OF ANTENNA GROUNDING AS PER NATIONAL ELECT RICAL CODE ANTE NNA L EAD I N W I R E GROUND C L A M P A NTENNA DI SCHARG E UN I T (NEC SECTION 8 10 -2 0) EL ECT RI C SE RV I CE EQ U I PM EN T...
-
Page 4: C Precautions
PRECAUTIONS LASER SAFETY IMPORTANT COPYRIGHT INFORMATION Unauthorized copying, broadcasting, public perfor- This unit employs a laser. Only a qualified service mance and lending of discs are prohibited. person should remove the cover or attempt to ser- This product incorporates copyright protection tech- vice this device, due to possible eye injury. -
Page 5: Location
WARNING LOCATION Moisture condensation may occur inside the unit For safe operation and satisfactory performance of when it is moved from a cold place to a warm place your TV/VCR/DVD, keep the following in mind or after heating a cold room or under conditions of when selecting a place for its installation: high humidity. -
Page 6: Table Of Contents
TABLE OF CONTENTS STILL PICTURE ....26 TIME SEARCH ....39 C IMPORTANT SAFEGUARDS ..2 VERTICAL HOLD CONTROL . -
Page 7: C Features
FEATURES TV/VCR Mode • • The Hi-Fi stereo recording/playback You can view a Hi-Fi system– 2 Step picture search operation– system offers you excellent sound quality with a video program at a high speed or super high speed dynamic range of 80dB, frequency response from in either a forward or reverse direction in LP and 20Hz to 20kHz, and 0.005% wow and flutter. -
Page 8: Dvd Mode
DVD Mode ¡ ¡ Dolby Digital sound On-screen display This TV/VCR/DVD can output a Dolby Digital Information about the current operation can be dis- surround signal from the coaxial digital audio out- played on a TV screen, allowing you to confirm the put jack currently active functions (such as program play- ¡... -
Page 9: C Operating Controls And Functions
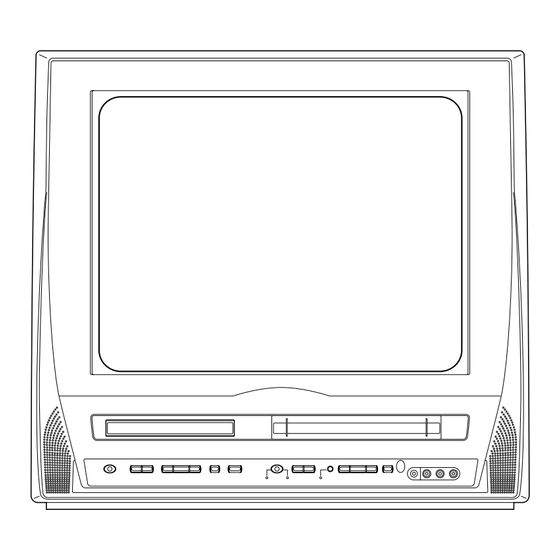
OPERATING CONTROLS AND FUNCTIONS - TV/VCR/DVD FRONT PANEL - [Fig.1] DVD buttons TV/VCR buttons POWER SKIP PLAY SKIP STOP OPEN/CLOSE SELECT SELECT REC/O REC/OTR PLAY F.FWD STOP VOLUME CHANNEL HEADPHONE VIDEO AUDIO SEARCH EJECT TV/VCR 11 12 13 STOP Button [TV/VCR P.26 / DVD P.37] [Fig. - Page 10 - TV/VCR/DVD REAR PANEL - [Fig.3] AUDIO OUT ANT. COAXIAL AUDIO L/R input Jacks MODE Button [DVD P.40] Connect to the audio output jacks of a video Activates program playback or random playback mode. camera, VCR, video game system. SEARCH MODE Button [DVD P.39] Cassette compartment Press to locate a desired point on a DVD disc.
-
Page 11: C Preparation For Use
ANT. in Jack COAXIAL digital audio out Jack Connect to an antenna, cable system or satellite Connect to the digital input of an external Audio system. receiver. Only DVD and CD audio will be output NOTE: Power cord from this jack. Connect to a standard AC outlet (120V/60Hz). -
Page 12: Connecting To External Input Jacks
TO RECORD A SCRAMBLED/UNSCRAM- INSTALLING THE BATTERIES BLED CHANNEL 1. Set the TV/VCR/DVD channel selector to the out- 1)Open the battery compartment cover by pressing put channel of the Cable Converter Box or Satellite the cover on the remote unit in the direction of the Box. -
Page 13: Connecting To A Stereo Receiver Equipped With Digital Input Jacks
CONNECTING TO A STEREO RECEIVER EQUIPPED WITH DIGITAL INPUT JACKS Use an audio coaxial digital cable available at retail stores for the audio connection. AUDIO OUT ANT. COAXIAL Receiver equipped with digital DIGITAL AUDIO OUT COAXIAL input jacks NOTE: DVD, CD audio only To COAXIAL DIGITAL AUDIO INPUT jack [Fig. -
Page 14: Connecting To Receiver With A Dolby Digital Decoder (For Dvd)
CONNECTING TO RECEIVER WITH A DOLBY DIGITAL DECODER (for DVD) If using this TV/VCR/DVD to play a DVD disc in a 5.1 channel Dolby Digital surround format, the TV/VCR/DVD outputs a DOLBY DIGITAL Data stream from its COAXIAL digital audio out jack. By hook- ing the TV/VCR/DVD up to a Dolby Digital decoder, you can enjoy a more convincing, realistic surround sound as enjoyed in movie theaters. -
Page 15: Tv/Vcr Section
TV/VCR SECTION SET UP FOR USE SELECTING THE LANGUAGE CLOCK SET UP (AUTO / MANUAL) TV/VCR TV/VCR Plug in the TV/VCR/DVD power cord The TV/VCR/DVD clock must be set correctly before Plug the TV/VCR/DVD power cord into a VCR timer recording is possible. It is suggested that standard AC outlet. - Page 16 AUTOMATIC CLOCK SETTING Select the year – MANUAL CLOCK SET – Make sure ... • Press the Arrow button K or L The TV/VCR/DVD is turned on. MONTH DAY YEAR 0 5 / 0 6 2 0 0 4 until your desired year appears. •...
-
Page 17: Daylight-Saving Time
NOTE: During Auto Clock CH Search, the picture DAYLIGHT-SAVING TIME may be distorted, this is normal. TV/VCR Enter the channel number that contains the Select this feature and the TV/VCR/DVD’s clock Automatic Clock Setting Signal automatically will advance one hour in April, then Press the SETUP button on the reverse one hour in October. -
Page 18: Channel Set Up
DELETING (OR ADDING) CHANNEL SET UP CHANNEL(S) TV/VCR TV/VCR You can program the tuner to preset all the channels The channels you no longer receive or seldom watch you receive in your area. can be deleted from the memory. (Of course, you NOTE: Channel memory programming is NOT can add the deleted channel into the memory again.) needed when connected to a cable box or satellite... -
Page 19: C Tv Operation
TV OPERATION WATCHING A TV PROGRAM PICTURE CONTROL TV/VCR TV/VCR The TV/VCR/DVD’s picture controls – BRIGHT, CONTRAST, COLOR, TINT and SHARPNESS – Turn on the TV/VCR/DVD are preset to factory specifications. Although they are Press the POWER button to turn on the TV/VCR/DVD. usually the best, you may need to make some further adjustments to your preference. -
Page 20: Closed Caption System
CLOSED CAPTION SYSTEM Select “CAPTION” - TV/VCR SETUP - TIMER PROGRAMMING Press the SETUP button on the SETTING CLOCK CHANNEL SET UP TV/VCR USER’S SET UP remote control. V-CHIP SET UP LANGUAGE [ENGLISH] B CAPTION [OFF] You can view specially labeled (cc) TV programs, Press the Arrow button K or L to ZERO RETURN TIME SEARCH... -
Page 21: V-Chip Set Up
V-CHIP SET UP SUB RATINGS V-CHIP SET UP When you select the ratings of TV-Y7,TV-PG,TV-14 or TV-MA you will have the option of selecting sub TV/VCR rating categories. V-CHIP SET UP Select “V-CHIP SET UP” Make sure ... - TV/VCR SETUP - Press the SETUP button on the TIMER PROGRAMMING •... -
Page 22: Change Access Code
CHANGING V-CHIP BLOCKED PRO- Exit the V-Chip setting mode GRAMMING Press the SETUP button on the remote control to Note: To change the rating, the TV must be turned to exit the screen. a station that is not protected. If the (PROTECTED) appears on the screen, please change the channel to a station that is not protected. -
Page 23: C Mts(Multi-Channel Television Sound)System
MTS (Multi-Channel Television sound) SYSTEM You can record or listen to a program in MTS stereo. CHECKING THE SELECTED MTS MODE TV/VCR When you play a VHS tape, or receive a broadcast 1) When a program is broadcast in stereo, STEREO on the tuner channel you are watching, appears on the TV screen. -
Page 24: Selecting The Mts System
SELECTING THE MTS SYSTEM TV/VCR Make sure ... TO SELECT MONO MODE • TV/VCR/DVD power must be turned on. You can change the selection to “MONO” if you want to listen to HIFI tapes in normal audio play- TO SELECT HIFI MODE back. -
Page 25: Video Cassette
VIDEO CASSETTE This TV/VCR/DVD will operate with any cassette that has the mark. For best results, we recommend the use of high-quality tapes. Do not use poor quality or damaged tapes. PRECAUTIONS INSERTING A CASSETTE • Avoid moisture. Moisture condensation may occur Insert the cassette in the direction as shown. -
Page 26: C Playback
PLAYBACK NORMAL PLAYBACK SLOW MOTION TV/VCR TV/VCR Press the PAUSE button, then press the F.FWD g Make sure ... button to start the playback in slow motion. The • TV/VCR/DVD power must be turned on. TV/VCR/DVD mutes the sound during slow motion. Press the PLAY button to return to normal playback. -
Page 27: C Special Playback
SPECIAL PLAYBACK Make sure ... AUTO REPEAT PLAYBACK • TV/VCR/DVD’s power must be turned on. • Insert a prerecorded tape. TV/VCR The TV/VCR/DVD has the auto repeat function that RENTAL PLAYBACK allows you to repeat a tape indefinitely without touching the PLAY button. TV/VCR Repeat playback from the beginning ALL REPEAT:... -
Page 28: C Search
SEARCH Make sure ... TIME SEARCH • TV/VCR/DVD power must be turned on. • Insert a tape. TV/VCR The Time Search function makes it possible to quick- ZERO RETURN ly advance the tape to your desired location simply by entering the exact amount of playback time you TV/VCR want to skip. -
Page 29: Index Search
INDEX SEARCH Select “INDEX SEARCH” - TV/VCR SETUP - Press the SETUP button on the TIMER PROGRAMMING SETTING CLOCK TV/VCR CHANNEL SET UP remote control. USER’S SET UP V-CHIP SET UP This feature provides a method of indexing the start- Press the Arrow button K or L to LANGUAGE [ENGLISH] CAPTION [OFF]... -
Page 30: C Recording
RECORDING Make sure ... • TV/VCR/DVD power must be turned on. • Insert a cassette tape with its erase prevention tab in place. (If necessary, rewind or fast forward the tape to the point at which you want to begin recording.) NOTES: •... -
Page 31: Otr (One Touch Recording)
Push(es) Display Recording length OTR (One Touch Recording) 1 push (normal recording) 2 pushes 0:30 30 minutes TV/VCR 3 pushes 1:00 60 minutes This function enables you to set a recording length simply by pressing the REC/OTR button on the 17 pushes 8:00 480 minutes... -
Page 32: C Timer
TIMER AUTOMATIC TIMER Select “TIMER PROGRAMMING” RECORDING Press the SETUP button on the - TV/VCR SETUP - B TIMER PROGRAMMING SETTING CLOCK remote control. CHANNEL SET UP TV/VCR USER’S SET UP V-CHIP SET UP Confirm “TIMER PROGRAM- LANGUAGE [ENGLISH] You may set the TV/VCR/DVD to start and end a CAPTION [OFF] MING”... -
Page 33: Timer Program Extension
TIMER PROGRAM EXTENSION Set beginning hour – TIMER PROGRAMMING – Press the Arrow button K or L until CH DATE BEGIN END -/- - - - - -:- - -:- - - - TV/VCR the desired hour appears. -/- - - - - -:- - -:- - - - -/- - - - -... -
Page 34: Hints For Automatic Timer Recording
TO CHECK THE BEGIN/END TIME Auto Return will begin 1)Press the POWER button so that the Recording When all the timer recordings are completed, the indicator goes off. TV/VCR/DVD will rewind to the beginning of the 2)Press the SETUP button on the remote control. recorded program(s). -
Page 35: C On Screen Display
ON SCREEN DISPLAY To check the Counter, Clock and Channel number on the TV screen, press the DISPLAY button on the remote control. Each time you press the DISPLAY button on the remote control, the TV screen will change as follows: When the Closed Caption mode is OFF: When the Closed Caption mode is ON: •... -
Page 36: Dvd Section
DVD SECTION ABOUT THE DISCS PLAYABLE DISCS DISC TYPES The following discs can be played back on this [ DVD ] TV/VCR/DVD. Data on a DVD is divided into sections called "titles" and then into subsections called "chapters", each of which is ¡... -
Page 37: C Playing A Disc
PLAYING A DISC BASIC PLAYBACK GENERAL FEATURES DVD-V DVD-V DVD may contain menus to navigate the disc and Getting started access special features. Press the appropriate number ¡ Turn on the power of any other components, if nec- buttons or use the Arrow button ( /s /B) to high- essary. -
Page 38: Resume
FAST FORWARD/REVERSE RESUME SEARCH DVD-V DVD-V During playback, press the STOP button. During playback, press and hold the SKIP ¡ Resume message will appear on the TV screen. ) button for a few seconds. ¡ “ g 1” or “h 1” appears on the screen. Press the PLAY button, playback will resume from the point at which playback was stopped. -
Page 39: C Search Function
SEARCH FUNCTION TRACK SEARCH TIME SEARCH DVD-V There are three ways to begin playback on an Audio During playback, press the SEARCH MODE CD at a specific track. button three times (CD: twice) to display the Time Search on the TV screen. Using the Number buttons on the remote control Within 30 seconds, enter a desired disc time using the Number buttons on the... -
Page 40: C Special Playback Function
SPECIAL PLAYBACK FUNCTION REPEAT PROGRAM REPEAT is available only during playback. REPEAT TITLE / CHAPTER You may determine the order in which tracks will play. DVD-V In stop mode, press the MODE button. To activate the repeat function, press the ¡... -
Page 41: C Changing The Settings
CHANGING THE SETTINGS SUBTITLE LANGUAGE CAMERA ANGLE DVD-V DVD-V Some DVD discs contain scenes which have been shot The TV/VCR/DVD allows you to select a language for simultaneously from various angles. You can change subtitles during DVD (if available) playback. the camera angle when the ( ) icon appears on the screen. -
Page 42: C The On-Screen Information
THE ON-SCREEN INFORMATION DVD-V You can check the information about the current disc by pressing the DISPLAY button on the remote control. For DVD-Vs For audio CDs Press the DISPLAY button during playback Press the DISPLAY button during playback to show current Chapter. to show the current Track. -
Page 43: Items
CHANGING THE DVD SETUP ITEMS LANGUAGE SETTING Language Code Language Code DVD-V Abkhazian 4748 Laothian 5861 Afar 4747 Latin 5847 Language options are not available with some discs. Afrikaans 4752 Latvian;Lettish 5868 Albanian 6563 Lingala 5860 Amharic 4759 Lithuanian 5866 Press the SETUP button twice in STOP Arabic 4764... -
Page 44: Display Setting
DISPLAY SETTING AUDIO SETTINGS DVD-V DVD-V You can change certain aspects of the DVD display Choose the appropriate Audio settings for your equip- screens and on-screen messages on the TV screen. ment as it only affects during the playback of DVD discs. -
Page 45: Parental Control
CONTROL LEVELS PARENTAL CONTROL ¡ALL All parental lock is cancelled. DVD-V ¡Level 8 DVD software of any grade (adult/general/children) Parental Control limits the disc viewing that exceed can be played back. your settings (with a password or playback will stop). ¡Levels 7 to 2 This feature allows you to prevent discs with objec- tionable material from being played by your children. -
Page 46: Troubleshooting Guide
TROUBLESHOOTING GUIDE If the TV/VCR/DVD does not perform properly when operated as instructed in this Owner’s Manual, check the TV/VCR/DVD, consulting the following checklist. PROBLEM CORRECTIVE ACTION • No power Make sure the power plug is connected to an AC outlet. •... - Page 47 PROBLEM CORRECTIVE ACTION • Picture OK, Sound Poor Try a new channel, if OK, then possible station trouble. • Check for local interference. • Timer recording is not possible Make sure the timer recording is set correctly. • Make sure the power is off. •...
- Page 48 DVD Mode PROBLEM CORRECTIVE ACTION No picture • Insert a correct video disc that plays on this TV/VCR/DVD. • Press the SELECT button on the remote control to select DVD mode. Then, try other DVD feature. • Insert the disc. Disc cannot be played •...
-
Page 49: C Maintenance
MAINTENANCE CABINET CLEANING 1. Please visit your local Audio/Video store and pur- chase a good quality VHS Video Head Cleaner. • Wipe the front panel and other exterior surfaces of 2. If a Video Head Cleaner does not solve the prob- the TV/VCR/DVD with a soft cloth immersed in lem, please call our help line at 1-800-488-1222, to lukewarm water and wrung dry. -
Page 50: Specifications
SPECIFICATIONS GENERAL SPECIFICATIONS ELECTRICAL SPECIFICATIONS Sound output: 2 speakers, 1W, 8 ohm TV/VCR 20 inch in-line gun, OTHER SPECIFICATIONS 90˚ deflection tube Terminals Television system : NTSC-M Antenna input: VHF/UHF/CATV Closed caption system :§15.119/FCC 75 ohm unbalanced (F-type) Video Heads : Rotary four-head Video input: RCA connector... -
Page 51: C Español
INDICE 10. Indicador TV/VCR Se ilumina durante el modo TV/VCR. ■ CONTROLES DE OPERACIÓN Y FUNCIONES ..51 11. Botones CHANNEL K/L Utilice estos botones para seleccionar canales memorizados. PANEL FRONTAL DEL 12. Indicador de grabación TELEVISOR/VIDEOGRABADORA/DVD . - Page 52 28. Botón SETUP PREPARACIÓN PARA LA Presione este botón para activar o salir del modo de UTILIZACIÓN menús de televisor o configuración de DVD. 29. Botón TITLE Para visualizar el menú de títulos. 30. Botón CLEAR Para cancelar ajustes. CONEXIONES DE ANTENA/CABLE 31.
- Page 53 NOTAS: CONEXIÓN A TOMAS DE ENTRADA • La fuente de audio de un disco grabado en formato EXTERNA de sonido envolvente Dolby Digital de 5,1 canales Cuando vea un programa grabado en otra fuente (videograba- no se puede grabar como sonido digital mediante dora o videocámara), utilice las tomas de entrada de audio/ vídeo una platina MD o DAT.
- Page 54 AJUSTE DE CANAL SECCIÓN DE TV/VCR TV/VCR PREPARACIÓN PARA LA Puede programar el sintonizador para buscar todos UTILIZACIÓN los canales que recibe en su localidad. NOTA: El canal preparado NO es necesario cuando esté conectado a una caja de cable o caja de satélite. SELECCIÓN DE IDIOMA Sólo tiene que seleccionar con el selector de canal del televisor/videograbadora/DVD al canal de salida...
- Page 55 AJUSTE DEL RELOJ SECCIÓN DE DVD TV/VCR REPRODUCCIÓN BÁSICA Cerciórese... • La alimentación del televisor/videograbadora/DVD DVD-V deberá estar conectada. En el ejemplo de abajo, el reloj va a ajustarse así: Para empezar FECHA: 6 de mayo de 2004 ¡ Conecte la alimentación del amplificador y otros HORA: 5:40 PM componentes, si es necesario.
- Page 56 Get it fixed, at your home or ours! Your Home For repair- in your home -of all major brand appliances, lawn and garden equipment, or heating and cooling systems, no matter who made it, no matter who sold it! For the replacement parts, accessories and owner's manuals that you need to do-it-yourself.
Need help?
Do you have a question about the SuperScan SSF420TR and is the answer not in the manual?
Questions and answers