Table of Contents
Advertisement
Advertisement
Table of Contents

Related Manuals for Firenzi FWM 1000

Summary of Contents for Firenzi FWM 1000
-
Page 1: Washing Machine
WASHING MACHINE FWM 1000 INSTRUCTION BOOKLET 132991960... -
Page 2: Important Safety Information
Important Safety Information It is most important that this instruction book should be retained with the appliance for future reference. Should the appliance be sold or transferred to another owner, or should you move house and leave the appliance, always ensure that the book is supplied with the appliance in order that the new owner can get to know the functioning of the appliance and the relevant warnings. -
Page 3: Table Of Contents
Contents For the User For the Installer Important Safety Information Installation Instructions Your New Washing Machine Technical Specifications Description of the Appliance Unpacking Detergent dispenser drawer Positioning Water inlet The Control Panel Water drainage 23-24 Operating sequence 7-10 Levelling Washing 4.5 kg of white cotton at 95°C Special conditions Load the laundry In the interest of the environment... -
Page 4: Your New Washing Machine
Your New Washing Machine Your new washing machine meets all modern requirements for effective treatment of laundry with low water, energy and detergent consumption. Automatic cooling of the wash water to 60°C In the interest before draining, with the 95°C programme. This of the environment reduces thermal shock to fabrics, helping to prevent creasing. -
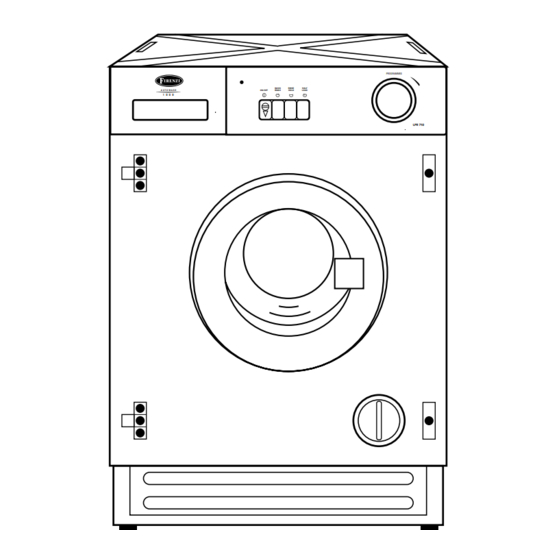
Page 5: Description Of The Appliance
Description of the Appliance 1 Detergent dispenser drawer 2 Programme guide 3 “Mains-on” light 4 ON/OFF button 5 “Option” buttons 6 Programme selector dial 7 Door opening handle 8 Filter 9 Adjustable feet Detergent dispenser drawer Prewash Main wash Fabric softener The programme chart is in the interior part of the drawer. -
Page 6: The Control Panel
The Control Panel 1 Programme guide 5 RINSE HOLD button Press this button to make the machine stop with water 2 Mains-on light in the drum after the cotton, synthetic or delicate wash cycles. This light illuminates when the machine starts working This prevents any creasing which may occur if the and goes out when the ON/OFF button is released. -
Page 7: Operating Sequence
Operating Sequence 3. Measure out the fabric Before the first wash, we recommend that you run a cotton cycle at 60°C, without any laundry in the softener machine, to remove any manufacturing residue from the If required, pour fabric softener into the compartment drum and tub. -
Page 8: Start The Machine
6. Start the machine Before starting up the machine check that: the appliance is plugged in the water supply tap is turned on the drain hose is correctly and securely positioned the door and the detergent dispenser drawer are closed. Depress the ON/OFF button: the mains-on light will illuminate and the machine starts operating. -
Page 9: Washing 2 Kg Of Mixed Fabrics At 50°C
4. Select the required option WASHING 2 KG OF MIXED FABRICS AT 50°C Suppose you have 2 kg of Mixed fabrics to wash. They Depress the RINSE HOLD or QUICK WASH button if are rather delicate fabrics and should not be washed at a your laundry is lightly soiled. -
Page 10: At The End Of The Programme
7. At the end of the programme The machine stops automatically. If you have depressed the RINSE HOLD button, the machine will stop with the water left in the tub, to prevent the fabric from creasing. To drain the water and spin, release the same button. -
Page 11: Washing Hints
Washing Hints Do NOT overload the machine. Weigh the laundry the For wool, use gentle detergent only in small first few times you use the appliance. quantities. Bleach is very corrosive; it should be used with care The average weights of the most common items are and kept out of reach of children. -
Page 12: Which Detergent
And in which form? Which detergent?..Not only are there different types of detergent, but they To ensure you obtain the best wash results from your are also available in different forms. Whether you chose appliance, it is important to use the right detergent in a powder or liquid in traditional or compact form is your everyday wash, and only detergents recommended your own personal choice. -
Page 13: Wash Care Symbols
Wash Care Symbols Wash care labels inside garments recommend how to launder your clothes with the best results. The care labelling code is in line with care labelling used in the rest of Europe. The symbols used make it easy to select the correct programme on your washing machine. -
Page 14: Washing Programmes
Washing Programmes Programmes for cotton and linen Progr. Wash programme/ Degree of soil Programme Possible Max. Description time Washing symbol and type of laundry dial position options load mins. Prewash at 40 °C WHITES RINSE HOLD For heavy soiled cotton Wash at 95°C 4.5 kg WITH... -
Page 15: Washing Programmes
Washing Programmes Programmes for synthetics, mixed fabrics, wool and delicates Progr. Wash programme/ Degree of soil Programme Possible Max. time Description Washing symbol and type of laundry dial position options load mins. Synthetic or mixed RINSE fabrics, underwear, Wash at 50 °C HOLD coloured garments, 2 kg... -
Page 16: Maintenance And Cleaning
Maintenance and Cleaning Before any maintenance or cleaning is carried out you must DISCONNECT the appliance from the electricity supply. Descaling The water we use normally contains lime. It is a good idea to periodically use a water softening powder in the machine. -
Page 17: The Dangers Of Freezing
The dangers of freezing Unscrew and remove the filter. Clean carefully under a fast running tap. If the machine is exposed to temperatures below 0°C, certain precautions should be taken. Turn off the water tap. Unscrew the inlet hose. Unhook the drain hose from the rear support and position the end of this hose and that of the inlet hose in a bowl. -
Page 18: Something Not Working
Something Not Working Certain problems are due to lack of simple maintenance or oversights, which can be solved easily without calling out an engineer. Before contacting your local Service Centre, please carry out the checks listed below. IMPORTANT: if you call out an engineer to a fault listed below, or to repair a fault caused by incorrect use or installation, a charge will be made even if the appliance is under guarantee. -
Page 19: Service And Spare Parts
Symptom Possible causes The programme is still running. The door will not open The door lock has not yet released. Water in the tub: the door cannot be opened if water is present in the tub. The electronic unbalance detection device has cut in because the Spinning starts late or the machine laundry is not evenly distributed in the drum. -
Page 20: Guarantee Conditions
We, EHP, undertake that if, within 12 months of the date This guarantee does not cover: of the purchase, this Firenzi appliance or any part thereof Damage or calls resulting from transportation, is proved to be defective by reason only of faulty... -
Page 21: Installation Instructions
Installation Instructions It is dangerous to alter the specifications or attempt to modify this product in any way. Care must be taken to ensure that the appliance does not stand on the electrical supply cable. Any electrical work required to install this appliance should be carried out by a qualified electrician or competent person. -
Page 22: Unpacking
Unpacking All transit bolts and packing must be removed Plug the open holes with the plugs supplied with the instruction booklet. before using the appliance. You are advised to keep all the packaging for re-use in case the machine is to be transported again. Using a spanner unscrew and remove the rear right bolt. -
Page 23: Water Inlet
Water inlet Water drainage Connect the hose to a tap with a 3/4” thread. This appliance is designed to be permanently plumbed Do not use previously used hoses for water connection. into your home's water supply and drainage system. The appliance drain hose should hook into a standpipe, the hook in the drain hose is formed using the plastic “U-Piece”... -
Page 24: Levelling
Special conditions If the floor is carpeted or covered with crumbly or soft If you intend the drain hose to empty into a sink, make material, insert a rigid support base under the feet to sure that the sink is empty and the plug hole is not prevent noise, vibration or displacement. -
Page 25: Electrical Connection
Electrical connection Any electrical work required to install this appliance The wire coloured blue must be connected to the should be carried out by a qualified electrician or terminal marked «N» or coloured black. competent person. The wire coloured brown must be connected to the terminal marked «L»... -
Page 26: Building-In
Building-in This appliance has been designed to be built into the The distance (B) from upper edge of the door to the kitchen furniture. centre of the hole depends on the adjacent furniture's The recess should have the dimensions shown in picture dimensions. - Page 27 Recommendations regarding the Fix the base firmly to the floor using four appropriate countersunk screws (see Fig. H). construction and fitting of a base when the installation requires an integrated appliance to be raised Where the appliance has been raised by mounting onto a wooden base provided by the installer.
Need help?
Do you have a question about the FWM 1000 and is the answer not in the manual?
Questions and answers