Table of Contents
Advertisement
Available languages
Available languages
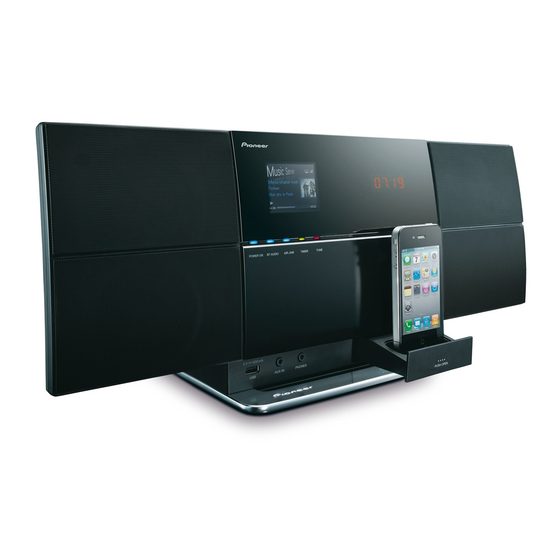
X-SMC3
Slim AV Micro System
Système AV Compact
Sistema Micro Slim AV
Register your product at:
http://www.pioneerelectronics.com (US)
http://www.pioneerelectronics.ca (Canada)
• Protect your new investment
The details of your purchase will be on file for reference in the event of an insurance claim such as loss or theft.
• Receive free tips, updates and service bulletins on your new product
• Improve product development
Your input helps us continue to design products that meet your needs.
• Receive a free Pioneer newsletter
Registered customers can opt in to receive a monthly newsletter.
http://www.pioneerelectronics.com (États-Unis)
http://www.pioneerelectronics.ca (Canada)
Operating Instructions
Mode d'emploi
Manual de instrucciones
-K / - S
Advertisement
Chapters
Table of Contents

Related Manuals for Pioneer X-SMC3-K


Summary of Contents for Pioneer X-SMC3-K
-
Page 1: Operating Instructions
• Receive free tips, updates and service bulletins on your new product • Improve product development Your input helps us continue to design products that meet your needs. • Receive a free Pioneer newsletter Registered customers can opt in to receive a monthly newsletter. http://www.pioneerelectronics.com (États-Unis) http://www.pioneerelectronics.ca (Canada) - Page 2 IMPORTANT NOTICE THE MODEL NUMBER AND SERIAL NUMBER OF THIS EQUIPMENT ARE ON THE REAR OR BOTTOM. RECORD THESE NUMBERS ON YOUR ENCLOSED WARRANTY CARD AND KEEP IN A SAFE PLACE FOR FUTURE REFERENCE. D36-AP9-1_A1_En NOTE: This equipment has been tested and found to comply with the limits for a Class B digital device, pursuant to Part 15 of the FCC Rules.
- Page 3 IMPORTANT The lightning flash with arrowhead symbol, CAUTION: The exclamation point within an equilateral within an equilateral triangle, is intended to TO PREVENT THE RISK OF ELECTRIC triangle is intended to alert the user to the alert the user to the presence of uninsulated SHOCK, DO NOT REMOVE COVER (OR presence of important operating and “dangerous voltage”...
- Page 4 BE SURE TO OBSERVE THE FOLLOWING • Pioneer is not responsible for any malfunction of the GUIDELINES: compatible Pioneer product due to communication error/malfunctions associated with your network •...
-
Page 5: Table Of Contents
Pioneer site ......23 and may therefore differ from the actual product appearance. -
Page 6: Before You Start
Before you start Chapter 1: Before you start • Batteries may have different voltages, even if they are the same size and shape. Do not use different types of What’s in the box batteries together. Please confirm that the following accessories are in the box •... -
Page 7: Connections
® Connecting optional Bluetooth adapter This unit’s rear panel (optional) ® Connect the Bluetooth adapter (Pioneer Model No. AS-BT200) to AS-BT200 terminal on the rear panel. • Open the AS-BT200 terminal’s cover and connect the ANTENNA VIDEO DC IN FM75 ®... -
Page 8: Connecting To The Network Through The Lan
Connections Connecting using wireless LAN Connecting to the network through the LAN interface Internet By connecting this unit to the network via the LAN interface, you can play back audio files stored on components on the network, including your PC, and listen to Internet radio stations. -
Page 9: Plugging In
Connections Plugging in Important • Before making or changing the connections, switch off the power and disconnect the power cord from the AC outlet. After you’ve finished making all connections, plug the unit into an AC outlet. This unit’s rear panel ANTENNA VIDEO DC IN... -
Page 10: Part Names And Functions
Part names and functions Chapter 3: Part names and functions STANDBY/ON Remote control Press to turn the power on and off. DISP OFF Press to turn the display off when you do not need it. Number buttons (0 to 9) STANDBY/ON Use them to select the station preset when using the tuner, etc. -
Page 11: Top Panel
Part names and functions 11 PREV 17 MUTE Press to return to the beginning of the currently playing track Press to temporarily silence the sound. or file. Press twice to move back to the beginning of the 18 SHUFFLE previous track or file. -
Page 12: Front Panel
Part names and functions Front panel POWER ON Main Display When the power is on, this indicator lights. Sub Display BT AUDIO Speaker units When BT Audio is selected as the input source, this indicator lights. USB port AIR JAM AUX IN When Air Jam is selected as the input source, this Use to connect auxiliary components. -
Page 13: Main Display
Part names and functions Main display Song 1 Artist Album Input source Repeat and Shuffle Sleep timer When the sleep timer is set, the remaining time until power Repeat all files. off is displayed. AirPlay Repeat a file. This appears in blue during AirPlay operation, and in white during stop mode. -
Page 14: Getting Started
Getting started Chapter 4: Getting started Use / to select the menu language of this When you use the unit for the first time, the following screens will be displayed. unit, then press ENTER. Set up the following items to customize the unit. Press STANDBY/ON. -
Page 15: Ipod/Iphone Playback
• Features such as the equalizer cannot be controlled using this system, and we recommend switching the equalizer off before connecting. • Pioneer cannot under any circumstances accept responsibility for any direct or indirect loss arising from any inconvenience or loss of recorded material resulting from iPod/iPhone failure. -
Page 16: Connecting Your Tv
iPod/iPhone playback Connect your iPod/iPhone. Playing your iPod/iPhone Caution • When your iPod/iPhone is connected to this unit and you wish to operate the iPod/iPhone directly, be sure to hold the iPod/iPhone steady with the other hand to prevent malfunctions due to faulty contacts. Connect your iPod/iPhone. - Page 17 iPod/iPhone playback Important If this unit cannot play your iPod/iPhone, perform the following troubleshooting checks: • Check whether the iPod/iPhone is supported by this unit. • Reconnect the iPod/iPhone to the unit. If this doesn’t seem to work, try resetting your iPod/iPhone. •...
-
Page 18: Music Playback Using Bluetooth Wireless
® • The Bluetooth word mark and logos are registered trademarks owned by Bluetooth SIG, Inc. and any use of such marks by PIONEER CORPORATION is under license. Other trademarks and trade names are those of their respective owners. 2 • The Bluetooth wireless technology enabled device must support AVRCP profiles. -
Page 19: Setting The Pin Code
® Bluetooth Audio playback (optional) Press STANDBY/ON to turn the power on. ® Pairing Bluetooth adapter and Press FUNCTION / or BT AUDIO on the Bluetooth wireless technology device top panel of the unit to select BT AUDIO as the input source. -
Page 20: Air Jam
AIR JAM – Air Jam a Pioneer-exclusive application and available for free. Air Jam lets you connect multi compatible devices to this unit using Bluetooth wireless technology. With it, you can make a group playlist directly on a supported device to play in your home theater through the unit. -
Page 21: Usb Playback
When a USB storage device is connected on page 36. • Pioneer does not guarantee that any file recorded on a USB storage device will play or that power will be supplied to a USB storage device. Also note that Pioneer... -
Page 22: Internet Radio
Internet radio Chapter 8: Internet radio Tune into a station Listening to the Internet radio Press FUNCTION / to select Internet Radio as the input source. Connecting to a LAN network • The information of the station you last selected is Connect to the network using the LAN interface. -
Page 23: Adding The Stations To The Favorites
ENTER. Add to Favorites The access code required for registration on the special Pioneer Internet radio site is displayed. Make a memo of this address. To delete the stations from the list The following can be checked on the Help screen: Press MENU to display the Internet radio •... -
Page 24: Music Server
Windows Media Player 11 installed are indicated on the Pioneer website. AirPlay may not be compatible with iPod touch, iPhone, iPad or iTunes • PCs running Microsoft Windows 7 with Windows Media... -
Page 25: Playing Audio Files Stored On Pcs Or Other Components
Music server You can perform the following operations. Note that some buttons are not available for operation depending on the Playing audio files stored on PCs or other category currently being played back. components Button What it does Connecting to the LAN network ... -
Page 26: Using The Tuner
Using the tuner Chapter 10: Using the tuner Listening to the FM radio broadcasts Listening to station presets The tuner can receive FM broadcasts, and can save your Press FUNCTION / to select Tuner. favorite stations. The tuned frequency will be shown on the main display. Press FUNCTION /... -
Page 27: Other Connections
Other connections Chapter 11: Other connections • Before making or changing the connections, switch off the power and disconnect the power cord from the Listening to auxiliary components power outlet. • If the AUX IN mini-plug jack is connected to auxiliary Press FUNCTION /... -
Page 28: Changing The Settings
Changing the settings Chapter 12: Changing the settings The factory default settings are indicated in italic. Press SET UP to show the Initial Setup screen. Use / to select the item, then press ENTER. Follow the descriptions on the main display to change the setting. Settings What it does Timer Setting... -
Page 29: Using The Timer
Changing the settings Settings What it does Bluetooth BT PIN Select Use this to set the PIN code. (page 19) (0000/1234/8888) Volume Limit Setting When On is selected, the volume can be set between 0 to 30. (On/Off) Each time this setting has been changed, the volume becomes to 0. Internet Parental Lock Restricts usage of internet radio using password. -
Page 30: Turning On/Off The Wake-Up Timer
Changing the settings Use /// or number buttons to adjust Network setting the clock, then press ENTER. The TIMER indicator lights and the wake-up timer has been If a broadband router (with built-in DHCP server function) is set. connected to this unit, you can simply turn on the DHCP •... -
Page 31: Wired Setting
Changing the settings Wired Setting Wireless Setting Use / to select DHCP Off, then press Use / to select Manual, then press ENTER. ENTER. The IP address setting screen is displayed. Use /// or number buttons to adjust the numbers, then press ENTER. •... -
Page 32: Wps Connection Setting
Changing the settings Use / to select security type, then press WPS connection setting ENTER. WPS is abbreviation of Wi-Fi Protected Setup. A standard established by the Wi-Fi Alliance industry group for a function allowing settings related to interconnection of WPS compatible wireless LAN devices and encryption to be made with simple operations. -
Page 33: Connecting Using Pin Input
Changing the settings Connecting using PIN Input Friendly Name Press SET UP and select Network Setting Press SET UP. PIN Input, then press ENTER. Use / to select the access point which Select Network Setting Friendly Name. you want to connect, then press ENTER. -
Page 34: Software Update
USB port on the unit’s front panel. Sound Retriever. • If an update file is provided on the Pioneer website, Use / to select On or Off, then press download it onto your computer. When downloading an update file from the Pioneer website onto your ENTER. -
Page 35: Additional Information
If the trouble cannot be rectified even after exercising the checks listed below, ask your nearest Pioneer authorized service center or your dealer to carry out repair work. • If the unit does not operate normally due to external effects such as static electricity disconnect the power plug from the outlet and insert again to return to normal operating conditions. - Page 36 Additional information When a USB storage device is connected Problem Check Remedy USB storage device is not Is the USB storage device properly Connect the device securely (all the way in). recognized. connected? Is the USB storage device connected This unit does not support USB hubs. Connect the USB storage via a USB hub? device directly.
- Page 37 Additional information Problem Check Remedy The PC or Internet radio is The corresponding IP address is not Switch on the built-in DHCP server function of your router, or set up not properly operated. properly set. the network manually according to your network environment (page 30).
- Page 38 Additional information Problem Check Remedy Audio playback is The audio file currently being played Check whether the audio file was recorded in a format supported by undesirably stopped or back was not recorded in a format this unit. disturbed. playable on this unit. Check whether the folder has been damaged or corrupted.
- Page 39 Additional information Wireless LAN Problem Check Remedy Network cannot be accessed Is Network Type set to Auto and Switch Network Type to Wireless or disconnect the LAN cable via wireless LAN. the LAN cable connected to the unit? from the unit, then restart the unit. If Network Type is set to Auto and the LAN cable is connected to the unit, the unit recognizes the Network Type as Wired.
-
Page 40: Playable File Formats
Additional information Category Extension Stream Playable file formats Sampling 8 kHz to 48 kHz This unit supports the following file formats. Note that some frequency file formats are not available for playback although they are listed as playable file formats. Also, the compatibility of file Quantization 16 bit formats varies depending on the type of server. -
Page 41: Cautions On Use
Additional information Cleaning the product Cautions on use • Unplug the power cord from the power outlet when cleaning this unit. • Clean this unit using a soft cloth. For tough dirt, apply When moving this unit some neutral detergent diluted in 5 to 6 parts water to a When moving this unit, be sure to first disconnect the iPod/ soft cloth, wring out thoroughly, wipe off the dirt, then iPhone, USB storage device, LAN cable or any other... - Page 42 • Supported file formats vary by server. As such, files not Pioneer is not responsible for any malfunction of the player supported by your server are not displayed on this unit. and/or the Music Server features due to communication...
-
Page 43: About Ipod/Iphone
Additional information Authorizing this unit About iPod/iPhone In order to be able to play with Music Server, this unit must be authorized. This happens automatically when the unit makes a connection over the network to the PC. If not, please authorize this unit manually on the PC. -
Page 44: Specifications
AC adapter........1 Power cord Operating instructions (This document) Note • Specifications and the design are subject to possible modifications without notice, due to improvements. • This product is not designed for use in Japan. © 2011 PIONEER CORPORATION. All rights reserved. - Page 45 Additional information...
- Page 46 REMARQUE IMPORTANTE LE NUMÉRO DE MODÈLE ET LE NUMÉRO DE SÉRIE SE TROUVENT À L’ARRIÈRE OU SUR LE FOND DE CET APPAREIL. ENREGISTREZ CES NUMÉROS SUR LA CARTE DE GARANTIE CI-JOINTE ET CONSERVEZ-LA EN UN LIEU SÛR POUR VOUS Y RÉFÉRER ULTÉRIEUREMENT. D36-AP9-1_A1_Fr REMARQUE : Cet appareil a été...
- Page 47 IMPORTANT ATTENTION DANGER D´ELECTROCUTION NE PAS OUVRIR ATTENTION : Ce symbole de l’éclair, placé dans un Ce point d’exclamation, placé dans un triangle équilatéral, a pour but d’attirer POUR ÉVITER TOUT RISQUE triangle équilatéral, a pour but d’attirer l’attention de l’utilisateur sur la présence, à D’ÉLECTROCUTION, NE PAS ENLEVER LE l’attention de l’utilisateur sur la présence, l’intérieur du coffret de l’appareil, de...
- Page 48 électrique. Vérifier le câble d’alimentation de temps et – plus important encore – la protection de votre ouïe, en temps. Contacter le service après-vente PIONEER le réglez le volume à un niveau raisonnable. Pour ne pas plus proche ou le revendeur pour un remplacement.
- Page 49 Mémorisation de stations émettrices absentes de la liste d’emploi aient été modifiées ou simplifiées pour faciliter vTuner depuis le site spécial Pioneer ....23 les explications ; elles peuvent dès lors différer de...
-
Page 50: Avant De Commencer
Avant de commencer Chapitre 1 : Avant de commencer • Les piles peuvent avoir des tensions différentes, même si elles ont une taille et une forme identiques. N’utilisez Contenu de la boîte pas ensemble différents types de piles. • Pour éviter toute fuite d’électrolyte, retirez les piles si Veuillez confirmer que les accessoires suivants sont présents vous prévoyez de ne pas utiliser la télécommande dans la boîte quand vous l’ouvrez. -
Page 51: Connexions
Connexion d’un adaptateur Bluetooth ® Panneau arrière de cet appareil (en option) ® Branchez l’adaptateur Bluetooth (Modèle No. AS-BT200 de Pioneer) sur la borne AS-BT200 du panneau arrière. • Ouvrez le couvercle de la borne AS-BT200 et insérez ANTENNA ® VIDEO... -
Page 52: Connexion Au Réseau Via L'interface Lan
Connexions Connexion avec une interface LAN sans fil Connexion au réseau via l’interface LAN En raccordant cet appareil au réseau par l’interface LAN, Internet vous pourrez écouter des fichiers audio enregistrés sur des composants en réseau, par exemple votre ordinateur, ainsi que des stations radio Internet. -
Page 53: Connexion Au Secteur
Connexions Connexion au secteur Important • Avant d’effectuer ou de modifier les raccordements, mettez l’appareil hors tension et débranchez le cordon d'alimentation au niveau de la prise secteur. Après avoir effectué toutes les connexions, branchez l’appareil sur une prise secteur. Panneau arrière de cet appareil ANTENNA VIDEO... -
Page 54: Les Organes Et Leurs Fonctions
Les organes et leurs fonctions Chapitre 3 : Les organes et leurs fonctions STANDBY/ON Appuyez pour mettre l’appareil sous ou hors tension. Télécommande DISP OFF Appuyez pour éteindre l'afficheur quand il n’est pas nécessaire. STANDBY/ON Touches numériques (0 à 9) A utiliser pour sélectionner une station préréglée à... -
Page 55: Panneau Supérieur
Les organes et leurs fonctions 11 PREV 17 MUTE Permet de revenir au début de la plage ou du fichier en cours Appuyez pour couper temporairement le son. de lecture. Appuyez deux fois pour revenir au début de la 18 SHUFFLE plage ou du fichier précédent. -
Page 56: Panneau Avant
Les organes et leurs fonctions Panneau avant POWER ON Afficheur principal Ce voyant s’allume quand l’appareil est sous tension. Afficheur auxiliaire BT AUDIO Enceintes Lorsque BT Audio est sélectionné comme source d’entrée, ce voyant s’allume. Port USB Air Jam AUX IN LorsqueAir Jam est sélectionné... - Page 57 Les organes et leurs fonctions Afficheur principal Song 1 Artist Album Source d’entrée Lecture répétée and Lecture aléatoire Minuteur de mise en veille Quand la minuterie de mise en veille est programmée, la Répétition de tous les fichiers. durée restante jusqu’à la mise hors tension est affichée. AirPlay Répétition d’un fichier.
-
Page 58: Mise En Marche
Mise en marche Chapitre 4 : Mise en marche Utilisez / pour sélectionner la langue des Lorsque vous utilisez l’appareil pour la première fois, les écrans suivants sont affichés. menus de votre appareil, puis appuyez sur Programmez les paramètres suivants pour personnaliser ENTER. -
Page 59: Lecture Par Un Ipod/Iphone
• Les fonctions telles que l’égaliseur ne peuvent pas être commandées en utilisant ce système et nous recommandons de désactiver l’égaliseur avant la connexion. • Pioneer ne peut en aucun cas être tenu responsable pour toute perte directe ou indirecte, liée à un problème ou une perte des données enregistrées à la suite d’une défaillance de l’iPod/iPhone. -
Page 60: Connexion De Votre Téléviseur
Lecture par un iPod/iPhone Connectez votre iPod/iPhone. Lecture par votre iPod/iPhone Attention • Quand votre iPod/iPhone est connecté à cet appareil et que vous souhaitez le faire fonctionner en le touchant directement, assurez-vous de tenir solidement l’iPod/ iPhone avec l’autre main pour éviter un mauvais fonctionnement causé... - Page 61 Lecture par un iPod/iPhone Conseil • L’iPod/iPhone se charge chaque fois qu’il est connecté à cet appareil. (C’est aussi valable quand l’appareil se trouve en mode veille.) • Lorsque l'entrée passe de l’iPod à une autre fonction, l’alimentation de l’iPod/iPhone est coupée automatiquement.
-
Page 62: Lecture Audio Bluetooth ® (En Option)
1 • Le périphérique adapté pour la technologie sans fil Bluetooth doit prendre en charge les profils A2DP. • Pioneer ne garantit pas une connexion et un fonctionnement corrects de cet appareil avec tous les périphériques adaptés à la technologie sans fil Bluetooth. -
Page 63: Réglage Du Code Pin
® Lecture audio Bluetooth (en option) Appuyez sur STANDBY/ON pour la mise sous tension. ® Appariement de l’adaptateur Bluetooth Sur le panneau supérieur de l’appareil, et du périphérique à technologie sans fil appuyez sur FUNCTION / ou BT AUDIO pour Bluetooth choisir BT AUDIO comme source d’entrée. -
Page 64: Air Jam
AIR JAM – Air Jam une application exclusive de Pioneer est disponible gratuitement. Air Jam vous permet de raccorder plusieurs périphériques compatibles sur cet appareil en utilisant la technologie sans fil Bluetooth. Grâce à cette application, vous pouvez composer directement une liste de lecture de groupe sur un périphérique pris en charge pour la jouer sur votre Home... -
Page 65: Lecture Usb
à Lorsqu’une clé de mémoire USB est raccordée à la page 36. • Pioneer ne garantit pas que tout fichier, enregistré sur une clé de mémoire USB, pourra être lu ou que le courant électrique sera fourni à tous les types de clé... -
Page 66: Radio Internet
Radio Internet Chapitre 8 : Radio Internet Syntonisation sur une station Écoute de la radio Internet Appuyez sur FUNCTION / pour sélectionner Internet Radio comme source Connexion à un réseau local LAN d’entrée. Connexion au réseau via l’interface LAN • Les informations relatives à la station sélectionnée en Pour les détails, reportez-vous à... -
Page 67: Effacement De Stations De La Liste
Vérifiez le code d’accès requis pour l’enregistrement sur cet appareil, utilisez ce code d’accès pour accéder au site de radio internet spécial de Pioneer et enregistrez les stations que vous souhaitez dans le dossier Favorites. L’adresse du site de radio Internet spécial de Pioneer est la suivante : http://www.radio-pioneer.com... -
Page 68: Serveur De Musique
DLNA (sur les ordinateurs ou d’autres touch, l’iPhone, l’iPad et les versions logicielles pour composants) l’iTunes, indiquées sur le site web de Pioneer. Il se peut Les fichiers mémorisés sur un PC ou une passerelle qu’AirPlay ne soit pas compatible avec des versions multimédia (Digital Media Server ou DMS), tel que décrit ci-... -
Page 69: Connexion À Un Réseau Local Lan
Serveur de musique d’autorisation (ou de permission) d’accès dépend du type de • Si le fichier que vous voulez lire se trouve dans le dossier, serveur auquel vous vous connectez. Pour plus sélectionnez d’abord le dossier. d’informations sur l’autorisation de l’appareil, reportez-vous •... -
Page 70: Utilisation Du Syntonisateur
Utilisation du syntonisateur Chapitre 10 : Utilisation du syntonisateur • L’accord automatique s’arrête après que la recherche sur la bande FM est terminée, ou après que le maximum Écoute des émissions radio FM de 9 stations est atteint. Le syntonisateur peut capter les émissions FM et mémoriser vos stations préférées. -
Page 71: Autres Connexions
Autres connexions Chapitre 11 : Autres connexions • Avant d’effectuer ou de modifier les raccordements, mettez l’appareil hors tension et débranchez le cordon Ecoute de composants auxiliaires d’alimentation au niveau de la prise secteur. • Si le jack à mini-fiche AUX IN est branché sur la prise Appuyez sur la touche FUNCTION /... -
Page 72: Changement Des Réglages
Changement des réglages Chapitre 12 : Changement des réglages Les réglages par défaut sont indiqués en italique. Appuyez sur SET UP pour obtenir l’écran Initial Setup. Utilisez / pour sélectionner le paramètre, puis appuyez sur ENTER. Suivez les instructions sur l’afficheur principal pour modifier le réglage. Réglages Leur rôle Réglage du minuteur de réveil et de l’heure de mise sous tension de l’appareil. -
Page 73: Utilisation Du Minuteur
Changement des réglages Réglages Leur rôle A utiliser pour définir le code PIN Bluetooth (page 19). BT PIN Select (0000/1234/8888) Quand On est sélectionné, le volume peut être ajusté entre 0 et 30. Volume Limit Setting Chaque fois que ce réglage est modifié, le volume revient à 0. (On/Off) Permet de limiter l’accès à... -
Page 74: Mise En/Hors Service Du Minuteur De Réveil
Changement des réglages Utilisez /// ou les touches Appuyez de façon répétée sur SLEEP pour numériques pour ajuster l’horloge, puis appuyez sélectionner la durée avant la mise à l’arrêt. sur ENTER. Choisissez enter 5 min, 15 min, 30 min, 60 min, 90 min ou Le voyant TIMER s’allumet le minuteur de réveil est ainsi Hors service. -
Page 75: Réglage Câblé
Changement des réglages Réglage câblé Réglage sans fil Utilisez / pour choisir DHCP Off, puis Utilisez / pour sélectionner Manual, puis appuyez sur ENTER. appuyez sur ENTER. L’écran de réglage de l’adresse IP apparaît. Utilisez /// ou les touches Conseil numériques pour ajuster les chiffres, puis •... -
Page 76: Réglage De Connexion Wps
Changement des réglages Utilisez / pour sélectionner le type de sécurité, puis appuyez sur ENTER. Réglage de connexion WPS WPS est un acronyme pour “Wi-Fi Protected Setup”. Il s’agit d’une norme établie par le groupe industriel Wi-Fi Alliance pour permettre des réglages, liés à l’interconnexion de dispositifs LAN sans fil compatibles WPS et un cryptage réalisable par de simples opérations. -
Page 77: Connexion Au Moyen De L'entrée Pin
Changement des réglages Connexion au moyen de l’entrée PIN Friendly Name Appuyez sur SET UP et sélectionnez Network PIN Input Setting , puis appuyez sur Appuyez sur SET UP. ENTER. Sélectionnez Network Setting Friendly Utilisez / pour sélectionner le point Name. -
Page 78: Mise À Jour Du Logiciel
Pioneer, téléchargez-le sur votre ordinateur. Lors du Réglages du son téléchargement d’un fichier de mise à jour depuis le site Web de Pioneer sur votre ordinateur, le fichier sera en Utilisation de Virtual Surround/Sound format ZIP. Dézippez (décompressez) le fichier ZIP avant de le sauvegarder sur la clé... -
Page 79: Informations Supplémentaires
Examinez les autres composants et appareils électriques utilisés. Si le problème ne peut pas être résolu en dépit des vérifications ci-dessous, consultez le service après-vente Pioneer le plus proche pour faire réparer l’appareil. • Si l’appareil ne fonctionne pas normalement en raison de causes externes comme l’électricité statique, débranchez la fiche d’alimentation de la prise de courant et insérez-la de nouveau pour rétablir les conditions normales de fonctionnement. - Page 80 Informations supplémentaires Lorsqu’une clé de mémoire USB est raccordée Problèmes Vérification Solutions La clé de mémoire USB n’est La clé de mémoire USB est-elle Raccordez la clé correctement (enfoncée à fond). pas reconnue. raccordée correctement ? La clé de mémoire USB est-elle Cet appareil ne prend pas en compte un concentrateur USB.
- Page 81 Informations supplémentaires Problèmes Vérification Solutions Le PC ou la radio Internet ne L’adresse IP correspondante n’a pas Mettez en service la fonction serveur DHCP de votre routeur, ou fonctionne pas correctement. été réglée correctement. paramétrez le réseau manuellement pour votre environnement réseau (page 30).
- Page 82 Informations supplémentaires Problèmes Vérification Solutions La lecture audio s’arrête ou Le fichier audio actuellement en Vérifiez si le fichier audio a été enregistré dans un format pris en est perturbée. cours de lecture n’a pas été charge par cet appareil. enregistré...
- Page 83 Informations supplémentaires LAN sans fil Problèmes Vérification Solutions Impossible d’accéder au Est-ce que Network Type est réglé Commutez Network Type sur Wireless ou déconnectez le câble réseau via le réseau LAN sur Auto et le câble LAN est-il LAN au niveau de l'apparei, puis remettez l’appareil en marche. sans fil.
-
Page 84: Formats De Fichiers Utilisables
Informations supplémentaires Catégorie Extension Flux Formats de fichiers utilisables Fréquence 8 kHz à 48 kHz d’échantil- Ce lecteur prend en charge les formats de fichier suivants: lonnage Notez que certains formats de fichiers ne sont pas disponibles pour la lecture bien qu’ils figurent comme Débit binaire 16 bit formats de fichiers lisibles. -
Page 85: Précautions D'emploi
Informations supplémentaires Nettoyage de l’appareil • Débranchez le cordon d’alimentation de la prise secteur Précautions d’emploi avant de nettoyer cet appareil. • Nettoyez l’appareil avec un chiffon doux. Pour enlever Lors d’un déplacement de l’appareil les taches rebelles, imprégnez le chiffon d’un détergent neutre dilué... - Page 86 PRÉCÈDE. PIONEER N'EST PAS RESPONSABLE EN CAS DE PERTE OU DE DÉGÂTS DÉCOULANT DE L’ACCÈS OU DE L’UTILISATION DES CONTENUS. AUCUNE INFORMATION OU CONSEIL ORAL OU ÉCRIT FOURNI PAR PIONEER OU PAR DES REPRÉSENTANTS DE SES SERVICES CLIENTÈLE NE JUSTIFIERA UNE TELLE GARANTIE.
-
Page 87: À Propos De L'ipod/Iphone
Informations supplémentaires ® ® ® ® Microsoft , Windows 7, Windows Vista, Windows DE RESPONSABILITE, QU’ELLE DÉCOULE D’UN CONTRAT, ® ® ® Windows 2000, Windows Edition Millennium , Windows DE RESPONSABILITÉ STRICTE OU D’ACTE DÉLICTUEL (Y ® et WindowsNT sont soit des marques déposées ou des COMPRIS NÉGLIGENCE OU AUTRE) DÉCOULANT DE marques de commerce de Microsoft Corporation aux Etats- L’EMPLOI DE CE LOGICIEL, MÊME EN CAS D’ANNONCE LA... -
Page 88: Fiche Technique
Remarque • Spécifications et design sujets à des modifications éventuelles sans préavis suite à des améliorations. • Ce produit n'est pas conçu en vue d’une utilisation au Japon. © 2011 PIONEER CORPORATION. Tous droits de reproduction et de traduction réservés. - Page 89 Informations supplémentaires...
- Page 90 AVISO IMPORTANTE EL NÚMERO DE MODELO Y EL NÚMERO DE SERIE DE ESTE EQUIPO SE ENCUENTRAN EN EL PANEL TRASERO O INFERIOR. ANOTE ESTOS NÚMEROS EN LA TARJETA DE GARANTÍA ADJUNTA Y GUÁRDELA EN UN LUGAR SEGURO PARA PODERLA CONSULTAR EN EL FUTURO. D36-AP9-1_A1_Es NOTA : Este equipo ha sido probado y se ha comprobado que cumple con los límites para un dispositivo digital de clase B, de acuerdo con la Parte 15 de las Reglas de FCC.
- Page 91 IMPORTANTE CAUTION RISK OF ELECTRIC SHOCK DO NOT OPEN ATENCIÓN : La luz intermitente con el símbolo de punta El punto exclamativo dentro un triángulo de flecha dentro un triángulo equilátero. PARA PREVENIR EL PELIGRO DE CHOQUE equilátero convenido para avisar el usuário Está...
- Page 92 (incluyendo los D3-4-2-2-4_B1_Es productos compatibles con esta unidad). • Pioneer no se hace responsable de ningún fallo del ADVERTENCIA producto Pioneer compatible debido a un error de Guarde las partes pequeñas fuera del alcance de los comunicación/fallos de funcionamiento asociados...
- Page 93 Registro de emisoras de radio que no están en la lista de instrucciones pueden estar modificadas o simplificadas vTuner desde el sitio especial de Pioneer ... . 23 para facilitar las explicaciones, por lo que pueden ser...
-
Page 94: Antes De Comenzar
Antes de comenzar Capítulo 1: Antes de comenzar • Las pilas pueden tener diferente tensión, a pesar de ser del mismo tamaño y forma. No use juntas pilas de tipos Contenido de la caja diferentes. • Para impedir la fuga del líquido de las pilas, retírelas si Verifique que los siguientes accesorios estén en la caja al no piensa usar el mando a distancia durante mucho abrirla. -
Page 95: Conexiones
Conexión del adaptador Bluetooth (opcional) Panel posterior de esta unidad ® Conecte el adaptador Bluetooth (Pioneer Modelo N.° AS-BT200) al terminal AS-BT200 del panel posterior. • Abra la cubierta del terminal AS-BT200 y conecte el ® adaptador Bluetooth con el lado de la etiqueta... -
Page 96: Conexión A La Red Mediante La Interfaz Lan
Conexiones Conexión empleando una LAN inalámbrica Conexión a la red mediante la interfaz Internet Conectando este aparato a la red mediante la interfaz LAN, usted podrá reproducir los archivos de audio guardados en componentes de la red, incluyendo su ordenador, y escuchar emisoras de radio de Internet. -
Page 97: Para Enchufar
Conexiones Para enchufar Importante • Antes de hacer o cambiar las conexiones, apague la unidad y desenchufe el cable de alimentación de la toma de CA. Después de haber terminado todas las conexiones, enchufe la unidad a una toma de corriente de CA. Panel posterior de esta unidad ANTENNA VIDEO... -
Page 98: Nombres Y Funciones De Los Controles
Nombres y funciones de los controles Capítulo 3: Nombres y funciones de los controles STANDBY/ON Púlselo para conectar y desconectar la alimentación. Mando a distancia DISP OFF Púlselo para apagar el visualizador cuando no lo necesite. Botones numéricos (0 a 9) STANDBY/ON Úselos para seleccionar emisoras preajustadas cuando emplee el sintonizador, etc. -
Page 99: Panel Superior
Nombres y funciones de los controles 11 PREV 18 SHUFFLE Púlselo para volver al principio de la pista o archivo que esté Efectúa la reproducción en orden aleatorio de las pistas del reproduciéndose. Púlselo dos veces para retroceder al iPod/iPhone, dispositivo de almacenamiento USB comienzo de la pista o archivo anterior. -
Page 100: Panel Frontal
Nombres y funciones de los controles Panel frontal POWER ON Visualizador principal Este indicador se enciende cuando se conecta la Visualizador secundaria alimentación. Altavoces BT AUDIO Este indicador se enciende cuando se selecciona BT Puerto USB Audio como la fuente de entrada. AUX IN AIR JAM Úselo para la conexión de componentes auxiliares. -
Page 101: Visualizador Principal
Nombres y funciones de los controles Visualizador principal Song 1 Artist Album Fuente de entrada Repetición y reproducción aleatoria Temporizador de desconexión automática Cuando se haya ajustado el temporizador de desconexión Repetir todos los archivos. automática se visualizará el tiempo remanente. AirPlay Repetir un archivo. -
Page 102: Primeros Pasos
Primeros pasos Capítulo 4: Primeros pasos Cuando utilice este aparato por primera vez, aparecerán las Para seleccionar el idioma de los menús de este aparato utilice / y, a continuación, pulse pantallas siguientes. Configure los elementos siguientes para personalizar el ENTER. -
Page 103: Reproducción Del Ipod/Iphone
Se visualizará la versión del software. Nota 1 • Pioneer no garantiza que esta unidad pueda reproducir otros modelos de iPod/iPhone que no sean los especificados. • Dependiendo del modelo o de la versión del software, es posible que algunas funciones estén restringidas. -
Page 104: Conexión De Un Televisor
Reproducción del iPod/iPhone Conecte el iPod/iPhone. Reproducción de un iPod/iPhone Precaución • Cuando tenga el iPod/iPhone conectado a esta unidad y desee operar directamente el iPod/iPhone, asegúrese de tener el iPod/iPhone en una posición estable con la otra mano para evitar mal funcionamiento debido a contactos defectuosos. - Page 105 Reproducción del iPod/iPhone Importante Si esta unidad no puede reproducir el contenido del iPod/ iPhone, efectúe las siguientes comprobaciones para solucionarlo: • Verifique si el iPod/iPhone es compatible con esta unidad. • Vuelva a conectar el iPod/iPhone a la unidad. Si esto no funciona, pruebe si lo hace el reinicio del iPod/iPhone.
-
Page 106: Reproducción De Audio Con Bluetooth (Opcional)
Nota 1 • Es necesario que el dispositivo con tecnología inalámbrica Bluetooth sea compatible con perfiles A2DP. • Pioneer no garantiza la conexión y la operación correctas de esta unidad con todos los dispositivos con tecnología inalámbrica Bluetooth. ® • La marca literal y los logotipos Bluetooth son marcas registradas propiedad de Bluetooth SIG, Inc., y cualquier uso de dichas marcas... -
Page 107: Ajuste Del Código Pin
® Reproduccion de audio con Bluetooth (opcional) Pulse STANDBY/ON para conectar la alimentación. Cómo emparejar el adaptador Pulse FUNCTION / o BT AUDIO en el ® Bluetooth y el aparato con tecnología panel superior de la unidad para seleccionar BT inalámbrica Bluetooth AUDIO como la fuente de entrada. -
Page 108: Air Jam
AIR JAM – Air Jam es una aplicación exclusiva de Pioneer y está disponible de forma gratuita. Air Jam le permite conectar varios dispositivos compatibles a esta unidad empleando la tecnología inalámbrica Bluetooth. Con esta aplicación podrá crear una lista de reproducción o un grupo directamente en el dispositivo compatible para reproducirlo en su sistema Home Theater a través de esta... -
Page 109: Reproducción Usb
USB en la página 36. cuando usted reproduce archivos de audio. Tenga presente • Pioneer no garantiza que puedan reproducirse todos los que es posible que no se visualicen algunos tipos de archivo. archivos grabados en un dispositivo de almacenamiento USB ni que se suministre alimentación al dispositivo de... -
Page 110: Radio De Internet
Radio de Internet Capítulo 8: Radio de Internet Sintonice una emisora Audición de la radio de Internet Pulse FUNCTION / para seleccionar Internet Radio como la fuente de entrada. Conexión a una red LAN • En el visualizador principal aparecerá la información Conéctelo a la red utilizando la interfaz LAN. -
Page 111: Adición De Emisoras A La Favorites
Pulse y mantenga pulsado ENTER durante Se visualizará el código de acceso que es necesario para algunos segundos. registrarse en el sitio de radio de Internet especial de Pioneer. Anote esta dirección. En la pantalla de Ayuda podrá verificarse lo siguiente: •... -
Page 112: Servidor De Música
(en ordenadores o en otros componentes) sitio Web de Pioneer. Es posible que AirPlay no resulte Los archivos guardados en un ordenador o DMS (Servidor de compatible con versiones de software para los iPod... -
Page 113: Autorización Para Esta Unidad
Servidor de música Utilice / para seleccionar el archivo que Autorización para esta unidad quiera reproducir, y luego pulse ENTER. Es necesario autorizar a esta unidad para habilitar la Se iniciará la reproducción. reproducción. La unidad se autoriza automáticamente cuando se conecta a un ordenador a través de una red. Si no, autorice manualmente a esta unidad en el ordenador. -
Page 114: Uso Del Sintonizador
Uso del sintonizador Capítulo 10: Uso del sintonizador • La sintonización automática se detiene cuando finaliza la banda de FM o cuando se llega al límite de 9 Audición de las emisoras de radio de FM preajustes. El sintonizador puede recibir emisoras FM y puede guardar sus emisoras favoritas. -
Page 115: Otras Conexiones
Otras conexiones Capítulo 11: Otras conexiones • Antes de establecer o modificar las conexiones, desconecte la alimentación y desenchufe el cable de Audición de componentes auxiliares alimentación de la toma de corriente. • Si la toma de miniclavija AUX IN está conectada a la Pulse FUNCTION /... -
Page 116: Cambio De Los Ajustes
Cambio de los ajustes Capítulo 12: Cambio de los ajustes Los ajustes predeterminados en fábrica se indican en cursiva. Pulse SET UP para que aparezca la pantalla Initial Setup. Utilice / para seleccionar el elemento y pulse luego ENTER. Siga las indicaciones del visualizador principal para cambiar el ajuste. Configuración Función Ajuste del temporizador de conexión automática y la hora a la que se encenderá... -
Page 117: Utilización Del Temporizador
Cambio de los ajustes Configuración Función Úselo para seleccionar el código PIN de Bluetooth . (página 19) BT PIN Select (0000/1234/8888) Cuando seleccione On, el volumen podrá ajustarse de 0 a 30. Volume Limit Setting Cada vez que se cambie este ajuste, el volumen volverá a 0. (On/Off) Restringe el empleo de radio de Internet mediante una contraseña. -
Page 118: Activación/Desactivación Del Temporizador De Conexión
Cambio de los ajustes Utilice /// o los botones numéricos Pulse repetidamente SLEEP para seleccionar para ajustar el reloj y luego pulse ENTER. un tiempo hasta la desconexión. Se encenderá el indicador TIMER y quedará ajustado el Seleccione uno de los ajustes de 5 min, 15 min, 30 min, 60 temporizador de conexión automática. -
Page 119: Ajuste Alámbrico
Cambio de los ajustes Ajuste alámbrico Ajuste inalámbrico Utilice / para seleccionar DHCP Off y Utilice / para seleccionar Manual y pulse luego, pulse ENTER. luego ENTER. Aparecerá la pantalla de ajuste de la dirección IP. Sugerencia Utilice /// o los botones numéricos •... -
Page 120: Ajuste Para La Conexión Wps
Cambio de los ajustes Utilice /// para introducir la Pass Seleccione Network Setting WPS. Phrase o la WEP Key. Utilice / para seleccionar PBC (Push Button Configuration) o PIN Input y, a continuación, pulse ENTER. Enter Password Select WPS Method PBC (Push Button Configuration) [SOUND] Change Text... -
Page 121: Nombre Personalizado (Friendly Name)
Configuración de censura paterna USB que hay en el panel frontal de la unidad. • Si en el sitio Web de Pioneer se ofrece un archivo de Restringa el acceso a la radio de Internet para los niños. actualización, descárguelo a su ordenador. Cuando se Cuando Internet Parental Lock esté... -
Page 122: Mensajes De Actualización Del Software
Cambio de los ajustes Importante Ajustes del sonido • NO desenchufe el cable de alimentación durante la actualización. Utilización de Virtual Surround/Sound • Cuando efectúe la actualización a través de un dispositivo de almacenamiento USB, no desconecte el Retriever dispositivo de almacenamiento USB. Podrá... -
Page 123: Información Adicional
Inspeccione los otros componentes y los aparatos eléctricos que esté utilizando. Si el problema no se puede solucionar después de comprobar los puntos indicados abajo, solicite al centro de servicio autorizado por Pioneer o a su distribuidor que le haga los trabajos de reparación necesarios. - Page 124 Información adicional Cuando se ha conectado un dispositivo de almacenamiento USB Problema Verificación Solución No se reconoce el dispositivo ¿Está bien conectado el dispositivo Conecte el dispositivo firmemente (hasta el fondo). de almacenamiento USB. de almacenamiento USB? ¿Está el dispositivo de Esta unidad no es compatible con concentradores USB.
- Page 125 Información adicional Problema Verificación Solución El ordenador o la radio de La dirección IP correspondiente no Active la función de servidor DHCP incorporada de su enrutador, o Internet no se utilizan está bien ajustada. configure manualmente la red según el entorno de su red correctamente.
- Page 126 Información adicional Problema Verificación Solución La reproducción de audio se El archivo de audio que está siendo Compruebe si el archivo de audio fue grabado en un formato detiene sin querer o se altera. reproducido no fue grabado en un compatible con esta unidad.
- Page 127 Información adicional LAN inalámbrica Problema Verificación Solución No puede accederse a la red ¿Se ha ajustado Network Type en Cambie Network Type a Wireless o desconecte el cable LAN de a través de la LAN Auto y se ha conectado el cable LAN la unidad y luego reinicie la unidad.
-
Page 128: Formatos De Archivos Que Pueden Reproducirse
Información adicional Categoría Extensión Stream Formatos de archivos que pueden Frecuencia 8 kHz a 48 kHz de muestreo reproducirse Esta unidad es compatible con los formatos de archivos Velocidad en 16 bits siguientes. Tenga presente que algunos formatos de archivo bits de cuan- no podrán reproducirse aunque estén en la lista de formatos tificación... -
Page 129: Precauciones Durante La Utilización
Información adicional Limpieza del producto • Desenchufe el cable de alimentación de la toma de Precauciones durante la utilización corriente cuando limpie la unidad. • Limpie la unidad con un paño blando. Para eliminar la Cuando traslade esta unidad suciedad difícil de quitar, ponga un poco de detergente neutro diluido en 5 ó... - Page 130 POSIBILIDAD DE TALES DAÑOS. LA RESPONSABILIDAD reproductor, puede que sea necesario hacer algunos TOTAL DE PIONEER CON USTED PARA TODOS LOS DAÑOS cambios de software o de otros dispositivos. Consulte el CAUSADOS POR EL USO O LA IMPOSIBILIDAD DE USO DE manual de instrucciones que acompaña al software o...
-
Page 131: Acerca Del Ipod/Iphone
Información adicional ® ® ® ® Microsoft , Windows 7, Windows Vista, Windows NEGOCIO) POR NINGUNA CAUSA O TEORÍA DE ® ® ® Windows 2000, Windows Millennium Edition, Windows 98, y RESPONSABILIDAD, YA SEA POR CONTRATO, ® WindowsNT son marcas comerciales o marcas comerciales RESPONSABILIDAD ESTRICTA O AGRAVIO (INCLUYENDO registradas de Microsoft Corporation en los Estados Unidos y/ NEGLIGENCIA O OTRA CAUSA) DERIVADOS DE ALGUNA... -
Page 132: Especificaciones
Manual de instrucciones (este manual) Nota • Las características técnicas y el diseño están sujetos a modificaciones sin previo aviso, debido a mejoras del producto. • Este producto no está diseñado ser utilizado en Japón. © 2011 PIONEER CORPORATION. Todos los derechos reservados. - Page 133 Información adicional...
- Page 134 Within 40 days of receiving your complaint, Pioneer will investigate the dispute and will either: (1) respond to your complaint in writing informing you what action Pioneer will take, and in what time period, to resolve the dispute; or (2) respond to your complaint in writing informing you why it will not take any action.
- Page 135 RÈGLEMENT DES CONFLITS AUX ÉTATS-UNIS - Si un conflit se produit entre vous et Pioneer après la réponse à une demande initiale faite au service de Soutien à la clientèle, vous pouvez avoir recours au Programme de résolution des plaintes de Pioneer pour résoudre le conflit. Ce programme vous est offert sans frais. Vous devez avoir recours au Programme de résolution des plaintes avant de vous prévaloir de vos droits ou de chercher réparation en vertu du Titre I de la loi Magnuson-Moss Warranty-Federal Trade Commission Improvement Act, 15 U.S.C.
- Page 136 253 Alexandra Road, #04-01, Singapore 159936 TEL: 65-6472-7555 PIONEER ELECTRONICS AUSTRALIA PTY. LTD. 5 Arco Lane, Heatherton, Victoria, 3202, Australia, TEL: (03) 9586-6300 PIONEER ELECTRONICS DE MEXICO S.A. DE C.V. Blvd.Manuel Avila Camacho 138 10 piso Col.Lomas de Chapultepec, Mexico, D.F. 11000 TEL: 55-9178-4270 K002_B3_En...
Need help?
Do you have a question about the X-SMC3-K and is the answer not in the manual?
Questions and answers
produit acheté en 2013 j'ai une erreur serveur pour réception radio internet je pense qu'il faut une mise a jour que je ne trouve pas
To update the Pioneer X-SMC3-K and fix the internet radio server error, follow these steps:
1. Download the Update: Visit the Pioneer website and download the update file to your computer.
2. Extract the File: The downloaded file will be in ZIP format. Extract the contents before proceeding.
3. Prepare a USB Drive: Copy the extracted update file to a USB storage device.
4. Remove Old Files: Ensure that only the necessary update files for your model are on the USB device. Delete any old or unrelated files.
5. Perform the Update:
- Insert the USB storage device into the X-SMC3-K.
- Do not unplug the power cable during the update process.
- Follow the on-screen instructions to complete the update.
After updating, check if the internet radio server error is resolved.
This answer is automatically generated