Technics SH-DX1200 Operating Instructions Manual
Hide thumbs
Also See for SH-DX1200:
- Operating instructions manual (24 pages) ,
- Operating instructions manual (24 pages) ,
- Service manual (53 pages)
Table of Contents
Advertisement
Advertisement
Table of Contents

Related Manuals for Technics SH-DX1200


Summary of Contents for Technics SH-DX1200
-
Page 1: Audio Mixer
Audio Mixer Operating Instructions SH-DX1200 Model No. Note: The “ EB ” indication shown on the packing case indicates United Kingdom. Before connecting, operating or adjusting this prod- uct, please read these instructions completely. Please keep this manual for future reference. -
Page 2: Table Of Contents
Dear customer Thank you for purchasing this product. For optimum performance and safety, please read these instructions carefully. Contents Caution for AC mains lead ..........3 Suggestions for safety ............. 4 Features ................5 Connections ..............6 Names of the parts ............8 Block diagram .............. -
Page 3: Caution For Ac Mains Lead
Caution for AC mains lead (For United Kingdom) (“EB” area code model only) WARNING: DO NOT CONNECT EITHER WIRE TO THE EARTH TERMINAL WHICH IS MARKED WITH For your safety, please read the following text care- THE LETTER E, BY THE EARTH SYMBOL n OR fully. -
Page 4: Suggestions For Safety
Suggestions for safety Placement Foreign materials Avoid placing the unit in areas of: ¡Ensure that no foreign objects, such as needles, coins, ¡direct sunlight screwdrivers etc., accidentally fall into the unit. ¡high temperature Otherwise, a serious electric shock or malfunction could occur. ¡high humidity ¡Be extremely careful about spilling water or liquid on/into the unit, ¡excessive vibration... -
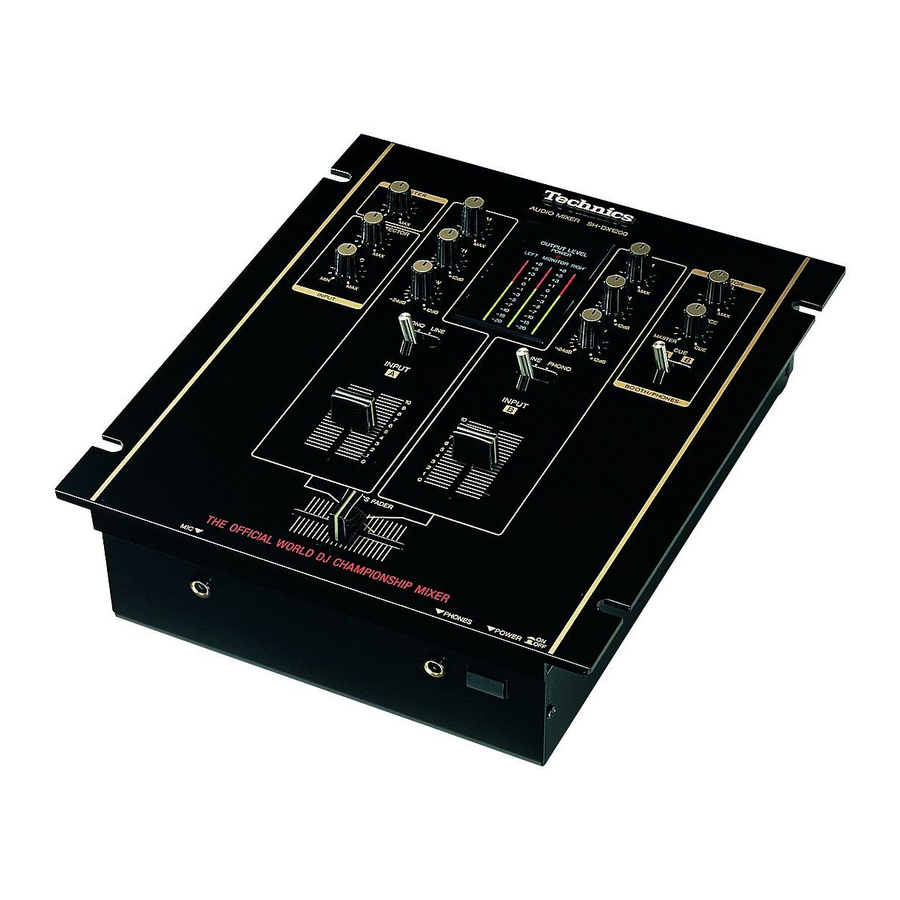
Page 5: Features
Features This model is the official audio mixer for the DMC-sponsored World DJ Championship, an event held annually since 1997 that brings together professional disc jockeys from all over the world. It is a top-of-the-line audio mixer with the kind of outstanding design, functions, and sound quality that suits the requirements of disc jockeys accustomed to giving scratch-mixing performances in a variety of ways. -
Page 6: Connections
Connections Stereo phono cable (white) (red) turntable turntable (not included) (not included) CD or MD player MD or CD player (not included) (not included) Grounding wire Grounding wire Rear panel of this unit To household mains socket AC mains lead (included) page 9 Sampler... - Page 7 Connections Plug type:6.3 mm monaural Microphone Plug type:6.3 mm stereo Mic input jack Headphones jack Headphones Monitor amplifier Amplifier Turntable 1 Turntable 2 Turntable 3 Turntable 4 CD, MD player 1 MD, CD player 2 CD, MD player 3 MD, CD player 4 MONITOR LINE MONITOR...
-
Page 8: Names Of The Parts
Names of the parts Rear panel of this unit RQT5375... - Page 9 ) INPUT control (INPUT) [MONITOR BALANCE] control ) Input selector (LINE, PHONO) Select [CUE] (completely to the right) ) LOW-range level control (LOW) •Works as past general DJ mixer monitors. MIC volume level control (MIC) •Allows the CH ( ) input selected with the [MONITOR CUE] control to be monitored regardless of the position of the [INPUT] AUX/EFFECTOR volume level control (AUX/EFFECTOR)
-
Page 10: Block Diagram
Block diagram RQT5375... -
Page 11: Maintenance
PHONES MONITOR REC OUT LINE OUT Maintenance To clean this unit, wipe with a soft, dry cloth. If the surfaces are extremely dirty, use a soft cloth dipped in a soap-and-water solution or a weak detergent solution. •Never use alcohol, paint thinner, or benzine to clean this unit. •Before using chemically treated cloth, read the instructions that came with the cloth carefully. -
Page 12: Troubleshooting Guide
Troubleshooting guide Before requesting service for this unit, check the chart below for a possible cause of the problem you are experiencing. Some simple checks or a minor adjustment on your part may eliminate the problem and restore proper operation. If you are in doubt about some of the check points, or if the remedies indicated in the chart do not solve the problem, refer to the directory of Authorized Service Centers (enclosed with this unit) to locate a convenient service center, or consult your dealer for instructions.
Need help?
Do you have a question about the SH-DX1200 and is the answer not in the manual?
Questions and answers