Table of Contents
Advertisement
Quick Links
Advertisement
Table of Contents

Related Manuals for Fishman Aura


Summary of Contents for Fishman Aura
- Page 1 Aura ™ Acoustic Imaging Blender...
- Page 2 Aura ™ Acoustic Imaging Blender...
-
Page 3: Table Of Contents
To ensure your personal safety and the safety of others, operate this apparatus only after reading these instructions and heeding the warnings listed below. • • Before you operate the Aura, read the safety instructions below and keep them for reference. • • Follow all instructions. -
Page 4: Acoustic Imaging Blender
• If your pickup system has onboard EQ, set all the controls flat. Get Your Feet Wet 1 Connect the Aura’s ¼” Output or XLR Output to your amplifier or mixer input. 2 Connect your acoustic instrument to the Input jack on the rear panel. -
Page 5: Introduction
Why register? When you do, we have your information on file should your Aura Acoustic Imaging Blender ever require warranty service. Your registration also keeps you on the cutting edge: we can let you know when updates and upgrades for the Aura become available. -
Page 6: Aura Capabilities
Sound Image. Modeling is simulation, whereas Sound Imaging is re-creation. Don’t expect a catalog of different guitars at your fingertips; that is not what the Aura is intended for. Expect the Aura to amplify your instrument's most natural sound with incredible accuracy. -
Page 7: Aura, The Internet And You
Sound Images. Why would you want to start replacing these before you’ve even unpacked the Aura? Because each Sound Image in the Aura is specific to body size, microphone model and pickup type, you may not find a factory preset that is a perfect match for your instrument. -
Page 8: Rear Panel
Use a so-called “string-sensitive” pickup on your instrument. For acoustic guitar this means an undersaddle pickup or a magnetic soundhole pickup. The Aura will not perform well with soundboard type pickups, such as the Fishman SBT or any other pickup that locates on the soundboard, away from the bridge. -
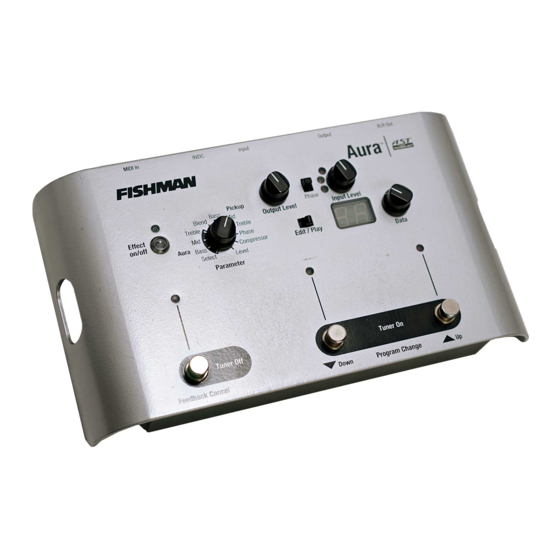
Page 9: Front Panel
3 Input Level and LEDs Lets you match the output of your pickup to the input of the Aura for the cleanest possible signal. 4 Effect on/off Switch Push this switch to turn the digital Sound Image off and on. -
Page 10: Chapter 1: Control Panel Overview
Aura ™ Acoustic Imaging Blender Chapter 1 Control Panel Overview... -
Page 11: The Five Basic Groups
16 program locations and the factory mixes associated with them. Once you get more fluent with the Aura, you will use the Play mode to assign your mixes to the program locations (01-50) of your choice. During a performance, you will normally use the Aura in Play Mode. -
Page 12: Led Display
In Play mode, the Aura’s LED displays the number of the program you are in. Play = Programs 1 through 50 In the Edit mode the Aura’s display tells you the status of a selected Parameter. Select = no digital Sound Image, just pickup... -
Page 13: Edit/Play Switch
Aura’s memory. Use the Data Knob or the Up and Down footswitches to move through the different program Locations. When you move the switch to Edit, the numbers and letters in the display will refer to the Aura parameters. In Edit, you select a Parameter, then dial it in with the Data knob. -
Page 14: Chapter 2: Inner Workings
Aura ™ Acoustic Imaging Blender Chapter 2 Inner Workings... -
Page 15: Input /Output
™ Input Level and LEDs Use the Input Level control and the multi-colored LEDs to set the gain structure for the Aura. When you plug into the Aura, play your instrument aggressively and adjust the Input Level control so that the green LED (signal present) lights brightly, the yellow LED (optimal level) flickers often and the red LED does not flicker on at all. -
Page 16: Play Mode
A Sound Image is created from an actual microphone in front of a guitar. So the distance of the mic from the instrument and the polarity of the mic capsule will contribute to relative phase of the signal. Because the Aura blends a Sound Image signal with a pickup signal there is a 50% chance that the two will clash. -
Page 17: Effect On/Off Switch
The Effect on/off lets you bypass the blended sound image/pickup mixes in both the Play and Edit modes, so that only the basic pickup signal from your instrument appears at the Aura's outputs. Use the Effect on/off switch to help set baseline levels for your mixes (see page 22) and to compare your raw pickup sound to the processed sound. -
Page 18: Edit Mode
Play. When you move the switch to Edit, the numbers and letters in the display will refer to the Aura parameters. In Edit, you select a Parameter, then dial it in with the Data knob. -
Page 19: Select
Can’t find the Sound Image(s) to fit your instrument? Not to worry. We are constantly adding new Sound Images to our catalog that you can download to your computer and then transfer to Aura. Log on to www.fishmanaura.com for more details. -
Page 20: Blend
(up to 12) that indicates the amount of boost in dB. Dial in the bass to add depth or subtract boominess from the Sound Image. The bass control for the Aura is “normalized”, which means that when you boost Bass, the volume stays the same. - Page 21 Because the Aura blends a Sound Image signal with a pickup signal there is a 50% chance that the two will clash. The clash will manifest itself as a loss of bass response, shrill treble, and a generally anemic tone.
-
Page 22: Level
1 Start with the Edit/Play switch in the Play position and select a program. Make note of the number of the program and move the switch to the Edit position. 2 Turn the Parameter knob to Blend and turn the Data knob clockwise until the letter A (Aura effect only, no pickup) appears in the display. 3 Raise the Output Level. -
Page 23: Effect On/Off Switch
If you wish to override the mute function of the tuner, tap the Down footswitch when the tuner is engaged. A dot will light up in the upper left corner of the display and the pickup signal will appear at the Aura’s outputs. This will now be the normal operating state of the tuner, unless you press the Down footswitch again and re-engage the mute before exiting the tuner. -
Page 24: Feedback Cancel
Feedback Cancel We’ve made it very easy to eliminate the feedback that typically occurs when you plug in an acoustic instrument. Here are three ways to use the Feedback Cancel filter. Aura ™ Factory Default Feedback Cancel The Feedback Cancel is set up at the factory with a 100 Hz notch filter; the frequency where many acoustic guitars howl. -
Page 25: Chapter 3: Setting Up For Performance
Aura ™ Acoustic Imaging Blender Chapter 3 Setting Up for Performance... - Page 26 Understanding Aura Navigation To get the most out of your Aura experience, you will need to understand the the navigation terminology for this device. If not, here is a brief summary: Play Mode Move the Play/Edit switch to Play to make the Aura’s fifty program locations (and their related mixes) are accessible.
- Page 27 “smear” effect. Set Levels 1 Plug in and adjust the Input Level on the Aura so that the green LED lights brightly, the yellow LED flickers often and the red LED does not flicker at all.
- Page 28 Fingerstyle Set Blend to 3 or 4 and boost bass slightly for the Aura (Sound Image). Boost bass and treble and cut the mids for the pickup. Use a little bit of “L” Compression (L1 or L2) for more “snap”.
- Page 29 Program Suggestions Since the Aura always goes back to Program location 01 when you plug it in, we suggest you place your mixes at or around this slot. For example, you might have a mix that you set up for rhythm playing in program 01 and perhaps a flatpicking mix in 02. For a little more volume, you might place a Solo mix into program 03.
-
Page 30: Specifications
-3dB @ 3kHz Digital Sound Image & Pickup Mid Controls: Boost: +11.5dB Cut: -9dB Center Frequency: 1kHz Bandwidth: 0.55 octave (full boost, -3dB from peak) Aura ™ Specifications Anti-Feedback Filter: Cut: Bandwidth: Default Frequency: Compressor C1-C9: L1-L9: Compression threshold: Compression attenuation at -10dBu:... -
Page 31: Glossary
Turn this knob to modify the Data currently shown in the LED display. Edit Mode The state in which the Aura’s eleven Parameters are accessible for building sound image/pickup mixes. Also the state in which the Feedback Cancel feature can be preset for later recall. -
Page 32: Troubleshooting
You hear only pickup and no Sound Image Aura ™ Solution Use only Fishman 910R or Roland PSA adapters Check your connections Raise Input and/or Output levels Disengage the tuner or step on the Down footswitch to un-mute the tuner Switch to Edit mode and select the Phase parameter. -
Page 33: Factory Default Settings
Programs 05 through 16 correspond to Sound Images 01 to 12 (Select parameter) Note: Any Sound Images imported by the user into the Aura will remain there when the unit is reset to factory defaults. Original factory Sound Images are available at www.fishmanaura.com. - Page 34 Orchestra Model 2 Mag rosewood Grand Concert 2 Mag mahogany 17-50 No Sound Image, pickup only *Note: All mixes are factory preset to a blend of 75% sound image and 25% pickup. Aura ™ Edit Mode Reference Pickup Microphone undersaddle...
- Page 35 Acoustic Imaging Blender Programs Aura ™...
-
Page 36: Limited Warranty
EXCEPT AS SPECIFICALLY PROVIDED IN THIS DOCUMENT, THERE ARE NO OTHER WARRANTIES, EXPRESSED OR IMPLIED, INCLUDING, BUT NOT LIMITED TO, IMPLIED WARRANTIES OF MERCHANTABILITY OR FITNESS FOR A PARTICULAR PURPOSE. IN NO EVENT SHALL FISHMAN BE LIABLE FOR LOSS OF PROFITS OR INCIDENTAL, INDIRECT, SPECIAL, CONSEQUENTIAL OR OTHER SIMILAR DAMAGES ARISING OUT OF ANY BREACH OF WARRANTY OR OTHER OBLIGATION CONTAINED IN THIS OWNERS' MANUAL.
Need help?
Do you have a question about the Aura and is the answer not in the manual?
Questions and answers