Table of Contents
Advertisement
Advertisement
Table of Contents

Related Manuals for Sima SUR-20


Summary of Contents for Sima SUR-20
- Page 1 SUR-20 Learning Universal Remote With LCD touch screen User Manual...
-
Page 3: About This Manual
The SUR-20 User’s Manual Preface About this manual This manual is designed to make using the SUR-20 Smart Remote Control as easy as possible. Information in this document has been carefully checked for accuracy; however, no guarantee is given to the correctness of the contents. -
Page 4: Table Of Contents
Table of Contents CHAPTER 1 - INTRODUCING THE SUR-20 ........1 Unpacking the SUR-20............2 SUR-20 features............... 2 Identifying components............3 CHAPTER 2 -GETTING STARTED ............4 Batteries ................... 4 Battery low icon ..............5 Battery tips and precautions..........5 The LCD.................. - Page 5 Table of Contents CHAPTER 8 - SPECIAL FEATURES............Adjusting the LCD backlight..........35-37 Turning off the beep signal ..........38 Recalling the original LCD layout ........39 APPENDIX A..................Specifications and Accessories........... 40 APPENDIX B..................Troubleshooting ...............41-42 Quick Start Function Guide............43 WARRANTY................
-
Page 7: Chapter 1 - Introducing The Sur-20
You can control up to eight devices, including VCRs, DVDs, TVs, and satellite dishes. The SUR-20 is easy to set up. You can quickly configure each device in your household or office using the “learning eye”. In addition, the advanced macro function enables you to initiate a chain of up to 25 commands with the touch of a single button. -
Page 8: Unpacking The Sur-20
The SUR-20 User’s Manual Unpacking the SUR-20 After you have unpacked the SUR-20, check the contents to make sure the following items are included. • SUR-20 • This User’s Manual If any of the above items are missing or appear damaged, contact your dealer immediately. -
Page 9: Identifying Components
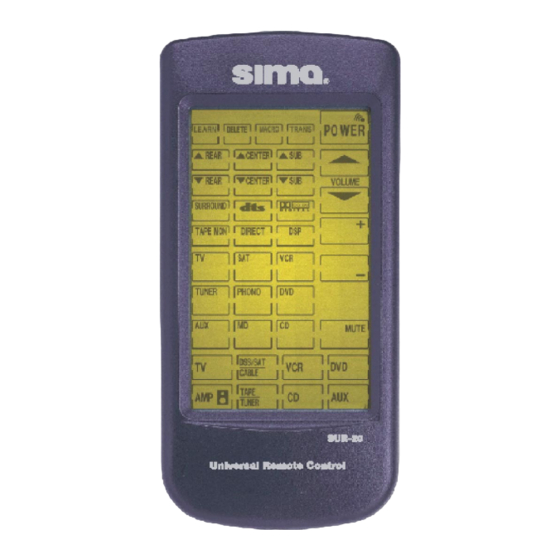
Chapter 1 —Identifying Components Identifying components Please refer to the following illustrations to identify the features of the SUR-20. This section provides an overview of the SUR-20’s features and controls. Refer to Chapters 3-8 for detailed descriptions on using the LCD panel and controls. -
Page 10: Chapter 2 -Getting Started
Batteries The SUR-20 operates on four AAA batteries (not included). Batteries must be inserted before you can operate the SUR-20. To insert the batteries, refer to the following illustration: Open the battery case cover by... -
Page 11: Battery Low Icon
Replace the batteries immediately when the battery low- power warning icon appears in the information screen. • To reduce danger of leakage and damage, remove used batteries when used longer than two years. • The SUR-20 will not lose programmed data when batteries are replaced... -
Page 12: The Lcd
Keep the touch screen dry. Wipe off any spills immediately. The SUR-20 is not waterproof; never immerse it in liquid. • Don’t expose the SUR-20 to extreme temperatures. Keep it away from heat sources. • Avoid dropping the SUR-20. •... -
Page 13: Sur-20 Touch Screen Buttons
You will hear a beep when you press a button. To activate or deactivate the beep, press any device button twice. (For more info see Chpt. 8) The SUR-20 will turn itself off 20 minutes after the last use. -
Page 14: Chapter 3 - Operating The Sur-20
SUR-20 LCD display. Read the following chapters to • Edit the LCD layout to match your devices (Chpt. 3) • Teach existing remote controls to the SUR-20 (Chpt. 4) • Access pre-programmed manufacturers codes in the SUR-20, for lost remotes. (Chpt. 5) •... - Page 15 SUR-20. TIP: To exit the password screen, touch any other button once. The SUR-20 will return to its normal operation screen in 15 sec. if left untouched. Press each number button ( 2, 4, 6, 8) until it disappears.
- Page 16 Tip: Press and hold the power button while in layout edit mode to see all of the available icons for each button simultaneously. When you have finished making changes, press the device screen button again. You will hear three beeps and the SUR-20 returns to its normal operational mode.
-
Page 17: The Aux Device Button
3. Tap screen once. 4. Then press any of the device buttons. The selected device layout is copied to the AUX button. 5. Press the AUX button again. You will hear three beeps and the SUR-20 returns to its normal operating mode. -
Page 18: Chapter 4 -The Learning Function
The Learning function Overview: In this chapter you will learn how to teach the SUR-20 codes used by your other remote controls. The SUR-20 has the ability to learn how to operate any infra-red controlled device. Before you use the learning function Before you start using the SUR-20’s learning function,... -
Page 19: Using The Learning Function
SUR-20’s learning eye, which is located at the bottom of the unit. Do not use the other eye located at the top of the SUR-20. You do not have to turn on the actual device (TV, VCR etc…). Refer to the following illustration:... - Page 20 The SUR-20 User’s Manual . Follow these instructions: Press the LEARN button for three seconds. You will hear a beep and then see the password screen to the right. Note: This screen prevents you from accidentally modifying the SUR-20. Press each number button until it disappears.
- Page 21 LEARN key at any time. Line up your remote control and the SUR-20 learning eye, according to the diagram at right. The SUR-20 is now ready to learn your remote controls buttons. The power button is the first button to be assigned.
- Page 22 The SUR-20 User’s Manual You can change the order of assigning buttons by pressing any button on the SUR-20’s LCD touch screen display panel… … and then pressing the corresponding button on your device’s remote control. To customize the SUR-20 device screen buttons to match your remote control’s,...
-
Page 23: Chapter 5 - Loading Pre-Programmed Codes
If you have the original remote, it is recommended you teach the SUR-20 the functions most important to you (Ch. 4). You can directly access the manufacturer’s code for your device by following the steps below. - Page 24 The SUR-20 User’s Manual The device screen appears again, with the Blinking icon Learning icon icon above the LEARN LEARN button. The POWER button icon is blinking, to wait for a signal from your device’s remote control. Select the device button for which you want to load a manufacturer’s...
- Page 25 Chapter 5 - Loading Pre-programmed Codes You will hear 2 beeps and then see the digital pad screen shown in diagram at right. Enter a number from the manufacturers’ code table that you think will operate your device. Manufacturer code tables are found on pages 20 - 25.
-
Page 26: Manufacturer's Code Tables
The SUR-20 User’s Manual Manufacturers’ Codes Table 1 – Televisions Vendor Code Vendor Code Admiral 12, 13 Daytron Aiko Dimensia 11, 13 Alleron Dumont Akai Dynasty Amtron Elektra Anam National 16, 18, 20 Electroband 01, 15 01, 02, 08 Electrohome... - Page 27 Chapter 5 - Loading Pre-programmed Codes Manufacturers’ Codes Table 1 – Televisions (cont.) Vendor Code Vendor Code Kawasho 08, 15 Nikko 07, 08 Kenwood Onking Kloss Novabeam 09 Onwa 16, 20 01, 16, 20 Optonica Lodgenet 11, 12 Panasonic 03, 17, 18 Loewe Philco 02, 06, 08, 09,...
- Page 28 The SUR-20 User’s Manual Manufacturers’ Codes Table 1 – Televisions (cont.) Vendor Code Vendor Code Shogun Technics Signature 11, 12 Technwood 03, 08 Simpson Teknika 02, 04, 05, 06, 07, 08, 11, 12, 16, 19, 20 Sonic Telerent 11, 12...
- Page 29 Chapter 5 - Loading Pre-programmed Codes Vendor Code Vendor Code Admiral Goldstar 25, 28 Adventura 27, 33 Gardiente Aiwa 27, 33 Harley Davidson 27 American High 30, 32 Harman Kardon 28 Asha Hitachi Audio Dynamics 28 Instant Replay 30, 32 Audiovox Inteq Beaumark...
- Page 30 The SUR-20 User’s Manual Manufacturers’ Code Table 3- VCRs (cont.) Vendor Code Vendor Code 28, 36 Signature Nikko Singer 30, 32 Noblex Sony Olympus 30, 32 30, 32 Optimus 25, 31 Sylvania 27, 30, 33, 34 Panasonic 30, 32 Symphonic...
-
Page 31: Manufacturer's Code Tables
Chapter 5 - Loading Pre-programmed Codes Manufacturers’ Codes Table 4 – Satellite Dishes Vendor Sima Code Vendor Sima Code Dish Network 42 Proscan Drake RCA DBS Echoshere Sony Echostar Video Cypher 41 General Zenith Electric Manufacturers’ Codes Table 5 - DVDs... -
Page 32: Chapter 6 -The Delete Function
Delete device button Follow these instructions to delete taught commands: Press the delete button for three seconds. You will hear two beeps and then see the password screen to the right. Note: This screen prevents you from accidentally modifying your SUR-20. - Page 33 Chapter 6 – The Delete Function Press each number button until it disappears. Delete icon The touch screen appears again, with DELETE icon above the DELETE button. Press the device screen button to select the device for which you want to delete data.
- Page 34 The SUR-20 User’s Manual OK icon Press the button whose data you want to delete. You will hear a beep and see the icon. The button’s data has been deleted. Note: Pressing the button deletes only the taught data; it does not remove the button.
- Page 35 Chapter 6 – The Delete Function Press the device screen button to select the device whose data you want to delete. You will hear two beeps and see the icon. The taught data for the entire device has been erased. To exit the delete function, press the LEARN button to...
-
Page 36: Macro
Chapter 7 Chapter 7 Chapter 7 Chapter 7 Macro Function A macro is simply a series of commands. The MACRO feature enables you to initiate a sequence of up to 25 commands with a single button. You can create a macro on any control button. -
Page 37: Chapter 7 -The Macro Function
Chapter 7 – Macro Function Press each number button until it disappears. icon will LEARN appear above the LEARN button. First, select a device screen. For this example, we have chosen the AUX screen. A. Press the AUX button. B. Press 1. You will hear three beeps. - Page 38 The macro only works when the SUR-20 is in its normal operational mode. Press the power button. This will power the TV on when the macro is running.
-
Page 39: Running The Macro
Running the macro To run the macro, press the AUX device button. Press the 1 button. Be sure to aim the SUR-20 at the devices while the macro sequence is being sent. The following macro will begin: TV turns on Two-second delay. -
Page 40: Quick Start Macro Setup Guide
The SUR-20 User’s Manual Follow these instructions to set up a macro: 1. Press the macro button for three seconds. 2. Press each number button until it disappears. Learning icon icon appears LEARN above the learn button. 3. Select a device screen. -
Page 41: Adjusting The Lcd Backlight
AUX buttons at the same time for three seconds to enter the LCD backlight configuration mode. You will hear two beeps and then see the password screen to the right. Note: This screen prevents you from accidentally modifying your SUR-20. - Page 42 The SUR-20 User’s Manual Press each number button until it disappears. You will see the screen to the right. It enables you to set the length of time that the LCD backlight stays on after touching the LCD panel. Two buttons showing the current setting will be flashing.
- Page 43 Chapter 8 – Special Features The SUR-20 detects the level of ambient light and adjusts the backlight to respond according to the setting in this screen. Press the up arrow key to increase the sensitivity of the backlight to the...
-
Page 44: Turning Off The Beep Signal
The SUR-20 User’s Manual Turning off the beep signal To turn off the beep signal, press any device button twice. To turn it back on press any other device button twice. If you don’t hear a beep when you press the screen, you may have deactivated the beep. -
Page 45: Recalling The Original Lcd Layout
Figure 3-3: Recalling the original LCD panel configuration You will hear two beeps and then see the password screen to the right. Press each button until it disappears. The SUR-20 beeps six times and returns to normal view. The original LCD panel configuration has been recalled. -
Page 46: Specifications And Accessories
User’s manual Accessories Optional Accessories An optional link cable to connect two SUR-20’s is available. The cable enables you to transfer data between the SUR-20 units. To perform a data transfer you will use the TRANS special function button. Please see the manual which accompanies the cable when purchased. -
Page 47: Troubleshooting
Troubleshooting Appendix B Troubleshooting If you have trouble configuring or operating the SUR-20, first check that you have inserted the batteries correctly (page 4). Then check the items below. Symptom Remedy The SUR-20 • Batteries may be dead. Replace with fresh doesn’t operate... - Page 48 The SUR-20 User’s Manual Troubleshooting Guide (Cont.) Macro does not • Be sure to aim SUR-20 at devices while macro work commands are being sent. • Macro was not properly set up. Repeat macro set-up procedure ( Chpt. 7). Record button •...
-
Page 49: Quick Start Function Guide
Hold LEARN key for 3 Press Control Codes to seconds. Push buttons on LEARN key SUR-20 remote following cues from SUR-20. Turn beep on or off Press any device key twice Press any Press and hold AMP and device key AUX keys for 3 seconds. -
Page 50: Warranty
90 Day Limited Warranty Sima Products Corporation warrants this product against defects in materials and workmanship for a period of 90 days from the date of purchase. During the warranty period, the product will be repaired or replaced, at Sima’s option. - Page 51 Notes...
- Page 52 To see our full line of products, visit us at: www.simacorp.com Home Theater I-Mix™ Digital Audio Recorder & CD Player Universal Remotes A/V Selectors Speaker Selectors Photo Image Bank Digital Photo Storage FilmShield Tripods Lens Pens Cap Keepers Video Audio/Video Editors Video Mixers Battery Chargers Rewinders...
Need help?
Do you have a question about the SUR-20 and is the answer not in the manual?
Questions and answers