Table of Contents
Advertisement
Table of Contents
Introduction . . . . . . . . . . . . . . . . . . . . . . . . . . . . . . . . . . . . . . . . . . . . . . . . . . . . . .2
1. Theory of Operation . . . . . . . . . . . . . . . . . . . . . . . . . . . . . . . . . . . . . . . . . . . . .2
2. Features . . . . . . . . . . . . . . . . . . . . . . . . . . . . . . . . . . . . . . . . . . . . . . . . . . . . . . .3
2.1 Recording Section . . . . . . . . . . . . . . . . . . . . . . . . . . . . . . . . . . . . . . .3
2.2 Mixing Section (all balanced/unbalanced on TRS jacks) . . . . . . . . .3
3. What's In the Box . . . . . . . . . . . . . . . . . . . . . . . . . . . . . . . . . . . . . . . . . . . . . . .4
4. Front, Rear, and Top Panel Descriptions . . . . . . . . . . . . . . . . . . . . . . . . . . . . . .4
4.1 Front Panel . . . . . . . . . . . . . . . . . . . . . . . . . . . . . . . . . . . . . . . . . . . .4
4.2 Rear Panel . . . . . . . . . . . . . . . . . . . . . . . . . . . . . . . . . . . . . . . . . . . . .6
4.3 Top Panel . . . . . . . . . . . . . . . . . . . . . . . . . . . . . . . . . . . . . . . . . . . . . .7
5. Operational Basics & Definitions . . . . . . . . . . . . . . . . . . . . . . . . . . . . . . . . . . .7
5.1 Balanced Signals . . . . . . . . . . . . . . . . . . . . . . . . . . . . . . . . . . . . . . . .7
5.2 Unbalanced Signals . . . . . . . . . . . . . . . . . . . . . . . . . . . . . . . . . . . . . .8
5.3 Phantom Power . . . . . . . . . . . . . . . . . . . . . . . . . . . . . . . . . . . . . . . . .8
5.4 Sends and Returns . . . . . . . . . . . . . . . . . . . . . . . . . . . . . . . . . . . . . . .8
5.5 Plugs and Jacks . . . . . . . . . . . . . . . . . . . . . . . . . . . . . . . . . . . . . . . . .9
5.6 Balanced Cabling & Connections . . . . . . . . . . . . . . . . . . . . . . . . . . .9
5.7 Unbalalanced Cabling & Connections . . . . . . . . . . . . . . . . . . . . . . .9
5.8 Stereo Input and Insert Cables/Connections . . . . . . . . . . . . . . . . . .10
5.9 Line Levels vs. Mic/Instr Levels . . . . . . . . . . . . . . . . . . . . . . . . . . .10
5.10 Virtual Tracks . . . . . . . . . . . . . . . . . . . . . . . . . . . . . . . . . . . . . . . .10
6. Basic Playback Setup for the Omni I/O . . . . . . . . . . . . . . . . . . . . . . . . . . . . .11
7. Basic Recording Setup for the Omni I/O . . . . . . . . . . . . . . . . . . . . . . . . . . . .14
8. Omni Signal Flow Chart . . . . . . . . . . . . . . . . . . . . . . . . . . . . . . . . . . . . . . . . .16
9. Sequencing and the Omni I/O . . . . . . . . . . . . . . . . . . . . . . . . . . . . . . . . . . . . .17
9.1 MIDI Sequencing . . . . . . . . . . . . . . . . . . . . . . . . . . . . . . . . . . . . . .17
9.2 Setting MIDI Playback Levels . . . . . . . . . . . . . . . . . . . . . . . . . . . .18
10. Recording Audio to the Delta 44 or 66 . . . . . . . . . . . . . . . . . . . . . . . . . . . . .19
10.1 Monitoring the Signals You Are Recording . . . . . . . . . . . . . . . . .20
10.2 Monitoring the Record Inputs Using ASIO or EASI . . . . . . . . . .22
10.3 Setting Record Levels . . . . . . . . . . . . . . . . . . . . . . . . . . . . . . . . . .22
10.4 Record Levels Using the Inserts . . . . . . . . . . . . . . . . . . . . . . . . . .23
10.5 Setting the Audio Track Playback Levels . . . . . . . . . . . . . . . . . . .24
10.6 Adding Effects . . . . . . . . . . . . . . . . . . . . . . . . . . . . . . . . . . . . . . . .25
10.7 Recording Your MIDI Instruments as Audio Tracks . . . . . . . . . . .25
11. Mixing With the Omni . . . . . . . . . . . . . . . . . . . . . . . . . . . . . . . . . . . . . . . . . .26
11.1 Organizing the Audio Tracks for Mixing . . . . . . . . . . . . . . . . . . .27
11.2 Using the Direct Outs 1-4 . . . . . . . . . . . . . . . . . . . . . . . . . . . . . . .27
12. Alternate Omni Setups . . . . . . . . . . . . . . . . . . . . . . . . . . . . . . . . . . . . . . . . .28
12.1 Recording with Four Pre-Amps . . . . . . . . . . . . . . . . . . . . . . . . . .28
12.2 Monitoring While Recording to Four Tracks . . . . . . . . . . . . . . . .28
12.3 Recording Four Line Inputs . . . . . . . . . . . . . . . . . . . . . . . . . . . . .28
12.4 Recording FX . . . . . . . . . . . . . . . . . . . . . . . . . . . . . . . . . . . . . . . .29
12.5 Submixing MIDI Instrument . . . . . . . . . . . . . . . . . . . . . . . . . . . . .29
Limited Lifetime Warranty . . . . . . . . . . . . . . . . . . . . . . . . . . . . . . . . . . . . . . .30
Advertisement
Table of Contents

Related Manuals for M-Audio Omni I/O


Summary of Contents for M-Audio Omni I/O
-
Page 1: Table Of Contents
5.10 Virtual Tracks ........10 6. Basic Playback Setup for the Omni I/O ......11 7. -
Page 2: Introduction
“virtual” MIDI keyboard tracks. The Omni I/O performs these tasks. The Omni, in conjunction with a Delta 44 or Delta 66 PCI Interface and your PC or Macintosh computer, adds the functionality of a recording console in a desktop unit. -
Page 3: Features
M Audio pre-amp and mixer technology to bring you an extremely powerful desktop recording solution. Incorporate your existing gear, or do all of your sounds and effects right inside the computer. Either way, the Omni I/O can ultimately handle all of your signal flow from tracking to mixdown. -
Page 4: What's In The Box
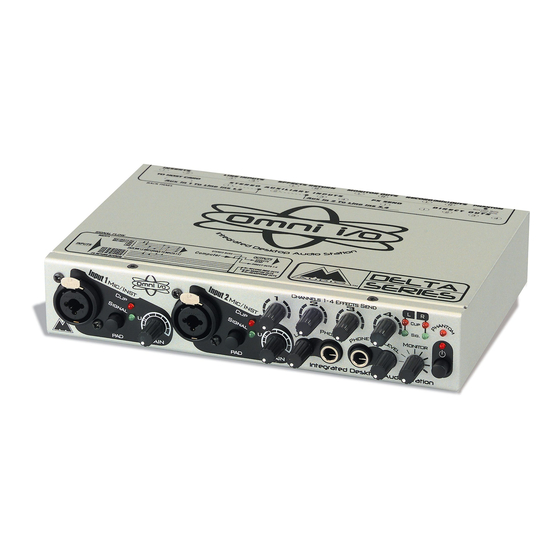
A 9v AC 500 mA “wall wart” power supply 4. Front, Rear, and Top Panel Descriptions This section identifies the external connections and controls of the Omni I/O Integrated Desktop Audio Station, with a basic description of their function. More detailed descriptions of the Omni components and the basics of operation follow. - Page 5 4. Gain Controls: The position of these rotary gain controls will determine the amount of microphone or instrument pre-amp gain being applied to the Omni pre-amps (Mic/Instr Inputs 1 & 2). The “U” marking shows a unity gain setting for the high impedance input when the Pad switch is engaged. 5.
-
Page 6: Rear Panel
4.2 Rear Panel 1. 9v AC Power Jack: This jack accepts a 2.5mm plug from a 9vAC, 500 mA power supply, included with the Omni. Use only the proper, AC power supply on the Omni. 2. Direct Outs 1 – 4: These jacks are connected to the Delta H/W Outs 1 through 4, and bypass the Omni mixer. -
Page 7: Top Panel
There are some basic concepts that apply to all audio gear. Understanding them will help in your operation of the Omni I/O, as well as create a set of common terms to use in our discussion of the Omni components. -
Page 8: Unbalanced Signals
stereo) plug on the 1/4” jacks of the Omni (that are designed for unbal/balanced operation) will give you this balanced line—tip positive, ring negative, and sleeve ground. Generally, if the Omni outputs connect to a system or device that accepts a balanced line at +4dB (nominal level) operating level, you should use TRS plugs on the outputs. -
Page 9: Plugs And Jacks
Sends and returns are generally spoken of in terms of the gear that is receiving the signal. The “effects send,” therefore, is an output from the mixer to the effect. The effect’s input receives the signal from the “effects send,” and the output of the effects device returns the signal to the mixer’s input, the “effects return.”... -
Page 10: Stereo Input And Insert Cables/Connections
5.8 Stereo Input and Insert Cables/Connections A 1/4” TRS plug can alternately carry an unbalanced stereo audio signal over a two-conductor cable with a shield, which applies to “Aux In” and the “Insert” TRS jacks on the Omni. A TRS plug on one end with two mono TS plugs on the other is in fact a stereo cable, and is sometimes referred to as an “insert cable.”... -
Page 11: Basic Playback Setup For The Omni I/O
Delta 44 or 66 manual. In the step by step instructions that follow, the items in quotations such as “9v AC Power Jack” relate specifically to numbered items on the front and back panels of the Omni I/O. 1. Make sure that the host computer is powered off. Using the shielded 15 pin to 15 pin cable that came with your Delta card, connect one end of the cable to the D-sub connector on the Delta card, and the other end to the “15 Pin D-... - Page 12 1/4” TRS, XLR, etc., into the mixdown deck inputs. 6. To connect an effects unit to the Omni I/O, use a 1/4” TS plug if your effects unit accepts only an unbalanced signal, or a 1/4” TRS plug if your effects unit accepts balanced signals.
- Page 13 Output Signal/Clip LEDs, since this level is pre- monitor control settings. Raise the level on your monitoring system, then raise the “Monitor Level” control on the Omni until you begin to hear playback. Omni i/O Playback setup...
-
Page 14: Basic Recording Setup For The Omni I/O
7. Basic Recording Setup for the Omni I/O Now that you’re setup for playback, setting up for recording is the next logical step. The recording setup is the most likely to change, so we’ll speak in terms of the types of devices that you will use at the Delta recording inputs. - Page 15 NOTE: Line Input 3 is connected to, and sends its signal to the Delta H/W In 3. Line Input 4 is connected to, and sends its signal to the Delta H/W In 4. COMPUTER INPUTS OUTBOARD GEAR Guitar Omni i/O Record Setup...
-
Page 16: Omni Signal Flow Chart
8. Omni Signal Flow Chart The flowchart that sits atop the Omni I/O gives you an overview of what is connected to what, and what goes to where on the Omni. A flow chart is a powerful tool, so we will go into it in a little more detail with the expanded version. -
Page 17: Sequencing And The Omni I/O
You should be ready to at this point to start getting some work done with the Omni I/O and your Delta 44 or 66 PCI Interface. If you are using MIDI sequencing in your production work, that’s where you may want to begin. -
Page 18: Setting Midi Playback Levels
to get you up and running. We also assume that you have installed a MIDI interface into your computer, and that this basic MIDI setup has already been established. The Omni provides you with four “Aux Ins” for monitoring your MIDI keyboards while you are sequencing and creating MIDI tracks. -
Page 19: Recording Audio To The Delta 44 Or 66
10. Recording Audio to the Delta 44 or 66 Take some time to read the Delta manual that came with your Delta card. Recording audio tracks requires a proper record setup, but setup for monitoring those signals while recording is equally important. Having read the basic recording setup in section 7 of this manual, you understand that Omni Mic/Instr Channel 1 is connected to the Delta H/W (hardware) In1. -
Page 20: Monitoring The Signals You Are Recording
Once you have chosen your setup, refer to section 10.3, “Setting Record Levels.” NOTE: The Omni I/O runs at a +4dB line level. We suggest leaving the Variable Signal Level in the Delta panel’s Hardware Settings page to +4 for the Delta Outs. - Page 21 Using this setup, you will be able to record from the Omni Mic/Instr inputs, monitoring the H/W inputs while you record, and then monitor the tracks once they are recorded. All of these signals will enter the Omni mixer on channels 1 and 2.
-
Page 22: Monitoring The Record Inputs Using Asio Or Easi
then this signal will appear on the Omni mixer channels 1 & 2 as well as mixer channels 3 & 4. Generally, this is not a desirable scenario, and setup B is designed to prevent this. 10.2 Monitoring the Record Inputs Using ASIO or EASI If your music software allows you to monitor the software outputs of the program, such as those programs using the ASIO or EASI drivers, then the default Patchbay/Router setting (WavOut on the PC, or SM/ASIO Out on the... -
Page 23: Record Levels Using The Inserts
3. Start to raise the Omni gain control while testing your microphone or guitar. If you are using an instrument with volume controls, start with it on the highest setting, then play to test the level. Raise the Omni gain control to between 9 o’clock and 12 o’clock, or until you see the green signal LED start to light. -
Page 24: Setting The Audio Track Playback Levels
1/4” TRS connection. This now processed signal is what is sent to the Delta H/W Ins, which are the record inputs to the Delta card. This type of insertion point is most often used for dynamics processors such as compressors or expanders (noise gates), or for other outboard gear such as an equalizer (EQ). -
Page 25: Adding Effects
Therefore, the volume level on each individual audio track recorded in your music software will control the playback level that enters the Omni mixer. Your music software may also have a mixer panel to control playback levels. Either will work fine, as generally, the MIDI volume level that you set on an individual track will be reflected in the software’s mixer panel. -
Page 26: Mixing With The Omni
1. Next to Aux In 1 is a switch labeled “To Ins 1, 2.” Pressing in and engaging this switch, will a) take the signal present at the Aux In1 out of the stereo buss of the Omni mixer, and b) send that same signal to the Delta H/W Ins 1 &... -
Page 27: Organizing The Audio Tracks For Mixing
You can still mix through the Omni, adding effects using the Channel 1-4 Effects Send, and also using the Direct Outs. We will describe using the Direct Outs in the section 11.2, “Using the Direct Outs 1-4.” 11.1 Organizing the Audio Tracks for Mixing There are a number of ways to setup the audio tracks for mixing. -
Page 28: Alternate Omni Setups
12. Alternate Omni Setups These are some advanced techniques. Once you master the Omni basics, you may want to try some of these variations. 12.1 Recording with Four Pre-Amps The Omni provides you with 2 pre-amp channels, Mic/Instr Channel 1, and Mic/Instr Channel 2. -
Page 29: Recording Fx
1 & 2, by plugging in only to the insert in (the red, or right side of the insert cable). This will break the signal flow of the pre-amps to the inserts, allowing you to have 2 unbalanced line inputs to the Delta H/W Ins 1 & 2. Pressing in the “To Ins 1, 2” switch will disconnect the Mic/Instr channels, however, so you must chose one or the other. -
Page 30: Limited Lifetime Warranty
Limited Lifetime Warranty M Audio warrants that this product is free of defects in materials and workmanship under normal use so long as the product is: owned by the original purchaser; the original purchaser has proof of purchase from an authorized M Audio dealer; and the purchaser has registered his/her ownership of the product by sending in the completed warranty card.
Need help?
Do you have a question about the Omni I/O and is the answer not in the manual?
Questions and answers