Table of Contents
Advertisement
Quick Links
Smartpen User Guide
V
2.5
ERSION
This device complies with Part 15 of the FCC Rules. Operation is subject to the
following two conditions: (1) this device may not cause harmful interference, and (2)
this device must accept any interference received, including interference that may
cause undesired operation.
Advertisement
Table of Contents

Related Manuals for Livescribe Smartpen


Summary of Contents for Livescribe Smartpen
- Page 1 Smartpen User Guide ERSION This device complies with Part 15 of the FCC Rules. Operation is subject to the following two conditions: (1) this device may not cause harmful interference, and (2) this device must accept any interference received, including interference that may...
-
Page 2: Copyright And Trademark
You accept the terms of the End User License Agreement by using any part of the software. Using any non-authorized charging accessories or ink cartridges may damage the Livescribe™ smartpen and voids the Livescribe smartpen warranty (see Warranty Information on page 115.) -
Page 3: About This Guide
This guide instructs you to tap on paper controls to perform certain functions. When you see this instruction, turn on your smartpen, and use the ink tip to tap on the printed buttons within the Getting Started Guide and Livescribe™ Dot Paper notebooks. -
Page 4: Table Of Contents
About This Guide............. . iii Introducing the Livescribe™ Smartpen .......1 Livescribe Smartpen . - Page 5 Renaming Your Smartpen in Livescribe™ Desktop........
- Page 6 Setting Session Bookmarks............78 Livescribe™ Smartpen User Guide...
- Page 7 Deleting Sessions from the Smartpen Main Menu ....... . .
- Page 8 Can I convert my handwriting into text? ........125 Can I use my smartpen with more than one computer? ......125 How do I print my own dot paper? .
- Page 9 Items Purchased Directly from Livescribe........
-
Page 10: Introducing The Livescribe™ Smartpen
It synchronizes the audio your hear to what you write, so you never miss a word. Just tap on your notes and the smartpen will play back what you recorded from that exact moment in time. -
Page 11: Livescribe™ Dot Paper
Specifically, when you tap on your notes with the smartpen, it locates the position where you are tapping and starts to play back the audio at the position linked to that paper location. - Page 12 The area of the entire Anoto dot pattern is huge, and represents a piece of paper the combined size of Europe and Asia. Livescribe™ dot paper is based on a portion of this dot pattern. Livescribe™ Smartpen User Guide...
-
Page 13: New In This Version
The Paper Tablet is similar to a graphics tablet. You connect your smartpen to your computer using its micro-USB cable and use it like a stylus. You then use one or more pages from a Livescribe™ dot paper product as the tablet. The Paper Tablet is available for purchase from the Livescribe Store and from Livescribe retailers as a redeemable application card. - Page 14 New Features Sticky Notes pads come in two sizes. The 3”x3” Livescribe Sticky Note looks like this: The 3” x 5” Livescribe Sticky Note looks like this: Livescribe™ Smartpen User Guide...
- Page 15 Open a new pack. Your smartpen can carry up to 6 pads (Sticky Notes 3”x3” Pads 1, 2, 3 and Sticky Notes 3”x5” Pads 1, 2, 3) at the same time. When you are done with all six pads, archive them with Livescribe Desktop before starting a new 6-pack.
-
Page 16: Home Button
Tapping on the Home Button stops the currently running smartpen application and returns the smart- pen to its default mode: The current time is showing on the display and the smartpen is ready to store whatever you write on Open Paper. - Page 17 However, you can assign different functionality to double-tapping the Home Button. You can assign any Open Paper smartpen application or Quick Command. For instance, if you do lots of calculations, you might want to go to Calc Quick Command when you double-tap on the Home But- ton.
- Page 18 The display will scroll: Write a command, then double-tap. You can write an application name or a Quick Command. Write any Open Paper smartpen application name or write a Quick Command. For instance, write calc double-tap the center of the Nav Plus or write a doubled-back horizontal line.
-
Page 19: Shortcut Buttons
Sticky Notes. They are labeled with successive numbers: 1, 2, 3, etc. You can assign functionality to the Shortcut Buttons, just as you can assign functionality to double- tapping the Home Button. Assign any Open paper smartpen application or Quick Command to a Shortcut Button. - Page 20 Main Menu will be displayed on the Livescribe smartpen. Tap down on the directional arrow of the Nav Plus to scroll through a list of applications on the Livescribe smartpen. When Shortcuts is displayed, tap right to select it. The display will scroll: Assign Home Button double-tap.
- Page 21 The display will scroll: Write a command, then double-tap. You can write an application name or a Quick Command. Write any Open Paper smartpen application name or write a Quick Command. For instance, write calc double-tap the center of the Nav Plus or write a doubled-back horizontal line.
- Page 22 Unlike the Home Button, the Shortcut Buttons have no default assignments. If you tap on an unassigned Shortcut Button, the following message displays on the smartpen: To assign this shortcut, tap and hold the button, then write the name of an application or Quick Command.
- Page 23 The display will scroll: Write a command, then double-tap. You can write an application name or a Quick Command. Write any Open Paper smartpen application name or write a Quick Command. For instance, write calc double-tap the center of the Nav Plus or write a doubled-back horizontal line.
-
Page 24: Improvements And Corrected Issues
Left-Tap: Exit the Way You Came In Left-tap is the way to the exit on the smartpen. You can tap left on the directional error of a Nav Plus to exit a smartpen application or a Quick Command. You can also exit by left-tapping around any Launch Lines you drew. -
Page 25: Getting To Know Your Livescribe™ Smartpen
Warranty Information on page 115) • Free downloads of Livescribe™ Desktop for Windows and Mac OS X. • Free sign-up for a Livescribe Online account with 500 MB of online space to store and share your smartpen content. Livescribe™ Smartpen User Guide... -
Page 26: Identifying Your Livescribe™ Smartpen Model
Identifying Your Livescribe™ Smartpen Model Identifying Your Livescribe™ Smartpen Model There are two Livescribe smartpen models: the Echo™ smartpen and the Pulse™ smartpen. Use the table below to identify your model. Smartpen Model Color Power Symbol Black Echo™ smartpen Power button has a printed power symbol Titanium and Black Pro Pack Pulse™... -
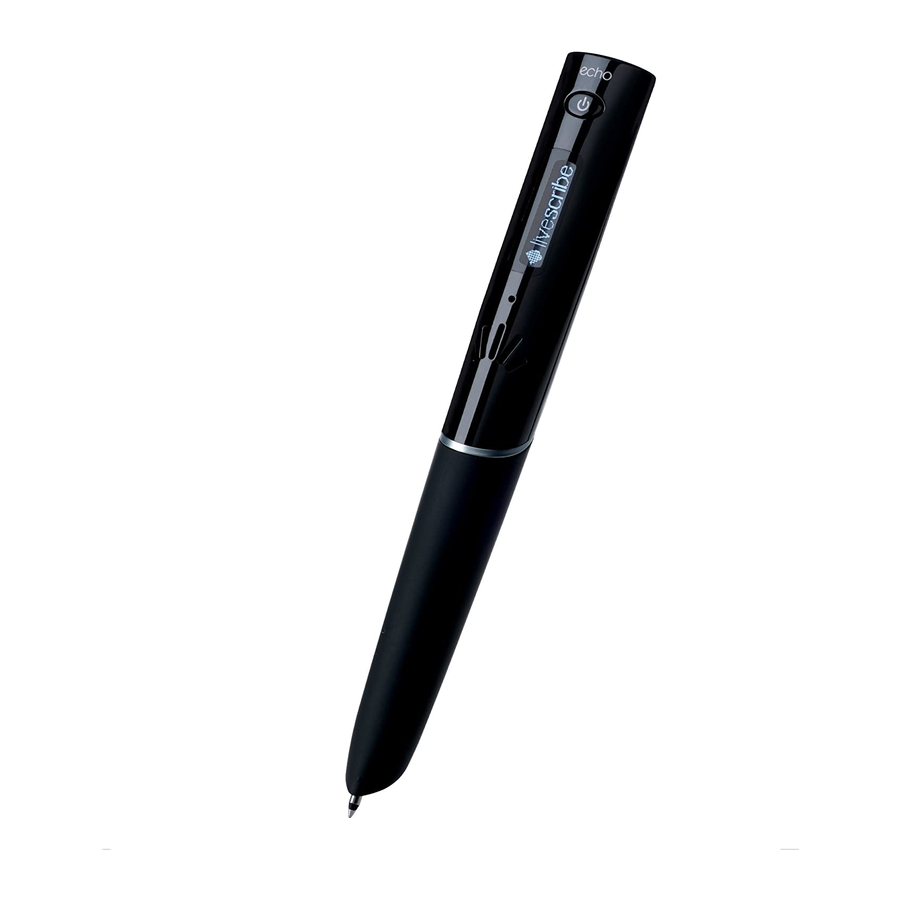
Page 27: Anatomy Of A Smartpen
Anatomy of a Smartpen Anatomy of a Smartpen If you own an Echo™ smartpen, use the diagram below to learn about its components. • Micro-USB connector • Headset/Audio jack • Organic Light-Emitting Diode (OLED) display • Built-in microphone • Built-in speaker •... - Page 28 Anatomy of a Smartpen Use the diagram below to learn about thePulse™ smartpen components. Power button Headset/Audio jack Built-in microphone Organic Light-Emitting Diode (OLED) display Built-in speaker USB connector Infrared camera Replaceable ink tip Rechargeable lithium battery (non-removable) Pulse smartpen cap (purchased separately)
-
Page 29: Turning On Your Smartpen
Turning On Your Smartpen Turning On Your Smartpen To use your smartpen, first turn it on. It must be running to capture written notes or enable its audio recording or playback features. See Using the Paper Replay™ Application on page 69 for more information. -
Page 30: Capturing Notes With Audio
Power on your Livescribe smartpen by pressing the power button. If needed, remove the smartpen cap. If you are using a new ink cartridge, you may need to remove possibly the small protective plastic coating from your ink cartridge tip. All new ink cartridges have this coating to prevent the ink from drying up. - Page 31 Power button for approximately five seconds until the display indicates that the recording started. • Tap on the Record button in any Livescribe™ dot paper product, such as a Livescribe notebook, journal, or flip notepad. See.Starting Recording with a Pre-Printed Record button on page 70 •...
-
Page 32: Charging An Echo™ Smartpen
Charging an Echo™ Smartpen Charging an Echo™ Smartpen The USB connector for an Echo™ smartpen is located on the top next to the headset jack. This is a standard micro USB connector that is compatible with any standard USB charging cable. Follow these steps to charge your smartpen Before charging your Echo™... -
Page 33: Charging A Pulse™ Smartpen
Charging a Pulse™ Smartpen The USB connector for a Pulse smartpen is located on its side. The connector is designed to fit into a compatible Livescribe USB charging cradle. Follow these steps to charge your smartpen Before charging your Pulse™ smartpen, download and install the Livescribe Desktop software from www.livescribe.com/install. -
Page 34: Replacing The Ink Cartridge Or Stylus
To replace an ink cartridge, just use your fingers to grasp and pull out the old cartridge and insert a new one. If you own a Pulse smartpen and have a USB mobile charging cradle, you can instead use the cradle to help replace the cartridge as follows. -
Page 35: Using A 3-D Recording Headset
If you want to use the smartpen but do not want to make ink marks on your paper, purchase a stylus from the Livescribe web store. To insert the stylus, follow the steps above, but substitute the stylus for the replacement ink cartridge. -
Page 36: Renaming Your Smartpen In Livescribe™ Desktop
Install and Launch Livescribe™ Desktop. (See the Livescribe™ Desktop User Guide for details). Dock the smartpen to be renamed. If it is not already selected, use the smartpen selector drop down to choose the smartpen you want to rename. Choose Tools > Smartpen > Rename. At the prompt, type the smartpen name and click OK. -
Page 37: Rebooting Your Livescribe™ Smartpen
If for some reason your Livescribe smartpen is unresponsive, perform the following steps: Charge your smartpen using its cradle (for Pulse™ smartpens) or Micro-USB cable (for Echo™ smartpens) for at least five minutes. If your smartpen is still nonresponsive after five minutes of charging, you may need to reboot it. -
Page 38: Configuring Your Livescribe™ Smartpen
Configuring Your Livescribe™ Smartpen You can configure the Livescribe smartpen to your own preferences. There are generally two ways to view current smartpen settings and optionally change them: • Use printed buttons in the Status and Settings areas printed on the inside covers of Livescribe notebooks. - Page 39 Software version Using a Notebook’s Settings and Status Buttons Livescribe notebooks provide printed buttons you can use to view and change settings. Some notebooks have more printed buttons than others for viewing and changing settings.Most notebooks include Settings and Status areas, with various printed buttons.
-
Page 40: Setting The Date
• Software version Setting the Date It is critical that you set the correct time and date on your smartpen because Paper Replay MPORTANT sessions you create with your smartpen are named using the time and date they are created. Also, the Livescribe smartpen presents the date format as mm/dd/yy by default. -
Page 41: Setting The Time
Tap the printed keypad and type the current date. Example: Tapping 101809 sets the date to Sunday, October 18, 2009 for the date format of mm/dd/yy. Your smartpen will now display the date you entered. OTES • If you make a mistake while entering the date, simply tap on the Set Date buttons again to start over. -
Page 42: Setting Display Brightness
Alternatively, use the Settings menu on your smartpen to change the display brightness. Setting the Display Orientation You can configure your smartpen display for either left- or right-handed use. Tap the appropriate button to configure your display orientation. Alternatively, use the Settings menu on your smartpen to change the display orientation. -
Page 43: Setting Scroll Speed Of The Display
Setting Scroll Speed of the Display Text that is too long to fit on your smartpen display will scroll across the display. You can increase or decrease the rate at which text scrolls using the Scroll Speed settings. •... -
Page 44: Viewing Playback Latency
You can also view the microphone sensitivity setting using the Settings menu. See Setting/Viewing Microphone Sensitivity on page 41. Or, view the current setting using a quick command. See Viewing Audio Settings with a Quick Command on page Livescribe™ Smartpen User Guide... -
Page 45: Viewing The Date And Time
The indicator pictured shows a full battery. You can also view the battery level using a quick command. See Viewing the Battery Level with a Quick Command on page Livescribe™ Smartpen User Guide... -
Page 46: Viewing Storage Available
(recording) quality settings. If available space is less than 1 MB, your smartpen will display memory in available KB. If you see the circled MPORTANT exclamation mark... -
Page 47: Using The Settings Menu
Using the Settings Menu Using the Settings Menu Using the Settings menu, you can change and view settings of the Livescribe smartpen, including: Setting Values Audio (Recording) quality High, Medium, Low Microphone sensitivity Conference room, Lecture hall, Automatic Playback latency... - Page 48 Using the Settings Menu Double-tap the center of a Nav Plus to go the Main Menu. Tap down until Settings is displayed. Tap right to select Settings. Tap down and up to scroll through the setting types list. Livescribe™ Smartpen User Guide...
- Page 49 Tap right to select an option. After activating an option, a confirmation message will scroll across your smartpen display and the active option will have a checkmark beside it in the display. Tap left to return to the option setting list to make a different selection.
-
Page 50: Setting/Viewing Audio (Recording) Quality
Use Lecture Hall to set the microphone to pick up sounds in a wider open area. This setting is optimal for large rooms where the speaker’s voice is distant from your smartpen microphone. We also recommend the use of the 3-D Recording Headset when recording in this type of environment. -
Page 51: Setting/Viewing Playback Latency
Turning off the Menu Voice will not affect Paper Replay™ audio or other smartpen sounds. Setting/Viewing Display Brightness To change the brightness of your smartpen display, use the Settings menu. Values are 100%, 90%, 75%, 50%, and 10%. The lowest brightness setting is optimal for dark room environments, such as when a speaker may be presenting a slideshow. -
Page 52: Setting The Auto-Off Time
You smartpen has an auto-off feature to save power after long periods of inactivity. Using the Auto-Off Time option, you can set the length of time before your smartpen automatically powers off. You can set the auto-off time as 30 minutes, 1 hour (the default), 2 hours, and 4 hours. -
Page 53: Switching Languages (Locales)
When prompted, tap right again to restart your smartpen. After your smartpen restarts, it will run with the selected language as the default. Using the Language Switch Card for Chinese and Korean You can use the Language Switch Card to switch your Livescribe smartpen from English to Chinese or Korean. Livescribe™ Smartpen User Guide... -
Page 54: Using The Getting Started Guide Controls To Switch Locales
The Getting Started Guide that ships with your Livescribe smartpen may have printed controls to switch your smartpen from English to other languages. If it does, you can use these controls as fol- lows. Otherwise, use the Settings menu to switch locales:... -
Page 55: Navigating The Main Menu
Navigating the Main Menu You can use the Main Menu of the Livescribe smartpen to locate applications and settings for the Live- scribe smartpen. This topic describes how to navigate around the Main Menu and use other tech- niques to quickly get to applications and information you want. Topics covered include: •... - Page 56 Main Menu will be displayed on the Livescribe smartpen. Tap down on the directional arrow of the Nav Plus to scroll through a list of applications on the Livescribe smartpen. When the desired application name is displayed, tap right to select that application.
-
Page 57: Drawing A Nav Plus
To return to the Main Menu, tap a series of left taps or double-tap on the center of the Nav Plus to jump to the Main Menu. The Livescribe smartpen will display small directional arrows to indicate the directions in the menu that you can scroll through. Drawing a Nav Plus If a pre-printed Nav Plus is not easily accessible, create your own simply by drawing one. - Page 58 Using any Livescribe™ dot paper product, such as the included Starter notebook, draw intersecting vertical and horizontal lines. You can draw the intersecting lines in either order. The lines should: • Be fairly straight • Be approximately the same length •...
-
Page 59: Scrolling With Flick And Scrub
Flicking refers to quickly dragging your smartpen across paper and then lifting your smartpen off the paper. The contents of the display scrolls rapidly, based on the speed of your smartpen when it was lifted. - Page 60 On any unused paper region, press the tip of your smartpen down for one-half (1/2) second. Wait until you hear a short beep, then without lifting your smartpen tip off the paper, draw a horizontal or vertical line. Your smartpen assigns the area you draw as a Flick and Scrub control area for any applica- tion.
-
Page 61: Flick And Scrub Display Indicators
Nav Plus after creating it. To return to use the Flick and Scrub region you do not need to press down the smartpen tip again for 1/2 a second. This is only needed when first creating the region. -
Page 62: Using Quick Commands
Quick Commands let you write a one-line command with the Livescribe smartpen and get an immediate response on your smartpen display. Quick Commands are useful when you do not have access to the Status buttons on the inside cover of your Livescribe notebooks, or if you need to do a quick calculation while writing. -
Page 63: Launching Applications With A Quick Command
Viewing the Time and Date with Quick Commands on page Launching Applications with a Quick Command Quick Launch is a Quick Command you can use to start smartpen applications. You can use Quick Launch to start any applications available in the Main Menu and other folders within it. - Page 64 As soon as you see the application you want on the display, you can stop writing. Tap right on the Nav Plus, or double-tap on any open paper. Your smartpen will leave Quick Launch and start the application. Livescribe™ Smartpen User Guide...
-
Page 65: Locating And Playing A Recent Session With A Quick Command
“Play Session” list: Double-tap on the center of a Nav Plus. A double-tap is two taps in quick succession. Your smartpen will display the Quick Command indicator in the Main Menu. It is waiting for you to write a Quick Command. - Page 66 Right-tap on the Nav Plus, or double-tap on any open paper. Your smartpen will display the top item in the Play session list. You can tap down using the Nav Plus to scroll through sessions and then tap right to begin playback.
-
Page 67: Doing Basic Math Calculations With A Quick Command
You can use the Calc Quick Command to perform basic mathematical calculations. Double-tap the center of a Nav Plus. A double- tap is two taps in quick succession. Your smartpen will display the Quick Command indicator in the Main Menu. It is waiting for you to write a Quick Command. - Page 68 Using Quick Commands Your smartpen will prompt you to write a problem. Write a basic math problem, such as 51 x 3 = Your smartpen will display the result. Once you have written a Quick Command, you can tap where you wrote it to repeat the command.
-
Page 69: Viewing Audio Settings With A Quick Command
Using Quick Commands Viewing Audio Settings with a Quick Command To display the status of audio settings on the Livescribe smartpen, including: • audio (recording) quality • microphone sensitivity • playback latency Double-tap on the center of a Nav Plus. A double-tap is two taps in quick succession. -
Page 70: Viewing Available Storage With A Quick Command
Once you have written a Quick Command, you can tap where you wrote it to repeat the command. Viewing Available Storage with a Quick Command To display the amount of available memory on the Livescribe smartpen: Livescribe™ Smartpen User Guide... - Page 71 Using Quick Commands Double-tap on the center of a Nav Plus. A double-tap is two taps in quick succession. Your smartpen will display the Quick Command indicator in the Main Menu. It is waiting for you to write a Quick Command.
-
Page 72: Viewing The Battery Level With A Quick Command
Once you have written a Quick Command, you can tap where you wrote it to repeat the command. Viewing the Battery Level with a Quick Command To view the current battery level of your Livescribe smartpen: Livescribe™ Smartpen User Guide... - Page 73 Within three (3) seconds, write the word “battery.” Using its predictive text feature, your smartpen will display the first command that matches your written input In this case, battery is displayed as soon as you write a “b”. As soon as you see the command you want on the display, you can stop writing.
-
Page 74: Viewing The Time And Date With Quick Commands
Using Quick Commands Your smartpen will display the remaining battery power. Once you have written a Quick Command, you can tap where you wrote it to repeat the command. Viewing the Time and Date with Quick Commands You can use Quick Commands to check the time or date. Or, you can check the current Time and Date... - Page 75 “d” or “t”. As soon as you see the command you want on the display, you can stop writing. Right-tap on the Nav Plus, or double-tap on any open paper. Your smartpen will display the date or time. Livescribe™ Smartpen User Guide...
-
Page 76: Launch Line And Tap Around
Using Launch Line is similar to Quick Launch. You can use Launch Line to quickly launch any Open Paper application installed on your smartpen. Open Paper applications are applications that do not require pre-printed paper controls to function. Examples of these applications are Piano, Translator Demo, and most applications on the Livescribe Online Store. - Page 77 Draw a horizontal line on your notebook (starting from right or left) and without removing your smartpen tip from the page, immediately double back on the line ending close to where you started. Immediately write the name of the target application above the line.
-
Page 78: Using The Paper Replay™ Application
Whenever you turn on the Livescribe smartpen, it captures a digital copy of your notes, whether or not you also choose to record audio. -
Page 79: Recording Sessions
While your smartpen is recording, you will see an incrementing timer on your display. After you initiate a recording, you can use other applications on the Livescribe smartpen, such as the Calculator. A blinking Record icon will appear in the bottom right corner of your display to indicate that recording is still in progress. -
Page 80: Starting Recording Using A Nav Plus
Press and hold the Power button for approximately five seconds until the display indicates that the recording started. If your smartpen is off, press and hold the Power button until the start sequence and the word “REC…” appear on the display. Also, if you write on Livescribe™ dot paper after starting recording with Quick Record, your smartpen will link your notes and audio. -
Page 81: Stopping A Recording Or A Session Playback
Tap the Stop button on the bottom of your notebook. • Turn Power off. • Use the Nav Plus label to stop recording. During recording, single-tap the center of the Nav Plus. Your smartpen will display Stop Session. Livescribe™ Smartpen User Guide... -
Page 82: Pausing/Resuming A Recording Or Session Playback
Paused during Recording While your smartpen is paused, it will continue to capture a copy of your digital notes. Any notes that you write after you tap pause are linked to the audio that occurred the moment before you tapped Pause. -
Page 83: Play A Session By Tapping On Your Notes
Tap any note of the notes you wrote while you recorded using the Paper Replay™ application. The recorded audio will play back from the moment the notes were taken. During playback, your smartpen display will indicate the current position in the recording and the time remaining in your recording. - Page 84 Double-tap the center of the Nav Plus to reach your smartpen Main Menu. Tap down until Paper Replay™is displayed. Tap right to select the Paper Replay™ application menu. The first item in the list is Record new session. Tap down to locate Play Session. Livescribe™ Smartpen User Guide...
-
Page 85: Controlling Session Playback
Controlling Session Playback There are various ways that you can control the playback of an audio file on your smartpen and quickly locate any section of the audio file. All of the controls mentioned below are available on the bottom of each page of your notebook. -
Page 86: Jumping Forward And Backward
To speed up the audio from normal speed, tap the Speed Up Audio button. Tap repeatedly to keep increasing the playback speed. • To return to normal speed—the speed at which the audio was recorded—tap the Normal Audio Speed button. Livescribe™ Smartpen User Guide... -
Page 87: Setting Session Bookmarks
Reviewing Bookmarks After you have added bookmarks to an audio session, you can scan through the bookmarks using the Previous and Next bookmark buttons. During playback, your smartpen display will indicate the bookmarks in the audio timeline. Livescribe™ Smartpen User Guide... -
Page 88: Recording Paperless (Audio Only) Sessions
Recording Paperless (Audio Only) Sessions Recording Paperless (Audio Only) Sessions If you want to record audio but cannot or do not want to write on Livescribe™ dot paper, you can create a paperless or pageless Paper Replay™ session. OTES •... -
Page 89: Annotating - Linking Notes To Pre-Recorded Sessions
Annotating - Linking Notes to Pre-Recorded Sessions If recording the paperless session was the last action you took with the Livescribe smartpen, you can also access the session by tapping on the 0% point of the paper control position bar. -
Page 90: Browsing Paper Replay™ Sessions
Double-tap the center of the Nav Plus to go to the Main Menu. Tap down to scroll through the applications on your smartpen until Paper Replay™ is displayed. Tap right to launch the Paper Replay™ application menu. Record new session will be the first item. - Page 91 June 03, 2008, at 12:22PM, it will be named and dis- played as 06.03.08 12:22p. Your smartpen displays Paper Replay™ sessions in the order of the most recent with paperless sessions coming before regular sessions.
-
Page 92: Deleting Paper Replay™ Sessions
Deleting Paper Replay™ Sessions Deleting Paper Replay™ Sessions If you wish to delete sessions from your smartpen for any reason, such as managing storage, we recommend that you transfer your notes to Livescribe Desktop and then delete Paper Replay™ sessions from your smartpen. - Page 93 Deleting Paper Replay™ Sessions Double-tap on the Nav Plus to go to the Main Menu. Tap down to scroll through the applications on your smartpen until Paper Replay™is displayed. Tap right to launch Paper Replay. Tap down to locate Delete session from the menu.
- Page 94 Tap right to browse sessions. Tap down to scroll through a list of sessions. Locate the session to delete and tap right to select it. Tap right to confirm deletion. Your smartpen will indicate that the session is deleted. Livescribe™ Smartpen User Guide...
-
Page 95: Using The Delete Current Session Shortcut
Paper Replay™. Paper Replay™will continue audio recording in the background However, your smartpen will not link your notes to the audio while the other application is running. This is because the new application receives your smartpen input (ink and strokes). The newly-launched application has the focus of the Livescribe smartpen, and has control of your display and audio output. -
Page 96: Paper Replay Password
Paper Replay™ application using the Nav Plus. • Do not write or tap anything with your smartpen for five seconds. Your smartpen display will indicate background recording is in effect with a blinking recording dot in the lower right-hand corner of your display. MPORTANT... - Page 97 When you are finished entering your password, tap right on the Nav Plus. Your smartpen will confirm the password is set. After setting your password, your smartpen will prompt you each time you try to play back a session.
- Page 98 You can also cancel password protection and remove your Paper Replay password using Livescribe Desktop. This is useful if you forget your password and need to regain access to your Paper Replay sessions. The Livescribe Desktop you use to cancel the password must be registered to the same account as your smartpen.
-
Page 99: Additional Applications
Additional Applications In addition to Paper Replay, your Livescribe smartpen includes other applications, including: • Printed Calculator. See Using the Printed Calculator on page • Translator Demo. See Using the Translator Demo on page • Piano. See Using the Piano on page You can also purchase additional applications from the Livescribe Online Store. -
Page 100: Basic Math Functions
A stylus is available for purchase from the Livescribe web store. Use the stylus instead of an ink cartridge to keep your calculator free and clear of ink marks. For information on using the stylus, please see Using a 3-D Recording Headset on page Basic Math Functions The calculator displays results and accepts input of numbers up to a length of 11 characters. -
Page 101: Using Scientific Functions
You can store numbers in the memory register. When a value is present in memory an M indicator appears. When the value in memory changes, the indicator on your smartpen display blinks. When the value in memory is zero, the memory indicator disappears. -
Page 102: Using The Translator Demo
With the Translator Demo, you can translate a small set of words and the numbers zero to nine from English into Spanish, Swedish, Arabic, or Mandarin. By writing a word in English in your notebook, you can see and hear correct translation from the Livescribe smartpen. Translator Demo Word List Here are the words currently defined for the Translator Demo: •... - Page 103 Using your Written Word as a Button. See Re-Launching Translator Demo on page • You can also launch Translator Demo using Quick Launch (see Using Quick Commands on page 53) or Launch Line (see Launch Line and Tap Around on page 67). Livescribe™ Smartpen User Guide...
-
Page 104: Launching Translator Demo From The Nav Plus
Double-tap the center of a Nav Plus to get to the Main Menu. Tap down to scroll to the Translator Demo. Tap right to launch the Translator Demo menu. Tap down to scroll through available languages. Livescribe™ Smartpen User Guide... -
Page 105: Re-Launching Translator Demo
Using the Translator Demo Tap right to select a language. When your smartpen displays a language on its display, the translator demo is automatically switched into that mode, whether or not you tap right. Write a word to translate. You can write in upper- or lower-case letters. - Page 106 Translator Demo. Tap down to scroll through available languages. Tap right to select a language. When your smartpen displays a language on its display, the translator demo is automatically switched into that mode, whether or not you tap right.
-
Page 107: Using The Piano
Using the Piano Using the Piano With Piano, you can draw a piano on your dotted paper and play music with the Livescribe smartpen. You can change the sound of your piano, add rhythm tracks, and add sharp and flat notes. -
Page 108: Drawing A Piano
Using the Piano Drawing a Piano From left to right, draw 9 parallel vertical lines. The Livescribe smartpen display will display a blinking line to indicate which line you should draw next. Connect the 9 parallel lines with horizontal lines at the top and bottom. - Page 109 Next, add sharps and flats to your piano keyboard. After setting the instrument and rhythm buttons, tap left on the Nav Plus. The Livescribe will display Rhythms OFF. Tap down to reach Add Sharps & Flats. Tap right to activate Add Sharps & Flats.
- Page 110 Rhythm Track on page 102. A stylus is available for purchase from the Livescribe web store. You can use the stylus on your piano, rather than the ink cartridge. This will keep the paper free and clear of ink marks. For...
-
Page 111: Choosing An Instrument (Piano Sound)
• Celeste Tap on your piano keyboard to select a sound. The first letter of the instrument you want to play shows on the Livescribe smartpen display. Choosing a Background Rhythm Track • Tap the “r” rhythm track button repeatedly to scroll through the available background rhythm tracks. -
Page 112: Getting New Applications
Livescribe smartpen. Visit the store regularly to check for new updates. After you download a new application, you can use Livescribe™ Desktop and add it to any Livescribe smartpen registered to your Livescribe account. - Page 113 Getting New Applications To launch a purchased application on your smartpen: Double-tap the center of a Nav Plus to get to the Main Menu. Tap down to scroll to the Applications menu. Tap right to view the first of your purchased applications.
- Page 114 Getting New Applications Tap right to launch the application. You can also launch the application using Quick Launch or Launch Line. See Launching Applications with a Quick Command on page 54 Launch Line and Tap Around on page Livescribe™ Smartpen User Guide...
-
Page 115: Livescribe™ Desktop And Livescribe™ Online
Livescribe™ Desktop is software you install on your computer to store and access the Livescribe smartpen content. With Livescribe Desktop you can search and review your written notes and listen to your recorded audio. You can also export your notes and recorded audio and save them as Pencasts and save them as files on your computer to share with others. -
Page 116: Working With Dot Paper Products
Livescribe™ dot paper products sometimes re-use dot pattern. As a general rule, do not use Livescribe™ dot paper products with the same dot pattern at the same time. This prevents a potential problem that can happen when viewing your notebooks in Livescribe™ Desktop: when you write in two notebooks with the same pattern, your notes from the second notebook will be superimposed on your notes from the first notebook when you view them in Livescribe™... -
Page 117: Checking Paper Product Usage
Checking Paper Product Usage Each Livescribe™ dot paper product has a Notebook Status Label. Using the Notebook Status Label is the best way to tell if you are currently using a Livescribe™ dot paper product that has the same dot pattern. -
Page 118: Using Notebooks With Same Names And Numbers
If you own two Livescribe™ dot paper products with the same Group and Number (such as two Lined Notebook 2 paper products), you should follow these guidelines: • Use only one of the Livescribe™ dot paper products at a time. Do not use the two paper products at the same time. •... -
Page 119: Archiving Paper Products
Frees up storage space on your Livescribe smartpen • Enables you to use another Livescribe™ dot paper product that has the same dot pattern as the one you archived. Livescribe™ dot paper products with the same dot pattern have the same name. -
Page 120: Regulatory Information
The use of shielded I/O cables is required when connecting this equipment to any and all optional peripheral or host devices. Failure to do so may violate FCC rules. Shielded I/O cables are available for the Livescribe smartpen from Livescribe. Changes or modifications not covered in this Guide must be approved in writing by the manufacturer’s Regulatory Engineering Department. -
Page 121: Ce Declaration Of Conformity
7677 Oakport Street, 12th Floor Oakland, CA 94621 United States of America (510) 777-0771 This product was tested by Livescribe Inc. and found to comply with all the requirements of the EMC Directive 2004/108/EC and of the LVD Directive 2006/95/EC. Livescribe™ Smartpen User Guide... - Page 122 EN60950-1 and IEC 60950-1, Information technology equipment. Safety. ROHS Compliance Statement Livescribe has determined that this product complies with the requirements of the Restriction of Hazardous Substances (ROHS) directive 2002/95/EC and its amendments. For additional information, contact Livescribe at the address above.
-
Page 123: Description Of Esd
Even a small amount of ESD can harm circuitry, so when working with electronic devices, take measures to help protect your electronic devices, including your Livescribe smartpen, from ESD harm. While Livescribe has built protections against ESD into its products, ESD unfortunately exists and, unless neutralized, could build up to levels that could harm your equipment. -
Page 124: Warranty Information
Livescribe is that you take this precaution before connecting your smartpen to your computer, placing your smartpen in a cradle, or connecting it to any other device. You can do this in many ways, including the following: • Ground yourself when you are holding your mobile device by simultaneously touching a metal surface that is at earth ground. - Page 125 DAMAGES FOR LOSS OF PROFITS, LOSS OF DATA, BUSINESS INTERRUPTION OR ANY OTHER COMMERCIAL DAMAGES OR LOSSES, ARISING OUT OF OR RELATED TO YOUR USE OR INABILITY TO USE THE LIVESCRIBE DESKTOP SOFTWARE, LIVESCRIBE SMARTPEN, OR SERVICES, HOWEVER CAUSED, REGARDLESS OF THE THEORY OF LIABILITY (CONTRACT,...
- Page 126 TORT OR OTHERWISE) AND EVEN IF LIVESCRIBE HAS BEEN ADVISED OF THE POSSIBILITY OF SUCH DAMAGES. IN NO EVENT SHALL LIVESCRIBE'S TOTAL LIABILITY TO YOU FOR ALL DAMAGES (OTHER THAN AS MAY BE REQUIRED BY APPLICABLE LAW IN CASES INVOLVING PERSONAL INJURY) EXCEED THE AMOUNT OF FIFTY DOLLARS ($50.00).
-
Page 127: Product Safety And Maintenance
It is also essential that you take proper care of the Livescribe smartpen to ensure its durability. Here are our guidelines: • Do not drop your smartpen or allow any other kind of strong impact, which can severely damage it or prevent it from working properly. •... - Page 128 • The included Micro USB cable or any standard Micro USB cable for the Echo smartpen. ARNING O NOT ATTEMPT TO DO ANY REPAIRS YOURSELF O NOT ATTEMPT TO OPEN THE IVESCRIBE SMARTPEN DISASSEMBLE IT REMOVE THE BATTERY OR ATTEMPT TO REPLACE THE BATTERY YOURSELF...
-
Page 129: Frequently Asked Questions
Yes. Press and hold the smartpen power button until you see the recording timer appear on the display. When you are done recording simply turn off the smartpen. To play back the audio, go to the smartpen’s Main Menu, select Paper Replay™, and then select Play session. While you are playing back the audio, you can write down notes on dot paper and the audio will automatically link to your notes. -
Page 130: Smartpen Accessories
Custom Notebooks in the Library tab. In the Notebook Name dialog, type in a name for the new notebook. Click OK. Livescribe Desktop creates and opens the new notebook and places it in the Library tab under the heading Custom Notebooks. -
Page 131: What Can I Share
How do I share my pencasts as .pencast files? One way to share pencasts is to upload your smartpen content (audio, pages, or both) to your myLivescribe account on Livescribe Online. You can keep it private, share it with others, or share with the Livescribe community. -
Page 132: How Can I Share Pencasts Using A Mylivescribe Account
Access List, giving them permission to see your private pencasts, and then send them a link to view. The people on your Access List will be required to create a Livescribe account to view pencasts. -
Page 133: How Do I Share My Notes As A Pdf
How do I share my notes as a PDF? On Windows: In Livescribe™ Desktop's Pages View, choose one or more pages you want to share. Click the Share button on Main Toolbar. Using the cascading menus, select the type of data you want to share and how to share it. Your options are to share: •... -
Page 134: How Do I Get The Latest Software Updates
How do I print my own dot paper? To print your own dot paper, you need to have Livescribe Desktop version 2.0 or later and an Adobe PostScript-compatible color laser printer with a print resolution of 600 dpi or greater. -
Page 135: Can I Change The Date And Time Format
Can I change the date and time format? Yes. You can set your smartpen to display the time in 12- or 24-hour format, and the date in any of several formats. You can find format options on your smartpen under: Main Menu> Settings> Time Format or Main Menu>... -
Page 136: Quick Launch (Jump To An Application And Quickly Launch It)
Keep your recorded Paper Replay™ sessions private. To set up Paper Replay Password protection: Power on your smartpen. Go to the Main Menu by tapping the center of the Nav Plus at the bottom of your Livescribe Dot Paper. Tap down to Paper Replay. - Page 137 Paper Replay™ Password After setting your password, your smartpen will prompt you for your password each time you try to play back a session. Once you turn off password protection, all previously set passwords are permanently erased. Livescribe™ Smartpen User Guide...
-
Page 138: Glossary
By default, active ink is displayed as green in Livescribe™ Desktop. See inactive ink. archiving. The process of moving your notes and audio for a Livescribe™ dot paper product into an Archived Notebooks folder in the Navigation Pane. This process also deletes your notes (ink data) and audio from the Livescribe smartpen. - Page 139 Livescribe™ Desktop. See active ink ink. The markings of the Livescribe smartpen ballpoint on dot paper. See active ink and inactive ink. Launch Line. Launch Line is similar to Quick Launch. You can use Launch Line to quickly launch any Open Paper application installed on your smartpen.
- Page 140 Paper Replay Password. Paper Replay Password sets a password for your Paper Replay sessions. Setting a password can prevent others from listening to your recorded audio on your smartpen. PDF. A graphic file format that is used to export writings and drawings saved in Livescribe™ Desktop. ®...
- Page 141 Sessions (or Audio) view. Sessions presented in Livescribe™ Desktop as a list of files with details about each. Single-Page View (or mode). A view or mode in Livescribe™ Desktop in which a single page is displayed at a time. tap around. Tap around is a feature of Launch Line that is an alternate to using the Nav Plus to navigate menus of an application.
-
Page 142: Getting Help
Getting Help Livescribe Online Support On the Livescribe Support page you will find several ways to get answers to any questions you might have about your smartpen or other Livescribe™ products. To open the Livescribe Support page: • From a web browser, go to www.livescribe.com/support, or •... -
Page 143: User Guides And Release Notes
Forum Other Livescribe smartpen users may have found an answer to your question. Check the forums to post a question or browse similar questions and find responses that may help you. -
Page 144: Returning Livescribe Products
Save the data to your computer so you can send it to Customer Service if requested. Returning Livescribe Products If you need to return the Livescribe smartpen or other Livescribe product, follow the instructions below. Items Purchased Directly from Livescribe Items purchased directly from Livescribe will have the following return timeframe to qualify for a refund. - Page 145 Returning Livescribe Products conditions packaged with the products. Third-party software or products are not covered by Livescribe’s Limited Warranty. Livescribe™ Smartpen User Guide...
Need help?
Do you have a question about the Smartpen and is the answer not in the manual?
Questions and answers