Table of Contents
Advertisement
Advertisement
Table of Contents

Summary of Contents for LOOQS MB202
- Page 1 LOOQS MeeBox NAS MB202 User Guide...
- Page 2 Copyright | FCC Notice Copyright © 2009 RRC b.v. All rights reserved. MeeBox and LOOQS are trademarks of RRC bv. Other trademarks are the property of their resp. owners. Specifications subject to change without notice. This equipment has been tested and found to comply with the limits for a Class B digital device, pursuant to Part 15 of the FCC Rules.
-
Page 3: Table Of Contents
Table of Contents Part 1 - About Your MeeBox ................... 6 Safety Precautions ........................ 7 Specifications ......................... 8 What’s in the Box ........................9 Product Exterior ........................10 Front .............................. 10 Rear ............................... 11 Note for Macintosh users ....................12 Part 2 - Setting Up Your MeeBox ................ - Page 4 Sharing a USB printer ......................31 Adding a shared printer to your computer ............... 31 Printing to a shared printer ..................... 34 Managing users, groups, and shared folders ............. 35 Why create user accounts, groups, or additional shared folders? ......35 Creating, modifying, and deleting user accounts ............
- Page 5 Product Registration ......................63 Warranty ..........................64 Copyright ..........................67 Licensing ..........................68 Page 5 User Guide MeeBox NAS...
-
Page 6: Part 1 About Your Meebox
About Your MeeBox Part 1 Congratulations on acquiring your MeeBox NAS, the most versatile media server in the world. Before you begin using your new MeeBox, please read the following pages to familiarize yourself with important facts about the product. -
Page 7: Safety Precautions
Safety Precautions Please read these safety instructions and precautions carefully before using your MeeBox. Use a grounded electrical outlet. Place the server where there is good ventilation. There should be at least three inches of clearance on all four sides. ... -
Page 8: Specifications
Specifications Product name: LOOQS MeeBox NAS MB202 Storage: One or two 3.5" SATA hard disk drives Processor: 300-MHz ARM9 32-bit RISC CPU w/ 24KB L1 cache Memory: 128 MB DDR SDRAM / 16 MB Flash ROM Network interface: Gigabit Ethernet Expansion ports: 2 x USB 2.0 (support drives, printers, memory card readers) -
Page 9: What's In The Box
What’s in the Box MeeBox media server AC adapter power cord Ethernet cable Mounting screws for second internal drive (except two-drive models) Setup CD User Guide Quick Start Guide Page 9 User Guide MeeBox NAS... -
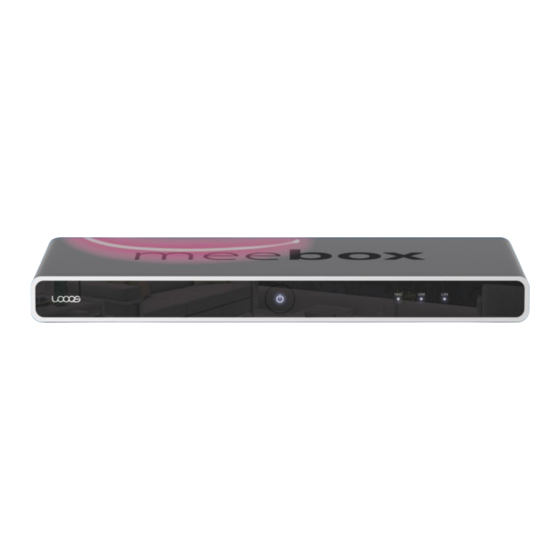
Page 10: Product Exterior
Product Exterior Front Power Button Press to turn your MeeBox on. Press and hold for at least one second to turn your MeeBox off. HDD Activity Indicator Blinks when the internal hard drive is being accessed. USB Status Indicator Lights up when a USB device is attached. -
Page 11: Rear
Rear Network Port Connect a cable to your router here. Factory Reset Button Using a thin object such as a straigtened paper clip, push this to reset all settings to factory defaults. USB 2.0 Ports Connect external USB drives, memory card readers, and/or a USB printer here. -
Page 12: Note For Macintosh Users
Note for Macintosh users Important! When accessing your MeeBox’s admin interface or web applications from a Mac OS X computer, the hostname you use is slightly different from the one used on Windows. Throughout this user guide, wherever the instructions refer to the hostname MeeBox, please substitute the hostname MeeBox.local. -
Page 13: Part 2 Setting Up Your Meebox
Setting Up Your MeeBox Part 2 Setting up your MeeBox is easy. The following pages will get you up and running in a jiffy. -
Page 14: Connecting And Turning On Your Meebox
Connecting and turning on your MeeBox In order for the computers on your network to access your MeeBox, the MeeBox must be connected by Ethernet cable to your network router. The router can be a wireless router, but your MeeBox must connect to it through an Ethernet cable. Using the supplied Ethernet cable (or another that is rated at least Category 5), plug one end of the cable into the network port on your MeeBox and the other end into an available LAN port on your router. -
Page 15: Performing Initial Setup
Performing initial setup If you have a Windows computer on the same network as your MeeBox, you can use the Setup Wizard to perform initial setup of the MeeBox. Otherwise, you will use the browser- based admin interface. (You can use the browser-based interface on Windows, too.) Using the Setup Wizard (Windows only) The MeeBox Setup Wizard is a Windows application that facilitates configuring the MeeBox’s IP address and a few other settings before you start using your MeeBox. -
Page 16: Using The Browser-Based Admin Interface (All Operating Systems)
Next, decide whether you want to have your MeeBox obtain an IP address automatically from your router, or use a static IP address that you specify. Select the appropriate option button. If you choose to use a static IP address, enter the IP address, subnet mask, gateway address, and DNS server address in the provided boxes. - Page 17 5. Decide whether you want to have your MeeBox obtain an IP address automatically from your router, or use a static IP address that you specify. Choose the appropriate selection under LAN mode. 6. If you choose to use a static IP address, enter the IP address, subnet mask, gateway address, and DNS server addresses in the provided boxes.
-
Page 18: Adding User Accounts
Adding user accounts If you will be sharing your MeeBox with others, you should consider creating an account for each user. This lets you control how much disk space each user can use and which shared folders each user can access. 1. -
Page 19: Part 3 Using Your Meebox
Using Your MeeBox Part 3 Your MeeBox offers a wealth of functionality. This chapter will help you get the most out of the product. -
Page 20: Using Your Meebox As A Upnp Media Server
Your MeeBox can stream media files (video, audio, or photos), wirelessly or through Ethernet, to any UPnP-AV compliant media player or digital media adapter that is on your local network. Examples of UPnP-AV media players or adapters include LOOQS MeeCeiver, LOOQS MeeFrame, XBMC Media Center, and Windows Media Player (running on Windows Vista or Windows 7). -
Page 21: Managing The Media Server
1. On the Start menu, click Run. The Run dialog box opens. 2. Type \\meebox and press Enter. 3. Double-click the public folder. If you are prompted for login credentials, enter your MeeBox username and password. 4. Double-click the media folder. Copy media files into this folder or one of its subfolders. Managing the media server You can manage various aspects of the UPnP media server through its browser-based management interface. -
Page 22: Understanding Scan Options
4. Set the following options as shown (see Figure 4): Scan mode: Timed Scan level: Basic Recursive: (selected) Include hidden files/directories: (unselected) Scan interval: 300 5. Click Set. The selected folder will be immediately scanned for media files. Stopping a folder from being scanned 1. -
Page 23: Enabling/Disabling The Media Server
Timed: The folder will be scanned at regular intervals determined by the Scan interval setting. Inotify: This option is not used. Scan level Basic: Files are scanned for metadata (such as ID3 tags in MP3 files) only once, when first added to the database. - Page 24 To re-enable the media server, repeat the steps above, but select the check box under Enable UPnP media server. Page 24 User Guide MeeBox NAS...
-
Page 25: Using Your Meebox As An Itunes Server
Using your MeeBox as an iTunes server Your MeeBox can function as an iTunes server. This lets iTunes-equipped computers on the MeeBox’s network play music that is stored on the MeeBox. The music is streamed from your MeeBox to the iTunes software on the computer. When the iTunes server on your MeeBox is enabled, the music collection on the MeeBox will appear in iTunes as a shared library with the name meebox_music_box. -
Page 26: Using Your Meebox As A Network Storage Device
Using your MeeBox as a network storage device As a network-attached storage device, or NAS, your MeeBox can provide both shared and private storage space to all the users on your network. Storage space on your MeeBox is organized into two kinds of folders: private folders and shared folders. -
Page 27: Accessing A Share In Windows
Accessing a share in Windows To access a specific share directly, enter a network address in the form: \\meebox\share_name where share_name is the name of the shared or private folder you want to access. For example, to access the public shared folder, you would enter \\meebox\public. You will be prompted to enter a username and password, unless you have previously instructed If you are unable to access shares on your MeeBox from a Windows PC, you may need to... -
Page 28: Mapping A Share To A Drive Letter (Windows Only)
Mapping a share to a drive letter (Windows only) On a Windows PC, you can assign a drive letter to a specific share on your MeeBox, so that you can access the share more conveniently in the future. (This is called network drive mapping.) After assigning a drive letter to a share, you can access the share any time by simply clicking the network drive in Windows Explorer, even after restarting your computer. -
Page 29: Using External Storage Devices
Using external storage devices You can connect various kinds of external storage devices to your MeeBox—either temporarily, in order to copy files to the server (from a USB thumb drive, for example); or more permanently, in order to add storage space beyond that of the server’s internal hard drive. - Page 30 If you have a multi-format card reader, please use it with only one memory card at a time. If you connect a card reader to your MeeBox with more than one card inserted, the server will only recognize one of the cards. Note ...
-
Page 31: Sharing A Usb Printer
Sharing a USB printer If you connect a compatible USB printer to one of your MeeBox’s three USB 2.0 ports, you can use it from any computer on the server’s local network. Most standard USB printers are compatible, although ―bidirectional‖ features such as reporting ink levels are not supported. - Page 32 Adding a shared printer using a TCP/IP port 1. On the Start menu, click Run. The Run dialog box opens. 2. Type control printers and press Enter. The Printers and Faxes window opens. 3. Click Add a printer or double-click the Add Printer icon. The Add Printer Wizard dialog box opens.
- Page 33 Adding a shared printer as a network printer 1. On the Start menu, click Run. The Run dialog box opens. 2. Type control printers and press Enter. The Printers and Faxes window opens. 3. Click Add a printer or double-click the Add Printer icon. The Add Printer Wizard dialog box opens.
-
Page 34: Printing To A Shared Printer
Printing to a shared printer Before using a printer that is shared through your MeeBox, make sure the printer is connected and turned on, and that your MeeBox is turned on. Then, simply print as if the printer were directly connected to your computer. For example, in a Windows application, select the shared printer in the Print dialog box and click Print. -
Page 35: Managing Users, Groups, And Shared Folders
Managing users, groups, and shared folders Why create user accounts, groups, or additional shared folders? Benefits of multiple user accounts There are two reasons to create different user accounts on your MeeBox: security and privacy. Multiple user accounts enhance security because they allow non-administrators to access shares on your MeeBox without being able to access the admin interface. -
Page 36: Creating, Modifying, And Deleting User Accounts
Creating, modifying, and deleting user accounts To create, modify, or delete a user account, open your MeeBox’s admin interface (http://meebox:8090) and click Advanced Settings > Management > Users & Groups > Users (see Figure 13). To create a user account 1. -
Page 37: Creating, Modifying, And Deleting Groups
Creating, modifying, and deleting groups To create, modify, or delete a group, open your MeeBox’s admin interface (http://meebox:8090) and click Management > Users & Groups > Groups (see Figure 14). To create a group Enter a name for the new group and click Save. To edit a group’s member list 1. - Page 38 3. To grant full access for a user or a group (or several of them), select the user(s) or group(s) in the No Access list box, and click << Writable. 4. To deny access for a user or a group (or several of them), select the user(s) or group(s) in the Allowed list box, and click Remove >>.
-
Page 39: Using The Bittorrent Client
Using the BitTorrent client Your MeeBox has a built-in BitTorrent client, a program that can download files from the popular BitTorrent peer-to-peer (P2P) file sharing network. The BitTorrent client’s user interface is part of your MeeBox’s admin interface. To access it, on a computer connected to your MeeBox, open a browser window and go to http://meebox:8090. - Page 40 3. Under Add Torrent, click Browse. In the Choose File dialog box, locate the .torrent file you downloaded on your computer and double-click it. 4. Click Add Torrent. The torrent will appear in the Torrent List. To start downloading it, click the Start button below the torrent name.
-
Page 41: Using The Web Photo Gallery Application
Using the web photo gallery application Your MeeBox includes a web photo gallery application called Gallery. You can use it to upload photos to your MeeBox, organize them into albums, and share them on the Web using your MeeBox’s built-in web server. To access Gallery, in your web browser, go to http://meebox:8090/, log in, and click Shared Photos. -
Page 42: Using Other Preinstalled Web Applications
Using other preinstalled web applications Your MeeBox comes with several free, open-source web applications already installed, so you can run a useful web site right out of the box. The preinstalled web applications are listed in the table below. Application Path Software Home Page Description... - Page 43 whose password is ―meebox‖. For those apps that require it, ―admin‖ is also the administrator. Instructions for working with these applications are beyond the scope of this user’s guide. You are encouraged to explore the apps on your own and to visit their respective home pages on the Internet for more information about them.
-
Page 44: Part 4 Advanced Topics
Advanced Topics Part 4... -
Page 45: Accessing Your Meebox Remotely
Accessing your MeeBox remotely If you set up your router to forward certain ports to your MeeBox, you can access your MeeBox’s files, and some of its services, from remote locations over the Internet. Setting up port forwarding on your router Before you can access your MeeBox NAS from the Internet, you must set up your router to forward certain ports to the MeeBox. -
Page 46: Using The Web File Browser
Using the web file browser Your MeeBox comes with a web-based file manager called Extplorer preinstalled on the hard drive. You can use Extplorer to work with files in your MeeBox’s public shared folder (\\meebox\public) from any computer with an Internet connection. To use Extplorer, go to http://ip_address/extplorer/ (where ip_address is your public IP address) and log in with username ―admin‖, password ―meebox‖. - Page 47 Enabling the FTP service 23. In your web browser, go to http://meebox:8090/, log in, and click MeeBox Settings. 24. Click Advanced Settings. 25. In the menu, click Apps & Services, then click File Server. 26. Under FTP Server Setting, select the Enable check box. 27.
-
Page 48: Accessing Files On Your Meebox Remotely Using Secure Ftp
Folder Name Folder Description ftp root +--ide3 user partition of first internal hard drive +--admin admin’s private folder +--gallery2data data storage for Gallery web application +--guest-share home folder of guest user +--htdocs web document root +--lost+found recovered files from disk repair operations +--public the “public”... - Page 49 Note When you connect to your MeeBox through SSH/SFTP for the first time, you may be prompted to save the server’s host key (or “fingerprint” or “signature”) on your computer. If so prompted, answer yes. Folders accessible through SFTP When you connect to your MeeBox through SFTP, you can navigate to any folder in the MeeBox’s entire file system.
-
Page 50: Setting Up A Website
Setting up a website Your MeeBox is a fully-functional Web server, with Apache HTTP Server, PHP, and MySQL software all preinstalled. The Web server is disabled by default. To enable it, open To see what versions of Apache HTTP Server, http://meebox:8090 in your Web browser, log in as admin, click MeeBox Settings, click PHP, and MySQL are installed on your Personal Features, select the Enable check box under Enable Web/Database server, and then click... -
Page 51: Editing Web Server Configuration Files
/mnt/ide3/htdocs +--extplorer +--gallery +--phpbb +--phpmyadmin +--wiki +--wordpress +--AppsInfo +--index.php +--mount_root The folders, indicated in boldface in the box above, contain the web applications that your MeeBox came preinstalled with. For example, wb contains the application files of Website Baker. The file index.php is the default index page, which redirects to Extplorer. Whatever website files you place directly in htdocs will be viewable on the Internet at a URL in the form http://public_ip_address/filename. -
Page 52: Adding A Second Internal Hard Drive
Adding a second internal hard drive Your MeeBox supports up to two internal SATA 3.5-inch hard drives. If your MeeBox shipped with one drive, you can add a second drive to either increase storage capacity or enhance data security (by making the second drive ―mirror‖ the first). You have three choices in how to use a second internal hard drive. -
Page 53: Verifying And Formatting The Second Hard Drive
14. Remove the four screws that secure the unused drive sled (near the middle of the bottom plate) and put them aside. The free drive sled will fall to the work surface. 15. Turn the MeeBox over again, top-up. 16. Attach the free drive sled to the bottom of your new hard drive using the four supplied screws. -
Page 54: Creating A Raid Array
is recommended that you use ext3 unless you have a specific reason to use another file system. If you intend to create a RAID array, you do not need to format the second drive at this time, since the system will automatically format both drives when you create the array. Creating a RAID array If you have two internal hard drives installed in your MeeBox, you can set up a RAID 0 (striping) or RAID 1 (mirroring) array. - Page 55 24. Select the desired file system for the new, combined volume. (Ext3 is recommended for enhanced data protection.) 25. Click Create RAID System. RAID creation will proceed in two phases. First, the system will perform initial RAID setup, and then it will automatically reboot. Once the MeeBox has finished rebooting, the system will format both hard drives to finish RAID creation.
-
Page 56: Managing Storage Devices
Managing storage devices Your MeeBox’s admin interface includes various ways to get information about its storage devices and to manage them. Storage reports display disk usage by volume and by user. The disk utility is used to format drives, scan them for errors, unmount and remount them, and view disk health statistics. -
Page 57: Managing A Raid Array
Each connected storage device is listed in the Disk Utility, along with some basic information about the device and buttons for available actions. For internal hard drives, you can: Format the drive to various file systems—FAT32, ext2, ext3, and XFS ... - Page 58 29. Note the drive designator just below the icon. If it is /dev/hdc, then the second drive is the one that has failed. If it is /dev/hdd, then the primary drive is the one that has failed. (The primary drive is the one that is connected to the longer SATA cable.) 30.
-
Page 59: Updating Your Meebox's Software
You can download the latest firmware or hard disk image (if any has been made available) from the Downloads section of the Support area of www.looqs.com. Installing a firmware update 32. In your web browser, go to http://meebox:8090/, log in, and click MeeBox Settings. - Page 60 Caution While firmware installation is in progress, do not navigate away from the firmware upgrade page or shut down your MeeBox until at least 20 minutes have passed. Interrupting the firmware installation process will render the MeeBox inoperable. Installing a disk image 36.
-
Page 61: Accessing Your Meebox's Command Line Interface
Accessing your MeeBox’s command line interface Although the browser-based administrative interface at http://meebox:8090 is your primary means of managing your MeeBox, the server also features a command line interface that you can use to perform tasks that cannot be done through the admin interface, such as deleting orphan folders left over when you remove user accounts or shares. -
Page 62: Executing Commands With Elevated Privileges
Accessing the CLI using Windows’s built-in telnet client 40. On the Start menu, click Run. The Run dialog box opens. 41. Type cmd and press Enter. A Windows command prompt window opens. 42. Type telnet MeeBox and press Enter. (If accessing the CLI remotely, substitute your public IP address for ―meebox‖.) 43. -
Page 63: Product Registration
We count on our customers’ feedback and suggestions in improving our products and services. Your input would be much appreciated. How to register your MeeBox: 1. Visit our corporate website at www.LOOQS.com. 2. Click on the ―Product Registration‖ link. 3. Fill out the product registration form online and submit. -
Page 64: Warranty
3. Warranty repairs must be carried out by authorized LOOQS Dealers or authorized LOOQS service centers. No re-imbursement will be made for repairs carried out by non LOOQS dealers and, any such repair work and damage to the products caused by such repair work will not be covered by this warranty. - Page 65 LIMITED WARRANTY AND LIABILITLY LOOQS provides a limited warranty for its Products only to the initial person or entity that originally purchased the Product from LOOQS or its authorized distributor or retailer. LOOQS warrants that every hardware portion of the Products will be free...
- Page 66 PRODUCT IS INSTALLED AND USED IN A MANNER NOT SPECIFIED OR DESCRIBED IN THE PRODUCT SPECIFICATIONS OR DESCRIPTION, THE PRODUCT HAS BEEN MODIFIED OR ALTERED IN ANY WAY BY ANY PARTY OTHER THAN LOOQS, OR THE FAILURE OF THE PRODUCT TO CONFORM TO ITS SPECIFICATIONS CAN BE ATTRIBUTED TO CAUSES THAT NOT THE RESPONSIBILITY OF LOOQS.
-
Page 67: Copyright
Copyright Copyright © 2009 LOOQS. All rights reserved. This user manual shall not be copied, stored in a search system, applied or transmitted in whole or in part in any form or method (electronically, mechanically, copy through photocopier, disk copy, or other methods) without an expressed permission from RRC BV in a form of a document. -
Page 68: Licensing
Licensing Supply of this product does not convey a license nor imply any right to distribute content created with this product in revenue-generating broadcast systems (terrestrial, satellite, cable and/or other distribution channels), streaming applications (via Internet, intranets and/or other networks), other content distribution systems (pay-audio or audio-on-demand applications and the like) or on physical media (compact discs, digital versatile discs, semiconductor chips, hard drives, memory cards and the like).
Need help?
Do you have a question about the MB202 and is the answer not in the manual?
Questions and answers