Table of Contents
Advertisement
Quick Links
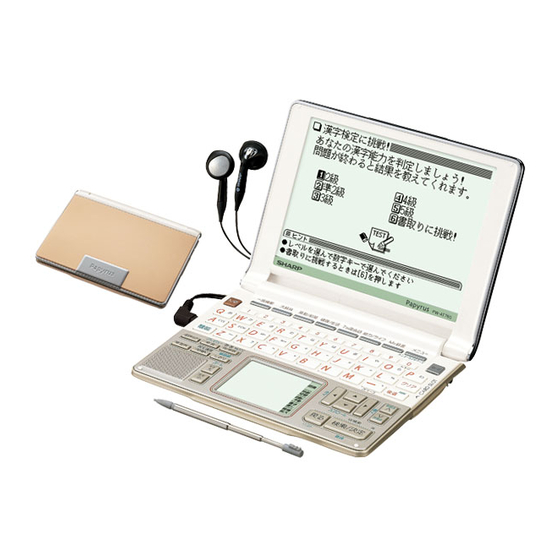
Layout
Display (Main display)
Global search key
(Searching through several
dictionaries is possible.)
Power on/off key
Earphone jack (side)
Function key
Volume control (side)
Utility keys for dictionaries
and functions
(S-jump, quick reference, example/note,
illustrations/diagrams/notes, audio, switch,
playback setting, bookmark, word list)
Speaker
Font size shift (zoom) keys
Using the PW-AT760 for the first time
Insert the batteries using the procedure below before using the
PW-AT760 for the first time.
To insert the batteries
1
Set the battery replacement switch on
the bottom of the unit to the "
" position.
2
Remove the battery cover as shown
in the diagram.
3
Insert the batteries included with the
unit.
Make sure the battery polarity is correct.
• Insert the batteries over the ribbon
tab being sure not to cover the end
of the tab.
4
Replace the battery cover as shown in
the diagram.
5
Set the battery replacement switch to
the "
" position.
6
Open the unit and press
to turn
the power on.
The calibration screen
for the handwriting pad
appears.
Main display
Handwriting pad
ELECTRONIC DICTIONARY
PW-AT760
QUICK REFERENCE
Dictionary/function selection keys
Menu (Menu customize) key
Stylus holder (side)
Card key
Clear key
Back space (delete) key
Card slot (side)
Cursor keys
Page scroll keys
Escape key
Search/enter (store) key
Handwriting pad
• If the power cannot be turned on:
• Make sure the battery replacement switch is in the "
" position, then press
again.
• If the power still cannot be switched on, try performing steps
1 through 6 in the above procedure again.
7
Pull out the stylus, extend it, and use it to accurately touch the
center of the "+" character displayed on the handwriting pad.
back of the unit
• Touch the center of "+" as it appears in four different locations.
The LCD contrast adjustment screen appears.
8
Adjust the LCD contrast of the main display using
and
(
).
9
The LCD contrast of the handwriting pad can be adjusted by
touching
and
displayed on the pad.
10
When done, press
.
The key sound (beep) on/off screen appears.
11
Select
or
to turn the key sound on/off.
Kana input screen appears.
12
Press
to select alphabet character input or press
Japanese input.
Using the handwriting pad
Parts and functions
The handwriting pad is set to enter characters when the cursor is in
any part of the character entry area.
Single-frame pad
Automatic/manual
recognition indicator
{
Character entry type indicator
button
Dual-frame pad
Entry display area
Candidate list display area
Automatic/manual
recognition indicator
Character entry type indicator
button
Entering characters using the single-frame pad
Example: Enter a Japanese word "
Japanese-English dictionary.
1
Press
.
The entry/selection screen of
with the cursor placed over the spelling entry area.
5
Likewise, enter "
" in the entry area.
When you start drawing, the previous entry is confirmed then
erased.
Entering characters using the dual-frame pad
Example: Enter "
1
Press
.
2
Press
to switch to the dual-frame pad.
dotted
frame
(
)
3
Use the stylus to draw "
" on the thick-framed (undotted)
writing area.
Upon completion of each entry, the positions
of these two areas switch automatically. The
dotted-framed side cannot accept entries.
• To have the dictionary recognize the entry
immediately, touch
to select
The handwriting pad is set to the English character entry mode.
• If the dual-frame pad is displayed, press
the single-frame pad.
2
Candidate list display area
Press
to move the cursor to the Japanese entry area.
button
The handwriting pad is now switched to enter kanji and kana.
button
button
button
button
Writing area (frame)
3
Use the stylus to draw "
The character shown in the candidate list display area is also
button
placed in the entry area so that the dictionary search can proceed.
button
button
button
button
button
4
If the character in the entry area is not the one you desired, use
Writing area (frames)
the stylus to touch and select the desired character in the list.
The character in the entry area changes.
" in the
• If you cannot find the character in the list, touch
&
appears,
to erase it and reenter it on the pad.
4
If a character is recognized incorrectly, use the stylus to touch
the character. In the candidate display area, find and touch the
character to replace it with.
The character in the entry display area is
replaced with the character selected in the
candidate display.
5
Likewise, repeat the above steps 3 – 4 to enter "
" in
.
Up to 6 characters
can be accomodated.
For longer words, enter up to six characters, then touch
transfer the entries to the content's entry field.
6
When done entering, touch
the content's entry field.
You can then proceed with the
dictionary search.
on the pad.
to switch to
" on the handwriting pad.
or press
" and "
".
to
to transfer the characters to
Advertisement
Table of Contents

Related Manuals for Sharp PW-AT760


Summary of Contents for Sharp PW-AT760
-
Page 1: Quick Reference
Handwriting pad with the cursor placed over the spelling entry area. Font size shift (zoom) keys Using the PW-AT760 for the first time If a character is recognized incorrectly, use the stylus to touch Likewise, enter “ ” in the entry area. - Page 2 • To return to the previous display, press an English word or the word indicated by the jump mark using and skip the Japanese. • To select a Japanese word, you must first mark the start and end points. SHARP CORPORATION...
Need help?
Do you have a question about the PW-AT760 and is the answer not in the manual?
Questions and answers