Table of Contents
Advertisement
Advertisement
Table of Contents

Related Manuals for Sangean ATS-909X


Summary of Contents for Sangean ATS-909X
- Page 1 ATS-909X Version 1...
-
Page 2: Important Safety Instructions
Important safety instructions 1. Read and understand all safety and operating instructions before the radio is operated. 2. Retain instruction: The safety and operating instructions should be retained for future reference. 3. Heed warnings. All warnings on the appliance and operating instructions should be followed. - Page 3 9. Power sources: The radio should be operated only from the type of power source indicated on the marking label. If you are not sure of the type of power supply to your home, consult your radio dealer or power company. 10.
- Page 4 15. Never push objects of any kind into this radio through opening as they may touch dangerous voltage points or short-out parts that could result in a fire or electric shock. Never spill liquid of any kind or products. 16. The appliance should be serviced by qualified service personnel when: A.
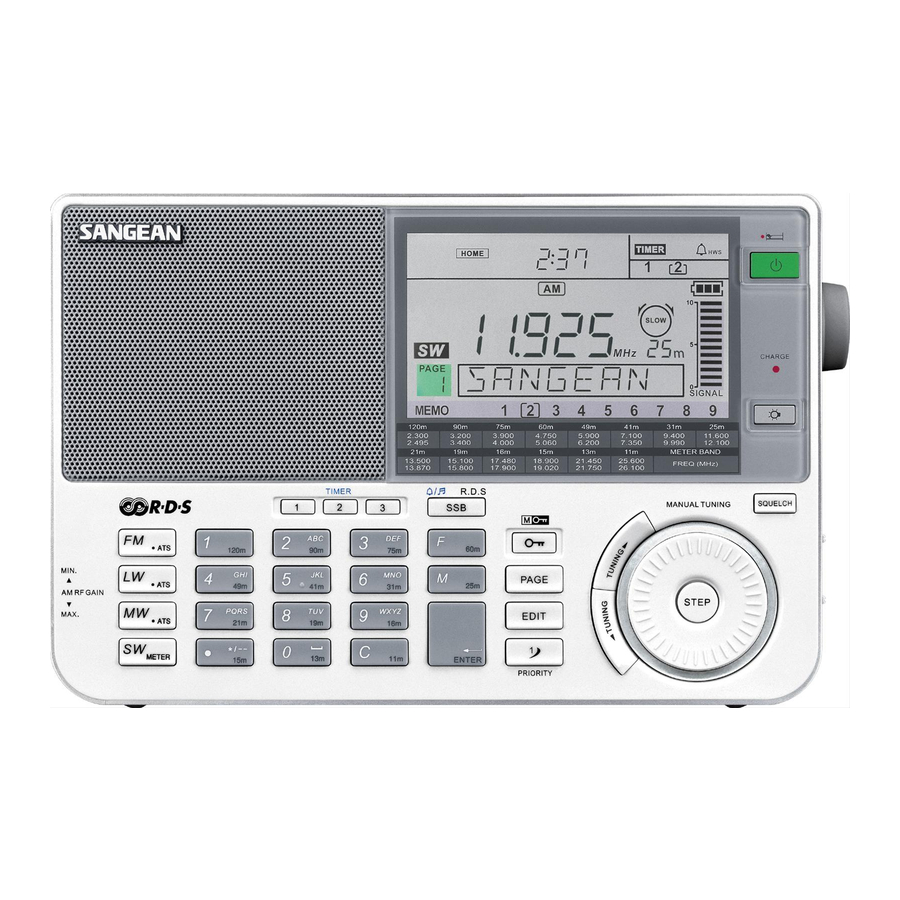
- Page 5 Introduction The Sangean ATS-909X world band synthesized receiver provides the following range of features: Radio for FM/LW/MW/SW broadcasts 406 radio station presets (FM 3 pages: 27 presets / LW 1 page: 9 presets / MW 2 pages: 18 presets /...
- Page 6 Controls Time Set Daylight Saving Time Switch Home / World Time Selection Loudspeaker Freq – Allows direct frequency input Single Side Band (SSB) / RDS / Alarm mode LCD display Standby / Sleep timer LED charge indicator Backlight Squelch Rotary tuning knob – Edit characters selected / Frequency adjustment / Home-world city selection / SW page selection Step –...
- Page 7 AM RF gain – Adjusts level of incoming signal to prevent overload AM Ext. Ant – Jack for external AM antenna Aux-in socket Rec. standby – Turn-on for external recorder Line out – Audio output Headphone jack AC in 9V – Jack for 9V AC power adapter...
- Page 8 Controls Folding stand Telescopic antenna Battery compartment Volume control Time set – Selects auto or manual mode for time set Tone – Tone control (news, music, normal) Wide narrow – AM wide / narrow filter / FM mono stereo selector Alkaline / NiMH / NiCad rechargeable battery switch MW / AM tuning step switch (9 kHz / 10 kHz switch, 9 kHz for European MW)
- Page 10 Display icon Buttons locked Home / world time Daylight saving time RDS icon Time AM mode selection Snooze icon Sleep timer icon Timer Radio wake-up HWS buzzer wake-up Selected timer Squelch Battery level indicator Signal level SW meter band Frequency Digit for memory slot Text display Memory locked...
-
Page 12: Power Supply
When selecting a page of memory the ATS-909X will scan and select the memory preset for the strongest station. At certain times the strongest station may not be from the country/station of the page selected. -
Page 13: Changing Batteries
Slide battery cover back into place in direction of arrow until case snaps into place. Each time the ATS-909X is turned on the battery level indicator will remain. Batteries should be replaced when battery level drops or the level indicator flashes. - Page 14 USING EXTERNAL AC ADAPTER The ATS-909X can be used on AC by using the adapter included with this radio. When connected, the batteries within the radio will be automatically disconnected. SETTING THE CLOCK (REAL TIME) In keeping with world wide short wave protocol time is programmed on a 24 hour basis.
-
Page 15: Setting World Time
SETTING WORLD TIME The ATS-909X is programmed to provide the correct time for 42 cities worldwide. Each cities time is correct once your own city time zone is inserted into the system. Once you have inserted the correct time for your city as described previously push Home/World Time Selection button. -
Page 16: Edit Method
EDIT METHOD You may program the page name, preset station name and World/Home city name you desire. Press EDIT button and use Rotary Tuning Knob or the key pad to enter the first word of the name you desire. Then press the one of the Tuning Up/Down buttons to move the next word you desire. -
Page 17: Radio Operation
RADIO OPERATION The selection of radio bands FM/LW/MW/SW is made by selecting buttons 24-27. Button Band Frequency Range Wavelength 87.5 – 108 MHz / VHF/FM 76 – 108 MHz / 64 - 108 MHz 153 – 519 kHz / Long Wave 100 –... -
Page 18: Technical Data
100 – 519 kHz (European version) (Short Wave) 1.711 – 29.999MHz The ATS-909X is a continuously tunable receiver from 153 kHz – 29999 kHz (by manual tuning). This receiver is capable of receiving and tuning all the short wave bands and any stations in between. -
Page 19: Tuning Methods
TUNING METHODS This receiver offers 5 methods of frequency tuning: ATS-Auto Tuning This system automatically sets your memory presets based upon the signal strength of the received station Direct Tuning Frequency of desired station is entered into receiver using key pad on receiver Manual Tuning Station is selected by manually using Rotary Tuning Knob, or short press (under 0.5s) - Page 20 ATS – Automatic Tuning System The ATS-909X features an automatic tuning system that will quickly and automatically set all your memory presets on FM, LW and MW based upon the signal strength of the incoming stations. Among the many conveniences offered by this...
- Page 21 MANUAL TUNING (ROTARY TUNING) Manual Tuning is accomplished using the convenient Rotary Tuning Knob. The Step button is used to determine the tuning spread for each step of the Rotary Tuning Knob. Spread may be changing accordingly: Press and release the Step button to select the step in FAST or SLOW mode.
-
Page 22: Memory Tuning
MEMORY TUNING It is possible to preset up to 406 stations using the memory capability of the ATS-909X. Each 9 presets compromise 1 page. The SW band is capable of storing 39 pages or 351 preset stations (39 Pages x 9 Presets/Page): 27 Presets on FM (3 Pages x 9 Presets), 18 Presets on MW (2 Pages x 9 Presets) and 9 presets on LW. - Page 23 To Manually Set Memory on SW Band: Tune to station you would like to program into memory. Press Memo button, MEMO will flash in the LCD display. Select page desired by using the PAGE button and Rotary Tuning Knob. Display will flash and next available position on display will flash if an available position is available.
- Page 24 RECALLING A STATION IN MEMORY On LW, press ATS/LW button, then press any of the numbered buttons on the key pad. On MW/FM, press ATS/MW button or press ATS/FM button, select desired page by pressing PAGE button and then press any of the numbered button on the key pad.
- Page 25 EXCHANGING STATION POSITIONS IN MEMORY To move a station, in memory to another position recall station. Press Memo button, MEMO and position display will flash, press new position desired and a signal will be heard indicating the exchange has taken place and the positions have been swapped. SELECTING AN SW BAND To select an SW Band, press METER/SW button once and then press a second time.
- Page 26 Note: The SW meter Band ranges are indicated in a convenient chart below the LCD display. KEY PAD INPUT SHORT WAVE BAND FREQUENCY (MHz) 120m 2.300 – 2.495 90 m 3.200 – 3.400 75 m 3.900 – 4.000 FREQ 60 m 4.750 –...
- Page 27 PRIORITY BUTTON (Instant Priority) The PRIORITY button allows instant program and recall to your favorite station from any frequency across any band or receiving any mode by simply pressing one button. To program the Priority button for recall your favorite station, press Memo button, the MEMO will flash in the LCD display and then press PRIORITY button.
-
Page 28: Alarm Function
ALARM FUNCTION The ATS-909X has three timer circuits as indicated by TIMER buttons. The alarm functions may be set with the power on or off. To set the alarm, press one of the three TIMER buttons. The timer and button number will flash in the LCD display along with the icon indicating radio or buzzer for approximately 12 seconds. - Page 29 Note: When the buzzer alarm activates, the alarm will start softly and gradually increase in level. It will sound for 1 minute and silence for 1 minute in repetition for 30 minutes unless cancelled. The radio will sound non-stop at the selected time for up to 60 minutes for other radio alarm types.
-
Page 30: Snooze Function
SNOOZE FUNCTION The radio or buzzer alarm can be silenced for 5 minutes by pressing any button (except STANDBY/SLEEP or LCD DISPLAY LIGHT). This sequence can be repeated during the alarm period. The Snooze function is indicated with an icon in the display. -
Page 31: Rds Function
RDS FUNCTION The ATS-909X incorporates circuitry to receive FM stations transmitting an RDS (Radio Data System) signal. When receiving an RDS station the display will show the station call letters and if the RDS station is also transmitting a CT function (clock time) it will automatically correct the time every minute. - Page 32 SSB and transmit below 10 MHz generally use the lower side band (LSB) while amateur and commercial stations transmitting above 10 MHz generally use the USB. Your ATS-909X is equipped to receive all USB and LSB transmissions. To receive SSB stations: 1) Turn the set on.
-
Page 33: Daylight Saving Time
STEREO RECEPTION The ATS-909X is designed to receive FM stereo broadcasts with headphones connected to the stereo headphone jack. Switch FM STEREO/MONO must be placed in the stereo position. Stereo icon will appear in the LCD display if headphones are connected. -
Page 34: Operating Lock
Just connect the external audio and turn on the radio. Press the Aux in switch then you can play the external audio device with your ATS-909X now. Adjust the volume control on the radio as needed. MW /AM STEP In Europe and most other parts of the world set the switch to the... - Page 35 (Line-out) and a timer activation (Standby out) to control external recorder. The ATS-909X has 3 timers which can be set for radio alarm and can also trigger recording standby out to control external recorder as Sangean’s DAR-101. You can connect an external audio device to record or play the programs received by the ATS-909X.
-
Page 36: Line-Out Jack
1. LINE-OUT JACK The Line-out jack, is used to output the audio from the ATS-909X to another device such as a recorder, your home stereo, or some other units. To do this, you will need a 1/8" stereo patch cord. -
Page 37: Headphone Socket
It is used in conjunction with the Line-out jack. See your recorder’s instructions to determine if this function will work with your recorder. Note: The ATS-909X radio can trigger the above function for an hour. Note: If you don’t connect the standby out jack to your recorder for a timed recording, you may turn on your recorder to record manually. -
Page 38: Software Version
SOFTWARE VERSION The software display cannot be altered and is just for your reference. 1. Press and release the Standby button to ensure the radio is off. 2. Press and release the Enter selection button then the display shows your radio software information. RESET SWITCH The Reset Switch situated at the bottom of the receiver case will reset the Time and Microprocessor only. -
Page 39: Specification
Specification Power Requirements Batteries: 4 x UM3 (AA Size) External Power Supply: 9V AC 700mA / Negative Polarity Center Polarity Center Dimensions in inches: (W x H x D): 7 3/4 X 5 1/4 x 1 1/2 Weight in oz: 28 Circuit Features Speaker: 3”...