
Related Manuals for Jeep MEDIA CENTER 730N (RER)


Summary of Contents for Jeep MEDIA CENTER 730N (RER)
- Page 1 Navigation User’s Manual Navigation User’s Manual MEDIA CENTER 730N (RER) MEDIA CENTER 730N (RER)
- Page 2 USER AGREEMENT NOTICE: This device complies with Part 15 of the FCC Rules [and with RSS-210 of Industry Canada]. Operation is subject to the following two conditions: this device may not cause harmful interference, and this device must accept any interference received, including interference that may cause undesired operation.
- Page 3 Modifications not expressly approved by the radio following measures: - Increase the separation between manufacturer could void the user’s authority to operate the equipment and receiver. - Consult the dealer or an the equipment. experienced radio technician for help. NOTE: This equipment has been tested and found to Safety Information comply with the limits for a Class B digital device, Exposure to Radio Frequency Radiation...
- Page 4 The radio manufacturer believes the internal wireless NAVIGABLE MAP DATABASE, INCLUDING ASSOCI- radio is safe for use by consumers. The level of energy ATED COMPUTER SOFTWARE, MEDIA AND EX- emitted is far less than the electromagnetic energy emit- PLANATORY PRINTED DOCUMENTATION PUB- ted by wireless devices such as mobile phones.
- Page 5 amounts due to NAVTEQ and/or your supplier pursuant meant in (the national laws based on) the European to this Agreement or similar agreement(s) under which Software Directive, you shall grant NAVTEQ reasonable goods are provided to you. opportunity to provide said information on reasonable terms, including costs, to be determined by NAVTEQ.
- Page 6 Completeness existing on the date you acquired the increase the scope of the limited warranty described Database; these criteria are available from NAVTEQ at above. The limited warranty set forth in this Agreement your request. If the Database does not perform in accor- does not affect or prejudice any statutory legal rights that dance with this limited warranty, NAVTEQ will use you may have under the legal warranty against hidden...
- Page 7 event shall NAVTEQ be liable for any consequential or WARNINGS indirect damages, including without limitation, loss of The Database may contain inaccurate or incomplete revenue, data, or use, incurred by you or any third party information due to the passage of time, changing circum- arising out of your use of the Database, whether in an stances, sources used and the nature of collecting com- action in contract or tort or based on a warranty, even if...
- Page 8 GOVERNING LAW Gracenote MusicID Terms of Use This Agreement shall be governed by the laws of the This device contains software from Gracenote, Inc. of jurisdiction, in which you reside at the date of acquisition Emeryville, California (“Gracenote”). The software from of the Database.
- Page 9 You agree that your non-exclusive license to use the knowing anything about who you are. For more infor- Gracenote Data, the Gracenote Software, and Gracenote mation, see the web page for the Gracenote Privacy Servers will terminate if you violate these restrictions. If Policy for the Gracenote MusicID Service.
- Page 10 GRACENOTE DISCLAIMS ALL WARRANTIES EX- CD and music-related data from Gracenote, Inc., copy- PRESS OR IMPLIED, INCLUDING, BUT NOT LIMITED right © 2000-2007 Gracenote. Gracenote Software, copy- TO, IMPLIED WARRANTIES OF MERCHANTABILITY, right © 2000-2007 Gracenote. This product and service FITNESS FOR A PARTICULAR PURPOSE, TITLE, AND may practice one or more of the following U.S.
-
Page 12: Table Of Contents
NAVIGATION CONTENTS Safety Guidelines ..... . . 4 Steering Wheel Mounted Controls (If Equipped) ......13 Introduction . - Page 13 2 NAVIGATION Connect Bluetooth Phone ....19 Uconnect™ Multimedia (Remote Devices) ..71 Set Default Country ....21 iPod Mode (If Equipped) .
- Page 14 NAVIGATION 3 Route Guidance ..... 125 Software And Database Updates ..161 Navigation Options .
-
Page 15: Safety Guidelines
4 NAVIGATION • Glance at the screen only when necessary and safe to SAFETY GUIDELINES Ensure that all persons read this manual carefully before do so. If prolonged viewing of the screen is necessary, using the navigation system. It contains instructions on pull over at a safe location. - Page 16 NAVIGATION 5 • Make certain that the volume level of the system is set • The law in some states prohibits the Front Seat DVD to a level that still allows you to hear outside traffic Viewer. As a result, it may be disabled prior to delivery and emergency vehicles.
-
Page 17: Introduction
6 NAVIGATION INTRODUCTION Visit http://www.chrysler.com/en/owners/mygig/ for updates, additional information, compatible phones, etc. Warnings This manual contains WARNINGS against operating System Care procedures that could result in an accident or bodily Software Update injury. If you do not read the entire manual you may miss Both navigation data and Gracenote data are software important information. - Page 18 NAVIGATION 7 Driving is a complex activity that requires your full Any attached cable should be routed so that it will not attention. If you’re engaged in driving or any activity that apply any pressure to the connection. requires your full attention, we recommend that you not Do not use a USB device which will interfere with the use your radio navigation system.
- Page 19 8 NAVIGATION If necessary, use a lint-free cloth dampened with a GPS Navigation Antenna cleaning solution such as isopropyl alcohol or an isopro- The antenna for the navigation GPS system is mounted in pyl alcohol and water solution ratio of 50:50. Be sure to various locations (depending on the vehicle model) follow solvent...
- Page 20 NAVIGATION 9 Other Electronic Devices You may bring other electronic devices into your vehicle (e.g., PDA, iPod, laptop computer, etc.). Some of these devices may cause electromagnetic interference with the GPS. If a degradation in the navigation system is ob- served, turn the devices off, or keep them as far away from the GPS antenna as possible.
-
Page 21: General Handling
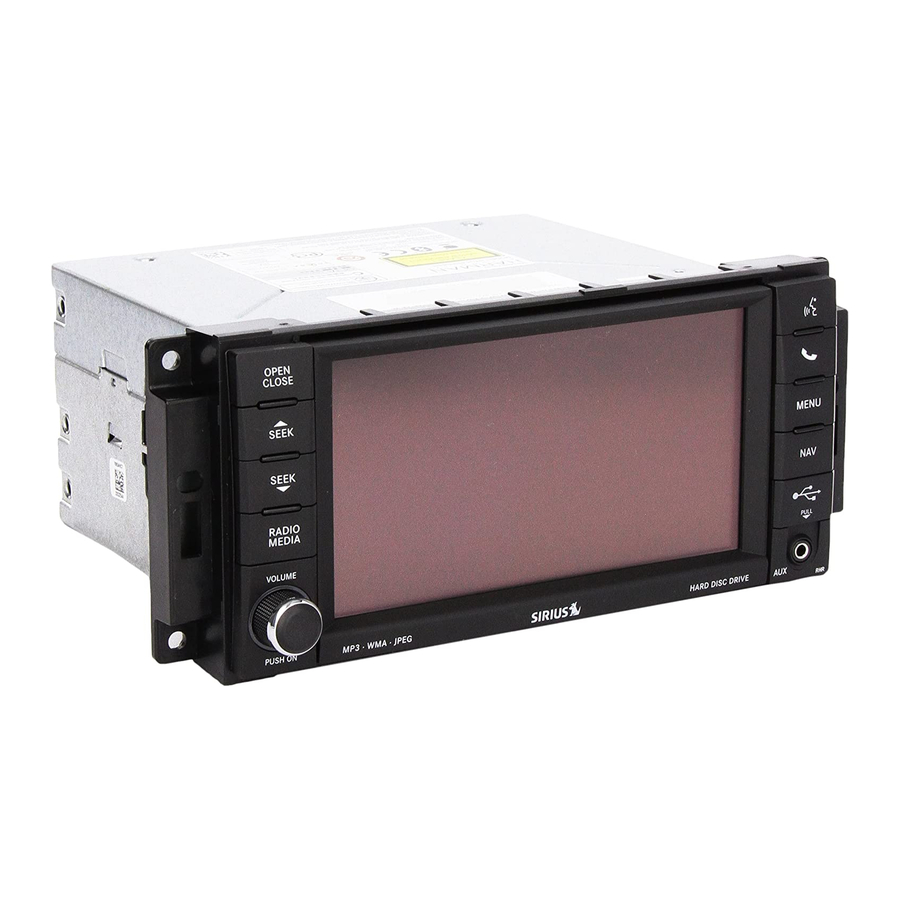
10 NAVIGATION GENERAL HANDLING Soft-Keys Soft-keys are accessible on the touch screen. User Interface Elements Hard-Keys Hard-keys are on the left and right side of the radio faceplate. (1) OPEN/CLOSE To open or close the display, press the OPEN CLOSE hard-key (1). - Page 22 NAVIGATION 11 • If a CD or DVD will not eject from the player when the (3) RADIO/MEDIA OPEN/CLOSE hard-key is pressed, the user can per- Press the RADIO/MEDIA hard-key (3) to toggle between form the following eject override procedure: RADIO and MEDIA mode.
- Page 23 12 NAVIGATION (5) Voice Command (7) MENU Press the Voice Command hard-key (5) Press the MENU hard-key (7) to access the system settings menu. and wait for the confirmation beep before you say a voice command. NOTE: Press the MENU hard-key in an active mode in order to change mode specific settings.
-
Page 24: Steering Wheel Mounted Controls (If Equipped)
NAVIGATION 13 (10) AUX Connector 1. The VOLUME rocker switch, located on the right, Connect an external audio device into the AUX Input (10) controls the volume of the sound system. Pressing the top (e.g., MP3 player, video-game), to play the device audio of the rocker switch will increase the volume and press- through the car audio system. -
Page 25: Audio Settings
14 NAVIGATION The following describes the operation of the SCROLL SIRIUS Backseat TV™ Operation switch in each mode: If equipped with a SIRIUS Backseat TV™, this control will function the same way as in SIRIUS Satellite Radio AM/FM/SAT Operation mode. Pressing the top of the rocker switch will seek up for the next available station and pressing the bottom of the The Voice Command button (if equipped) will have the... - Page 26 NAVIGATION 15 Audio Control Menu Press the MENU hard-key (7) on the right side of the radio. Then press the Audio Control soft-key to get to the audio control menu. Press the Equalizer soft-key and use either the arrow soft-keys or the sliders on the screen to adjust BASS, MID, and/or TREBLE.
-
Page 27: Getting Started
16 NAVIGATION GETTING STARTED Before using the navigation radio read and accept the disclaimer. The disclaimer will be activated after the NOTE: The ignition switch must be in the ON or ACC ignition is turned on. position to operate the navigation radio. Change the Language If the unit is off, switch it on using the ON/OFF Volume The navigation radio will conform to the vehicle lan-... -
Page 28: Set The Time
NAVIGATION 17 3. Press the Language soft-key and select a language. The time is automatically set by the GPS system for the time zone selected. Set the Time 2. Press the Set Time Zone soft-key to change to the 1. Press the Time Display soft-key in the lower left corner desired time zone. -
Page 29: Store Radio Presets
18 NAVIGATION It is possible to set the time manually (ahead or behind 3. Either press the SEEK up/down hard-keys, or touch actual GPS time), by pressing the USER CLOCK soft-key. the SCAN soft-key, DIRECT TUNE soft-key, or the left and right arrows to change the currently playing station. -
Page 30: Connect Bluetooth Phone
NAVIGATION 19 Connect Bluetooth Phone This menu lists all paired Bluetooth devices. 1. Press the MENU hard-key on the right side of the 4. Press the PAIR soft-key to start a new pairing. radio. 2. Then touch the System Setup soft-key to get to the System Setup menu. - Page 31 20 NAVIGATION 6. Enter any 4 Digit Security PIN and touch the PAIR 7. The pairing procedure starts. Refer to the user’s soft-key again. manual of your Bluetooth phone to complete the pro- cedure. 8. You will then be asked to set a priority for the paired phone.
-
Page 32: Set Default Country
NAVIGATION 21 Set Default Country Set Default State 1. Press the NAV hard-key on the right side of the radio. 1. Press the NAV hard-key on the right side of the radio. 2. Press the MENU hard-key. 2. Press the MENU hard-key. 3. -
Page 33: Enter Home Address
22 NAVIGATION Enter Home Address If no home address has been set, touch YES to access the Enter Home Address menu. 1. Press the NAV hard-key on the right side of the radio. If the radio does not display the NAV - Main Menu, press 3. - Page 34 NAVIGATION 23 NOTE: Read more about destination input and the predictive speller in the Navigation section of this manual. 5. Once the street name has been input, touch continue to confirm. 6. Enter the house number into the next screen. If more than one city has this address, you will then need to select your city from a list.
-
Page 35: Change Home Address
24 NAVIGATION Change Home Address 2. Touch the My Files soft-key. This procedure will allow you to change your Home 3. Touch the My Address Book soft-key. Address if one has already been entered. 1. Press the MENU hard-key. 4. Touch the Home soft-key. - Page 36 NAVIGATION 25 NOTE: If the State or Country needs to be changed, 5. Touch the Edit Contact soft-key. touch the appropriate soft-key to edit the setting. 6. Touch the Change Address soft-key. 8. Once the street name has been input, touch continue to confirm.
-
Page 37: Voice Command Tutorial
26 NAVIGATION Once the address is entered completely, the system shows Voice Command Tutorial a map of your home address area. When you press the Voice Command hard-key, you will hear a beep. The beep is your signal to give a command. Say TUTORIAL to listen to a Voice Command tutorial. -
Page 38: Uconnect™ Multimedia (Radio)
NAVIGATION 27 Uconnect™ Multimedia (RADIO) Satellite Radio Mode In order to receive satellite radio, the vehicle needs to be Radio Mode outside with a clear view to the sky. If the screen shows Overview Acquiring Signal, you might have to change the vehicle The RER navigation radio is equipped with four different position in order to receive a signal. - Page 39 28 NAVIGATION Station Presets Touch the arrows to the left and right of the DIRECT There are 12 station presets available for storing the radio TUNE soft-key to step manually through the frequency stations in each tuner range. or channel roster. In order to store the desired station, touch and hold one Select the SCAN soft-key for a five second preview of of the station preset soft-keys for two seconds and you...
- Page 40 NAVIGATION 29 Radio Text Information Program Type (PTY) is only available in FM and SAT Select the INFO soft-key to display additional radio text mode. Radio stations are grouped according to their information in the right half of the screen. program (e.g., Soft Rock, Rhythm &...
-
Page 41: Radio Settings
30 NAVIGATION NHL, More Sports, Soccer, NASCAR, Financial News, US Deselect Presets List to display all channels on the right News, International News, Public Radio, Weather, Reli- side of the SIRIUS Satellite Radio screen. Press SHOW gion. LIST/HIDE LIST in the SAT screen to turn the list on or off. - Page 42 NAVIGATION 31 Write down the SIRIUS ID numbers for your receiver. To Re-Subscribe to SIRIUS Backseat TV™ reactivate your service either call the number listed on New vehicle purchasers or lessees will receive a free the screen or visit the provider online. limited time subscription to SIRIUS Backseat TV™...
- Page 43 32 NAVIGATION Touch the Subscription soft-key to access the Subscrip- Display Settings tion Information screen. Press the MENU hard-key and touch the Display Settings soft-key to access the Display Settings menu. Write down the SIRIUS ID numbers for your receiver. To reactivate your service either call the number listed on Select the Daytime Colors soft-key to switch to manual the screen or visit the provider online.
- Page 44 NAVIGATION 33 Select the Nighttime Colors soft-key to switch to manual nighttime mode and to adjust the brightness of the display using nighttime colors. Select the Auto Color soft-key to switch to automatic daytime/nighttime mode and to control the brightness of the display using the light switch of the vehicle.
- Page 45 34 NAVIGATION Touch the Map View soft-key to enable the map view ParkView™ Rear Backup Camera (if equipped) mode. When equipped with ParkView™, the radio display shows the rear view camera picture as soon as the shifter In Map View mode the navigation map or turn-by-turn is in the REVERSE position for vehicles with automatic navigation (as shown above) can be displayed on the transmission.
- Page 46 NAVIGATION 35 Touch the Camera Setup button in the System Setup menu to disable or enable ParkView™.
-
Page 47: Uconnect™ Multimedia (Media)
36 NAVIGATION Uconnect™ Multimedia (MEDIA) Toggle between the media and the radio menus by pressing the RADIO/MEDIA hard-key. The different Disc Mode media modes can be selected via the tabs in the radio Overview screen. The navigation radio is equipped with a CD/DVD Disc Requirements player. - Page 48 NAVIGATION 37 Your radio will play the following formats: NOTE: A faulty CD is NOT automatically ejected. Use only standard size discs. Discs that have been modified MP3, WMA, CD Audio, DVD Audio, and DVD Video, with an adhesive label should not be used in the CD/ DVD-ROM, DVD Plus, DualDisc, SA-CD (CD Layer).
- Page 49 38 NAVIGATION Removing a Disc Scan Search Touch the SCAN soft-key. 1. Press the OPEN/CLOSE hard-key. The individual tracks of the disc will be played in 2. The disc is ejected and can be removed. succession for eight seconds each. NOTE: If the disc is not removed within approximately Select the STOP SCAN soft-key to stop the scan function.
- Page 50 NAVIGATION 39 Fast Forward Track Disc Info Touch and hold the Fast Forward soft-key. The Select INFO to display title, artist, album and genre audio will be heard at a reduced level while going information in the right half of the screen. through the track in this mode.
- Page 51 40 NAVIGATION Music recognition technology and related data are pro- Select Repeat Folder to repeat all songs in the currently vided by Gracenote . Gracenote is the industry stan- playing folder (MP3/WMA disc only). Touch the Repeat dard in music recognition technology and related content Folder soft-key again to stop the repeat mode.
- Page 52 NAVIGATION 41 3. Touch the soft-key with a folder symbol to open a folder. A MP3/WMA disc may contain audio files in a folder structure. The folder, if any, is shown in the list view. 4. Touch the BACK soft-key to close a folder. Touch the BROWSE soft-key if the list is not displayed.
- Page 53 42 NAVIGATION Playing a Video DVD The playback starts automatically after the DVD video is recognized by the disc drive. NOTE: Viewing a DVD video on the radio screen is not available in all states/provinces, and the vehicle must be Touch the LIST soft-key to display a list of available stopped, and the shifter must be in the PARK position for chapters or tracks.
- Page 54 NAVIGATION 43 DVD Playback Controls In video playback mode, touch anywhere on the screen to show the DVD playback controls. Touch the cursor arrow soft-keys to select the title you want to view, then touch the ENTER soft-key to start playback.
- Page 55 44 NAVIGATION Touch the soft-key during playback to fast reverse DVD Video Menu playback. While in disc mode with a DVD inserted, press the MENU hard-key to access the DVD Video Menu. Touch the soft-key during playback to fast forward playback.
-
Page 56: Hard Disk Drive Mode (Hdd)
NAVIGATION 45 Disc Skipping Skipping is typically caused by a damaged (scratched) disc. This will result in a 10 second jump forward until the damaged area is passed. Temperature Protection If the temperature of the disc reader during operation becomes too high, a popup message will inform the user of an over temperature situation. - Page 57 46 NAVIGATION The files will be stored on the internal hard disk drive 3. Touch the My Files soft-key. and can be used in the HDD mode. 4. Select My Music. Copy Audio Disc to Hard-Drive 5. Touch the Import Music Files soft-key. 1.
- Page 58 NAVIGATION 47 During the copy process, the disc player cannot play It is possible to listen to radio modes during this process. audio. Copying time is greater than 5x the normal playback rate. NOTE: When copying CD Audio to HDD, audio files are converted from CD Audio to WMA.
- Page 59 48 NAVIGATION Example: Once the songs are copied, the playlist will be named by the originating folder name. For the example above the list on the HDD will show the following: Disc_Root_Level Songs (Playlist 1) • Song 1.mp3 (First song in Playlist 1) •...
- Page 60 NAVIGATION 49 Copying Complete Disc During the copy process, the disc player cannot play audio. 1. Insert a disc with MP3, WMA files. The copy progress is shown in the display. 2. Refer to the Copy Audio Disc to Hard Drive procedure.
- Page 61 50 NAVIGATION Selective Song Copying from Disc You can select specific songs on a WMA/MP3 disc using the following procedure: 2. Touch the My Files soft-key. 1. While in the DISC mode, press the MENU hard-key to access the Settings menu.
- Page 62 NAVIGATION 51 3. Select My Music. 4. Touch the Import Music Files soft-key. 5. Touch the From DISC soft-key in the next screen.
- Page 63 52 NAVIGATION A red check mark indicates the selected songs and/or folders. Touch the ALL soft-key to select all files and folders at once. 7. Touch the DONE soft-key to start the copy process. The copy process is shown on the display. It is possible to listen to radio modes during this process.
- Page 64 NAVIGATION 53 Copying from USB 1. Insert a USB device. 3. Touch the Import Music Files soft-key. 4. Touch the From USB soft-key in the next screen. 2. Select My Music.
- Page 65 54 NAVIGATION Playing Audio Files from the Hard Disk Drive You can play songs directly from the internal hard disk drive. 5. Select the folders or titles you would like to copy. A red check mark indicates the selected songs and/or folders.
- Page 66 NAVIGATION 55 The navigation radio can sort the files by playlist, by song name, by artist, by genre, by album, or from favorites. 3. Touch a soft-key with the desired playlist name to play a playlist. 2. For this example, touch the Playlists soft-key. Touch the PLAY ALL PLAYLISTS soft-key to play all available playlists.
- Page 67 56 NAVIGATION Next Track Rewind Track Press the SEEK up hard-key. The next track of the current Touch and hold the Fast Reverse soft-key. The audio playlist is played. Once the last track has been reached in will be heard at a reduced level while going the forward direction, the unit will loop back to the first through the track in this mode.
- Page 68 NAVIGATION 57 Repeat Track The repeat track function repeats the currently played track. Touch the Rpt. TRK soft-key to switch the repeat track function on or off. A red check mark indicates the repeat track function is active. List ABC... The List ABC...
- Page 69 58 NAVIGATION 2. Touch the Favorites soft-key to display a list of favorite 3. Touch one of the ADD FAVORITE soft-keys. playlists.
- Page 70 NAVIGATION 59 4. Select the desired playlist. You may use the A to Z A link to the selected playlist is now saved in the Favorite soft-key to navigate faster through very long lists. Playlists list. NOTE: The link to the favorite playlist will be removed after a playlist was removed from the My Playlists menu.
- Page 71 60 NAVIGATION You may now edit the list by touching the EDIT soft-key, or exit the list by touching the EXIT soft-key. Editing Playlists on the Hard Disk Drive 2. Touch the My Files soft-key. 1. While in the HDD mode, press the MENU hard-key to access the HDD Menu.
- Page 72 NAVIGATION 61 3. Select My Music. 4. Touch the My Playlists soft-key.
- Page 73 62 NAVIGATION 5. Touch the EDIT soft-key (example: DISC_Root_Level_ 6. Touch the Rename This Playlist soft-key. Songs) of the playlist you would like to edit. NOTE: If you touch the Delete This Playlist soft-key, the You can rename the selected playlist, delete songs from playlist and all songs contained in it will be permanently the selected playlist, or delete the selected playlist.
- Page 74 NAVIGATION 63 7. Type in a new name for the playlist. The playlist now has the new name. 8. Touch the SAVE soft-key to confirm the name. 9. Touch the Delete Songs From This Playlist soft-key. NOTE: If you touch the Delete This Playlist soft-key, the playlist and all songs contained in it will be permanently deleted.
- Page 75 64 NAVIGATION NOTE: If you delete a song from the playlist, the song cannot be recovered. 12. Touch the DONE soft-key when you are done editing the playlist. Deleting All Playlists from the Hard Disk Drive 1. Press the MENU hard-key on the right side of the radio.
- Page 76 NAVIGATION 65 WARNING! It is not possible to copy pictures from a USB device or CD while the vehicle is in motion. This menu displays the available space on the hard disk drive and allows you to delete pictures, music files, and address book entries.
- Page 77 66 NAVIGATION In the default mode, the vehicle brand logo is displayed in the right half of the screen. Press the Menu hard-key on the right side of the radio to access one of the Setting menus. It is recommended to change the picture dimensions on a PC or Digital Camera to 240 by 158 pixels before the import.
- Page 78 NAVIGATION 67 2. Insert either a CD or a USB device containing your The navigation radio can store eight user pictures. pictures. 4. Press one of the Add Picture soft-keys. 3. Touch the My Pictures soft-key to get an overview of the currently stored images.
- Page 79 68 NAVIGATION 5. Select the type of media inserted. 6. Use the PAGE soft-keys to page through a list of pictures and press the picture you would like to import. NOTE: Files must be in the root directory (top level) of the disc or USB device to be recognized.
- Page 80 NAVIGATION 69 7. Confirm your selection by touching the YES soft-key. The imported picture is now available in the Manage My Pictures screen. 8. In order to display the imported picture in the radio screen, touch the desired picture soft-key.
- Page 81 70 NAVIGATION 10. Press the MENU hard-key twice and then touch the Picture View soft-key to enable the picture view. 9. Select this picture by pressing the Picture View soft- key. A check mark indicates the currently used picture. The picture is now displayed on the right half of the Use the PREV or NEXT soft-key to step through the list of screen.
-
Page 82: Uconnect™ Multimedia (Remote Devices)
NAVIGATION 71 Uconnect™ Multimedia (REMOTE DEVICES) Playing Audio Files from the iPod Device You can play songs directly from the iPod device. iPod Mode (If Equipped) The iPod mode gives you access to the audio files on the external iPod . It functions as a remote control for the currently connected iPod mobile digital device, and you can play audio from the iPod device through the... - Page 83 72 NAVIGATION Touch the BROWSE soft-key to browse by categories. Select an iPod Category The radio can sort the files by playlists, by song names, by artists, by composers, by genres, by albums, by podcasts or by audio books. Touch a soft-key with the desired artist’s name to play songs from this artist.
- Page 84 NAVIGATION 73 List Jump If you encounter a very long list, it may be helpful to touch the A to Z soft-key to go to the List Jump menu. Touch a soft-key with the desired artist’s name to play songs from this artist. Next Track For this example we entered the first letter of the desired Press the SEEK up hard-key.
- Page 85 74 NAVIGATION Previous Track Pause Press the SEEK down hard-key. The previous track of the Touch the PAUSE soft-key to pause the playback. current folder is played. If the first track has been reached Play in the backward direction, the unit will switch from the Touch the PLAY soft-key to start the playback.
- Page 86 NAVIGATION 75 If additional information is available, the NEXT soft-key Random Playback will be displayed. Touch the NEXT soft-key to show the The random playback function plays random tracks from additional information. the iPod device. Touch the Random soft-key to switch the random play function on or off.
-
Page 87: Sirius Backseat Tv™ (If Equipped)
76 NAVIGATION Repeat Track change the vehicle position in order to receive a signal. In The repeat track function repeats the currently played most cases, the satellite radio does not receive a signal in track. Touch the Rpt. TRK soft-key to switch the repeat underground parking garages or tunnels. -
Page 88: Video Entertainment System (Ves)
NAVIGATION 77 View SIRIUS Backseat TV™ on the Radio Screen Receiving Audio/Video from the VES™ You can play audio from the VES™ through the vehicle’s NOTE: To view SIRIUS Backseat TV™ on the radio speaker system. If you have a VES™ with a video player, screen, the vehicle must be stopped, and the shifter must you can also see the video on the radios display if the be in PARK for vehicles with automatic transmission. - Page 89 78 NAVIGATION The VES tab becomes available after the VES™ system is Availability of the DVD Player soft-key, the Rear AUX 1 turned on. Touch the VES MODES soft-key to select the soft-key, and the Rear AUX 2 is based on the type of VES™...
-
Page 90: Usb Connector
NAVIGATION 79 USB Connector MP3 player devices cannot be controlled through the It is possible to transfer audio files or pictures files to the USB connector. Some player devices save music files in navigation radio. Files can be on a disc or on a USB MP4 format, which cannot be played in this radio. - Page 91 80 NAVIGATION How to open the cover 2. Pull forward. 1. Place finger under the pull arrow. NOTE: The flap is attached and should not be removed! Do not pull the flap off of the frame. Do not use a tool (e.g., screw driver, nail file, etc.) to open the flap, as this could cause damage to the face of the radio.
- Page 92 NAVIGATION 81 How to Close the Cover 2. Hook the top hooks (1) into the frame first. 1. Using your thumb and index finger, grasp the flap. Notice the hooks (1), which must first be inserted into the frame.
-
Page 93: Aux Mode
82 NAVIGATION CAUTION! Never force any connector into the ports of your radio. Make sure your connectors are the identical shape and size before you connect. AUX Mode The AUX connector allows you to connect the headset output of an audio device (e.g., MP3 player) to the navigation radio. - Page 94 NAVIGATION 83 The display will switch automatically to the AUX mode when a 3.5 mm stereo mini-jack cable has been connected. The radio screen will revert back to the last tuner mode when the cable is unplugged. To change radio modes while the cable is connected to the unit, press the RADIO/MEDIA hard-key until the AUX tab is displayed on the top of the screen.
-
Page 95: Voice Command
84 NAVIGATION VOICE COMMAND When you press the Voice Command hard-key, you will hear a beep. The beep is Voice Command Operation your signal to give a command. Voice Command allows you to control your AM and FM radio, satellite radio, disc player, navigation system, hard NOTE: If you do not say a command within a few disk drive storage, and a memo recorder. - Page 96 NAVIGATION 85 These commands are universal and can be used from any To hear the first available Menu, press the Voice menu or screen. Command hard-key and say HELP or MAIN MENU. All other commands can be used depending upon the active application.
- Page 97 86 NAVIGATION • In this mode you can say the following commands: Commands The Voice Command understands two types of com- • RADIO (to switch to the radio mode) mands. Universal commands are available at all times. • HARD DRIVE (to switch to the HDD mode) Local commands are available if the supported radio mode is active.
- Page 98 NAVIGATION 87 • RADIO FM (to switch to the FM band) • NEXT STATION (to select the next station) • SATELLITE RADIO (to switch to the satellite radio) • PREVIOUS STATION (to select the previous station) • RADIO MENU (to switch to the radio menu) Radio AM To switch to the AM band say AM or RADIO AM.
- Page 99 88 NAVIGATION • MAIN MENU (to switch to the main menu) In this mode you may say the following commands: • TRACK (1-250) (to change the track) SIRIUS Backseat TV™ To switch to SIRIUS Backseat TV™ mode say SATELLITE • NEXT TRACK (to play the next track) VIDEO.
- Page 100 NAVIGATION 89 VES™ − DELETE (to delete the recording) To switch to the VES™ mode say V E S. • PLAY MEMOS (to play previously recorded memos) In this mode you may say the following commands: During the playback you may press the Voice •...
- Page 101 90 NAVIGATION • INPUT HOUSE NUMBER Navigation To switch to the navigation mode say NAVIGATION. − INTERSECTION NOTE: Not all commands will be available at all times, − POINT OF INTEREST depending upon the system context. • FIND NEARBY POI NOTE: Read the navigation chapter first to help you •...
- Page 102 NAVIGATION 91 • ROUTING OPTIONS • ADDRESS BOOK − GO − NEW ENTRY − STOP ROUTING − NAVIGATE TO A NAME − MUTE GUIDANCE − DELETE − REPEAT GUIDANCE − ERASE ALL − CHANGE METHOD System Setup To switch to the system setup say SETUP. •...
- Page 103 92 NAVIGATION • HELP SCREEN 2. Repeat the words and phrases when prompted by the Uconnect™ Phone system. For best results, the Voice − ON Training session should be completed when the vehicle is − OFF parked, engine running, all windows closed, and the blower fan switched off.
- Page 104 NAVIGATION 93 • Touch the Start Voice Training soft-key to train the Voice Command system. • Touch the Listen to Tutorial soft-key to hear instruc- tions on voice training. NOTE: With rolled down windows, the system perfor- mance may be compromised. In a convertible vehicle, the system performance may be compromised with roof top down.
-
Page 105: Uconnect™ Phone
94 NAVIGATION Uconnect™ Phone phone battery status, signal strength, caller ID, and call Uconnect™ Phone is a voice-activated, hands-free, in- type. Uconnect™ Phone allows you to dial a phone vehicle communications system. number with your cellular phone using simple voice commands (e.g., “Call”... -
Page 106: Uconnect™ Gps Navigation
NAVIGATION 95 Uconnect™ GPS Navigation Navigation Software This navigation radio requires digital data from a navi- General Notes gation database. The data in the navigation database is System Overview licensed from Navigation Technologies . Not all roads Your navigation system receives GPS signals from up to are digitized. -
Page 107: Navigation Main Menu
96 NAVIGATION Navigation Main Menu WARNING! Selecting NAV Main Menu Drive with caution, paying attention to the road, 1. If not already done, press the ACCEPT soft-key to obeying all traffic laws! agree to the navigation disclaimer. 2. Press the NAV hard-key to switch to the navigation System Limitations menu and toggle between Map Viewer and Navigation The map data that is included with your system is the... - Page 108 NAVIGATION 97 • New Destination • Point of Interest Touch this soft-key when you want to program a Touch this soft-key when you want to route to a point destination. (See the Destination Input section for of interest. (See the POI section for details). details).
- Page 109 98 NAVIGATION • Where Am I Now? Touch this soft-key when you want to find out where you are, and when you need to search for an available point of interest near your current vehicle position. (See the Where Am I Now section for details). •...
-
Page 110: Destination Input By Poi
NAVIGATION 99 NOTE: Touch the DEL soft-key to delete a misspelled letter or press the NAV hard-key to go back to the Navigation Main Menu. NOTE: Touch the 0-9 soft-key to access numbers, and touch the MORE... soft-key to access special characters, if needed. - Page 111 100 NAVIGATION POI Local Area 2. Touch the NEARBY POI soft-key. For this example we will continue by entering a gas station close to the vehicle location. Select a POI category. For this example select Gasoline. 1. While you are in the NAV - Main Menu touch the NOTE: Some categories may be disabled while the Where AM I Now? soft-key.
- Page 112 NAVIGATION 101 POI Nearby Destination For this example we will continue by entering a gas station close to the currently entered destination. The POI list shows the POI address, the distance to the POI (direct distance - as the crow flies), and a directional arrow.
- Page 113 102 NAVIGATION 3. Touch the Find POI Near destination soft-key and 2. Touch the Destination Info soft-key to select the Des- select a category. Pick a gas station from the list and tination Info menu. confirm the destination. This is the same process as described in the POI Local Area section.
- Page 114 NAVIGATION 103 POI in Map Area POI by Type To select a POI from anywhere on the navigation data- To select a POI by type, select Point of Interest in the NAV base map area, select Point of Interest in the NAV – Main –...
- Page 115 104 NAVIGATION The Favorite POIs screen shows the available categories. 1. Touch the Favorite POIs soft-key in the NAV – Main 2. You may select ADD to add more categories. Menu screen. You may select EDIT LIST to either clear all, clear selected, or move POI categories in the list.
- Page 116 NAVIGATION 105 Destination Input Press the NAV hard-key to access the NAV Main Menu. Select CLEAR ALL to delete all categories from the list. Edit a category soft-key by touching the soft-key with the category you would like to edit. If you select Clear in the Touch the New Destination soft-key to get to the Desti- next screen the soft-key will be removed from the list.
- Page 117 106 NAVIGATION Overview Destination Entry Screen Point on Map allows quick and easy selection of a destination directly from the Map screen. By selecting a street segment or icon, you can quickly enter a destina- tion without the need to input the city name or street. Use Saved Trail to access previously saved trails.
- Page 118 NAVIGATION 107 Geo Coordinates A geo coordinate is a coordinate used in geography. You can determine a geo coordinate with the help of a handheld GPS receiver, a map, or the navigation system. Destination Input by Street Address For this example we will continue by entering the follow- ing address 2101 CONSTITUTION AVE NW, WASHING- TON D.C., DC 20037, U.S.A.
- Page 119 108 NAVIGATION You can change the state/province and/or country tem- porarily for the current destination input by touching the STATE, PROVINCE, or COUNTRY soft-key in this menu. NOTE: It is recommended to change the default state and/or default country, if you plan to enter more than one destination in the destination area (e.g., vacation, business travel, etc.).
- Page 120 NAVIGATION 109 soft-key in the first row of the Street Address screen. This 4. Touch the LIST soft-key to display a list of possible will allow you to input the street name in Washington street names. Select CONSTITUTION AVE NW from the D.C.
- Page 121 110 NAVIGATION If you touch the CONTINUE soft-key without entering a NOTE: If the displayed address is not the desired number, the navigation system will guide you to a address, you can either touch the BACK soft-key in the section of the entered street which is the closest to your upper left corner of the screen to step back to the current location.
- Page 122 NAVIGATION 111 NOTE: If Kentucky is not your default state refer to the 3. Touch the Enter Name of Street 1 soft-key to enter the change state/province and/or country section to learn first street. how to change state/province and/or country. 4.
- Page 123 112 NAVIGATION 5. Touch the Enter Name of Street 2 soft-key to enter the 6. Select “Bridwell Dr” for this example. second street. The navigation radio will display a list of possible cross streets of the initially entered street.
- Page 124 NAVIGATION 113 Destination Input by Geo Coordinate Touch the Geo Coordinate soft-key in the Destination Entry screen. If you wish to change your mind and prefer to select a different cross street, you can touch the soft-key with the cross street name to select another cross street. To enter a Geo Coordinate as a destination, simply touch 7.
- Page 125 114 NAVIGATION Destination Input by Favorite Places Touch the soft-key with the name of the desired destina- Touch the Favorite Places soft-key in the Destination tion and confirm the route with GO to start the route Entry Menu. guidance. NOTE: The Favorite Places soft-key is disabled if the Touch the EDIT LIST soft-key to delete either all or single favorite places memory is empty.
- Page 126 NAVIGATION 115 segment or POI icon, you can quickly enter a destination without the need to input the city name or street. NOTE: This feature is also available while the vehicle is in motion. 1. Touch the MAP soft-key in the NAV - Main Menu to access the map.
- Page 127 116 NAVIGATION After touching the map on the screen, a set of arrows appears. 2. Use the arrows to navigate the center of the cross over the desired destination. 3. Either touch the SELECT soft-key to select the desti- nation, or touch the POIs soft-key to see a list of POIs in the selected area.
- Page 128 NAVIGATION 117 Destination Input by Recent Places Touch the EDIT LIST soft-key to delete either all or single Touch the Recent Places soft-key in the NAV Main Menu. entries off the recent destination list. To exit the Edit Recent Destinations menu touch the DONE soft-key. To go back to the Main Menu touch the Back soft-key in the upper left corner of the screen.
- Page 129 118 NAVIGATION The radio will respond: “for Michigan. Please say the The radio will respond: “City name has been accepted. name of the street.” Now, do you want to enter a house number?” 3. Wait for the beep and say, LOLLY POP STREET 7.
- Page 130 NAVIGATION 119 Guide Me Home Touch the Guide Me Home soft-key in the NAV - Main Menu, and touch the GO soft-key to confirm the route to the home address saved in the address book. See the Getting Started and Address Book section in this manual for information on how to save, clear, or edit the home address.
- Page 131 120 NAVIGATION 1. Touch the Emergency Information soft-key in the NAV Touch the CALL 911 soft-key to dial 911 with a cellular - Main Menu. phone connected via Uconnect™ Phone. See the Uconnect™ Phone section in this manual for more infor- 2.
- Page 132 NAVIGATION 121 NOTE: The Start/Stop Trail button is not visible during and shortly after a route guidance announcement (inter- section zoom) and the map view settings are set to Turn by Turn. The Record Trail soft-key will switch to the Stop Trail soft-key and the trail appears as a yellow line on the map screen while you drive along a route.
- Page 133 122 NAVIGATION 3. Touch the Stop Trail soft-key to stop the trail record- 4. Touch Stop and Save Current Trail. ing. The trail will be named with time and date of the • Touch Discard Current Trail to discard the trail and recording.
- Page 134 NAVIGATION 123 6. Touch the DONE soft-key to save the trail recording without changing the name. The trail recording is now saved in the Saved Trails Memory. NOTE: You can save up to 12 trails. If the trail memory is full, you must discard one of the previous recorded trails in order to record a new trail.
- Page 135 124 NAVIGATION Once you arrive at the destination (green dot, destination You may touch the EDIT soft-key to change the trail name or to delete trails from the My Saved Trails list. icon), the route guidance will end. Select the desired trail and confirm the destination entry.
-
Page 136: Route Guidance
NAVIGATION 125 Route Guidance After starting route guidance, the system calculates the route and announces: “Follow the arrows on the display.” You will receive navigation recommendations by voice messages and screen displays. You may now follow the trail on the screen. The trail will be displayed until you touch the STOP TRAIL soft-key in the Navigation Main Menu. - Page 137 126 NAVIGATION NOTE: Touch the Map View soft-key in any Radio Menu screen to enable the map view mode, where the navigation map or turn-by-turn navigation can be dis- played on the right half of the radio screen (see Display Settings for more information).
- Page 138 NAVIGATION 127 • Touch the Map Buttons soft-key to show or hide the POI Icons on the Map Zoom, Map Heading, 2D/3D View and the Button The navigation radio is able to display available points of Minimize soft-key. interest on the map. •...
- Page 139 128 NAVIGATION Repeat Navigation Announcement Route Options After pressing the OPTIONS soft-key in the Route Guid- ance Menu, the following information is displayed: Touch the RPT soft-key in the upper right corner of the navigation screen to hear the current navigation announcement.
- Page 140 NAVIGATION 129 Touch the Find Nearby POI soft-key to search for a local POI. The Destination Info soft-key displays destination infor- mation. The View Turn List soft-key lists streets utilized for the current route. Touch the Save Destination to save the destination ad- dress.
- Page 141 130 NAVIGATION traveling in an unverified area, turn-by-turn guidance, NOTE: A warning message may appear on the screen voice prompts and a route are only route guidance every time you enter an area with unverified navigation suggestions. database data. In an unverified map area, the navigation system is Notes on Route Guidance unaware of turning restrictions e.g.
- Page 142 NAVIGATION 131 lot, garage, etc., that is not contained on the digital street map. The arrow indicates the actual geographic direction to the destination. “Follow the road.” - You should continue driving on the current road for the distance shown. “Please take a left in 500 feet.”...
- Page 143 132 NAVIGATION to make any lane changes needed to safely make the turn. NOTE: At intersections and traffic circles, only the ends As always, road safety must be observed when making a of the roads to be passed are displayed. lane change.
-
Page 144: Navigation Options
NAVIGATION 133 “You have reached your destination.” - The specified destination has been reached and route guidance is terminated. The display will switch back after few seconds. Navigation Options Options Before Activating the Route Guidance Before confirming the route with the GO soft-key, it is possible to select options different from the default route settings. - Page 145 134 NAVIGATION Press Simulate Route to simulate the route. Touch the Destination Info soft-key in the NAV Options View Turn List to see a list of turns on the route. menu to find a map of the destination area, the complete address or coordinates of your destination.
- Page 146 NAVIGATION 135 Use the page soft-keys to scroll through the list of turns. Touch the Avoid This Road soft-key to avoid the selected The turn soft-keys display the length of the route seg- turn in the list. The route will be re-calculated, if an ment, direction of turn, and the name of the street.
- Page 147 136 NAVIGATION Touch the Find POI Near Destination soft-key to ex- change the destination with a POI near to the desired destination. Read more about POI in the POI section of this manual. The turn will be displayed in the center of the map. Touch the NEXT TURN soft-key to show a map of the area close to the next turn in the turn list, touch the PREV TURN soft-key to show a map of the area close to the previous...
- Page 148 NAVIGATION 137 Options During Route Guidance During active route guidance the View Route Choices and Simulate Route soft-keys are replaced by the Take Detour and Find Nearby POI soft-keys. After you touch one of the method soft-keys in this menu, the CHANGE soft-key will appear for confirma- tion of the method change.
-
Page 149: Navigation Default Settings
138 NAVIGATION Navigation Default Settings Touch the NAV Settings soft-key in the Navigation - Main Menu to select the preferred measurement, set default routing method, view GPS information, and adjust guid- ance prompt volume. Set Measurement Metric/US Select a distance and touch the GO soft-key to confirm. The navigation will avoid the roads in the turn list for the selected distance and calculate an alternate route. - Page 150 NAVIGATION 139 Set Default Routing Method GPS Information Mark or unmark route parameters and then touch the The GPS Information menu displays Current Location, SAVE soft-key (not shown) to confirm the changes. Press Coordinates in degrees, minutes and seconds (touch the the NAV hard-key to cancel without change.
-
Page 151: Map Viewer
140 NAVIGATION Guidance Prompts Touch the SAMPLE VOL soft-key to listen to the current volume setting. Once satisfied with the volume, touch the SAVE soft-key to save the settings. Touch the CANCEL soft-key to exit the menu without saving the settings. Map Viewer Press the NAV hard-key to switch to the Navigation - Main Menu. - Page 152 NAVIGATION 141 Map Zoom Level Press the Zoom soft-key to change the zoom level. The tip of the arrow in the circle in the center shows your vehicle’s position on the map. The square soft-keys on the left show the map zoom factor, the map orientation, Touch the slider or the IN and OUT soft-keys to change the display mode, and the current location soft-key.
-
Page 153: Stop Over
142 NAVIGATION Map Orientation Suggested routes are displayed as bright green lines on Touch the soft-key with the compass arrow to toggle top of the road map when the route guidance is active. between a map oriented to the North, or oriented parallel NOTE: Suggested routes (green) have a higher priority to the vehicle heading. -
Page 154: Trip Planner
NAVIGATION 143 When the route guidance is active, press the Add Stop Trip Planner Over soft-key to add multiple destinations. After you If you are traveling to multiple destinations, the My Trip confirm a stop over, you may either go to the entered stop function will allow you to calculate and save the route to over first, or add it to a destination list. - Page 155 144 NAVIGATION 3. Name the trip and touch the SAVE soft-key. 4. Touch ADD DESTINATION. 5. Enter a destination (see section Destination Input in this manual).
- Page 156 NAVIGATION 145 In the Confirm Destination screen: NOTE: You can add up to eight destinations to a trip. The display shows the Itinerary is FULL message in the 6. Touch the SAVE soft-key to add the destination to the status line if all eight destinations are used. list.
- Page 157 146 NAVIGATION 8. You may now either PLAN NEW TRIP, DELETE ALL 9. Touch a destination soft-key to get the destination your trips, or select your trip by touching the soft-key information, or touch the START THIS TRIP soft-key to with the desired trip name.
- Page 158 NAVIGATION 147 In the Edit Trip menu you may rename, delete, or edit the You may now Change Name or Change Address. details of this trip. Touch a destination in the list. Touch the DONE soft-key to confirm your changes. From the Edit Trip menu touch the desired destination you would like to edit.
-
Page 159: Realtime Traffic By Sirius Satellite Radio
148 NAVIGATION Touch the Modify Input Order soft-key in the Edit Realtime Traffic by SIRIUS Satellite Radio Address Info menu to rearrange the order of the destina- The SIRIUS Realtime Traffic feature is a specific applica- tions in the trip. tion of the radio receiver used for receiving real-time traffic. - Page 160 NAVIGATION 149 Display Traffic Messages 1. Press the MENU hard-key on the right side of the radio. • A transparent green line indicates flowing traffic with speeds faster than 45 mph. • A transparent yellow line indicates an average driving speed between 10 and 45 mph.
- Page 161 150 NAVIGATION information is transferred to the Realtime Traffic Infor- mation service provider, who then generates the Realtime Traffic messages that are sent by SIRIUS to the vehicle. 3. Touch one of the soft-keys with a message to view details. The traffic message screen displays traffic messages in a list form.
- Page 162 NAVIGATION 151 Touch Map to see the location of a message on a map. Touch PREVIOUS or NEXT to step through the list of available messages. Touch the back soft-key in the upper left corner of the screen to exit the Traffic Message Detail screen. Switching SIRIUS Realtime Traffic On or Off 1.
- Page 163 152 NAVIGATION Warning Prompts NOTE: It can take between 15 and 30 minutes for a Touch the Warning Prompts soft-key to enable warning message to reach the system. prompts. Once you change settings, touch the SAVE soft-key to confirm your changes. View All Messages You can view either all received messages for the area you have a subscription, or only the messages on your...
-
Page 164: Address Book
NAVIGATION 153 • The HOME folder contains only your home address. Address Book Touch this folder soft-key to edit your home address. Overview You may route to this address by touching the Guide The address book provides a way to organize and store Me Home soft-key in the NAV - Main Menu. - Page 165 154 NAVIGATION • The Voice Command Created Entries folder contains contacts which were created with the help of the Voice Command System. Touch the Voice Command Cre- ated Entries folder soft-key to add, edit, delete, and route to your contacts. Add a Folder Touch the +Folder soft-key to add a personalized folder.
- Page 166 NAVIGATION 155 3. Touch My Address Book soft-key to get to the Address The Address Book screen appears. Book menu. 4. To select an address from the Default folder, touch the Default Folder soft-key. To select an address from another folder, touch one of the folder soft-keys.
- Page 167 156 NAVIGATION 5. Touch the ADD soft-key to add a new contact. Touch You may now create a new contact or copy a contact from CLEAR ALL to delete all contacts in this folder, touch another folder. DONE to go back to the Address Book menu, or touch a 6.
- Page 168 NAVIGATION 157 7. Enter a name for your new contact. You may now edit the contact information. Add a voice tag for the voice recognition or touch the Edit Contact 8. Press the SAVE soft-key to display the Contact Infor- soft-key to add more information to the entry.
- Page 169 158 NAVIGATION In this example, we need to add an address to the contact. 10. Once the destination is entered, touch the SAVE soft-key to confirm the address. 9. Press Add Address and enter a destination (refer to Destination Input section in this manual).
- Page 170 NAVIGATION 159 Search a Contact in the Address Book 1. Touch the SEARCH soft-key in the Address Book menu. In addition, you may enter a phone number by pressing the Add Phone # soft-key. 11. Touch the DONE soft-key after all available informa- tion has been entered.
- Page 171 160 NAVIGATION 4. Touch the B. Jeffries soft-key from the results list to 5. Once the contact information is displayed, touch the select the contact. Route To soft-key to start route guidance to the contacts address, or touch Call Contact if a valid phone was entered and a telephone is connected to the navigation radio.
-
Page 172: System Information
NAVIGATION 161 SYSTEM INFORMATION User Data Backup Press the MENU hard-key on the right side of the radio Visit http://www.chrysler.com/en/owners/mygig/ for and touch the System Setup soft-key to access the System information on how to backup or transfer your user data, Setup menu. -
Page 173: Troubleshooting
162 NAVIGATION TROUBLESHOOTING Q.: When the radio is playing songs from the HDD, it Radio jumps to the first song in the list. Why does it do that? Q.: I cannot find my favorite radio station that I was always able to receive before. What can I do? A.: After the radio is done copying or ripping music to the HDD, it needs to rebuild the current playlist. -
Page 174: Navigation
NAVIGATION 163 NOTE: MP4 and M4V files are not supported. A.: If the navigation radio has trouble recognizing your voice, you should press the MENU hard-key, press Q.: My iPod does not play audio on the radio. System Setup, and then press the Voice Command soft- A.: Make sure the iPod is connected via the iPod connec- key to access the Voice Command menu. -
Page 175: Glossary Of Terms
164 NAVIGATION GLOSSARY OF TERMS Global Positioning System Autostore Greenwich Mean Time Compact Disc Hard-Disk Drive Compact Disc Changer Hands-Free Module CDDB A technology company founded in Multifunction soft-key 1995 as CDDB, Inc. The company Multi Functional Steering Wheel has been renamed to Gracenote, MP3 MPEG-1 Compression scheme used to Inc. - Page 176 NAVIGATION 165 Navigation Speech Dialog System Position Traffic Message Channel Program type (radio) VES™ Video Entertainment System RBDS Radio Broadcast Data System Windows Media Audio Format Satellite Radio SAT-V Satellite Backseat TV™...
- Page 177 Chrysler Group LLC 11RER-526-AA First Edition Printed in U.S.A.
Need help?
Do you have a question about the MEDIA CENTER 730N (RER) and is the answer not in the manual?
Questions and answers
comment ejecter le cd
To eject a CD from a Jeep MEDIA CENTER 730N (RER):
1. Press the EJECT button.
2. Select the disc by pressing one of the preset buttons (1-6), if applicable.
3. The disc will be ejected and can be removed.
If the disc is not removed within approximately 10 seconds, the unit will pull it back into the slot.
This answer is automatically generated