Table of Contents
Advertisement
Available languages
Available languages
Operator's Manual
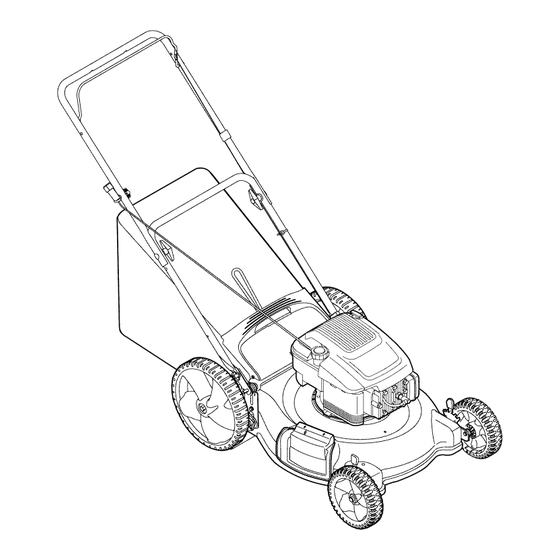
21" Hi-Wheel Mower
Model 549
Warning:
This unit is equipped with an internal combustion engine and should not be used on or near any unimproved forest-cov-
ered, brush-covered
or grass-covered
land unless the engine's exhaust system is equipped with a spark arrester meeting applicable
local or state laws (if any), If a spark arrester is used, it should be maintained in effective working order by the operator, In the State
of California the above is required by law (Section 4442 of the California Public Resources Code), Other states may have similar laws,
Federal laws apply on federal lands, A spark arrester for the muffler is available through your nearest engine authorized service dealer
or contact the service department,
P,O, Box 361131 Cleveland, Ohio 44136-0019,
MTD LLC, P.O. BOX361131CLEVELAND,OHIO44136-0019
PRINTED IN U.S.A.
Form No.769-01515
(11/2004)
Advertisement
Table of Contents

Subscribe to Our Youtube Channel
Related Manuals for MTD 11A-549R729


Summary of Contents for MTD 11A-549R729
- Page 1 Federal laws apply on federal lands, A spark arrester for the muffler is available through your nearest engine authorized service dealer or contact the service department, P,O, Box 361131 Cleveland, Ohio 44136-0019, MTD LLC, P.O. BOX361131CLEVELAND,OHIO44136-0019 PRINTED IN U.S.A. Form No.769-01515...
-
Page 2: Customer Support
TABLEOFCONTENTS Content Page Content Page Important SafeOperation P ractices Maintaining Your Lawn Mower Slope Gauge Servicing Your Mower Assembling YourLawn Mower Troubleshooting Know YourLawn Mower Illustrated Parts List Operating Y ourLawn Mower Warranty Making Adjustments Espanol FINDINGMODELNUMBER This Operator's Manual is an important part of your new lawn mower. It will help you assemble, prepare and maintain the unit for best performance. -
Page 3: Section 1: Important Safeoperation P Ractices
SECTION 1: IMPORTANT SAFEOPERATION P RACTICES WARNING: This symbol points out important safety instructions which, if not followed, could endanger the personal safety and/or property of yourself and others. Read and follow all instructions in this manual before attempting to operate this machine. Failure to comply with these instructions may result in personal injury. -
Page 4: Slope Operation
15. Never o perate themower i nwetgrass. A lways be Do Not: sureofyourfooting. A slipandfallcancause Do not mow near drop-offs, ditches or serious personal injury.Ifyoufeelyouarelosing embankments, you could lose your footing or yourfooting, r elease thebladecontrol h andle balance. immediately andtheblade willstoprotating within Do not mow slopes greater than 15 degrees as threeseconds. -
Page 5: Your Responsibility
7. Extinguish a llcigarettes, cigars, p ipes andother listed in this manual. "Use of parts which do not sources o fignition. meet the original equipment specifications may 8. Never f uelmachine indoors because f lammable lead to improper performance and compromise vapors willaccumulate i nthearea. - Page 6 SIGHT AND HOLD THIS LEVEL WITH A VERTICAL TREE i,II A POWER POLE A CORNER OFA BUILDING >, OR A FENCE POST >, >, 15 ° WARNING Do not mow on inclines with a slope in excess of 15 degrees (a rise of approximately 2-1/2 feet every 10 feet).
-
Page 7: Section 3: Assembling Your Lawnmower
SECTION 3: ASSEMBLING YOUR LAWNMOWER Removing UnitFromCarton Make sure that carriage bolt through the upper and lower handles on each side is properly seated. • Remove staples, break glue on top flaps, or cut Tighten the wing nuts. See Figure 2. tape at carton end and open carton. - Page 8 Fasten thecable tothelowerhandle withthetwo • Slip the rope through the rope guide as shown cable tiesfoundonthelower handle. P ull t hecable below. Tighten the wing nut holding the rope guide tiestightandtrimofftheexcess. SeeFigure 4. to the upper handle. Assembling GrassCatcher Cable Tie NOTE: If the grass catcher came pre-assembled, proceed to the next section.
-
Page 9: Section 4: Know Your Lawnmower
Liftthereardischarge d ooronthemower. AttachingSide-Discharge Chute Place thehooks, f ound onbothsides ofthegrass • Remove the grass catcher and let the discharge catcher frame, o verthechutedoorpivot r odatthe door close. rearofthemower. R elease t hereardischarge d oor. • On the right side of the mower, lift the mulching SeeFigure 8. -
Page 10: Section 5: Operating Y Our Lawnmower
Read thisoperator's m anual andsafety rulesbefore Cutting HeightAdjustmentLevers operating y ourlawnmower. C ompare t heillustration i n These levers are located on each wheel and are used Figure 10withyourlawnmower t ofamiliarize y ourself to adjust the cutting height. These levers have to be at withthelocation ofvarious controls andadjustments. -
Page 11: Section 6: Making Adjustments
Stopping Engine Mulching • Release blade control handle to stop the engine For effective mulching, do not cut wet grass. New or and the blade. thick grass may require a narrower cut. If the grass has • Disconnect spark plug wire and move away from grown in excess of 4", mulching is not recommended. -
Page 12: Section 7: Maintaining Your Lawnmower
SECTION 7: MAINTAINING YOUR LAWNMOWER • Put the mower back on its wheels on the ground. If you had put plastic under the gas cap, make sure to remove it now. ARNING" Always stop the engine and disconnect the spark plug wire before performing any maintenance work or Lubrication adjustments on your lawn mower. -
Page 13: Storing Yourlawn Mower
Sharpening the Blade • Place the blade on the adapter. Be certain the blade is aligned and seated on the blade adapter • The blade can be sharpened with a file or on a flanges. grinding wheel. Do not attempt to sharpen the blade while it is still on the mower. - Page 14 SECTION 10: PARTS LISTFORSERIES 549...
- Page 15 Series549 Ref. Ref. Part No. Part No. Part Description Part Description 747-1161A Control Handle 687-02074 Front Height Adjuster Assembly i 749-1092 687-02075 Upper Handle Front Height Adjuster Assembly i Grass Catcher Frame 747-04080 687-02039 Pivot Bar Assembly i 749-0928A Lower Handle 687-02040 Pivot Bar Assembly i 720-0279...
- Page 16 MANUFACTURER'S LIMITED WARRANTY FOR: The limited warranty set forth below is given by MTD LLC with MTD does not extend any warranty for products sold or respect to new merchandise purchased and used in the exported outside of the United States, its possessions United States, its possessions and territories.
-
Page 17: Manual Del Operador
Las leyes federales se aplican en territorios federales. Su distribuidor mas cercano autorizado para realizar el mantenimiento del motor puede conseguir el amortiguador de chispas para el silenciador sino usted puede comunicarse con el departamento servicios, P.O. Box 361131 Cleveland, Ohio 44136-0019. MTD LLC. APARTADO POSTAL361131CLEVELAND,OHIO44136-0019 IMPRESO EN ESTADOS UNIDOS DE AME_RICA Nt_mero de769-O1515_Sp formulario (11/2004) - Page 18 iNDICE Jndice P_gina |ndice P_gina Medidas importantes de seguridad Mantenimiento de la podadora Medidor de pendientes Servicio de la podadora Ensamblado de la podadora Soluci6n de problemas Conozca la podadora de cesped Lista de piezas ilustrada Garanta Operacion de la podadora Realizaci6n de ajustes BUSQUEDA DEL NUMERODE MODELO Este manual del operador es una parte importante de su nueva maquina podadora.
-
Page 19: Funcionamiento General
SECCION 1: MEDIDAS IMPORTANTES D ESEGURIDAD ADVERTENClA: Este simbolo indica instrucciones de seguridad importantes que de no seguirse, se podria poner en peligro la seguridad personal y/o la propiedad suya y de terceros. Lea y siga todas las instrucciones en este manual antes de iniciar la operaci6n de esta ma.quina. -
Page 20: Funcionamiento En Pendientes
15. Nunca opere la podadora en cesped ht_medo. No haga Io siguiente: Siempre este seguro de su equilibrio. Si tropieza y No corte el cesped cerca de pozos, hundimientos, cae puede lesionarse gravemente. Si siente que bancos, podria perder el equilibrio. pierde el equilibrio, suelte inmediatamente No pode pendientes que superen los 15 grados manija de control de la cuchilla y la cuchilla dejara. - Page 21 8. Nunca cargue combustible enla ma.quina en listado en este manual. "La utilizaci6n de partes interiores p orque losvapores inflamables podrian que no cumplan con las especificaciones de acumularse enelArea. equipos originales podria tener como resultado un 9. Nunca saque latapadeelcombustible niagregue rendimiento incorrecto y adema.s la seguridad combustible mientras e l motor e sta.
- Page 22 MIRE Y SOSTENGA ESTE NIVEL CON UN _,RBOL VERTICAL i'ql UN POSTE DE ENERGiA LA ESQUINA DE UN EDIFICIO O UNA CERCA o" _-& €:o IJ=l 15 ° .+.., I=lJ _o z ADVERTENCIA No pode en inclinaciones mayores a 15 grados (elevaci6n aproximada de 2 1/2 pies por cada 10 pies).
- Page 23 SECCION 3: ENSAMBLADO D ELA PODADORA Extracci6n de la unidadde la caja lado este asentado correctamente. Ajuste las tuercas a mariposa. Vea la Figura 2. • Saque las grapas, rompa el pegamento de las aletas superiores o corte la cinta de la caja y a.brala. •...
- Page 24 NOTA: Su podadora se envfa con la manija en la Inserte el marco dentro de la bolsa para recorte de posici6n elevada. Si desea bajar la altura de la manija, cesped con el lado pla.stico negro en la base de la consulte ahora la secci6n de ajustes.
- Page 25 posterior de la podadora. Libere la puerta de de bisagra del montaje del adaptador para abono. descarga posterior. Vea la Figura 8. Baje el adaptador para abono. Vea la Figura 9. Puerta de descarga IMPORTANTE: No retire en ningt_n momento el adaptador para abono, aunque no Io este usando.
-
Page 26: Encendido Delmotor
que estar en la misma posici6n relativa para asegurar un corte uniforme. puede ser que objetos extraSos sean arrojados DVERTENClA: AI operar una podadora Arrancadorde retroceso a los ojos, Io cual puede daSarlos gravemente. El arrancador de retrocesoestbunidoa la manija superior Utilice siempre gafas de seguridad durante la derecha. - Page 27 • Asegt_rese que el cesped esta. libre de piedras, descarga lateral para reducir la altura del cesped a un ma.ximo de 3,25" antes de usar la abonadora. palos, cables u otros objetos que pudiesen daSar la cortadora o el motor. Embolsado delosrecortes dec sped Puede utilizar la bolsa de recolecci6n de recortes de objeto extraSo, detenga el motor.
- Page 28 Lubricaci6n motor ydesconecte e lcable delabujiaantes DVERTENClA: Detenga s iempre el Manija de controlde la cuchilla derealizar l astareasdemantenimiento o los • Lubrique con aceite ligero los puntos de pivote de ajustes delapodadora. la manija de control de la cuchilla al menos una vez NOTA: No recomendamos el uso de arandelas...
- Page 29 • Deslice eladaptador delacuchilla sobre el Reemplazo de aler6ntrasero cigL)eSal delmotor. • Para retirar el aler6n trasero, corte el extremo • Coloque lacuchilla eneladaptador. Asegt_rese de piano de la varilla de alambre que Io sujeta a la quelacuchilla quede alineada y asentada enlas cubierta.
- Page 30 SECCION 10: LISTADEPIEZASPARA LASERIE549...
- Page 31 Serie549 No. de No. de Descripci6n de pieza No. de pieza No. de pieza Descripci6n de pieza ref. ref. 747-1.161A 687-02074 Manija de control Montaje del ajustador de altura frontal- LD 749-1092 687-02075 Manija superior Montaje del ajustador de altura frontal- LI 747-04080 687-02039 Marco de la tolva para recortes...
- Page 32 El dafio resultante por la instalaci6n o el uso Durante el plazo de la garantia el dnico recurso es la de piezas, accesorios o uniones no aprobados por MTD para reparacion o reemplazo del producto como se indico su uso con el(los) producto(s) incluido(s) en este manual anteriormente.
Need help?
Do you have a question about the 11A-549R729 and is the answer not in the manual?
Questions and answers