Table of Contents
Advertisement
Quick Links
Download this manual
See also:
User Manual
Advertisement
Table of Contents
Troubleshooting

Subscribe to Our Youtube Channel
Related Manuals for Kodak EASYSHARE CX6230


Summary of Contents for Kodak EASYSHARE CX6230
- Page 1 Kodak EasyShare CX6230 zoom digital camera User's Guide _.kodak.com For interactivetutorials, x _x kodak.co_VgoAmx_to...
- Page 2 Product Overview Front View Card door ._licrophone Shutter button Light sensor Flashunit SelfTimer/Vkleolight Vim_ f inder lens Wriststrap post 10 Lens Grip...
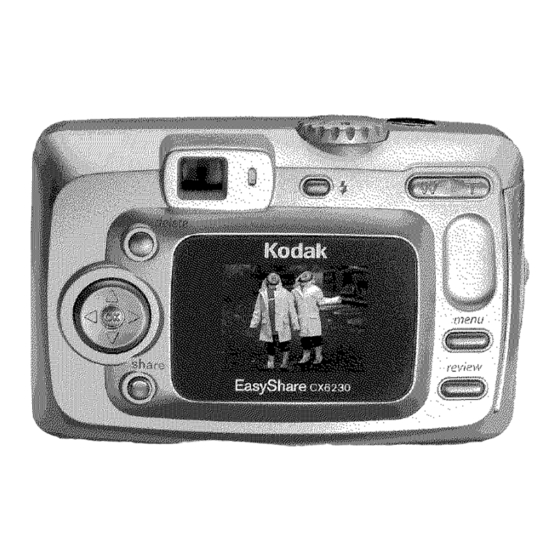
- Page 3 Product Overview Back View Camera screen (I£D) Flas/#Statusbutto_l Share button (page 51) Modedial/Off(page 17, page 6) ORMtton (press) Shmter button De-In (3V) _C:.,-'@, for Zoom (Widekugh:,/Telephom) optio_lal _,Cadapter 4-_a},controller _/b Tlmmbrest Ddete button Memlbutto_l Vie_finder Reviewbutton Read}, l ight...
- Page 4 Product Overview Side View A/V Out, for television viewing Slot for optional SD/MMC card USB Port...
- Page 5 Prod uct Overview Top and Bottom Views Batter_ door Tripod socket/locator, dock 6000 Dock cow,hector Locator, dock 6000...
-
Page 6: Table Of Contents
Table of Contents 1 Getting Started ..............1 install Software First ..............Need This User Guide in Larger Print? ......... 1 What Can i Do With My Camera? ........... 2 What Can i Do With My Pictures and Videos? ....2 Package Contents .............. - Page 7 Using t heFlash ............Changing Picture-Taking Options ........Changing Optional Settings ........... Putting Yoursdf i nthePicture ........Setting Exposure Compensation ........Setting Picture Q uality ..........Taking a BurstSeries o fPictures ........Setting Color M ode ............. Pre-tagging forAlbum Names .........
- Page 8 Magnifying Pictures ..........Protecting Pictures andVideos From Deletion ..... Tagging Pictures!Videos forAlbums ....... Running a Slide Show ..........Displaying Pictures!Videos ona Television ..... Copying Pictures a nd Videos ........Displaying Video D ate ..........Viewing Picture!Video information ........5 Sharing Pictures andVideos ........When Can i Tag MyPictures a nd Videos? ......
- Page 9 7 Installing the Software ..........61 Windows System Requirements .......... 61 Mac QS X System Requirements ........62 Mac OS 8.6 and 9.x System Requirements ....62 install the Software .............. 63 8 Connecting Camera to Computer ......65 Transferring Pictures With the USB Carte .....
-
Page 10: Locating Pictures And Videos On A Card
1Q Troubleshooting .............. 77 Camera Problems ..............Camera!Computer Communications ........81 SD!MMC Cards and internal Memory ......82 Camera Screen Messages ........... 83 Camera Ready Light Status ..........88 11 Getting Heip ..............91 Helpful Web Links ..............Help in this Manual ..............91 Software Help ................ -
Page 11: Getting Started
Getting Sta rted Install Software First Install the soft_are fromfileRodak Eas)Sharesoft\_areCDbefore conneeting thecamera (or canlem dock) to the computer.Failureto do so ma) cause the so_are to load incorrectly. Seetlle StartHere! guide or Installingthe Snflware,page 61. Need This User Guide in Larger Print? 1 Goto ww_.kndak.ennl/gn/cx6230snppnrt. -
Page 12: What Can I Do With My Camera
(ww_.ofoto.coul),or purchase an optionalKodaksecure digital(SD) or a Kodakmultimediacard (MMC)and: O _,utonlatically print tu allyprinter withan SDAMMC slot O Makeprints at all SDA_lMC-capable Kodakpicture maker ,,_ ,,v_ .kodak.eom/gcq)ieturemaker O Takethe card tuyour local photu retailer for pmfession_fl p riuting Organize---Use albums to organizea*ldretrievepictures on a computer. Edit Addspedal effectsto )our pictures, make a custum slide shm_,fix red-eD, crop, rotate, a_d much more. -
Page 13: Package Contents
_qdeos on television) 3 Kodak Max digital camera batteries 6 Wriststrap (2-AA, non-rechargeable) Not shown: User's Gltide, Quick Start Guide, Kodak Eas_Share soft_are CD. (In sonle comltries, the User's Guide is prosided on a CD.Content_ lna_ change without notice.) -
Page 14: Loading The Batteries
/f _,oupurchased an optionalKodakCRY3 CRV3 lithium batter},insert it as shox_ n. (optional) If }ou purchased file Kodak Eas}Share cmnera dock 6000 or printer (lock 6000. see page 70 for details on installing tile included Kodak Eas}Share Ni-MH rechargeable batter}. -
Page 15: Attaching The Wrist Strap
Chapter 1 Attaching the Wrist Strap 1 Threadthe short loop of the _rist strap post. fllroughfile wrist strap 2 Thread filelong loop through file short loop. 3 Pull until secure. -
Page 16: Turning The Camera Qn And Off
Chapter 1 Turning the Camera On and Off 1 Rotatethe Mode dial: Counterclockwise forStillcapture modes Clockwise for }_deomode The ready light blinks greel_wb#e the camera pelfinvns a self-check, tbel_glows green u'bet_the camera is tea@ to tc_e pichtres &r videos, if the mode dial is set to _t_ ). -
Page 17: Adjusting The Display
Chapter Adjusting Display If you want to Then do this Turn tile camera screen on Press file OK button. (enter Li_e_iew) or off. See Tumi_g Or_I,i_e_ie_ ir_Still Modes, Change tile Li_e_iew setting so that it is o_l whe_le_er the page 57. camera is o_. -
Page 18: Setting The Date And Time
Chapter 1 Setting the Date and Time Setting the Date & Time, First Time TileDate &l:ime hare beelt reset message appears tilefirst timeyou mm nu tilecamera or if the batteU is removed foran extended time. 1 SETDATE &T/VIE is highlighted.Press the OKbutton. -
Page 19: Checking Camera Status
Chapter 1 Checking Camera Status Tileieons that appear on the camera screen indicate theactive camera and pictnre settings.Seepage I0 for a list of tileicons. Tocheck tilecurrent camera setth/gs: Q) Turn theMode dial from the Offposition. "Status /f 10t is displa_,ed in tile statas area, press area tileFlash/Statusbuttonto display,additional settings. -
Page 20: Camera Screen Icons
Chapter1 Camera Screen Icons These icons appear on your camera screen \qlen tilesettingsare active. gamera/Picture Status Capture Modes _,hare I cons also on Mode dial) QualityIcons Protect .,k, Best Print Video *** Best(3:2) Email Better Favorite Good Auto Storage/Picturelocation SelfTimer &*ik Night _1_ Internal memor_ Burst... -
Page 21: Inserting An Mmc!Sd Card
Pushthe card into the slot to seat the connector. 5 Closethe door. Notched comer To remme the card, push it in, then release it. When tile card is partiall'_ ejected, i)1111 it out. Seepage 100 for storage capacities.Purchase SDA_IMC c ards at a dealer of Kodakproducts. See_.kodak.conl/go/cx6230accessories. -
Page 22: Choosing Internal Memory Or Sd!Mmc Card
SD/MMC Card I_--Store pic_lres and videos oll a card. Tile number of pictures or length of_ideos depends on tile sizeof thecard. Seepage 100 for storage capaeities.Purchase SD/MMC cards at a dealer of Kodak products. See ww_.kodak.eonl/go/e\6230aeeessories. Managing Your Storage Location Setting 1 Turn on the camera. - Page 23 Chapter 1 Checking Your Storage Setting /n Still and Video modes, tile storage loeatJonleon that appears in tile status area indicates tilecamera's storage location. To check the location, either: 0 Turn the Mode dial from tile Offposition, or 0 Ill ml_capture mode, press _. --Memory Card II_ --Internal Memory...
-
Page 24: Important Battery Information
Kodak Max digital camera batteries, AA (2) (included with camera) Battery Life (Approx, Number of Pictures * Included with the Kodak EasyShare camera dock 6000 and printer dock 6000 We do not recommend or support alkaline batteries, For acceptable batter}lift,,a11dto make sure}our camera operates dependal)l},use file replacement I)atterieslistedabme. - Page 25 Chapter 1 Extending Battery Life O Limitthe follnx_ing a ctivitiesthat quicMydeplete batteWpnxwr: Reviewing }nut pictures on the cmnera screen (see page 41) IIsingtivevie_ (see page 19) IIsingQnickview(see page 20 and page 36). Excessiveuse of tile flash O Purchase an optional Kodak3-/olt ACadapter to power your camera (see page 102).
-
Page 27: Taking Pictures
Taking Pictures Tilecamera is reMy to take pictures uhen you tun] it on--even if !,ouare in Resie_,Share, or Setup. (In Videomode, tilecamera captures ddeo.) Before you take a pk:ture, make sure tilestorage location is set the _a_,ym _ant it (see page 12). Take a Picture 1 Turn tileModedial to the mode you want to use. -
Page 28: Picture-Taking Modes
Chapter 2 Picture-Taking Modes For the best possible pictures, choose tile mode that suits your collditio_ls. Auto General p icnlre-taking.Automaticall} sets exposure, focus,and flash. &-,)!_ Night Nightscenes or low-lightconditions.Place tilecamera on a flat, stead}' s urface or use a tripod. Due to slow shutter speeds, a&_sepeople to stay still fur a few seconds a_er flashfires. - Page 29 Chapter 2 Liveview_Fra ruing with the Ca mera Screen Wheu you turn on lJ_eqex_, t ilecamera screen displaysali_e imageof whattile lens sees. I_setile camera screen to frame"_oursubject. I._IPORT,__NT: Livevie*_ .vign{lic(mtlyrech_ces'battery lift< 1 Turn the Mode dial to all'_Stillcapture position. 2 Press tile OKbutton toturn (mIJ*e_iew: 3 Dane "_our s ubject in the camera screen.
-
Page 30: Quickview--Reviewing The Picture Just Taken
Chapter 2 Quickview--Reviewing the Picture Just Ta ken After_ou takea picture, the camera screen displws a Quickviewof fllatpicture for approximately5 seconds.Whilefilepicture is displa_ed,_ou caJl: O Rmiew it: If'_outake no action, tilepicture Delete is sa_ed. O Share it: Press tileSharebutton to tag file llictumfor print, email, or as a Favorite (see page 51). -
Page 31: Using The Digital Zoom
Chapter 2 Using the Optical Zoom I_se Optical Zoom to get up to 3":. c loser to your subject. Optical zoom is effective _dlen the leus is uo closer thau 19.7 in. (50 cm) to tile subject. _heu you turn oil the camera, tile lens extends to tile Wkle &ngle position. Use tile _imffinder or camera screen to frame "ffmr subject. -
Page 32: Using T Heflash
Chapter 2 Using the Flash Usethe flashxqle_ _,outake pictures at night,indoors, or outdoors i_ hea_, shadows./ou can change the flash settingin an_, S tillmode; the defaultflash settingis restored when you e,(itthe mode or turn oft'the camera. Wide Augle _ (0.5-3.9 _/) Telephoto 11.6-7.5ft (0.5-2.3 m) Setting... - Page 33 Chapter 2 Flash Settings in Each Mode For tilebest possiblepictllres, flash settingsare pre-set for each capture mode. oetault FlasB _ettln_t Exitthe mode or turn Auto,FlashOff, _.lltO* offthe camera. FillFlash,Red-e}e _lltO* Flashcannot be tllrlled oIL * In these modes, xqlen._oucha_ge to Red-eye,it remains untilyou change it.
-
Page 34: Changing Picture-Taking Options
Chapter 2 Changing Picture-Taking Options Usethe Capturemenus to changepicture-taking options. If_,ouare in Re_ie_, SMm, or Setupmodes you must return to Capnlremode beforeyou can access the Capturemenus. To Return to Capture from Another Mode To return to Capturefrom: C) 4uy mode, press the Slmtterbutton half-war (_ Reviewmode, press the Reviewbutton. -
Page 35: Changing Optional Settings
Chapter Changing Optional Settings Press the Menu button to access optional picture-taking settings. NI menu options are not available in all modes. \_lode dial Turn for picture taking modes button... - Page 36 Chapter Picture Taking Modes Menu Options Available Video Still: - Autoa - Night II_ - Landscape - Close-up SelfTimer (page 27) Image Storage (page 12) ExposureComp, (page 28) Burst (page 30) Picture Qu:dit) "_ (page 29) olor Mode (page 31) SetMbum (page 32 •...
-
Page 37: Putting Yoursdf I Nthepicture
Chapter 2 Putting Yourself in the Picture TileSelfTimercreates a lO-secnnddelayhet_een the tinle_,nupress tile SMtter hutton and tiletime tilepicture is taken. 1 Ill a_} Stillmode, press tile Menuhutton. 2 Press a,_/_ tohighlighttheSelfTimer icon _.), then press tile ORMttm/. 3 HighlightOn, then press the OKbuttnn. 4- Press the Menu button to turn offtilememl screen. -
Page 38: Setting Exposure Compensation
Chapter 2 Setting Exposure Compensation UseExposureCompensatioutocontrol hm_mueh lightentersthe camera. This settingis usefulfor taking pictures in high-contrastscenes, or for remkiug pica.ires_qmnyou are not satisfiedwiththe brightness. Adjusttileexposure I) 7 plus or mimls 2 steps in l/2-step increments. 1 hi mr_Stillmode, press the Menu Iluttou. 2 Press _/_ to highlightthe ExposureCompensation icon [_, then press tile OKbutton. -
Page 39: Setting Picture Q Uality
Chapter 2 Setting Picture Quality IJsetileQnaliWsettingto selecta picture resolution. 1 In an_,Stillmode, press the Menubutton. to highlightthePkttnre i 2 Press _ Quail%icon "Jr",then press the OKbuttoo. Highlightan option, then press the OK button: Best "_'It7 (2.0 MP)--for printing up i!!ii!i!iiiiii_ii!_!_!i!,i_i!ifiiii_i¢i_!i¢ii_i_!ii_i_iii_i_ili_i_i i_iii!_!_!_i_!i!;_i_!i_i_;_i_ii_i:i_i_i_i_!i_:_!_i_i_!_!i_ii_i_i to 8 x 10 in.(20 x 25 cm);... -
Page 40: Taking A Burstseries O Fpictures
Chapter 2 Taking a Burst Series of Pictures Burstk,ts_nuto takeup to 3pieturesin quick successhm (al_prn_mately 3 framesper second). Burstis ideal for captnringsporting eu,nts or objectsin motion. SelfTimeris disal)ledwhenyou use Burst. Turn On Burst 1 /n an},Stillmode, press the Metal button. 2 Press _/_' to highlightthe Burst icnn mJ_l,then press the OKbntton. -
Page 41: Setting Color Mode
Chapter 2 Setting Color Mode tse ColorModeto comrol color tones and moods. 1 /n m}_, Stillmode, press the Menubutton. 2 Press _]_ to highlighttileColor .Mode icm__, thenpress tileOK button. 3 Highlightan option, then press the OK button: Color (default)--for color pictures. Black &White--for black and white pictures. -
Page 42: Pre-Tagging Foralbum Names
Chapter 2 Pre-tagging for Album Names Usethe SetMbum (Still)feature to pre-seleet album names before_ou take pictures. Then,all tilepictures .'you "takeare taK*ged withthose album ramies. First--On Your Computer UseKodakF.as}Share soft',_are, V 3.0 or higher, to ereate album ramieson }our computer,then copy up to 32 album nmnes to the camera's internal memor}. SeeKodakEas_Sharesoft_are BelI)for details. -
Page 43: Placing Thedate Onpictures
Chapter 2 Third--Transfer to Your Computer When }ou traslsfertile taggedpictures to}our computer, tileKodakEas}Share so_are opens mid categorizes}our pietures in tileappropriate album folder. Seetile KodakEas}Sharesofix_are Help for details. Placing the Date on Pictures I!se tileDate Stampsettingto imprh}tthe dateon ymr pictures. 1 .Makesure the camera clock is set to the correct (late (page 8). 2 In au.'y Stillmode, press tile Menubutton. -
Page 44: Setting Theorientation Sensor
Chapter Setting the Orientation Sensor /f _,ou rotate the camera to take a picture (for example, a portrait shot), the Orientation Sensor reorients tile picture so Nat it is displav,d correct side up. Tile Orientation Sensor is turned on as tile default. 'Youcan turn it off so that pictures are not rotated. -
Page 45: Taking Videos
Taking Videos Use _qdeo modeI_ to take_deosandto custounze _ ldeo-takiu_, settings..• Befnre_nutakea_ideo,makesureyourpicture stnrage locationis settilewa_ you_aut it (seepage12). NOTE: Flashis not available in Videomode.Change O pticalZoombefore(but not during) video recording. Soundis c@tured b} tilemicrophone, but ispla}ed back olflywhentile_deo istransferred toa computer or when the camera is connected to a television(see page 48). -
Page 46: Quickview--Reviewing Thevideo J Usttaken
Chapter 3 Quickview--Reviewing the Video Just Ta ken After)ou take a _ideo, tilecamera processes it, then displws the first frameof the videofor approximately5 secouds.Whilefileframe is (lispla_ed, y ou ceal: O PIW it: Press the OKbutton.Press the OK button againto pause the video. O Share it: Press the SharebuttCm to tag file video for email or as a Favorite(see page 51). -
Page 47: Using T Heoptical Zoom
Chapter 3 Using the Optical Zoom I_seOpticalZoomto getup to _,X (loser to ymr_ ublect. _ hell ?ou mm on tile camera, tilelens is set to the WideAnglepositiou. NOTF.: ]ou carl change OpticalZoom before (but not during)/ideo recording. --Wide Angle 1 Usetile/ie/_{iuderor camera screeu to Telephoto frame)our subject. -
Page 48: Pre-Tagging Foralbum Names
6 Press the Mennbutton to exit tilemenu. This setffng remains until you change it. ThirdiTransfer to Your Computer When you transfer tilt"lagged_ideos to _,oureomputer,the KodakF.as_,Share softx_are opens ;uld categorizes_,our_ideosin the appropriate allmm folder. Seethe Kodak Eas_,Share s oft_are Helpfor details. -
Page 49: Putting Yourself Inthevideo
Chapter 3 Putting Yourself in the Video TheSelfTimercreates a lO-seconddelay, h et_een Ill,, time yonpress the Slmtterbutton and the time _ideo recording begins. 1 Ill Videomode _, press the Metal Inltton. 2 Press _/_' to lzighlight t he SelfTinler icon _), then press the OKbutton. 3 HighlightOn, then press the OKbutton. - Page 50 Chapter Self Timer/ Compose the scene. Press the Slmtter button completel} dm_n, Video light then mo\e so that you are in tim scene. The Se_l'imelVVtdee light hliJ_ks ,s'km'{)' fi)r 8 secrmds (thell quicklj' fiJr 2 second, s') b_re the video begins recording lt_e light ,s't_o_s' on while recerdinq_ l'he Se(flmer...
-
Page 51: Reviewing Pictures Andvideos
Reviewing Pictures Videos Press the Re_ie_button to viewand work x_ithyour pk:tures and videos. To sa_ebatteU pm_er,plaee_our camera ill the optionalI(odakEas_Sharecamera dock 6000 or I(odak Eas_Share printer dock 6000 m re_ie_ pictures all(1 videos (see page 67). Remember, press tile Shutter button to take a picture anytime--even in Review. -
Page 52: Viewing Multiple P Ictures Andvideos
Chapter 4 NOTF.: IfPicture Quali_ is set to Best (3:2), the imageis displa}edat a 3:2 aspect ratio, as shmul, witha black bar at filetop of the screen. Viewing Multiple Pictures and Videos 1 Press the Re'4e_ button. 2 Press _. NOTE: "... -
Page 53: Deleting Pictures And Videos
Chapter 4 Deleting Pictures and Videos 1 Press tile Revie_buttnn. 2 Press {/b tolocateapietureor_ideo (or higltiightone in multiple vieu), tilenpress tile Delete button. 3 Press _/_ to highlightan option, ti/en press tile OKbutton: PICTUREor ¥1DEO--deletes tile displa}edpictnm or _Jdeo. EXlT--e\its tileDelete screen. AU,--deletes all picturesmid _ideos from }our current storage location. -
Page 54: Changing Optional Review Settings
Chapter 4 Changing Optional Review Settings In Re_ie_ mode, press the _,4enubuttonto access optional re_e_ settil_gs. Magnif_ (pictures) (page 44) SlideShow (page 47) Pla_ (_kleos) (page 42) _1_> Cop} (page 49) Share (page 51) VideoDate Displa_ (page 50) hnage Storage (page 12) Multi-up (page 42) Protect (page 45) Picture/Video... -
Page 55: Protecting Pictures Andvideos From Deletion
Chapter 4 Protecting Pictures and Videos From Deletion Press tile Rexiex_ b utton, the_ locate tilepicture or *i(leoto protect. 2 Press tile Menubutton. 3 Press _/_ to IlighlightProtect _l, then Protecticon press the OKbutton. l_e pictuw or vMen Lv prutected mM callllot be deleted. -
Page 56: Tagging Pictures!Videos Foralbums
Chapter 4 Tagging Pictures/Videos for Albums Usethe Mlmm featurein Re_ie_ mode to tag the pictures aM'_ideos in your \qth camera albunl names. First--On Your Computer UseKodakF.as},Share s ol,are, V3.0 or higher, to ereate albnm ramieson },our computer,then copy up to 32 albnnl nmnes to the camera's internal menlor},. SeeKodakEas_Sharesoft_are Help for details. -
Page 57: Running A Slide Show
Chapter 4 Third--Transfer to Your Computer When _,ontransfer tiletaggedpiemres and videos In_,onrenmputer,tileKodak Eas_,Share s oft_are opens and categorizesymr pictures and videos ill the appropriate album fol&r. See I_odakEas_,Share so_are Help fnr details. Running a Slide Show I;se tileSlideShm_to display, ymr pictures aud _ideos on tilecamera screen. Torun a slide shm_on a telmision or on an'_external de_ice, seepage 48. -
Page 58: Displaying Pictures!Videos Ona Television
Chapter 4 Running a Continuous Slide Show Loop When Bm turn on Loop,tileslide shinsis coutiuuuusl!,repeated. 1 OiltileSlideShowmenu, press ,_/v highlightI,oop, then press the ORbutton. 2 HighlightOn, then press the ORbutton. t_en.),ou start a slide shozr, # repeats until you cancel it l_ipmssing tl_eOK button or until batteo, power is exhausted, lZ_eLoop.vettingremains until Jou changeit. -
Page 59: Copying Pictures A Nd Videos
Chapter 4 Copying Pictures and Videos ;ou can cuD pictures aad _kteosfrom a card to interua/memur_ or from iaternal memor_to a card. Before you coD; make sure that: 0 Acard is hlsertedin the camera. O The camera's picture storage locationis set tothe location from _hich you are copying.See Choosinghlternal Memor)or SD/MMC Card, page 12. -
Page 60: Displaying Video D Ate
Chapter 4 Displaying Video Date Todislfla_,the capturedate and time (only,during _ideopla!,baekon tile Calllera): 1 Press the Revie_a button, then press the Menu breton. 2 Press *_//'_'_*'_ tohighlightVideoDate Displg ['_, then press the OKbutton. 3 Highlightan option, then press the OK button. -
Page 61: Sharing Pictures Andvideos
Sharing Pictures and Videos TileShare huttonlets Bm "tag" your pictures and videos.When rileyare transferredto your computer,you can share: Tagged Pictures TaggedVideos C) Byprint C) Byemafl O Byemail O AsFa/orims O AsFavorites,fur eas_, o rganizationon your computer Print (page 52) F.umil(page 53) Fa'mrite (page 54) When Can I Tag My Pictures and Videos? -
Page 62: Tagging Pictures F Orprinting
Chapter 5 Tagging Pictures for Printing 1 Press tile Sharebutton.Press 4/b locate a picOlre. 2 Press .,_./_ to highlightPrint ,_, then press the OKbutton.* 3 Press _1_ to selectthe mmlber of copies (0-99). Zero removes the tag fur that picture. The tWnt icon _ appeam fu the stah_s defa,dt... -
Page 63: Tagging Pictures A Nd Videos Foremailing
Chapter 5 Tagging Pictures and Videos for Emailing First--On Your Computer ITseKodakEas)Sharesnftwareto create an emailaddress book on ._onr computer.Then,cop} up to 32 email addresses to tile camera's internal IneuloQ Second--Tag On Your Camera 1 Press the Share Imttnn.Press 4/b locate a picture. 2 Press a._/_ to I_ighlight E mail _, then press the OKbutton. -
Page 64: Tagging Pictures A Nd Videos Asfavorites
_,ou choose. For details, click tile Help button in the Kodak Eas!,Share soft_are. Need Help? Click the Help button in the Kodak F.as_,Nharesol, are for details on ereating address hooks, and printing, emailing, and organizing tagged pictures on },our computer. -
Page 65: Customizing Yourcamera S Ettings
Customizing Your Camera Settings IJseSetupto customizecamera settingsaccording to your preferences. To Access Setup Mode/Menus 1 In m}'_ mode (il_eluding Re_ie_), press the Metal button. 2 Press _/_ to highlightSetup._leml_., then press the OKbud, ton. Setup Menus kleo Out (page 59) Return to pre_ious menu DefaultPrint Quanti_ Language(page 59) -
Page 66: Changing Thedefault Print Q Uantity
Chapter 6 Changing Default Print Quantity TheDefaultPrint QuanLiW determines the wtiuethat is displa_edon tile setting SMre Print screen (page 51). Tiledehult vMueis 1. 1 Press tileMelm buttml. 5' Press _/_ to highlightSetupMenu .,*_, tilenpress tile OKhutton. 3 Highlightthe DefimltPrint Qnantiwicon then press tileOKbutton. -
Page 67: Turning Qnliveview Instillmodes
Chapter Turning On Liveview in Still Modes Tilt"Li_t,vie_ feanlre lets _ou use tilt' eamera sereen as a vie_finder (see page 19). Tile default setiing is Liveview Off.Press file OKbutton to turn it on. IMPORTANT:Liveview sign!/icanth r('d_lces barrel 3 hifi!. To change tile Livedew default to On: 1 Press tile Menu button. -
Page 68: Changing Digital Zoom
Chapter 6 Changing Digital Zoom 1 Press the \'Mm butto11. 2 Press _jt_ to highlightSetupMetal _, theu press the OR button. _{!D| 3 Highlightthe Digit:dZoom icon _l,then press the OKbtlttOll. Highlightan option, then press the OK button: Continuous--digital zoom automatically turns on after the Telephotobutton is pressed to the optical zooul limit and held. -
Page 69: Setting Video Out
Chapter 6 Setting Video Out VideoOut is a reginu_lsettingthat lets )on cum}ect . '?ourcamera toa tde_ision or other external de_ice (see page 48). 1 Press the Menubutton. 2 Press _/'_" to highlightSetupMenu __, then press the OKbutton. 3 Highlightthe VideoOut icnn [_, then press the OKImtton. -
Page 70: Formatting Internal Memory Orsd!Mmc Card
Chapter 6 Formatting internal Memory or SD/MMC Card CAUTION: Formatting erases all pictures and _ideos, including those that are protected. Returning a card during formatting damage the card. 1 Presstlle Menubutton. 2 Press _/_ to IlighlightSetupMetal l_, thei}press tile OKbutton. 3 H_ghhght F or nat _n, then press the OKbutton. -
Page 71: Installing The Software
Installing the Software NOTE: T oinstall soft_are ou computers running \'_indm_s2000, \\indows M_ Pro operatings_stems,orMacOSX,._ouueed administratorpri'_ileges. See}our computer user's guide. Windows System Requirements O Personal computer ruuning g!indu\_s98, 98SE,MF., 2 000, or XP operati_gs}stems O 233 MHzprocessor or greater (300 MHzrecomme_ded forWindows 2000 midXPoperating s}stems) O 64 MBof availableRAM(128 MBrecommended) 100 MBof a_ailableham disk space... -
Page 72: Mac Qs X System Requirements
Chapter 7 Mac OS X System Requirements 0 Macintoshcomputer_ith a G3 or G4processor 0 MacOS10.1.2, nlioimum (_ 128 MBof availableR_M O 200 MBof axailablehard disk space O CD-ROM drive O Built-inIISBport C) Colormonitor witha minimum resolution of 800 x 600 pixels;thousands or millionsof colors recommended O/nternet access for online printing ml(1 emailing Mac OS 8.6 and 9.x System... -
Page 73: Install The Software
Chapter 7 Install the Software For inbrmation on tile soft_arc @plicationsinduded on tile KodakEas_,Share sol, are ¢D, click tileHelp bretonin tile KodakEas?Sharesol, are. CAUTION: Install Kodak EasyShare software beJbre connecting tile camera or optional eaJnera dock to the computer. Failure to do so may cause tile software to load incorrectly. - Page 74 Chapter 7 Fullm_the on-screeu iustructions to installthe sub, are. 0 Windows OS-based computers--seleet Completeto automaticalh installthe most commonlyused applications.SelectCustomto choose fileapplicationsyou wishto install. 0 Mac OS 8.6 or 9.x--select Easyto automatic:ally installthe most commonlyused applications. 0 Mac OSX followthe on-screen instructions. NOTE: W hen prompted, take a fewminutesto electronicallyregister _uur camera and sol, are.
-
Page 75: Connecting Camera To Computer
Camera to Computer CAUTION: Install Kodak EasyShare software before connecting tile camera or optional camera dock to the computer. Failure to do so may cause the software to load incorrectly: _ou can transfer pictures and videos from timcamera to the computer using: Q) The (indu&d) IJSBcable. -
Page 76: Print With Or Without A Computer
() antomatica]lyprint taggedpicturestqmu _,ouinsert yunr card intu aprinter xdth :mSDA_IMC s lot. Seeyour printer user's guide fnr details. 0 Makeprints at an SDX_lMC-capable Kodakpicture maker. (Contacta location prior to _qsiting. S ee ww_.kodak.conl/g_q_icturemaker.) 0 Taketile card toyour local photo retailer fur professional printing. Print... -
Page 77: Using The Camera Dock 6Qqq
Using the Camera Dock 6000 TheKodakEas}Sharecmnera dock 6000: 0 Makesit eas} totransfer ilicalres and _ideosto tile computer. 0 Chargesthe included KodakEas}ShareNi-MHrechargeable bark, U pack. (Installtile batteU paek ill the camera for charging.) 0 Suppliespmu,r to the cmnera. Youcall purdl_Lsea camera dock at a dealer of Kodakproducts. See w_.kodakeom/goA:',6230aeeessories. - Page 78 Chapter 9 Installing the Custom Camera Insert A universal insert is pre-insta/led in theeamera doek. It allm_s all F,o(lak Eas)Share C_DX6000series and LS600seriescameras to use tin' camera clock. A custom insert is inchlded xdti1 }our cmnera./t provklesa perfect fit for your I_odakEas}Share¢X6230zoom digitalcamera.
-
Page 79: Connecting The Camera Dock 6000
Chapter 9 Connecting the Camera Dock 6000 Afterthe KodakF'.as_Share s oft_are is loaded (see page 61), eonnect the camera dock to your computer and to a power outlet._ou need: O The tSB cable included `,`,_th y our canem Q) The ACadapter, 5-voltincluded withthe camera dock IMPORTANT: Make sulY, 3our camera is NOT in the camera dock whet* 3oft ctr(, _ ottnecti_tg... -
Page 80: Installing The Rechargeahe Battery
Chapter 9 Installing the Rechargeable Battery _ou reeeiwd non-recMrgeable batteries with_our eamera. To _ke flfll a&autage of _,ourc:unera dock 6000, replace the batteries withthe I_odak Eas_,SMreNi-MHrechargeable batteU pack that is packaged withthe camera {lock. 1 Openfile batter_door ol/tile bottom of tile camera. -
Page 81: Docking The Camera
Chapter 9 Docking the Camera Tocharge tilebatteU or to transfer pictures and/idens from tile camera to tile computer: 1 Flip down the camera (lockfnot. Alignment 7_e camera dock _ou' sits at theprnper mgle fi)r Hewh_gthe camera scree_. 2 Turuoffthe camera. 3 Matchtileconnector and alignmentpins on the cmnera dock totile camera. -
Page 82: Charging The Battery
Chapter 9 Charging the Battery 1 Makesure tileKodakF, a s_ShareNi-MH rechargealllebatteWpacl_is ins_led in tile camera (see page 70). 2 Tnrnofftilecmnera and place it ill file lights camera dock (see page 71). lf tbe batteO' requires cba_rd_g,cba_d_g begh_safter a bri_f batteo_&eck. O Fullcharging takes about 2.5 brows. -
Page 83: Transferring Pictures With The Dock
2 Push the Transfer button. _l_eh'ansfi,r light blinks glz,en u'hile the pictuws and videos alw transfi,l_ing. J/es._zgesabout the transfer status appear button oil the cdmel'(I,wreell. Kodak ]:,]a,%S_,al'e software automatica&' opens o** 3'our light computer NOTF.: aftertrausferring,tilecamera clockresumes charging as necessary,. -
Page 84: Reviewing Pictures And Videos
Chapter 9 Reviewing Pictures and Videos When the camera isin the clock,the camera is powered b_,tiledock, not tile camera batteries. Sa_ebatteU p(mer by using tiledock to reviewpictures and videos oil tile calnera screen. 1 Turnon the camera and place it ill tile cmnera dock. -
Page 85: Troubleshooting--Camera
Chapter 9 Troubleshooting--Camera Dock 6000 H!i iiiii ! iiiiiqiiiiiiiiiiiiiiiiiiiiiiiiiiii Pictures are not ACadapter or [SB Checkthe connections (page 69). transferred to cable is not securely cmmected. file computer Sol, are is not Install the software (page 61). i_st_led. Too man_applications Closeall so_are applications aml W again. -
Page 87: Troubleshooting
When _,ouha_e questionsabout _,ourcamera or camera clock6000, s"tart h ere. Additiollaltechnical informationis availablein the ReadMefilelocated on tile g, o dak Eas_,Share s oft_are ¢D. For updatesto Troubleshooting i nformation,see w_.kodak.eom/goA:x6230support. Camera Problems Cmneradoes not Batter? is not properl'_ Reinstallthe hatter_,(page 4). - Page 88 Chapter 10 Shutter button Camerais m_tturned Turnon fl*ecamera does *lotwork (page 6). Tilecamera is Waituntil the ready light stops processing a picture; blinkingred beforeattemptingto the read_, l ight (near takeanother picture. tile vimffinder)is blinking red. 'file card or internal Trmlsferpictures totileemnputer memou is fifll.
- Page 89 Chapter /n Re_ie_ mode, Theeamerama},notbe Cheekfllepicturestoragehmatin_ 'ou do not see a accessing the correct setting (page !2). _icture (or the storage location. expectedpicmre) Oil the calllera scr{_eIL Picture is too Flash is not on. Turn on the flash (page 22). dark.
- Page 90 Chapter 10 In Re'_im_ m ode, The pieture has no Transfer the picture to tilt" a blue scree_ is flnnnbnail or an computer(page 65), or deletethe displwed instead unrecognized picture (page 43). of a picture, thumbnail. Pictureis not The lens is dirt). Cleantilelens (page 98).
-
Page 91: Camera!Computer Communications
Chapter 1Q Camera/Computer Communications Theeomputer There is a prol)lemx_ith See this fileon the F.as}_hare cannot the configurationof the so,rare CD:USB.htmlOr, go to: communicate USBport on tile t_kodak.com/go/ withthe computer, eanlerasupport. camera. Camerapower is off. Turn on the camera (page 6). (For communication Batter_, is notcharged. -
Page 92: Sd!Mmc Cards And Internal Memory
Chapter 10 Canuottr:msfer Soft_are is notinstalled. Disconnect I;SBeallle. (If using _ictures. camera dock,disconnectcallleand (The Md New remme camera fromdock). Install Hardx_are Eas_Sharesof_are (page 6 I). _izard cannot Sofmare is installed Disconuectthe IOSB c al)le.Closeall locate dri*ers.) incorrectl'> open applications.Uninstall,then re-install tile soft_are (page 61 ). To tmJnslall,go to StaWSettJngs/ ControlPanel/Add/Remo_ e Programs. -
Page 93: Camera Screen Messages
Chapter 1Q Memory, card Storageis flfll. Tr_)sferpietures aud _qdeostotile full computer, then delete thenl from tilecamera. The ma.,_imum Transferpictllres _ld videosto the number of filesor computer, then fnrmat the card or foldersis reaehed (or internal memoU (page 60). other directoU Cautioll:Fornlattinga card erases conceru). - Page 94 Chapter 10 :C _u Soiuti Thecalm,ra internal Format the hlternal memory ]nterml] requiresfnrmatting memor) is corrnpted, memou (page 60). Internalmemo_ Caution:Fnrmattingerases all pictures and videos, c_mnot beread(Please fnrmat iuternal includingprotected files. (Formattinginternal melnoU) memoU also erases email addresses and album names.
- Page 95 Chapter 1Q Memo U card is Sxqtchon card is in Reset the s_qtchas shm_n _rolected(Reset write-protectposition, on camera screen. s\qtdl on lllemoU card) Memor_cardislocked The card is To take a picture, insert a Insert'ue_ memor_ write-protected, nm_card or change storage card) location to imernal memoU (page 12).
- Page 96 Chapter 10 :C _u Soiuti Dateand timeha_e Thisisthe first time!,ou Reset the clock (page 8). been reset turned on tilecamera; or the batteU has been removedfor an extended period of time; or the batteU is exhausted. Tile internal Lea_etile camera offfor Highcamera temperature.
- Page 97 Chapter 1Q tnrecoguized file Tile canera eamot Tralsfer the mlreadable format read tilepicture format, picture to tile computer (page 65), or delete tile picture (page 43). Noaddress book on Addressbook has not Createaid copyaldress canera (Cmmectwith been copied to the book fronl computer.
-
Page 98: Camera Ready Light Status
Chapter 10 Camera Ready Light Status Ready light Read}light does not Cameraisnotturned Turnon the can/era tunl on and the (page 6). camera does lint Batteu is exhausted. Rechargethe batteU work. (page 72) or installa new one (page 4). Mode dial x_as on Turn ,Modedial off,then back on. - Page 99 Chapter 1Q Rea(lylight blinks Flashis not charged. Wait.Resmnepicture taking amber, whentile lightstopsblinking and turns green. Release the Shutter bntton AlltOexposure or mlto focus are not aml recompose the picture. locked. Readylight blinks red. BatteU is low or Rechargethe batteU exhausted. (page 72) or installa new one (paNe4).
-
Page 101: Getting Heip
Getting Help Helpful Web Links Help with your camera wwx_.kodak.eom/goA:x6230support Help with Windows operating ww_.kodak.eom/go/pebasies s_,stem a_ld worMng with digital pictures Dm_uload the latest camera wwx_.kodak.eoul/goA:x6230dowu/oads soft_are and firmware Optimize _,uur printer fur truer, ww_.kodak.eoul/go/onetoueh more vibrant colors Get support fur cameras, sol, are, wwx_.kod'ak.eoul/go/support... -
Page 102: Telephone Customer Support
Chapter 11 Telephone Customer Support /f _,ouMve questionseoneerning the operatio_ of the soft_are or camera, you ma_, s peak _qtha customer support representative. Before You Call 0 Haw the camera or eamera dock connectedto your computer. 0 Be at !,ourcomputer. 0 Haw the follo\_inginformation available: Operatings_,stem Processor speed (._lHz) - Page 103 Chapter 11 Telephone Numbers Australia 1800 147 701 AustrWOsterreich 0179 567 357 02 713 14 45 Belgiut]VBelgique Brazil 0800 150000 Cmmda 1 800 465 6325 China 800 820 6027 Denmark/Danmark 3 848 71 30 /relan{gF,ire 01 407 3054 Finlalld/Suomi 0800 1 17056 France Ol 55 1740 77 069 5007 0035...
- Page 104 0870 243 0270 [ nited States 1 800 235 6325 Outsidethe [ uited States 585 726 7260 International TollLine +44 131 458 6714 /nternatiomd TollFax +44 131 458 6962 For file most up-to-datelistings, _sit: http://x_ _ x_.kodak.eo n lA S/en/dJ_tal/eontaets/DAI I nternationa/Contaets.shtm/...
-
Page 105: Appendix
Appendix Ca mera Specifications Color 24-bit, millionsof colors Colormodes Color,black &x_hite,sepia Communicationwithcomputer USB, _ ia: USBcable; Eas3_harecamera dock 6000; or printer (lock6000 Dimensions Width 4.1 in. (104 ram) Depth 1.6 in. (42 ram) Height 2.6 in. (67 ram) _ eight 7.6 oz (215 g) \_ithbatter_and card Exposuremetering Centerweighted... - Page 106 Chapter 12 OpticalqualiWglass, aspherica[ lens Leus T}pe .Maximum f/2.7 - f/4.6 aperture 36 - 108 mm FocalLength FocusDistance Stat]dardWi(le:19.7 in. (50 cm) toinfJniW Close-upTele:7.9 in. to23.6 i_].(20 cm to 60 cm) Close-up Wide: 3.9 to 23.6 in. (10 cm to 60 cm) Landscape:Fixedfocus 1.6 in.
-
Page 107: Original Factory Settings
Chapter 12 Viewfinder Opticalreal image Ime I_alance" Auto Zoom (stillcapture) 5X optical, 3. SXdigital Original Factory Settings DateMime 2003/01/01; 12:00 Date/TimeStamp DefaultPrint Quantdt_ ExposureCompensation Flash Still:Auto Video:Off hnage Storage Auto Language English Li',miew Oft" SelfTimer Picture Qua/ig Best QuicMie_ SlideShowInter_a[ 5 seconds SlideShowLoop StorageLocation... -
Page 108: Shutter Speeds
Chapter 12 Shutter Speeds I.'orsftmter speedsslm_er than 1/30 second,place the camera on a flat,steady surface or use a tripod. Upgrading Your Software and Firmware D(mnkmdtilelatest _ersions of tilesolid,are included on the KodakF.as_Sftare sof_vare¢D midtile canlera firmware (file soft\_arethat runs on the camera). See_ k{(ak _o /g{/_x623!)&m o lds Tips, Safety,... -
Page 109: Storage Capacities
Chapter 12 O Wipethe nntskte of tilt'camera with a clean, dU cloth. Neu, r use harsh or abrasiw clemlers or organic solventson the camera or anyof itsparts. O Connecta tripod directb to the camera; do notconnect a tripod to the cmnera dock. - Page 110 Chapter 12 Picture Storage Capacity iiiiiiiiiiiiiiiiiiiiiiiiiiiiiiiiiiiiiiiiiiiiiiiiiiiiiiiiiiiiiiiiiiiiiiiiiiiiiiiiiiiiiiiiiiiiiii 16 MB internal memory 16 MB SD/_MMC 32 MB SD/WiMC 64 MB SD/_MMC 128 MBSD/MMC Locating Pictures and Videos on a Card Pietures stored on SDAMMC Cards use a standard (DCF-Digital Camera Format) agreed upon by manycim_erammnlfactnrers.Thislets }on use tile cards in different cmneras.If}on use a card rea&r to retrieveyonr files,the follnwingdescription of tilecard filestnlctnm nla}be helpfifl.
-
Page 111: Picture Naming Conventions
Chapter 12 Picture Naming Conventions C) Pictures are named lot) nmm.JPG,and are nunti)eredin tilt, order in _llieh theyare taken.The firstpicture is named lot)O001.JP6; the highest nmnber allowedis 100 9999.JPG. Q) When a card contains a picture named 100 9999.jPGin tile \DCI\_I\I00K6230 folder, suhsequent pictures appear in a newfolder (kDC/M\I 0 1K6230),hegimlingwith picture 101000 I.JPG. -
Page 112: Optional Ac Adapter
2 Com_ect t he other end of the _.Cadapter to an electrical outlet. Purchase batteries and ACadapters at a dealer of Kodakproducts. See kodak.com/go/cx6230accessories. CAUTION: Do not use tile optional AC adapter, 3-_olt with tile Kodak EasyShare camera dock 6000. It is NOT compatible. -
Page 113: Fcc Compliance And Advisory
Chapter 12 FCC Compliance and Advisory Tested to comply with FCC Standards. Kodak EasyShare CX6230 zoom digital camera ] FOR HOME OR OFFICE USE ThisequipmentMs been tested and found to comply_qththe limitsfor a Class Bdigitalde_ice,pursuant to Part15 oftile FCC Rllles.These limitsare designed toprmide reasonallle protection againstharmflll interference in a residential installation. - Page 115 Index Numerics batteries 4-x_ay controller, ii, 6 alkalinewarning, 4 charge via camera dock, 72 A/V out, iii, 48, door location,iv AC adapter expected life, 14 3-volt,camera, 102 extendinglife, 15 5-volt,camera dock, 69 loading,4, 70 accessories safeb and handling, 15 AC adapter, camera, 102 bpes, 14 batteu, 15 black &...
- Page 116 index camera dock caring for your camera, 98 camera compatibilit_,75 changing chargingbatter_,72 picture _king mode, 18 connection,69 storage location, 12 chargingbatteU via camera COllll,tCtOf Oll Calll,tfa_ docking camera, 71 dock, 72 ins.tailing custom insert, 68 charginglights,camera dock, 72 lightssums, 73 checking packagecontents, 67 camera status, settings,9...
- Page 117 73 printer, 66 CRY3 batteU do\_nloadingpictures, 65, 73 expectedlife, 14 installing,4 EawShare software &,e also custom insert, 68 Kodak Eas_Share customer support, 92 software, 61 customizingcamera settings,55 emailing pictures, videos, 53 error messages, camera date screen, 83 displa_ing on video, 50...
- Page 118 77 setting storage h)cation, 12 camera dock, 75 storage capacig, 99 support, 91 troubleshooting, 77 web links, 91 Kodak Eas2_haresoftware gettinghelp, 91 installing,63 iCOI1S upgrading, 98 camera screen, 10 Kodakweb sites, 91 capture menus, 24 mode dial, 18...
- Page 119 index I,C_ (liquid crystaJ displw). &_e magni_ picture, camera screen nlaJntenance_ calllera_ lens mem( W cleaning,98 insertingcard, 11 lncatJ(m,i intema3,11, 12 light remnveable card, 12 camera dnck, 72, 73 storage capacities,99 readL ii, 88 storage location setting,12 sdf timer,i, 27, 40 menu sensnr, i button, ii...
- Page 120 index magnifying, 4 4 printing, 66 night (node, 18 printi((gtagged,52 Ni-MHrechargeable batte U protecting, 45 expected life, 14 quaJib, setting,29 ins'tailing, 70 reviewing,41, 74 NTSC,vide(( out setting, 59 storage capacib', 99 tagging,32, 46 OKbutton, ii, 6 taking, 17 online prints, ordering, 66 taking, modes, 18 transfer via camera, 65 optica3 zoom, 37...
- Page 121 index this user guide, 1 menu ul)ti(ms, 44 withouta cumputer,66 multi-up, 42 product uverview, i i protecting, 45 protectingpictures, videus,45 slide show, 47 reviewing videus as you take them, 36 quafiU setting,29 camera duck, 74 quickview camera screell, 4 ] turning off, 56 ddetJng, 43 using,20, 36...
- Page 122 index sepia tone pictures, 31 viewing on camera, 47 service and support, telephone viewing on tdevision, 48 software numbers, 92 setting getting help, 91 date and time, 8 installing, 63 flash, 22 upgrading, 98 language, 59 spedfications picture quality, 29 cmnera, 95 picum, taking mode, 18 camera dock, 74...
- Page 123 38, 46 upgrading software, for emaJl,53 firmware, 98 for print, 52 URLs, Kodak web sites, 91 when to tag, 51 USB (unive_a] seria3 bus) takingpictures, 17 connecting to camera, 65 taMngvideos, 35 collllectJllg to calllera telephone support, 93...
- Page 124 index viewfinder lens, i location,ii usingcamera screen, 19 viewing camera information,60 magnifiedpicture, 44 picmm after taking, 20, 41 picture/video inf(mnation,50 pictures and videos, 41 videoafter taking, 36, 41 wide angle button,ii WindowsOS installingsofh_are,63 s_stemrequirements,61 wrist strap, 5 wrist strap post, i zoonl button,ii digital,21, 58...
- Page 125 EastmmlKodakCompany 343 S'tateStreet Rochester,New'turk 14650 © EastmanKodakCompan},2003 Allscreen images are simulated. Kodak,Eas}Share,Ma\, and Retinar are trademarks of EastmanKodak Compml_,. P/N 6B8755...
Need help?
Do you have a question about the EASYSHARE CX6230 and is the answer not in the manual?
Questions and answers