Advertisement
Table of Contents
OWNER'S
MANUAL
Operating
and Servicing
Instructions
Please read these
instructions
carefully
before using your cleaner.
Let us help you put your
vacuum
together
or
answer any questions
call:
1o800o321o1134
(USA & Canada
www.dirtdevil.com
WARNING
Cleaner
assembly
may
include small parts.
Small
parts
can present
a choking
hazard.
For quick reference,
pRease record your
vacuum information
bemow,
Modem #:
Mfg. Code:
(Mfg. code locatedon the lower backsideo[ cleaner)
Espa_o/o pagina E1
@2003 All rights reserved
# 1z113169z000
5/03
Advertisement
Table of Contents

Subscribe to Our Youtube Channel
Related Manuals for Dirt Devil 87500


Summary of Contents for Dirt Devil 87500
- Page 1 OWNER'S MANUAL Operating and Servicing Instructions Please read these instructions carefully before using your cleaner. Let us help you put your vacuum together answer any questions call: 1o800o321o1134 (USA & Canada www.dirtdevil.com WARNING For quick reference, pRease record your Cleaner assembly vacuum information bemow,...
- Page 2 THIS CLEANERJSINTENDEDFORHOUSEHOLD USEONLY. mNPORTANTSAFETY mNSTRUCTmONS When you use an appliance, basic precautions shouH be followed, including the following: • READ ALL INSTRUCTIONSBEFOREUSING THE APPLIANCE. • ALWAYS FOLLOW THESESAFETY mNSTRUCTmONS. • BRING CLEANERTO UPRIGHT POSITION WHEN USING THE HOSEAND ATTACHMENTS. • DO NOT LEAVECLEANERUNATTENDEDWHEN PLUGGEDraN.
- Page 3 Keep hair, l oose clothing, fingers, a ndallpartsofbodyaway fromopenings andmoving parts. Donot pickup anything thatis burningor smoking, s uchas cigarettes, matches, or hotashes. Donotusewithout d irt container andfiltersin place. Turn offallcontrols before unplugging, Useextra carewhen cleaning o nstairs. Donot useto pickupflammable o r combustible l iquids, s uchasgasoline, or usein areas where theymaybepresent.
- Page 4 For effortless cleaning with total control, nothing beats a Dirt Devil :s: Self-Propelled vacuum! Thank }ou fiw }our support of Dirt DeviP products. Visit our website at www.dirtdevil.com TABLE OF CONTENTS Safety Instructions ..........
-
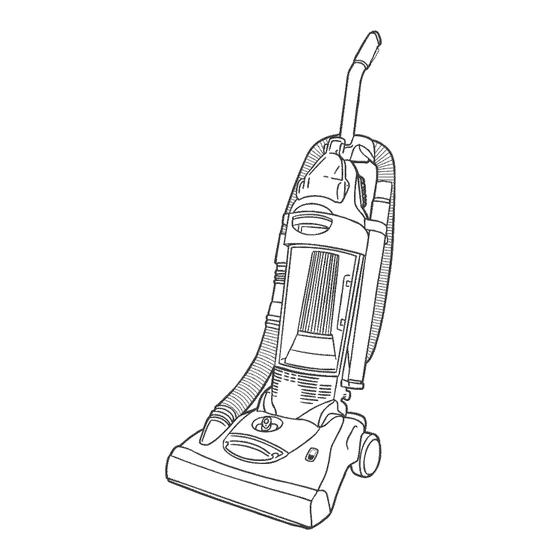
Page 5: Front View
FRONT VIEW BACK ViEW --21 16-- 15-- 14-- FRONTVtEW BACK VtEW l& Self-Propel Switch Handle Grip Handle 17. Hose Caddy l& Hose 3, Turbo Toot"' l& Dust Brush Crevice Tool (inside extension wand) 20, Cord Guide Extension Wand & Dirt Cup Lid 21, Cord Wrap withQuick Cord Release See Through Dirt Cup 22. - Page 6 TOOL REQUIRED: PHILLIPS OR FLAT HEAD SCREWDRIVER Guide power cord i nto o pen- Insert handle fastener into Insert the one (1) screw into ing, Slide u pper handle into the back of the turbo tool front and tighten until turbo tool caddy, caddy.
- Page 7 HANDLE RELEASE ONIOFF PEDAL FLOOR/CARPET PEDAL CLEANmNG Plug cord into electrical out- To release handle, push the Move the handle and adjust it let, Turn cleaner on by handle release pedal located to the desired position for (a) on the lower left side of the depressing foot pedal Iocab storing the upright, (b) oper- ed on the back left side of the...
-
Page 8: Carry Handle
ABOVE F LOOR C LEAMNG Choose any of the handy acces- sories hose alone, Simply push the Remove the hose from the attachment firmly onto the end of the Cleaner must be in wand or hose handle, To remove tool, tool caddy. -
Page 9: To Remove Belt
Return filterto d irt c on- Clean f ilter and empty dirt container com- tainer, Push f ilter i nto pletely, See "Regular place t o prevent dirt Maintenance" note leakage. below f orinstructions oncleaning the filter. Align s lots o nlidwith Return dirtcon- tabs on cup (Diagram tainer tocleaner,... - Page 10 TO REPLACE BEETOR BRLISHROLL Place new belt in area of Slide belt onto motorshaft. With new belt in place, pull brushroll without bristles. and slide brushroll into noz- zle making sure that the brushroll end caps are in the correct orientation inset), Rotate...
- Page 11 WARNING: TO REDUCETHE RISK OF INJURY FROMMOVING PARTS- UNPLUG BEFORESERVICING. DEBRmSREMOVALIHOSE 1. Check to see if dirt cup is full; empty if needed, 2, Plug cleaner in and check to see if there is any suction at end of hose (Diagram 1), If there is suctien at end of hose, move on to Diagram 3.
-
Page 12: Customer Service
WARNING: TO REDUCE RUSK OF P ERSONAL UNJURY -UNPLUG CLEANER BEFORE SERVUCING POSSIBLE REASON POSSIBLESOLUTION 1, Power cord not firmly 1, Plug unit in firmly, plugged into outlet. 2, Blown fuse or tripped breaker, 2, Checkfuse orbreakerin home, Replace fuse/reset breakec 3, Heeds service, 3. - Page 13 Assembly Schematic ModelNo. 087500 087600 087700 087900 © 321-1134 SM-24-0104 (888) 24-5...
- Page 14 Part Listing / Price List ModelNo. 087500 Item Part Number Models To Fit Part Description 1-503819-000 SCREW - BODY 8-10 X 5/8 087600 2-LC0331-000 HANDLE SCREW PACKAGE 087700 1-LC0333-000 HANDLE FASTENER 2-LC0320-000 UPPER HANDLE ASSEMBLY - 5 WIRE 087900 2-LC0322-000 UPPER HANDLE ASSEMBLY - 3 WIRE 2-LC0040-000 087900...
- Page 15 Price List ModelNo. Part Listing / 087500 Models To Fit Item Part Number Part Description 087600 1-790655-600 CORD HOOK 1-910298-000 HEIGHT ADJUSTMENT BUSHING 087700 1-912495-000 ENABLE MICRO SWITCH 087900 1-LC0025-000 SWITCH PEDAL 1-LC0010- NOZZLE BASE ASSEMBLY 1-LC0005- 087900 NOZZLE COVER ASSEMBLY 1-LC0005-BW0 087700 NOZZLE COVER ASSEMBLY...
- Page 16 ,--" HIGH / LOW SWITCH WHITE SELF-PROPEL PCI_ it" POSITION tffFO DC MOTOR BRUSHL.,_SS YELLOW DRIVE SIGNAL WIRES Cx:) Cx:) Cx:) BLACK _=MJCRO _N[TC H W_j* j-'WHITE WHITE POWER CORD UPPER t, I ANDLEAREA NOZZLEBASEAREA VAC MOTOR AREA 00 00 ",4",4",4",4...
Need help?
Do you have a question about the 87500 and is the answer not in the manual?
Questions and answers