Table of Contents
Advertisement
Available languages
Available languages
Owner's Manual
®
OTARY LAWN MOWER
725 Series Briggs
Power-Propelled
22" Multi-Cut
& Stratton
Engine
Model No.
917.370921
• EspaSol, p. 20
CAUTION'.
Read and follow all
Safety Rules and Instructions
before operating
this equipment
Sears Brands Management
Corp., Hoffman Estates, IL 60179 U.S.A.
Visit our Craftsman website: www.sears.com/craftsman
Advertisement
Table of Contents

Related Manuals for Craftsman 917.370921


Summary of Contents for Craftsman 917.370921
- Page 1 725 Series Briggs Engine Power-Propelled 22" Multi-Cut Model No. 917.370921 • EspaSol, p. 20 CAUTION'. Read and follow all Safety Rules and Instructions before operating this equipment Sears Brands Management Corp., Hoffman Estates, IL 60179 U.S.A. Visit our Craftsman website: www.sears.com/craftsman...
- Page 2 7-11 Repair Parts ........38-47 Maintenance Schedule ......Sears Service ......Back Cover CRAFTSMAN 2=YEAR FULL WARRANTY For TWO YEARS from the date of purchase, this product is warranted against any defects in material or workmanship. Defective product will receive free repair or replacement if repair is unavailable.
- Page 3 In the state of California the above is re- • Disengage the self-propelled mecha- nism or drive clutch on mowers so quired by law (Section 4442 of the Califor- nia Public Resources Code). Other states equipped before starting the engine. may have similar laws.
- Page 4 • When loading or unloadingthis ma- • If fuel is spilled on clothing, change chine, do not exceed the maximum clothing immediately, recommendedoperation angle of 15°, • Never overfill fuel tank, Replace gas • Wear proper Personal Protective Equip- cap and tighten securely, ment (PPE)while operatingthis ma- V.
- Page 5 Repair Protection Agreements Congratulations on making a smart pur- • Fast help by phone- phone sup- chase. Your new Craftsman® product is port from a Sears representative designed and manufactured for years of products requiring in-home repair, plus dependable operation.
- Page 6 Read these instructions and this manual in its entirety before you attempt to assemble or operate your new lawn mower. IMPORTANT: This lawn mower is shipped WITHOUT OIL OR GASOLINE in the engine. Your new lawn mower has been assembled at the factory with the exception of those parts left unassembled for shipping purposes.
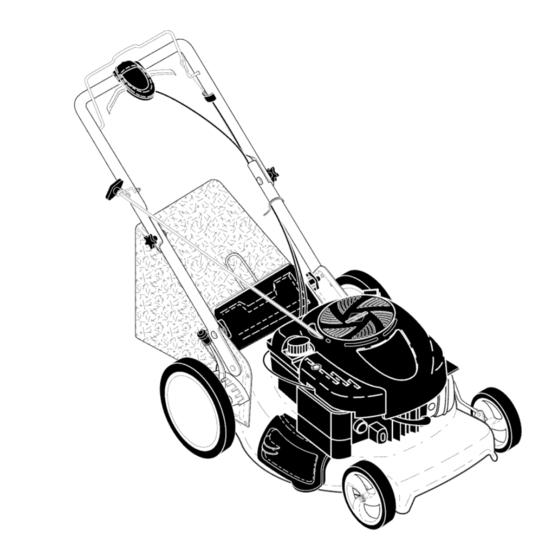
- Page 7 KNOW YOUR LAWN MOWER READ THIS OWNER'S MANUAL AND ALL SAFETY RULES BEFORE OPERATING YOUR LAWN MOWER. Compare the illustrations with your lawn mower to familiarize yourself with the location of various controls and adjustments. Save this manual for future reference. These symbols may appear on your lawn mower or in literature supplied with the...
- Page 8 DRIVE CONTROL ADJUSTMENT The operation of any lawn SAFETY GLASSES mower can result in foreign Over time, the drive control system may become "loose", resulting in decreased objects thrown into the eyes, which can result in severe speed. There is a turnbuckle on the drive eye damage.
- Page 9 TO CONVERT MOWER Your lawn mower was shipped ready to be used as a mulcher. To convert to bagging or discharging: REAR BAGGING * Lift rear door of the lawn mower and place the grass catcher frame hooks onto the grass bag brackets. * To convert to mulching or discharging operation, remove grass catcher and...
- Page 10 TO EMPTY GRASS CATCHER ADD GASOLINE • Fill fuel tank to bottom of tank filler neck. Empty the grass catcher when clippings are visible in the full bag indicator window. Do not overfill. Use fresh, clean, regular 1. Lift up on grass catcher using the unleaded gasoline with a minimum of frame handle.
- Page 11 MOWING TiPS MULCHING MOWING TiPS _, CAUTION: Do not use de-thatcher IMPORTANT: For best performance, blade attachments on your mower. Such keep mower housing free of built-up attachments are hazardous, will damage grass and trash. See "CLEANING" in the Maintenance section of this manual.
- Page 12 MAINTENANCE BEFORE A FTER EVERY EVERY EVERY BEFORE EACH EACH 25 HOURS SCHEDULE USE USE HOURS OR SEASON HOURS STORAGE Check for Loose Fasteners _ Clean / Inspect Grass Catcher * Check Tires _ Check Drive Wheels Clean Lawn Mower ..M Clean under Drive Cover *** O Check Drive Belt / Pulleys *** Check / Sharpen / Replace Blade...
- Page 13 LAWN MOWER Install the blade bolt with the lock washer and hardened washer into Always observe safety rules when per- blade adapter and crankshaft. forming any maintenance. 6. Use block of wood between blade and TIRES lawn mower housing and tighten the •...
-
Page 14: Grass Catcher/Gear Case
GRASS CATCHER Tip lawn mower on its side as shown and drain oil into a suitable container. • The grass catcher may be hosed with Rock lawn mower back and forth to re- water, but must be dry when used. •... -
Page 15: Cleaning
1. Move lawn mower to an area of cut Back plate grass or another hard surface. NOTE: Water, grass and other debris will drain from beneath the mower housing during the washout process. 2. Remove grass catcher and discharge chute assembly from lawn mower. 3. - Page 16 • ILWARNING" To avoid serious injury, before performing any service and adjustments 1. Release control bar and stop engine. 2. Make sure the blade and all moving parts have completely stopped. 3. Disconnect spark plug wire from spark plug and place wire where it cannot come in contact with plug.
- Page 17 ENGINE to suspected carburetor problems, take your lawn mower to a Sears or other ENGINE SPEED qualified service center for repair and/or Your engine speed has been factory set. adjustment. Do not attempt to increase engine speed IMPORTANT: Never tamper with the or it may result in personal injury.
- Page 18 ENGINE ENGINE OIL FUEL SYSTEM Drain oil (with engine warm) and replace with clean engine oil. (See "ENGINE" IMPORTANT: It is important to prevent the Maintenance section of this manual). gum deposits from forming in essential fuel CYLINDER system parts such as carburetor, fuel filter, 1.
- Page 19 TROUBLESHOOTING = See appropriate section in manual unless directed to a Sears Parts & Repair Center. CAUSE PROBLEM CORRECTION Loss of power 1. Raise cutting height. 1. Rear of mower housing or blade dragging in grass. 2. Cutting too much grass. 2.
- Page 20 Esta garantia SOLO cubre defectos de material y mano de obra. La cobertura de la garantia NO incluye: •...
- Page 21 • Desconectar el mecanismo de propulsi6n En el estado de California, la ley exige Io anterior (Secci6n 4442 del "California Public aut6noma o el embrague de transmisi6n Resources Code"). Otros estados pueden las segadoras que Io tienen antes de poner en marcha el motor.
- Page 22 • Cuando cargue o descargue la m_.quina, no • Nunca Ilenar en exceso el dep6sito de sobrepase el _.ngulo m_.ximo recomendado carburante. Colocar el tap6n de la gasolina y de operaci6n de 15 °. apretar de modo seguro. • Utilice equipo de protecci6n personal (EPP) V.
- Page 23 Reparaci6n Congratulaciones por su buena compra. • Ayuda rapida pot telefono - soporte tele- nuevo producto Craftsman® estb. disehado f6nico pot parte de un representante Sears y fabricado para funcionar de modo fiable pot sobre productos que requieren un arreglo en muchos ahos.
- Page 24 Lea estas instrucciones y este manual completamente antes de tratar de montar u operar su sega- dora nueva. IMPORTANTE" Este cortac_sped viene SIN ACEITE O GASOLINA en el motor. Su segadora nueva ha sido montada en la f_.brica con la excepci6n de aquellas partes que se de- jaron sin montar por razones de envio.
- Page 25 FAIVlILIARICESE CON SU SEGADORA LEA ESTE MANUAL DEL DUENO Y LAS REGLAS DE SEGURIDAD ANTES DE OPARAR SU SEGADORA. Compare las ilustraciones con su segadora para familiarizarse con la ubicaci6n de los diversos controles y ajustes. Guarde este manual para referencia en el futuro. Estos simbolos pueden apareser sobre su segadora...
- Page 26 AJUSTE DEL MANDO Laoperaci6n de cualquier Ocasionalmente, el sistema de mando puede segadora puedehacerque "aflojarse", provocando una disminuci6n de la saltenobjetos extraflosdentrode velocidad. Hay un torniquete en la sede del susojos,Ioquepuedeproducir mando para apretar la tensi6n del cable. Pro- daflosgravesen_stos.Siempre ceder de la siguiente manera: useanteojos de seguridad o protecci6n para Apagar la unidad y desconectar...
- Page 27 PARA CONVERTIR LA SEGADORA Su segadora fue enviada lista para usarse como acolchadora de capa vegetal. Para convertida una operaci6n de ensacado o de descarga: SEGADORAS CON DESCARGA TRASERA • Levantar la puerta trasera de cortac6sped y colocar los ganchos del armaz6n de la recolectora de hierba en los soporte del recogedor de c_sped.
- Page 28 PARA VAClAR EL RECOGEDOR Use gasolina regular, sin plomo, nueva y lim- CE_SPED pia con el minimo de 87 octanos. No mezcle el aceite con la gasolina. Para asegurar Vacie el recogedor de c6sped cuando los recortes son visibles en la ventana Ilena del que la gasolina utilizada sea fresca compre indicador de bolsa liana.
- Page 29 Si se ahogael motorespere unoscuantos CONSEJOS PARA SEGAFI Y ACOL- mJnutos a ntesdetratarde hacerloarrancar y CHAR norepitalospasosdelcebado. iMPORTANTE: Para obtener el mejor rendimiento mantenga la caja de la segadora CONSEJOS PARA SEGAR sin acumulacion de cesped y basura. Vea "LIMPIEZA" en la seccion de Mantenimento AI:_PRECAUCl0N: No utilizar dispositivos...
- Page 30 PROGRAMA ANTES DESPUES CADA CADA CADA ANTES DEL DE CADA DE CADA 25 HORAS O ALMACE- MANTEN|M|ENTO HORAS TEMPORADA HORAS NAMIENTO Revisar si hay Sujetadores Sueltos Limpiar/Inspeccionar el Recogedor de Cesped Controlar los Neumaticos Controlar las Ruedas Motrices Limpiar la Segadora ..
- Page 31 SEGADORA 5. Instale el perno de la cuchilla con la arandela de seguridad y la arandela endurecida en el Siempre observe las reglas de seguridad cu- adaptador de la cuchilla y el ciguehal. ando haga el mantenimiento. 6. Use un bloque de madera entre la cuchilla LLANTAS y la caja de la segadora y apriete el perno •...
- Page 32 RECOGEDOR DE ClaSPED Remueva la tapa del dep6sito del aceite; • El recogedor de c_sped puede ser rociado d_jela a un lado en una superficie limpia. con el agua de la manguera pero tiene que Incline la cortadora de c6sped pot este estar seco cuando se vaya a usar.
- Page 33 Labio Plancha trasera Mueva el cortac6spedes de c6sped a un _trea de la hierba cortada o de otra superfi- cie dura. NOTA: El agua, la hierba y la otra ruina escur- rirb.n debajo de la cubierta del cortac6spedes durante el proceso del derrubio. Quite el colector de la hierba y descargue el montaje del canal inclinado del cortac6s- pedes de c6sped.
- Page 34 _ADVERTENCiA: Para evitar lesi6nes serias, antes de dar calquier servico o de hacer ajustes: Suelte la barra de control y pare el motor. Aseg0rese que la cuchilla y que todas las partes movibles se hayan detenido completamente. Desconecte el alambre de la bujfa y p6ngalo en donde no pueda entrar en contacto con 6sta. SEGADORA PARA CAMBIAR CORREA...
- Page 35 MOTOR debido a problemas que se sospecha vienen del carburador, Ileve su segadora a contacto VELOCIDAD DEL MOTOR con su centro de servicio Sears o con un otto La velocidad del motor ha sido ajustada en centro de servicio cualificado para repararla y/o la fb.brica.
- Page 36 ACEITE DEL MOTOR MOTOR SISTEMA DE COMBUSTIBLE Drene el aceite (con el motor caliente) y c_.m- bielo con aceite de motor limpio. (Vea "MO- iMPORTANTE: Es importante evitar que TOR" en la secci6n de Mantenimento de este se formen depositos de coma en partes manual.) fundamentales...
- Page 37 SOLUCION DE PROBLEIVlAS - Yea ia secci6n apropiada en el manual amenos este dirigido a un centro de servico Sears. CAUSA PROBLEMA CORRECClON No arranca Cuchilla suelta o adaptador Apriete el perno de la cuchilla (continuado) de la cuchilla quebrado. cambie el adaptador de la cuchilla.
- Page 38 ,' 58 -q_.... 57 52 \ !_"...
- Page 39 CRAFTSMAN ROTARY LAWN MOWER - - MODEL NUMBER 917,370921 PART PART PART DESCRiPTiON DESCRiPTiON DESCRiPTiON 427616X479 Upper Handle 580943403 Grassbag 404763 Decal, Danger 438392 Cable, Engine Zone Control / 446432 Frame, Grass Catcher 17000510 Screw, Hex Head 5-16-18 Rear Door Prop...
- Page 40 ( (, ....35 41 31 3415 ® ..... 32...
- Page 41 CRAFTSMAN ROTARY LAWN MOWER - - MODEL NUMBER 917,370921 PART PART DESCRiPTiON DESCRiPTiON 430971 Drive Control Assembly 428780X428 Wheel & Tire Assembly, Rear, 11" (Includes Cable) 409148 Nut, Flangelock 3/8-16 431650 Cable, Drive 197480 O-Ring 429544X479 Mounting Bracket, Drive Control...
- Page 42 BRIGGS & STRATTON 4-CYCLE ENGINE MODEL NUMBER 128M02=1612=F1 337 _#_ 404 @ 27 C#...
- Page 43 BRIGGS & STRATTON 4=CYCLE ENGINE MODEL NUMBER 128M02=1612-F1 365'_ 127 _ <__J 1386...
- Page 44 BRIGGS & STRATTON 4-CYCLE ENGINE MODEL NUMBER 128M02=1612=F1 1036 EMISSIONS LABEL 1210 _r__k "__-_ 332 _, .."_ -;_'!_...
- Page 45 BRIGGS & STRATTON 4=CYCLE ENGINE MODEL NUMBER 128M02=1612-F1 121 CARBURETOR OVERHAUL 104 _'_>' 163 J_i! 127_ 358 ENGINE GASKET SET 524 _ 1095 VALVE GASKET SET Engine Power Rating information The gross power rating for individual gas engine models is labeled in accordance with SAE (So- ciety of Automo-tive Engineers) code J11940 (Small Engine Power &...
- Page 46 BRIGGS & STRATTON 4=CYCLE ENGINE MODEL NUMBER 128M02=1612=F1 PART PART DESCRiPTiON DESCRiPTiON 590401 Cylinder Assembly Short Block 299819s Seal-Oil (Magneto Side) 796703 Manifold-intake 493279 Sump-Engine 796704 Gasket-intake 590411 Head-Cylinder 691650 Screw (intake Manifold) 799875 Gasket-Cylinder Head 691421 Housing-Rewind Starter 590395 Breather Assembly 697316 Rope-Starter...
- Page 47 BRIGGS & STRATTON 4=CYCLE ENGINE MODEL NUMBER 128M02=1612=F1 PART PART DESCRIPTION DESCRiPTiON 690662 797521 Nut (Flywheel) Gear-Timing 590454 691648 Armature-Magneto Screw (Brake) 691061 691031 Screw (Magneto Armature) SeaI-O Ring (Dipstick Tube) 591040 692047 Plug-Spark Dipstick/Tube Assembly 692390 493880s Wire-Stop Terminal-Spark Plug 590508 697338...
- Page 48 NEED HOR£ HELP? Youq_[find the a_swer at@ more on managemyhO_eoCO_ - for fr'ee! o Find this and aLLyour other product manuals online. o Get answers from our team of home experts. o Get a personalized maintenance plan for your home. o Find information and tools to heLp with home projects.
Need help?
Do you have a question about the 917.370921 and is the answer not in the manual?
Questions and answers
How to replace drive belt on model 917.370921
To replace the drive belt on Craftsman model 917.370921:
1. Remove screws securing the rear baffle.
2. Tilt the mower on its side with the air filter and carburetor facing up.
3. Remove the rear baffle from the mower.
4. Remove the blade bolt, lock washer, hardened washer, and blade.
5. Remove the debris shield.
6. Remove the gearcase belt keeper.
7. Remove the old drive belt.
8. Make sure the new drive belt is placed inside the tabs of the belt retainer and within the wheels.
9. Align the key in the blade adapter with the crankshaft keyway and place the adapter on the engine crankshaft.
10. Reinstall the debris shield.
11. Reinstall the blade.
12. Return the mower to its upright position.
13. Reinstall rear baffle and secure it with screws.
This answer is automatically generated