Table of Contents
Advertisement
Available languages
Available languages
Quick Links
Owner's Manual
CRI:IFTSMgN °
6.0 HORSEPOWER
22" REAR DISCHARGE
POWER PROPELLED
ROTARY LAWN MOWER
Model No.
917.377530
• Safety
-
Assembly
• Operation
.
Maintenance
• EspaSol
-
Repair
Parts
€
CAUTION:
Read and follow all
Safety
Rules and Instructions
before operating
this equipment
Sears, Roebuck
and Co., Hoffman
Estates,
IL 60179
Advertisement
Table of Contents

Subscribe to Our Youtube Channel
Related Manuals for Craftsman EZ3 917.377530


Summary of Contents for Craftsman EZ3 917.377530
- Page 1 Owner's Manual CRI:IFTSMgN ° 6.0 HORSEPOWER 22" REAR DISCHARGE POWER PROPELLED ROTARY LAWN MOWER Model No. 917.377530 € • Safety Assembly • Operation Maintenance • EspaSol Repair Parts CAUTION: Read and follow all Safety Rules and Instructions before operating this equipment Sears, Roebuck and Co., Hoffman Estates,...
- Page 2 Back Cover LIMITED TWO YEAR WARRANTY ON CRAFTSMAN POWER MOWER For two years from date of purchase, when this Craftsman Lawn Mower is maintained, lubricated, and tuned up according to the operating and maintenance instructions in the owner's manual, Sears will repair free of charge any defect in material or workmanship.
-
Page 3: Maintenance
hot. A llow theengine t ocool f orseveral fumes are dangerous. minutes before f illing thegastank. C lean • Never cut grass by pulling the mower offanyspilled g asoline before s tarting towards you. Mow across the face of theengine. slopes, never up and down or you Always m ake wheel height adjustments... -
Page 4: Lawn Mower Maintenance
These accessories were available when t hislawn mower was produced. They arealso available atmost Sears r etail outlets and service c enters. Most S ears s tores c analso order r epak p arts f oryou, w hen youprovide themodel number ofyour l awn mower. Some ofthese accessories may not a pply t oyour l awn mower. - Page 5 NOTE: For shipping purposes, the rear TO INSTALL ATTACHMENTS wheels on your lawn mower are not Your lawn mower was shipped ready to be adjusted to the same position as the used as a mulcher. To convert to bagging or discharging: front wheels.
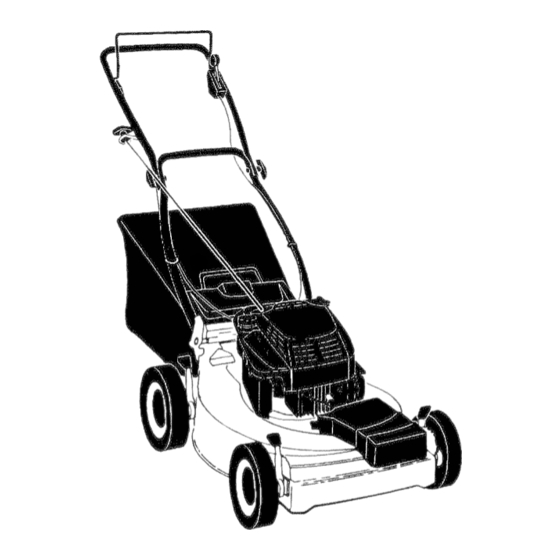
- Page 6 KNOW YOUR LAWN MOWER READ THIS OWNER'S MANUAL AND SAFETY RULES BEFORE OPERATING YOUR LAWN MOWER+ Compare the illustrations with your lawn mower to familiarize yourself with the location of various controls and adjustments. Save this manual for future refer- ence.
- Page 7 Plate Tab The operation of any lawn mower can result in foreign objects thrown into the Lowe eyes, which can result in severe eye dam- age. Always wear safety glasses or eye shields while operating your lawn mower ,_ver or performing any adjustments or repairs.
- Page 8 _RIVE CONTROL ADD GASOLINE Self-propelling iscontrolled byholding - Fill fuel tank. Use fresh, clean, regular theoperator presence control bardown unleaded gasoline with a minimum of 87 tothehandle a ndpushing thedrive con- octane. Do not mix oil with gasoline. trollever f orward u ntil i tclicks; then Purchase fuel in quantities that car'_ be release t helever.
-
Page 9: Mowing Tips
MULCHING MOWING TiPS NOTE: In cooler weather it may be necessary to repeat priming steps. In iMPORTANT: For best performance, keep warmer weather over priming may mower housing free of built-up grass and trash. See "Cleaning" in CUSTOMER cause flooding and engine will not start. RESPONSIBILITIES section of this manual. -
Page 10: Maintenance Schedule
MAINTENANCE SCHEDULE FILL IN DATES AS YOU COMPLETE ySERVICE DATES REGULAR SERVICE Clean/Inspect Grass Catcher (If Equipped) Clean Lawn Mower O I Clean Under Drive Cover _V (Power-Propelled Mowers) !,," E J Check drive belt/pulleys I (Power-Propelled Mowers) R FCheck/SharpeniReplac e Blade i Lubrication Chart J Clean Battery/Recharge... -
Page 11: Product Specifications
PRODUCT SPECiFiCATiONS MODEL NUMBER 9t 7.377530 _ERIAL NUMBER DATE OF PURCHASE HORSEPOWER: DISPLACEMENT: 11.5 CU. IN. GASOLINE CAPACITY/TYPE: 1.6 QUARTS UNLEADED REGULAR OIL TYPE (API-SF/SG/SH): SAE 30 (ABOVE 32°F) SAE 5W-30 (BELOW 32°F) OIL CAPACITY: 20 OZS. SPARK PLUG(GAP: .030") CHAMPION J19LM VALVECLEARANCE:... - Page 12 * Remove any trash or grass cuttings 3TE: We do not recommend sharp- from inside the dust cover, pinion and/or ing blade - but if you do, be sure the drive wheel gear teeth. _de is balanced. Put wheels back in place. ) SHARPEN BLADE If after cleaning, the drive wheels do not _re should...
-
Page 13: Air Filter
- Remove engine oil cap; lay aside on a inspect and replace corroded muffler as it clean surface. could create a fire hazard and/or damage. SPARK PLUG _p lawn mower on its side as shown and drain oi! into a suitable container. Rock Change your spark plug each year to make lawn mower back and forth to remove your engine start easier and run better. -
Page 14: Rear Deflector
OAtJTmON: BEFORE PERFORMING Remove the starter rope guide from the ANYSERVICE ORADJUSTMENTS: lower handle. Release control bar. , Remove hairpin cotters. Disconnect the lower handle from the Make sure theblade andallmoving handle brackets. parts have completely stopped. Turn the handle over and reassemble the Disconnect spark plug wirefrom spark plug andplace where itcannot come hairpin cotters that have been removed. -
Page 15: Lawn Mower
Upper immediately prepare your lawn mower for Operator presence control bar storage at the end of the season or if the _i_b handle unit wil! not be used for 30 days or more. LAWN MOWER for _torage When lawn mower is to be stored for a peri- od of time, clean it thoroughly, remove a!l Fold,. - Page 16 IGtNE OIL starts to rust. Rust and!or dirt in your ainoil(with engine warm) and replace gasoline will cause problems. _h clean engine o il (See "ENGINE" in If possible, store your unit indoors and :_ Customer Responsibilities section ofthis cover it to give protection from dust and dirt.
- Page 17 CORRECTION CAUSE - Set to "Higher Cur - Roar of lawn mower housing position. or cutting blade dragging in heavy grass. Set to "Higher Cut" * Cutting too much grass. position. o Clean!replace air filter. • Dirty air filter. Clean underside of mower o Buildup of grass, leaves, and trash under mower.
- Page 18 Contratapa Especificaciones dei Producto GARANTiA LIMITADA DE DOS ArqOS PARA LA SEGADORA A MOTOR CRAFTSMAN Pot dos (2) aSos, a partir de la fecha de compra, cuando esta Segadora Craftsman se mantenga, tubrique y afine segun las instrucciones para la operacion y et mantenirniento en el manual del duello, Sears reparara gratis todo defecto en el matedat y la mane de obra.
- Page 19 buena traccion cuando siegue. hacia usted. Siegue a traves de la cara de Revise el estanque de combustible antes de las pendientes, nunca hacia arriba o hacia hacer arrancar el motor. No Ilene el abajo pues puede pettier el equilibrio. No estanque de gasolina en recintos cerrados, siegue pendientes demasiado...
- Page 20 }tos accesorios estaban disponibles cuando se produjo la segadora. Tambien estan disponibles _la mayoria de las tiendas de Sears yen Ios-centros de servlcio La mayoria de las tiendas .ars Tambien pueden ordenar para usted, si les proporciona el numero del modelo de su ,gadora.
- Page 21 Barra de control que exige la o Deslice la costura igual al rededor del marco tubular, al mismo tiempo trabaje el marco adentro del recogedor de c_sped. Monte el marco inferior al marco tubular como demostrado. Mango superior ..___ --;/ Deslice los sugetadores de vinilio sobre el presencia del operado _...
- Page 22 FAMILIARICESE CON SU SEGADORA LEA ESTE MANUAL DEL DUEf, IO Y LAS REGLAS DE SEGURIDAD ANTES DE OPERAR SU SEGADORA. Compare las ilustraciones con su segadora para famitiarizarse con [a ubicaci6n de los diversos controles y ajustes. Guarde este manual para referenda en el futuro, Estos simboios pueden apareser sobre su segadora...
- Page 23 Laoperacion decualquier segadora puede Orejas de la hacer que salten objetos extrados dentro de Para un corte alto, baje las placa sus ojos, Ioque puede producir dados graves ruedas en estos. Siempre use anteojos de seguridad o protecci6n para los ojos mientras opere su segadora o cuando haga ajustes o repara- ciones.
- Page 24 ;ONTROL DE LA JMPULSI6N necesitar cambiar el aceite mas a menudo cuando las condiciones son polvorosas La autoimpulsi6n se controla al sujetar la barra sucias. de control que exige la presencia del operador GASOUNA hacia abajo en el mango y aJempujar la palanca de control de la impulsi6n hacia ade- Llene el estanque de combustible.
- Page 25 PARA HACER ARRANCAR EL MOTOR CONSEJOS PARA SEGAR Y ACOLCHAR IMPORTANTE: Para obtener el mejor rendimein- '_ Para.hacer arrancar un motor fifo, empuje el cebador tres (3) veces antes de tratarlo. to mantenga la caia de la segador a sin acumla- Empuje firmemente.
-
Page 26: Antes De Cada Uso
PROGRAMA DE MANTENIMIENTO LLENE LAS FECHAS A MEDIDA QUE COMPLETE SU SERV!CIO REGULAR el sitenciador 1 - Cambiar m#,s a menudo cuando se opere bajo carga pesada o en ambientes con altas temperaturas. 2 - Dar servicio rn_s a menudo c_uando se opere en condiciones sucias... - Page 27 _SPECIHCACIONES DELPRODUCTO NOMERO DEMODELO 917377530 NOMERO DESERIE FECHA D ECOMPRA CABALLOS DEFUERZA: &0 DESPLAZAMIENTO: 11,5 cu,in. APACIDAD Y TIPO 1.6Cuartos )EGASOLINA: REGULAR sinpfomo IPODEACEITE: SAE 30(sobre 32°F) APIoSF/SG) SAE 5W-30 (debajo 3 2°F) }APACIDAD DEACEITE: 20oz.decapacidad BUJiA (ABERTURA: .030") Champion J 19LM TQLERANCIA DE VALVULA: ADMISION: .005"...
- Page 28 CAJA DE ENGRANAJES Use un bloque de madera entre la cuchilla y la caja de la segadora y apfiete el pemo de la , Para mantener el sistema de impulsi6n funcio- cuchilla gir&ndoto en el sentido en que giran nando en forma adecuada, la caja de las manillas de! reloj.
- Page 29 :amble et aceite despues de 25 horas de plancha peracion o pot Io menos una vez al ado si la trase_ _gadora se uti[iza menos 25 horas e! a_io. tabio ranuras evise el nivel del aceite del carter antes de rrancar el motor y despu6s de cada cinco (5) 3ras de uso continuado.
- Page 30 PRECAUCION: ANTES DE DAR Para cambiar de la posici6n mediana baja a CUALQUIER SERVICIO O DE HACER mediana alta, la seccidn superior y la inferior AJUSTES: del mango tendran que darse vuelta. Remueva las abrazaderas del cable. • Suette la barra de control y pare el motor. Remueva los controles y la barra de control •...
- Page 31 MOTOR CARBURADOR VELOCIDAD DEL MOTOR Su carburador no es ajustable. S[ su motor no est_kfuncionando en forma adecuada debido a La velocidad del motor ha sido ajustada en ia problemas que se sospecha vienen del carbu- fabrica. No trate de aumentar la velocidad del rador, Ileve su segadora a un centro de servicio motor pues se pueden producir lesiones per°...
-
Page 32: Aceite Del Motor
C_UNDRO Drene el estanque de combustible. Haga arrancar el motor y d6jelo funcionar Remueva la bujia. hasta que las ffneas del combustible y el car- * Vacie una onza (29 ml) de aceite a traves det burador esten vacios. agujero de la bujia en el cilindro. •... - Page 33 _ENTJFJCAC!6N DE PROBLEMAS _ROBLEMA CAUSA CORRECCJON _o arranca * Filtro de aire sucio. o Limpieicambie eI filtro de aire. Sin combustible. o LIene el estanque de combustible. o Drene el estanque y vuelva a . Combustible rancio. Ilenarlo con combustible limpio y nuevo.
- Page 34 CORRECOION PROBLEMA CAUSA Cuchilla desgastada, -Cambie la cuchilia. Apriete el Mai corte -disparejo perno de la cuchilla. doblada o suelt& Ajuste todas las ruedas a la ,Altura de las ruedas dispareja. misma altur& Velocidad del motor lenta. P6ngase en contacto con su centro de servicio autorizado Acumulacion de c_sped, hojas o...
-
Page 35: Gear Case Assembly
ROTARY LAWN MOWER o o MODEL NO. 917.377530 GEAR CASE ASSEMBLY PART NUMBER 702511 PART PART DESCRIPTION DESCRIPTION 17490416 Drive Shaft Tapping Screw 1/4-20 x 137074 1-1/4 57079 Hardened Washer 137055X004 Clutch Yoke Engagement Bracket 131484 137053 Shifter 700343 Bushing 57072 Seal 86447... - Page 36 ROTARY LAWN MOWER MODEL NUMBER 9!7.377530...
- Page 37 PART DESCRIPTION PART DESCRIPTION 151511X479 Handle Bracket Assembly (Right) 145646X479 Upper Handle 150406 Hex Head Thread Rolling Screw 162788 Engine Zone Control Cable 3/8+16 x 1-1/8 150425 Mulcher Plug 161769 Lawn Mower Housing (lncl+ Key 66426 Wire Tie #14, 15, 51 & 136376 Handle Knob 851514...
- Page 38 ROTARY LAWN MOWER MODEL NUMBER 917,377530...
- Page 39 ROTARY LAWN MOWER MODEL NUMBER 917.377530 PART DESCRIPTION PART DESCRIPTION 145755 Control Cable 154990 Drive Cover Assembly 132010 Hex Flange Nut 48385 Control Head Kit 137052 Drive Pulley 751152 Locknut #10_24 48386 Drive Control Cable Kit 158755 Pan Head Machine 151521 Wheel Adjuster Assembly Screw 1/4 x 2.12...
- Page 40 BRIGGS & STRATTON MODEL NO, 12H802 TYPE NO. 2675-E1 4-CYCLE ENGINE 969_:_ _971A _163 _134 _634 11oQ...
- Page 41 :_IGGS & STRATTON MODEL NO. 12H802 =CYCLE ENGINE TYPE NO. 2675-E1 REQUIRES SPECIAL TOOLS TO INSTALL. SEE REPAIR iNSTRUCTION MANUAL.
- Page 42 BRIGGS & STRATTON MODEL NO. 12H802 4-CYCLE ENGINE TYPE NO. 2675-E1...
- Page 43 BRIGGS & STRATTON MODEL NO. 12H802 4-CYCLE ENGINE TYPE NO. 2675-E1 1036 LABEL KIT - EMISSION]...
- Page 44 BRIGGS & STRATTON MODEL NO. 12H802 4-CYCLE ENGINE TYPE NO. 2675-E1 PART PART DESCRIPTION DESCRIP'; tON 493260 Cylinder Assembly 493737 Slinger, Oit 399269 Bushing, Cylinder 272199 * Gasket, Intake Elbow 299819 * Seal, Oil 94526 Screw, Hex Head 493279 Sump, Engine 4974420 Housing, Rewind Starter...
- Page 45 MODEL NOo 12HSD2 BRIGGS & $TRATTON TYPE NO. 2675-E1 4_CYCLE ENGINF-= DESCRIPTION <EY PART DESCRIPT_ON - - - *** Washer, Shaft (S0td in 492349 Lever, Governor Kit Only) 67072 Washer, Thrust 66538 Elbow, Spark Plug 94512 Screw, Hex Head 280512 Spacer, Fuel Tank 94511 Screw, Hex Head...
- Page 48 Fortherepair orreplacement parts youneed delivered directly t oyourhome Call 7 am - 7 pro, 7 days a week 1=800-366-PART (1-800-368=7278) Para ordenar piezas con entrega a domicilio - 1-800-659-7084 For in-house major brand repair service Call 24 hours a day, 7 days a week 1-800-4-REPAIR (1-800-473-7274) Para...
Need help?
Do you have a question about the EZ3 917.377530 and is the answer not in the manual?
Questions and answers