Advertisement
Available languages
Available languages
Quick Links
Owner's
Manual
CRRFTSMIIN °
ROTARY LAWN MOWER
6.75 Horsepower
Power-Propelled
22" Rear Discharge
Model No.
917.376055
• EspaSol, p. 18
CAUTION:
Read and follow all
Safety Rules and Instructions
before operating this equipment
Sears, Roebuck and Co., Hoffman Estates, IL 60179
Visit our Craftsman website: www.sears.com/craftsman
U.S.A.
Advertisement

Related Manuals for Craftsman 917.376055


Summary of Contents for Craftsman 917.376055
- Page 1 6.75 Horsepower Power-Propelled 22" Rear Discharge Model No. 917.376055 • EspaSol, p. 18 CAUTION: Read and follow all Safety Rules and Instructions before operating this equipment U.S.A. Sears, Roebuck and Co., Hoffman Estates, IL 60179 Visit our Craftsman website: www.sears.com/craftsman...
- Page 2 Lawn Mower fails due to manufacturer defects in material workmanship within two years from the date of purchase, return it to any Sears store, Parts & Repair Center or other Craftsman outlet for free repair (or replacement if repair proves impossible). This warranty applies...
- Page 3 I. GENERAL OPERATION • Always wear safety goggles or safety glasses with side shields when operating • Read, understand, and follow all mower. instructions on the machine and in the manual(s) before starting. Be thoroughly II. SLOPE OPERATION familiar with the controls and the proper Slopes are a major factor...
-
Page 4: General Service
• Neverfill containersinsidea vehicle, on • Keepnuts and bolts, especiallyblade a truck or trailer bedwith a plasticliner. attachmentbolts, tight and keepequip- Always place containerson the ground mentin good condition. awayfrom yourvehicle beforefilling. • Nevertamperwith safetydevices.Check • Removegas-poweredequipmentfrom their proper operationregularly. the truck or trailerand refuel it on the •... -
Page 5: Lawn Mower Maintenance
Repair Protection Agreements Congratulations on making a smart pur- • Fast help by phone- phone sup- chase. Your new Craftsman® product port from a Sears representative designed and manufactured for years of products requiring in-home repair, plus dependable operation. But like all prod- convenient repair scheduling. -
Page 6: How To Set Up Your Mower
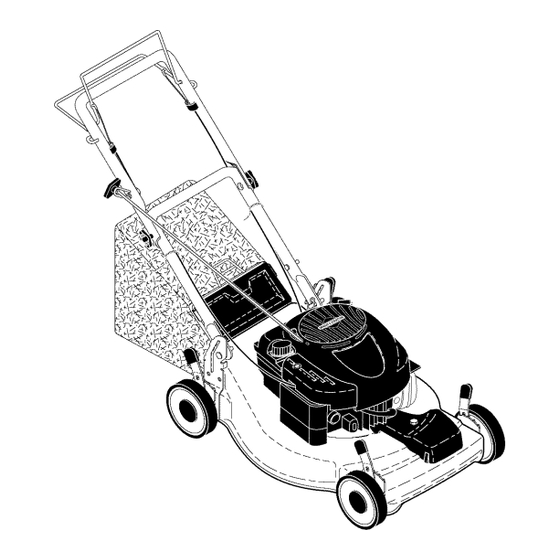
Read these instructions and this manual in its entirety before you attempt to assemble operate your new lawn mower. IMPORTANT: This lawn mower is shipped WITHOUT OIL OR GASOLINE in the engine. Your new lawn mower has been assembled at the factory with the exception of those parts left unassembled for shipping... - Page 7 KNOW YOUR LAWN MOWER READ THIS OWNER'S MANUAL AND ALL SAFETY RULES BEFORE OPERATING YOUR LAWN MOWER. Compare the illustrations with your lawn mower to familiarize yourself with the location of various controls and adjustments. Save this manual future reference. These symbols may appear...
- Page 8 LEVER BACKWARD Plate tab The operation of any lawn TO LOWER MOWER SAFETY GLASSES mower can result in foreign objectsthrownintothe eyes, which can result in severe eye damage. Atways wear safety glasses or eye shields while oper- ating your lawn mower or performingany adjustmentsor repairs.
-
Page 9: Before Starting Engine
ATTACH FUEL CAP CARTRIDGE Your mower is equipped with a special catcher FRESH START fuel cap and continuous frame handle Grass fuel preserver cartridge. See the infor- mation and instructions packed with the FRESH START cartridge. 1. Snap cartridge into bottom of fuel cap. - Page 10 TO STOP ENGINE MULCHING MOWING TIPS • To stop engine, release operator pres- IMPORTANT: For best performance, ence control bar. keep mower housing free of built-up grass and trash. See "CLEANING" in the TO START ENGINE Maintenance section of this manual. NOTE: Due to protective coatings...
- Page 11 BEFORE AFTER EVERY EVERY EVERY EACH EACH 25HOURS BEFORE SCHEDULE HOURS OR SEASON HOURS STORAGE Check for Loose Fasteners Clean / Inspect Grass Catcher* Check Tires N Check Drive Wheels Clean Lawn Mower ..M Clean under Drive Cover *** Check Drive Belt / Pulleys Check / Sharpen...
- Page 12 LAWN MOWER Use block of wood between blade and Alwaysobservesafety ruleswhen per- lawn mower housing and tighten formingany maintenance. blade bolt, turning clockwise. TIRES • The recommended tightening torque 35-40 ft. Ibs. • Keep tires free of gasoline,oil, or insect IMPORTANT: Blade bolt is heat treated.
- Page 13 ENGINE engine will smoke heavily from the muffler on startup. LU BRICATION Always be sure to retighten oil dipstick Use only high quality detergent oil rated with before starting engine. API service classification SG-SL Select the Reconnect spark plug wire to spark plug. oil's SAE viscosity grade according to your...
-
Page 14: Lawn Mower
• We do not recommendusing a garden ACAUTION: Disconnectspark plug wire hoseto clean lawn mowerunlessthe from spark plug and place wirewhere it electricalsystem,muffler,air filter and cannotcomein contactwith plug. carburetorare coveredto keepwater • Cleanthe undersideof your lawn mower out. Water in enginecan resultin short- by scrapingto removebuild-upof grass ened enginelife. - Page 15 ENGINE Mowing _-<_ Mowing r-<_ osition position ENGINE SPEED Your engine speed has been factory set. Do not attempt to increase engine speed or it may result in personal injury. If you believe that engine is running too fast or too slow, take your mower to a Sears or other qualified cotter__ i_"bracke...
-
Page 16: Troubleshooting
ENGINE ENGINE FUEL SYSTEM Drain oil (with engine warm) and replace with clean engine oil. (See "ENGINE" IMPORTANT: It is important to prevent the Maintenance section of this manual). gum deposits from forming in essential fuel CYLINDER system parts such as carburetor, fuel filter, Remove spark plug. - Page 17 TROUBLESHOOTING - See appropriate section in manual unless directed to a Sears Parts & Repair Center, CAUSE PROBLEM CORRECTION Loss of power 1. Rear of mower housing 1. Raise cutting height. blade dragging in grass. Cutting too much grass. Raise cutting height.
- Page 18 Sears, al Centro de Repuestos y Reparacion, o a otro comercio donde se vendan los equipos Craftsman, a efectos de que se la reparen sin costo (o bien se la reemplacen, en caso que no sea posible repararla).
- Page 19 I. OPERACION • Siempre use gafas de seguridad o anteojos con protecci6n lateral cuando opere la sega- • Antes de empezar, debe familiarizarse dora. completamente con los controles y el uso correcto de la maquina. Para esto, debe leer y comprender todas las instrucciones que II.
- Page 20 • Nunca repostar la maquina al interior de un • Mantenga las tuercas y los pernos, espe- local. cialmente los pernos del accesorio de la • Nunca guardar la maquina o el contenedor cuchilla, apretados y mantenga el equipo en buenas condiciones.
- Page 21 Protecci6n para la Reparaci6n Congratulaciones por su buena compra. Su • Ayuda r&pida por telefono - soporte tele- nuevo producto Craftsman@ esta diseSado fonico por parte de un representanto Sears y fabricado para funcionar de modo fiable por sobre productos que requieren un arreglo en muchos aSos.
- Page 22 Lea estas instrucciones y este manual completamente antes de tratar de montar u operar su sega- dora nueva. IMPORTANTE: Este cortacesped viene SIN ACEITE O GASOLINA en el motor. Su segadora nueva ha sido montada en la fabrica con la excepcion de aquellas partes que se de- jaron sin montar por razones de envio.
- Page 23 FAMILIARICESE CON SU SEGADORA LEA ESTE MANUAL DEL DUENO Y LAS REGLAS DE SEGURtDAD ANTES DE OPARAR SU SEGADORA. Compare las ilustraciones con su segadora para familiarizarse con la ubicacion de los diversos controles y ajustes. Guarde este manual para referencia en el futuro. Estos simbolos pueden apareser sobre su segadora o en la literatura proporcionada con el producto.
- Page 24 PALANCA HAClA ATR_,S Mare La operacion de cualquier PARA BAJAR EL CORTAC#SPED segadora puede hacer que salten objetos extrafios dentro de sus ojos, Io que puede producir dafios graves en estos. Siempre Orejas use anteojos de seguridad o proteccion para de la los ojos mientras opere su segadora o cuando placa...
- Page 25 ANTES DE HACER ARRANCAR MOTOR pa del deposito de AGREGUE ACEITE aceite Su segadora fue enviada sin aceite en el motor. Para el tipo y el grado del aceite a utilizar, vea el "MOTOR" en la secci6n del Mantenimiento de este manual.
- Page 26 PARA PARAR EL MOTOR CONSEJOS PARA SEGAR Y ACOL- CHAR • Para parar el motor, suelte la barra de con- troles que exigen la presencia del operador. IMPORTANTE: Para obtener el mejor PARA HACER ARRANCAR EL MOTOR rendimiento mantenga la caja de la segadora AVISO: Debido alas capas protectoras del mo- sin acumulacion de cesped y basura.
- Page 27 PROGRAMA ANTES DEsPuEs CADA CADA CADA ANTESDEL DE CADA DE CADA 10 2S.ORAS O 100 ALMACE- MANTENIMIENTO uso .ORASTEMPORADA.ORAS.AM,E.TO Revisar si hay Sujetadores Sueltos Limpiar/Inspeccionar el Recogedor de Cesped * Controlar los Neumaticos Controlar las Ruedas Motrices *** Limpiar la Segadora ..Limpiar debajo la Cubierta de la Transmisi6n Revisar las Correas y las Poleas Impulsadas...
- Page 28 SEGADORA PARA CAMBIAR LA CUCHILLA Siempre observe las reglas de seguridad cu- 1. Ponga el adaptador de la cuchilla en el ando haga el mantenimiento. ciguefial del motor. AsegQrese que la ranura del adaptador y que el chavetero del cigue- LLANTAS fial esten alineados.
- Page 29 Parar de adadir aceite cuando se alcanza la solamente por uno que sea aprobado por el fabricante. De el nOmero del modelo de la sedal de Ileno (FULL) en la varilla. Esperar un segadora cuando Io ordene. minuto para dejar que el aceite se arregle. ContinQe agregando cantidades pequeas CAJA DE ENGRANAJES de aceite y vuelva a inspeccionar la varilla...
- Page 30 LIMPIEZA • Mantenga las superficies pulidas y las rue- IMPORTANTE: Para obtenerel mejor r endimineto, das sin gasolina, aceite, etc. mantenga l acajadelasegadora s inacumulacion • No recomendamos el uso de una manguera de jardin para limpiar la segadora a menos decesped y basura.
- Page 31 MOTOR Posc6n J-<_j Posc6n #-c_ VELOCIDAD DEL MOTOR para segar para segar La velocidad del motor ha sido ajustada en la fa- brica. No trate de aumentar la velocidad del motor pues se pueden producir lesiones personales. Si ,k I cree que el motor esta funcionando demasiado rapido o demasiado lento, Ileve su segadora a mas con su centro de servicio Sears o con un...
- Page 32 MOTOR AVlSO: El sistema tap6n del carburante y car- tucho FRESH START -_ gotea automaticamente SISTEMA DE COMBUSTIBLE un preservador concentrado de carburante en el IMPORTANTE: Es JmpoFtante evJtaF que deposito del carburante y es una aceptable alter- se former depositos de coma en paFtes...
- Page 33 SOLUCION PROBLEMAS - Vea la secci6n apropiada en el manual amenos un centro de servico Sears. est_ dirigido CAUSA CORRECCION PROBLEMA Falta de Eleve la altura de corte. Cuchilla desgastada, doblada fuerza o suelta. Eleve la altura de corte. Altura de las ruedas dispareja. Velocidad del motor lenta.
- Page 34 CRAFTSMAN ROTARY LAWN MOWER- - MODEL NUMBER 917.3760,55 •...
- Page 35 CRAFTSMAN ROTARY LAWN MOWER - MODEL NUMBER 917.376055 PART PART DESCRIPTION DESCRIPTION 150078 194200X479 Upper Handle Screw, Sems, Thread Cutting 5/16-18 x 3/4 195916X479 183567 Engine Zone Control Cable Handle Bracket Assembly, LH 195917X479 850733X004 Bracket, Upstop Handle Bracket Assembly, RH...
- Page 36 CRAFTSMAN ROTARY LAWN MOWER - - MODEL NUMBER 917.376055 (..o H :_/._38/'ii...
- Page 37 CRAFTSMAN ROTARY LAWN MOWER- - MODEL NUMBER 917.376055 PART PART DESCRIPTION DESCRIPTION 194653 Cable, Drive Control 86012 Driveshaft Cover 191039 Bearing, Wheel Adjuster 401805 Frame, Grassbag 175262 Pan Head Tapping Screw#10-24 x 2-3/4 183497 * Case, Lower 146527 V-Belt 183498...
- Page 38 BRIGGS & STRATTON 4-CYCLE ENGINE MODEL NUMBER 125K02-0542-E1 !© 307_ ._o %_...
- Page 39 BRIGGS & STRATTON 4-CYCLE ENGINE MODEL NUMBER 125K02-0542-E1 977 CARBURETOR GASKET SET 633A _ 633 _ 276 _ 121 CARBURETOR OVERHAUL KIT 3® 365 _ 334_ 65 _ _ 592 689 _ 358 ENGINE GASKET SET 20 _ 842_ 524 C_...
- Page 40 BRIGGS & STRATTON 4-CYCLE ENGINE MODEL NUMBER 125K02-0542-E1 I 1058 OWNER'S MANUALll 1329 REPLACEMENT ENGINE 564_ 1883 1386 ;1613_ _332 1036 EMISSIONS LABEL I I 1330 REPAIR MANUAL I PART PART DESCRIPTION DESCRIPTION 697322 Cylinder Assembly 695759 Screw (Connecting Rod) 399269 Valve-Exhaust Kit-Bushing/Seal...
- Page 41 BRIGGS & STRATTON 4-CYCLE ENGINE MODEL NUMBER 125K02-0542-E1 KEY PART PART DESCRIPTION DESCRIPTION 498260 Kit-Carburetor Overhaul 690340 Retainer-Governor Shaft 790845 Carburetor 698801 Crank-Governor 694468 O Plug-Welch 270344s "O:1:O-Ring (Intake Manifold) 696564 Valve-Throttle 692310 Switch-Stop 398187 Float-Carburetor 691321 O:1:Seal-Throttle Shaft 398188 O Valve-Needle/Seat 633A 693867 O:1:Seal-Choke Shaft...
-
Page 42: Service Notes
SERVICE NOTES... - Page 43 SERVICE NOTES...
- Page 44 Your Home For repair - in your home - of all major brand appliances, lawn and garden equipment, or heating and cooling systems, no matter made it, no matter sold For the replacement parts, accessories owner's manuals that you need to do-it-yourself. For Sears professional installation of home appliances...
Need help?
Do you have a question about the 917.376055 and is the answer not in the manual?
Questions and answers