Advertisement
Available languages
Available languages
Owner's Manual
Husqvarna
ROTARY LAWN MOWER
7.0 Horsepower
Power-Propelled
21" Multi-Cut
Model No.
917.375830
• Espahol, p. 20
CAUTION:
Read and follow all
Safety Rules and Instructions
before operating this equipment
Sears, Roebuck and Co., Hoffman Estates, IL 60179
Visit our Craftsman website: www.sears.com/craftsman
U.S.A.
Advertisement
Table of Contents

Related Manuals for Husqvarna 917.375830


Summary of Contents for Husqvarna 917.375830
- Page 1 Owner's Manual Husqvarna ROTARY LAWN MOWER 7.0 Horsepower Power-Propelled 21" Multi-Cut Model No. 917.375830 • Espahol, p. 20 CAUTION: Read and follow all Safety Rules and Instructions before operating this equipment U.S.A. Sears, Roebuck and Co., Hoffman Estates, IL 60179...
- Page 2 Maintenance ........12-15 Safety Rules .......... Warranty ........... Service and Adjustments ....15-16 Product Specifications ......Storage ..........17-18 Assembly / Pre-Operation ......Troubleshooting ......... 18-19 Operation ..........7-11 Repair Parts ........38-45 Maintenance Schedule ......IMPORTANT: Thiscutting machine is capable of amputating hands and feet and throwing jects.
- Page 3 4442 of the California Public Resources Code). Other states may have similar laws. Federal laws apply on federal lands. A spark arrester for the muffler is available through your nearest Husqvarna other authorized service center (See the REPAIR PARTS section of this manual).
- Page 4 This warranty shall be inapplicable to defects resulting from the following: authorized Husqvarna dealer in a timely manner, no (1)Accident, abuse, misuse, negligence and neglect, later than thirty (30) days from date of the operational including stale fuel, dirt, abrasives, moisture, rust, problem or failure.
-
Page 5: Lawn Mower Maintenance
They are not shipped with your mower. They are also available at most Husqvarna retailers service centers. Some of these accessories may not apply to your lawn mower. LAWN MOWER PERFORMANCE CLIPPING DEFLECTORS STABILIZER... -
Page 6: How To Set Up Your Mower
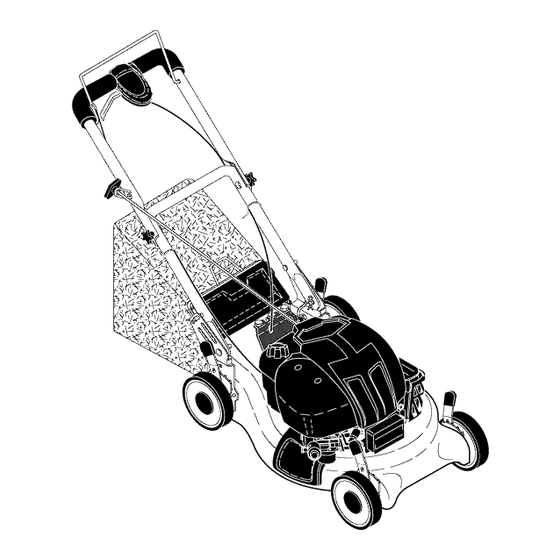
Read these instructions and this manual in its entirety before you attempt to assemble or operate your new lawn mower. IMPORTANT: This lawn mower is shipped WITHOUT OIL OR GASOLINE in the engine. Your new lawn mower has been assembled at the factory with the exception of those... - Page 7 KNOW YOUR LAWN MOWER READ THIS OWNER'S MANUAL AND ALL SAFETY RULES BEFORE OPERATING YOUR LAWN MOWER. Compare the illustrations with your lawn mower to familiarize yourself with the location of various controls and adjustments. Save this manual for future reference. These symbols may appear...
-
Page 8: How To Use Your
O erator presence control bar The operationof any SAFETY GLASSESlawn mower can result in foreign objects thrown into the eyes, which result in severe eye dam- age. Always wear safety glasses or eye Drive control shields while operating your lawn mower Ieve r or performing any adjustments... - Page 9 TO CONVERT MOWER Discharge deflector Your lawn mower was shipped ready to be used as a mulcher. To convert to bagging or discharging: REAR BAGGING • Open rear door and remove mulcher plug. Store mulcher plug in a safe place. •...
-
Page 10: Before Starting
ADD GASOLINE • Fill fuel tank to bottom of tank filler neck. Do not overfill. Use fresh, clean, regular unleaded gasoline with a minimum of 87 octane. Do not mix oil with gasoline. Pur- chase fuel in quantities that can be used within 30 days to assure fuel freshness. - Page 11 MOWING TIPS MULCHING MOWING TIPS _, CAUTION: Do not use de-thatcher IMPORTANT: For best performance, blade attachments on your mower. Such keep mower housing free of built-up attachments are hazardous, will damage grass and trash. See "CLEANING" in the Maintenance section of this manual.
-
Page 12: Maintenance Schedule
MAINTENANCE BEFORE AFTER EVERY EVERY EVERY BEFORE EACH EACH 25HOURS SCHEDULE HOURS OR SEASON HOURS STORAGE Check for Loose Fasteners Clean / inspect Grass Catcher Check Tires Check Drive Wheels Clean Lawn Mower ..Clean under Drive Cover *** Check Drive Belt / Putleys *** Check / Sharpen / Replace Blade... -
Page 13: Lawn Mower
LAWN MOWER IMPORTANT: Blade bolt is heat treated. If bolt needs replacing, replace only with Always observe safety rules when per- forming any maintenance. approved bolt shown in the Repair Parts section of this manual. TIRES Crankshaft Blade adapter • Keep tires free of gasoline, oil, or insect control chemicals which can harm rubber. - Page 14 ENGINE Continue adding small amounts of oil, LUBRICATION rechecking the dipstick until oil level settles at FULL. DO NOT overfill, Use only high quality detergent oil rated with API service classification SG-SL. engine will smoke heavily from the muffler on startup. lect the oil's SAE viscosity grade according Always...
- Page 15 CLEANING • Keep finished surfaces and wheels free of all gasoline, oil, etc. IMPORTANT: For best performance, • We do not recommend using a garden keep mower housing free of built-grass hose to clean lawn mower unless and trash. Clean the underside of your electrical system,...
- Page 16 13. Reattach drive cable and return spring your lawn mower to a Husqvarna or other to the idler arm assembly, then reat- qualified service center for repair and/or tach drive cable to anchor.
- Page 17 Immediately prepare your lawn mower for storage at the end of the season or if the unit will not be used for 30 days or more. LAWN MOWER Handle pin When lawn mower is to be stored for a SQUEEZE period of time, clean it thoroughly,...
-
Page 18: Troubleshooting
Replace with new spark plug. TROUBLESHOOTING - See appropriate section in manual unless directed to a Husqvarna Parts & Repair Center. PROBLEM CAUSE CORRECTION Does not start 1. Dirty air filter. Clean/replace air filter. 2. Out of fuel. - Page 19 TROUBLESHOOTING - See appropriate section in manual unless directed to a Husqvarna Parts & Repair Center. CAUSE PROBLEM CORRECTION Does not start Control bar defective. Replace control bar. 10.Turn fuel valve lever (continued) 10. Fuel valve lever (if so equipped) in OFF position.
- Page 20 Reglas de Seguridad ........ 20-21 Programa de Mantenimiento ......30 Garantia ............Servicio y Adjustes ........33-34 Almacenamiento ........35-36 Especificaciones del Producto ....... Montaje / Pre-Operaci6n ....... Identificaci6n de problemas ...... 36-37 Operaci6n ..........25-29 Partes de repuesto ........38-45 Mantenimiento ..........
- Page 21 HACER: • Nunca Ilenar contenedores en un vehiculo, en un cami6n o caravana con un forro de pl_.stico. • Puede recortar a trav_s de la superficie de Colocar siempre los contenedores en el suelo la cuesta, nunca hacia arriba y hacia abajo. lejos de su vehiculo antes de Ilenar.
- Page 22 Husqvarna SECCION 3: ART[CULOS NO CUBIERTOS POR autorizado para la estimaci6n. La prueba de compra,...
-
Page 23: Mantenimiento
Estos accesorios estaban disponibles cuando se produjo la segadora. No son facilitados junto al cortacesped. Tambi_n est_.n disponibles en la mayorfa de las tiendas de Husqvarna yen los centros de servicio. Algunos de estos accesorios tal vez no se apliquen a su segadora. RENDIMIENTO... - Page 24 Lea estas instrucciones y el manual completamente antes de tratar de montar u operar su sega- dora nueva. IMPORTANTE: Este cortacesped viene SIN ACEITE O GASOLINA en el motor. Su segadora nueva ha sido montada en la f_tbrica con la excepci6n de aquellas partes que se de- jaron sin montar por razones de envio.
- Page 25 FAMILIARICESE CON SU SEGADORA LEA ESTE MANUAL DEL DUENO Y LAS REGLAS DE SEGURIDAD ANTES DE OPARAR SU SEGADORA. Compare las ilustraciones con su segadora para familiarizarse con la ubicaci6n de los diversos controles y ajustes. Guarde este manual para referencia en el futuro. Estos simbolos pueden apareser sobre su segadora o en la literatura proporcionada con el producto.
- Page 26 Barra de control que oresencia del operador La operaci6n de cualquier segadora puede hacer que salten objetos extrafios dentro de sus ojos, Io que puede producir dafios graves en _stos. Siempre use anteojos de seguridad o protecci6n para Control de los ojos mientras opere su segadora o cuando la impulsi6n haga ajustes o reparaciones.
- Page 27 Desviador PARA CONVERTIR LA SEGADORA de la descarga Su segadora fue enviada lista para usarse come acolchadora de capa vegetal. Para convertirla a una operaci6n de ensacado o de descarga: SEGADORAS CON DESCARGA TRASERA • Abra la puerta trasera y remueva la tap6n acolchadora.
- Page 28 _PRECAUCI6N: Los combustibles Mango del mezclados con alcohol (conocidos como bastidor del recogedor gasohol, o el uso de etanol o metanol) pueclen atraer la humeclacl, la que conduce a la separaci6n y formaci6n de r_tciclos clurante el almacenamiento. La gasolina aciclica puecle claSar el sistema clel combustible de un motor clurante el almacenamiento.
- Page 29 CONSEJOS PARA SEGAR CONSEJOS PARA SEGAR Y ACOL- _i_PRECAUCI6N: No utilizar dispositivos anti- CHAR paja de la hoja en la segadora ya que estos IMPORTANTE: Para obtener el mejor accesorios son peligrosos, pueden daSar su rendimiento mantenga la caja de la segadora segadora y anular su garantfa.
- Page 30 PROGRAMA ANTES DESPUES CADA CADA CADA ANTES DEL DE CADAiDE CADA 25HORAS ALMACE- MANTENIMIENTO NORAS TEMPORADA HORAS NAMmENTO Revisar si hay Sujetadores Sueltos Limpiar/Inspeccionar el Recogedor de C6sped * Controlar los Neumaticos Controlar las Ruedas Motrices *** Limpiar la Segadora ..
- Page 31 SEGADORA Instale el perno de la cuchilla con la aran- clela de seguriclacl y la aranclela enclurecicla Siempre observe las reglas de seguridad cu- en el adaptador de la cuchilla y el ciguehal. ando haga el mantenimiento. Use un bloque de maclera entre la cuchilla y la caja de la segaclora y apriete el perno LLANTAS de la cuchilla girr_tncloloen el senticlo en que...
-
Page 32: Para Cambiar Elaceite Delmotor
• Lacajade engranajes se Ilenaconlubricante Limpie todo el aceite derramado en la sega- hastaelnivel a decuado enla f_.brica. La dora yen el lado del motor. t3nica vezqueel lubricante necesita atenci6n Echar aceite despacio en el conducto del escuandosele haprestado servicio a la aceite, par_.ndose a intervalos regulares cajade engranajes. - Page 33 BUJ|A • Limpie el motor a menudo para evitar que Cambie el bujia al comienzo de cada tempo- se acumule la basura. Un motor tapado fun- rada de siega o despues de cada 100 horas de ciona m_ts caliente y se acorta su duraci6n. operaci6n, Io que suceda primero.
- Page 34 Ileve su segadora a contacto con sorte de vuelta en el conjunto de la palanca su centro de servicio Husqvarna o con un otro de transmisi6n, luego fijar el cable de mando centro de servicio cualificado para repararla y/o al ancla.
- Page 35 Inmediatamente prepare su segadora para el mango almacenamiento al final de cada temporada o si la unidad no se va a usar por 30 dias o m_.s. SEGADORA Cuando se va a guardar la segadora por cierto periodo de tiempo, limpiela cuidadosamente, remueva toda la mugre, la grasa, las hojas, etc.
- Page 36 SOLUCION DE PROBLEMAS - Vea la seccibn apropiada en el manual amenos est_ dirigido a un centro de servico Husqvarna. PROBLEMA CAUSA CORRECCION No arranca Filtro de aire sucio. Limpie/cambie el filtro de aire. Sin combustible. Llene el estanque de combustible.
- Page 37 Ciguefial del motor doblado. P6ngase en contacto con su centro de servicio Husqvarna o con un otro centro de servicio cualificado. Cordbn El freno del volante del motor Presione la barra de control arrancador est,.
- Page 38 CRAFTSMAN ROTARY LAWN MOWER - - MODEL NUMBER 917.375830...
- Page 39 CRAFTSMAN ROTARY LAWN MOWER - - MODEL NUMBER 917.375830 PART PART PART DESCRIPTION DESCRIPTION DESCRIPTION 199982 Upper Handle Assembly 163183 Bolt, Hex Head 5/16-18 x 5/8 169699X418 Discharge Guard (Includes Foam Grip) 73800500 Nut, Hex, with 88349 Nut, Hex 193664X498 Handle, Lower Lockwasher Insert 5/16-18 188839X004...
- Page 40 CRAFTSMAN ROTARY LAWN MOWER - - MODEL NUMBER 917.375830 \ f/ "...
- Page 41 CRAFTSMAN ROTARY LAWN MOWER - - MODEL NUMBER 917.375830 PART PART DESCRIPTION DESCRIPTION 403326 Drive Control Assembly (Includes Cable) 12000058 E-Ring 7/16 195745 Cover, Top 189403 Cover, Dust, Wheel 187353 Pulley 73800400 Nut, Hex 190039 Pawl Lever, Drive Control 175098 195744 Cover, Bottom 193912X460...
- Page 42 BRIGGS & STRATTON 4-CYCLE ENGINE MODEL NUMBER 128602-0551-E1 I 11329 REPLACEMENT ENGINE 1330 REPAIR MANUAL 1036 EMISSIONS LABEL 1022 1029_ 238_ 1034 914_ 1022 46 _ 10 _ 32A_ 1058 OWNER'S MANUAL I 741" 1095 VALVE GASKET SET 868 _) 1022_ 158 20 51A /_...
- Page 43 BRIGGS & STRATTON 4-CYCLE ENGINE MODEL NUMBER 128602-0551-E1 1331 443%_ 276 Q 127_ 259_ 1171 300 Ir_,_ 613 '_ 287_ 8471 121 CARBURETOR OVERHAUL 104<_ 524QQ_ 977 CARBURETOR GASKET SET 633 ©_ 137C_ 276_ 127(_...
- Page 44 BRIGGS & STRATTON 4-CYCLE ENGINE MODEL NUMBER 128602-0551-E1 358 ENGINE GASKET SET 6o81 5 _ 592 1211 689 o PART PART DESCRIPTION DESCRIPTION 692670 Cylinder Assembly 691664 Screw (Connecting Rod) 399269 Kit-Bushing/Seal 695759 Screw (Connecting Rod) 299819s Valve-Exhaust Seal-Oil (Magneto Side) 499642 493279 Valve-Intake...
- Page 45 BRIGGS & STRATTON 4-CYCLE ENGINE MODEL NUMBER 128602-0551-E1 PART PART DESCRIPTION DESCRIPTION 398188 O Valve-Needle/Seat 692294 Spacer-Fuel Tank 690345 693981 O:1: Gasket-Float Bowl Screw (Breather Cover) 691855 691894•O:l:+Gasket-Air Cleaner Spring-Friction 791766 690959 Line-Fuel (Cut to Length) Pin-Locating 691147 790345 Screw (Control Bracket) Gear-Timing 690940 691648...
-
Page 46: Service Notes
SERVICE NOTES... - Page 47 SERVICE NOTES...
- Page 48 Your Home For repair = in your home = of all major brand appliances, iiiiiiiiiiiiiiii?_ iiiiiiiii;:' HHHHHHHHHi lawn and garden equipment, or heating and cooling systems, iiiiiiiii iiiiiiiii iiiiiiiiiiiiiiiiiii no matter made it, no matter sold iiiiiiiii iiiiiiiiiiiiiiiiiii iiiiiiiiiiiiiiiiiii iiiiiiiii iiiiiiiiiiiiiiiiiii For the replacement parts, accessories...
Need help?
Do you have a question about the 917.375830 and is the answer not in the manual?
Questions and answers