Table of Contents
Advertisement
Advertisement
Table of Contents

Related Manuals for Woods BACKHOE 1050


Summary of Contents for Woods BACKHOE 1050
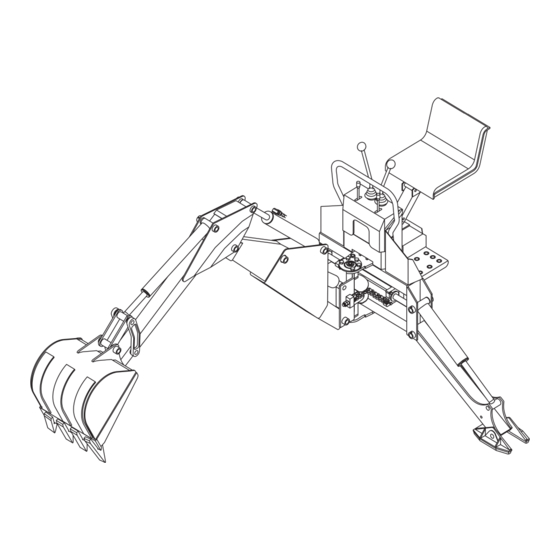
- Page 1 BACKHOE 1050 Tested. Proven. Unbeatable.
-
Page 2: Introduction
Dealer Check List items have been completed. The dealer is to return the prepaid postage portion to Woods, give one copy to the customer, and retain one copy. Failure to complete and return this card does not diminish customer’s warranty rights. -
Page 3: Table Of Contents
TABLE OF CONTENTS INTRODUCTION ..........2 SPECIFICATIONS . -
Page 4: Specifications
BH1050 SPECIFICATIONS Reach Below Grade (Standard Bucket) Maximum ..........127" (3225.8 mm) With Two Foot Flat Bottom Trench* . - Page 5 BH1050 SPECIFICATIONS Introduction 5 51861 (Rev. 6/16/2006)
-
Page 6: General Information
GENERAL INFORMATION The purpose of this manual is to assist in setting up, operating and maintaining your backhoe. Read it care- fully. It furnishes information and instructions that will help you achieve years of dependable performance. These instructions have been compiled from extensive field experience and engineering data. -
Page 7: Safety Rules
SAFETY RULES ATTENTION! BECOME ALERT! YOUR SAFETY IS INVOLVED! grene, serious injury, or death will result. CON- Safety is a primary concern in the design and TACT A P HY SICI AN I MME DIATE LY IF FLUID manufacture of our products. Unfortunately, our ENTERS SKIN OR EYES. - Page 8 1” diameter or approved top link brackets and pins. weight must be on the tractor front wheels when Brackets and pins are available from your WOODS attachments are in transport position. Without this dealer for some tractors not originally equipped weight, tractor could tip over, causing personal with 1”...
- Page 9 SAFETY RULES ATTENTION! BECOME ALERT! YOUR SAFETY IS INVOLVED! being trapped should the boom swing control MAINTENANCE be accidentally activated. Do not modify or alter or permit anyone else to Do not exceed these PTO speeds: modify or alter the equipment or any of its compo- •...
-
Page 10: Safety Decals
Replacement safety decals can be ordered free from your Woods dealer. To locate your nearest dealer, check the Dealer Locator at www.WoodsEquipment.com, or in the United States and Canada call 1-800-319- 6637. - Page 11 SAFETY & INSTRUCTIONAL DECALS ATTENTION! BECOME ALERT! YOUR SAFETY IS INVOLVED! Replace Immediately If Damaged! 2 - 34296 3 - 34244 Safety 11 51861 (Rev. 6/16/2006)
-
Page 12: Operation
OPERATION The operator is responsible for the safe operation of hoe in transport position. Without this weight, trac- the backhoe. The operator must be properly trained. tor could tip over, causing personal injury or death. Operators should be familiar with the backhoe, the The weight may be attained with a loader, front tractor, and all safety practices before starting opera- wheel weights, ballast in tires, or front tractor... -
Page 13: Position The Machine
When engaging optional PTO-mounted pump, engine rpm should always be low. Once engaged, engine rpm may be increased to desirable operation speed. When becoming familiar with backhoe controls, start with a lower rpm. Before operating, perform a functional test by placing control handles in their various positions and making certain correct operation occurs, matching decals on operator's console. -
Page 14: Fill Bucket
FLOAT 1. Left stabilizer handle 2. Right stabilizer handle 37885 -A 37884 -A CD4637 Figure 4. Operator’s Controls (Typical View) After becoming familiar with the backhoe operation, To start the excavation, position backhoe as shown in practice coordinated use of the controls in a safe open Figure 5 for maximum breakout force. -
Page 15: Dump And Return Cycle
SIDE SLOPE TRENCHING / EXCAVATING ARNING Be careful when swinging loaded bucket on hill- side. Always dump spoil on uphill side of backhoe DB3390 to minimize rollover possibility. When operating on a side slope, the backhoe must be Figure 6. Fill Bucket positioned using one of these two methods as shown in Figure 8 or Figure 9. -
Page 16: Transport And Swing Lock Installation
from being run over or crushed. Keep foldable ROPS system in “locked up” position at all times. ARNING Never leave equipment unattended with engine running or with bucket in raised position. Always engage swing and boom transport locks, relieve system pressure by operating controls, and remove ignition key before leaving equipment. - Page 17 ___ Place all backhoe controls in neutral position Sand down scratches and the edges of areas of before starting tractor engine. missing paint and coat with Woods spray paint of matching color (purchase from your Woods ___ Check hydraulic reservoir level.
-
Page 18: Owner Service
OWNER SERVICE The information in this section is written for operators Engage PTO and run at idle for 5 minutes, then check who possess basic mechanical skills. If you need help, oil level. Add fluid as necessary. your dealer has trained service technicians available. For your protection, read and follow the safety informa- Recommended Oils and Temperature Ranges tion in this manual. -
Page 19: Hydraulic Hoses And Fittings
When tightening hoses and fittings, always use two wrenches: one to hold hose and one to tighten fitting. This will prevent hose from twisting and kinking. Always back lock nut off and screw fitting all the way in for fitting that use O-rings for sealing. Then hold in position and tighten lock nut. -
Page 20: Troubleshooting
TROUBLESHOOTING PROBLEM POSSIBLE CAUSE SOLUTION Noisy pump caused by cavitation Oil too heavy Change to proper viscosity. Oil filter plugged Replace filter. Suction line plugged or too small Clean line and check for size. Suction line kinked Replace line. Oil heating Oil supply low Fill reservoir. -
Page 21: Dealer Service 21
DEALER SERVICE The information in this section is written for dealer ser- equipment for eyes, hair, hands, hearing, and head; vice personnel. The repair described here requires and respirator or filter mask where appropriate. special skills and tools. If your shop is not properly equipped or your mechanics are not properly trained in HYDRAULIC CYLINDER REPAIR this type of repair, it may be more time and cost effec-... -
Page 22: Hydraulic Pump Repair
Assembly their various positions and make certain the correct operation occurs corresponding to the decals on the Lubricate O-rings and seals with clean hydraulic fluid. operator's console. Pay specific attention to the float Install back-up washer (3E) on rod guide (5), then position of the boom. -
Page 23: Replacing Shock/Dampening Valves
system. The backhoe pump will separate or crack if Replacing Shock/Dampening Valves system pressure exceeds the maximum. It is not necessary to remove console valve from con- sole to replace shock/dampening valve cartridges. Relief valve adjustment requires a test bench and Remove console cover and replace them. - Page 24 Figure 17. Hydraulic Valve Repair 24 Dealer Service 51861 (Rev. 6/16/2006)
-
Page 25: Swing Cylinder Cushion Oil Flow
1.Complete hydraulic valve p. Dowel bushing h. Front spring washer 2.1350 - 3000 PSI Relief valve asy q. Scraper i. Valve poppet a. Cap nut r. Lever bracket j. Back-up ring b. Copper washer s. Cap screw k. Seal c. Adjusting screw t. - Page 26 Figure 18. Swing Cylinder Oil Flow - Energy Figure 19. Swing Cylinder Oil Flow - Prince 26 Dealer Service 51861 (Rev. 6/16/2006)
-
Page 27: Assembly 27
ASSEMBLY DEALER SET-UP INSTRUCTION ASSEMBLY PROCEDURE Backhoe assembly is the responsibility of the WOODS WARNING dealer. The backhoe should be delivered to the owner It is recommended that power unit be equipped completely assembled, lubricated and adjusted for nor- with ROPS or ROPS cab and seat belt. Keep seat mal operating conditions. - Page 28 Boom Dipperstick Bucket Dipperstick cylinder Bucket arm 1-1/8" x 6-1/2" Pivot pin 1 x 9.1" Pivot pin 5/16 x 2-3/8" Clevis pin 1/8 x 1" Cotter pin 5/16 NC x 2-1/4" Bolt 5/16 NC Lock nut Figure 20. Dipperstick & Bucket Assembly Plumbing Installation WARNING WARNING...
- Page 29 1" diameter or approved top link brackets and Install 90° elbow (9) into pump suction port. Install 90° pins available form your WOODS dealer for some trac- elbow (10) into pump pressure port. Place suction hose tors not originally equipped with 1" diameter pins.
- Page 30 (Refer to Danger decal in Safety Figure 22. Pump Mounting Bracket Installation Decal section.) The purpose of the pump mounting bracket is to keep Saf-T-Lok is a registered trademark of Woods Equipment pump from rotating. 30 Assembly 51861 (Rev. 6/16/2006)
- Page 31 ® maintain required minimum head clearance for tractors Saf-T-Lok Installation with ROPS or cabs. Required head clearance must take priority. The adjustable seat may be used in Insert hitch pin (4) through rear holes as shown in Fig- obtaining minimum head clearance. (Refer to Seat ure 23 and place diagonal bars (3) on hitch pins.
- Page 32 WARNING If tractor is equipped with draft sensing control, set control to “HEAVY” (minimum sensitivity) posi- tion. On tractors with draft control select hole closest to sup- porting point of floating link to mount top link. Use boom cylinder control to position backhoe main frame vertically by extending or retracting cylinder as required.
- Page 33 Make sure you meet minimum clearance distances between ROPS or tractor cab. Required head clear- DANGER ance must take priority. Refer to Danger decal on page 10. Make any adjustments required. Do not operate backhoe unless there is ade- quate operator clearance as shown on safety 1.
-
Page 34: Dealer Check Lists
DEALER CHECK LISTS PRE-DELIVERY CHECK LIST DELIVERY CHECK LIST Dealer’s Responsibility Dealer’s Responsibility Inspect the backhoe (and sub-frame when applicable) ___ Present Operator's Manual and request that cus- thoroughly after assembly to be certain it is set up tomer and all operators read it before operating properly before delivering it to the customer. -
Page 35: Index To Parts Lists
PARTS INDEX BH1050 MAIN FRAME ASSEMBLY....................36 BUCKET & DIPPERSTICK ASSEMBLY................38 BROOM ASSEMBLY ......................40 VALVE CONTROLS & HARDWARE .................. 41 CONSOLE VALVE ASSEMBLY ..................42 HOSES & FITTINGS ......................44 PUMP ASSEMBLY ......................46 540 RPM HYDRAULIC PUMP.................... 47 1000 RPM HYDRAULIC PUMP.................. - Page 36 BH1050 MAIN FRAME ASSEMBLY 36 Parts 51861 (Rev. 6/16/2006)
- Page 37 BH1050 MAIN FRAME ASSEMBLY REF PART DESCRIPTION REF PART DESCRIPTION 14562 * 5/16 NC x 1 HHCS GR5 34060 Main frame (includes item 63) 34178 5/16 x 2-3/8 Clevis pin HT 34041 Swing frame (includes item 64) 838 * 3/8 Standard lock washer 34344 Console assembly and decal 565 *...
- Page 38 BH1050 DIPPERSTICK & BUCKET ASSEMBLY 38 Parts 51861 (Rev. 6/16/2006)
- Page 39 BH1050 DIPPERSTICK & BUCKET ASSEMBLY REF PART DESCRIPTION REF PART DESCRIPTION 34173 1-1/8 x 6-1/2 Pivot pin HT 34011 Dipperstick (includes items 2, 3, and 34176 1 x 6-1/2 Pivot pin HT 34014 1-1/4 x 1-1/2 x 1-1/2 Tension bushing 62484 Socket, SMV emblem 34017...
- Page 40 BH1050 BOOM ASSEMBLY HARDWARE REF PART DESCRIPTION 34216 3 x 27 Hydraulic cylinder assembly REF PART DESCRIPTION (see page 52) 3597 * 1/8 x 1 Cotter pin 34343 Boom 1972 * 1/4 - 28 Tapered thread grease fitting 34172 1-1/8 x 10-3/4 Pin HT 5336 * 1/4 Standard flat washer 34167...
- Page 41 VALVE CONTROLS & HARDWARE HARDWARE REF PART DESCRIPTION 34179 Console valve (see page 42) REF PART DESCRIPTION 34141 Left handle assembly 31416 Rubber handle 34140 Right handle assembly 31246 * 1-5/8 Oval tapered knob 34144 Linkage pivot assembly 3597 1/8 x 1 Cotter pin 34149 2.31 Valve link, right and left 64803 *...
- Page 42 BH1050 CONSOLE VALVE ASSEMBLY 42 Parts 51861 (Rev. 6/16/2006)
- Page 43 BH1050 CONSOLE VALVE ASSEMBLY REF PART DESCRIPTION REF PART DESCRIPTION 33443 Bucket and stabilizer segments com- 34179 Console valve plete (includes body, spool & check 34368 Relief valve assembly, 2100 psi valve) 33339 Check valve assembly 33445 Standard exhaust section 33343 Spool position control assembly 34370...
- Page 44 BH1050 HOSES & FITTINGS 44 Parts 51861 (Rev. 6/16/2006)
- Page 45 BH1050 HOSES & FITTINGS REF PART DESCRIPTION REF PART DESCRIPTION 34221 1/4 NPT x 65" High pressure hose 34234 3/8 NPT x 1/2 NPT Nipple assembly 34180 Restrictor valve 34215 1/4 NPT x 48" High pressure hose 10802 * 3/8 x 1/2 Pipe reducer bushing, assembly straight 34215...
- Page 46 BH1050 PUMP ASSEMBLY REF PART DESCRIPTION REF PART DESCRIPTION 31246 1-5/8 Oval tapered knob 34231 540 RPM Gear pump assembly (see page 47) -or- HARDWARE 62437 1000 RPM Gear pump assembly REF PART DESCRIPTION (see page 48) 34238 540 RPM Pump adapter -or- 765 * 1/2 NC Hex lock nut 34281...
- Page 47 BH1050 540 RPM HYDRAULIC PUMP REF PART DESCRIPTION REF PART DESCRIPTION Drive gear ----- † Front seal Gear housing Retaining ring Rear cover ----- † Rear seal .438 Washer Mounting flange .438 Hex nut ----- † Outer O-Ring ----- † Stuffer strip ----- †...
- Page 48 BH1050 1000 RPM HYDRAULIC PUMP REF PART DESCRIPTION REF PART DESCRIPTION 10409 Shaft seal Back plate assembly Tie bolt ----- † O-Ring Tie bolt ----- † Thrust plate Idler gear assembly Body 62438 Seal kit complete (includes items 2, Dowel pin 3, 8-11, and 15) (for pumps with Drive gear assembly 1-5/16 - 12 SAE pressure port only)
- Page 49 BH1050 SWING CYLINDER REF PART DESCRIPTION 34219 Complete cylinder assembly REF PART DESCRIPTION 34273 Piston rod 34219 2-1/2 x 13 Hydraulic swing cylinder 1972 * 1/4-28 Tapered threaded fitting ----- Cylinder barrel assembly 58822 Seal kit (items 3A -3I) 34332 Rod assembly (includes item 7) ----- †...
- Page 50 BH1050 STABILIZER CYLINDER “E” “P” DESCRIPTION PART PART 34218 34218 2-1/2 x 15 Hydraulic cylinder assembly 1972 * 1972 * 1/4 - 28 Tapered thread grease fitting 34330 Retaining ring, internal 2-1/2 x 15 Wire retainer, 1/2 x 15 64874 34328 Hex lock nut 34254...
- Page 51 BH1050 BUCKET CYLINDER REF PART DESCRIPTION REF PART DESCRIPTION 34217 2-12 x 28 Hydraulic cylinder asy 34217 2-1/2 x 28 Hydraulic cylinder asy Collar, 2-7/8 - 12UN 1972 * 1/4 - 28 Tapered thread grease fitting 34266 Seal kit (contains items 3A-3H) 34266 Seal kit (contains items 3A-3G) (for lock collar style cylinders) -or-...
- Page 52 BH1050 BOOM & DIPPERSTICK CYLINDER REF PART DESCRIPTION REF PART DESCRIPTION 34261 Piston rod 34216 3 x 27 Hydraulic cylinder assembly ----- Cylinder body 34259 Collar 34359 5/16 NC x 5/16 Socket head set 34260 Seal kit (contains items 3A-3H) screw ----- †...
- Page 53 ® BH1050 SAF-T-LOK ASSEMBLY REF PART DESCRIPTION 34129 Double link assembly 34131 Link assembly 34993 Saf-T-Bar assembly, only for S/N 3700 and above (includes item 8-11) -or- 34292 Saf-T-Bar assembly for S/N 3000- 3699 only (includes items 8-11) 14012 Category 2 hitch pin, 1-1/8 drilled HARDWARE REF PART DESCRIPTION...
- Page 54 BH1050 STABILIZER PAD KIT (OPTIONAL) REF PART DESCRIPTION 34107 Stabilizer pad assembly (standard) 34093 Rubber street pad (optional) 34106 Stabilizer spike pad (optional) 29893 1/2 NC x 1-1/2 Carriage bolt HT 855 * 1/2 Extra-heavy lock washer 1093 1/2 NC Heavy hex nut Obtain locally 54 Parts 51861 (Rev.
-
Page 55: Bolt Torque Chart
BOLT TORQUE CHART Always tighten hardware to these values unless a different torque value or tightening procedure is listed for a specific application. Fasteners must always be replaced with the same grade as specified in the manual parts list. Always use the proper tool for tightening hardware: SAE for SAE hardware and Metric for metric hardware. Make sure fastener threads are clean and you start thread engagement properly. -
Page 56: Bolt Size Chart & Abbreviations
BOLT SIZE CHART NOTE: Chart shows bolt thread sizes and corresponding head (wrench) sizes for standard SAE and metric bolts. SAE Bolt Thread Sizes 5/16 Metric Bolt Thread Sizes 10MM 12MM 14MM 16MM 18MM ABBREVIATIONS AG ............Agriculture NC ............ National Coarse ATF ...... -
Page 57: Index 57
INDEX ASSEMBLY OPERATION Dealer Set-Up Instructions 27 Cleaning 16 Control Handle Operation 13 CHECK LISTS Dump and Return Cycle 15 Delivery Check List (Dealer’s Responsibility) 34 Fill Bucket 14 Pre-Delivery Check List (Dealer’s Responsibility) General Operation 12 Position the Machine 13 Pre-Operation Check List Owner’s Responsibility) Pre-Operation Check List (Owner’s Responsibility) DEALER SERVICE... -
Page 58: Product Warranty
Under no circumstances will this Warranty apply in the event that the product, in the good faith opinion of WOODS, has been subjected to improper operation, improper maintenance, misuse, or an accident. This Warranty does not apply in the event that the product has been materially modified or repaired by someone other than WOODS, a WOODS authorized dealer or distributor, and/or a WOODS authorized service center. - Page 59 WOODS’ obligation under this Warranty is limited to, at WOODS’ option, the repair or replacement, free of charge, of the product if WOODS, in its sole discretion, deems it to be defective or in noncompliance with this Warranty. The product must be returned to WOODS with proof of purchase within thirty (30) days after such defect or noncompliance is discovered or should have been discovered, routed through the dealer and distributor from whom the purchase was made, transportation charges prepaid.
- Page 60 © 1995 Woods Equipment Company. All rights reserved. WOODS, the Woods logo, and "Tested. Proven. Unbeatable." are trademarks of Woods Equipment Company. All other trademarks, trade names, or service marks not owned by Woods Equipment Company that appear in this manual...
Need help?
Do you have a question about the BACKHOE 1050 and is the answer not in the manual?
Questions and answers
I have a John Deere 4044 what size back how fits my tractor?