Soleus Air WA2-02-50A User Manual
Bottom-load water cooler
Hide thumbs
Also See for WA2-02-50A:
- Owner's manual (10 pages) ,
- Instruction manual (10 pages) ,
- Operating instructions manual (11 pages)

Related Manuals for Soleus Air WA2-02-50A


Summary of Contents for Soleus Air WA2-02-50A
- Page 1 WA2-02-50A | Aqua Sub Bottom-load Water Cooler 4002638 © 2011 Soleus Air International...
-
Page 2: Important Safety Instructions
Thank you for choosing a Soleus Air Water Cooler. This owner’s manual will provide you with valuable information necessary for the proper care and maintenance of your new product. Please take a few moments to thoroughly read the instructions and familiarize yourself with all the operational aspects of your new water cooler. -
Page 3: Technical Specifications
WARNING: This water cooler is for use on 120 volt outlets only. The cord has a plug as shown in A. An adapter as shown in C is available for connecting three- blade grounding-type plugs to two-slot receptacles. The grounding lug extending from the adapter must be con- nected to a permanent ground such as a properly grounded outlet box. -
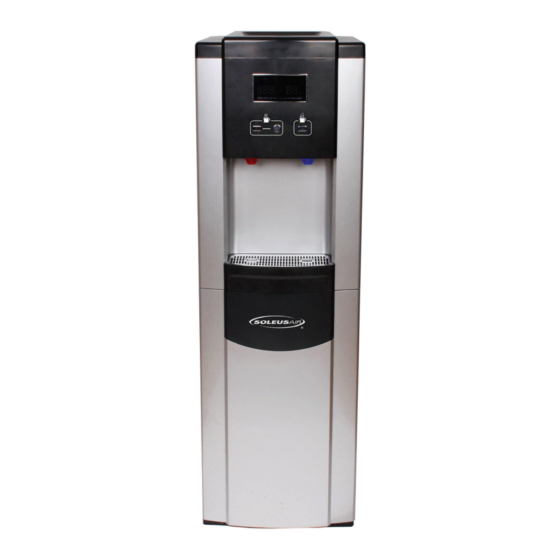
Page 4: Product Diagram
PRODUCT DIAGRAM Multi-color Display Cold Water Dispenser Hot Water Child Safety Lock Hot Water Dispenser Drip Tray Water Bottle Cap with Hose Reset Button Water Bottle (Not included) Lower Cabinet Door Power Switch Power Cord Drain Plug Condenser... -
Page 5: Child Safety Lock
CONTROL PANEL AND MULTI-COLOR DISPLAY Multi-color Display Child Safety Lock Cold Water Button Hot Water Button RESET FULL EMPTY WATER UNIT BOTTLE BOTTLE PUMP ON COLD WATER TEMPERATURE HOT WATER TEMP. COLD WATER ICON UNIT IS HEATING HOT WATER UNIT IS COOLING WATER ICON WATER... -
Page 6: Unpacking
UNPACKING THE WATER COOLER 1. Cut and remove the straps from the box. DO NOT turn the box upside down, or lay it on its side. The bottom of the box is separate from the top section. Lift straight up on the top box section to remove the top box section. - Page 7 1. Make sure the water dispenser is not plugged into an electrical out- let. 2. Open the door of the lower cabinet. 3. Place a full water bottle in the center of the cabinet. Remove the plastic cover over the mouth of the water bottle. 4.
-
Page 8: Operation
OPERATION After the water bottle has been connected to the water cooler, the unit is ready for use. Turn the power switch on the back of the unit to ON. The water cooler will start running. First the unit will pump the water from the water bottle into the cooling and heating tanks, and then the unit’s compressor and heater will start to operate. -
Page 9: Troubleshooting
System Malfunction System Malfunction Contact Soleus Air for service Contact Soleus Air for service The ventilation around the unit is The ventilation around the unit is Space the unit from the wall by Space the unit from the wall by... -
Page 10: Warranty
One Year Limited Warranty Soleus International Inc. warrants the accompanying Soleus Air Water Cooler to be free of defects in material and workmanship for the applications specified in its operation instruction for a period of ONE (1) year from the date of original retail purchase in the United States.
Need help?
Do you have a question about the WA2-02-50A and is the answer not in the manual?
Questions and answers