Table of Contents
Advertisement
Available languages
Available languages
Owner's Manual
CRAFTSMAN°
ROTARY LAWN MOWER
6.5 Horsepower
Power-Propelled
21" Multi-Cut
Model No.
917.377842
• Espa_ol, p. 20
CAUTION:
Read and follow all
Safety Rules and Instructions
before operating this equipment
Sears, Roebuck and Co., Hoffman Estates, IL 60179
Visit our Craftsman website: www.sears.com/craftsman
U.S.A.
Advertisement
Table of Contents
Troubleshooting

Subscribe to Our Youtube Channel
Related Manuals for Craftsman 917.377842


Summary of Contents for Craftsman 917.377842
- Page 1 ROTARY LAWN MOWER 6.5 Horsepower Power-Propelled 21" Multi-Cut Model No. 917.377842 • Espa_ol, p. 20 CAUTION: Read and follow all Safety Rules and Instructions before operating this equipment U.S.A. Sears, Roebuck and Co., Hoffman Estates, IL 60179 Visit our Craftsman website: www.sears.com/craftsman...
- Page 2 Warranty service is available by returning the Craftsman power mower to the nearest Sears Parts & Repair Center in the United States. This warranty applies only while this product is used in the United States.
- Page 3 DO NOT: • Clear the area of objects such as rocks, toys, wire, bones, sticks, etc., which • Do not trim near drop-offs, ditches could be picked up and thrown by blade. embankments. The operator could lose • Be sure the area is clear of other people footing or balance.
- Page 4 Repair Protection Agreements Congratulations on making a smart pur- • Fast help by phone- phone support chase. Your new Craftsman® product from a Sears technician on products designed and manufactured for years of requiring in-home repair, plus conve- dependable operation.
- Page 5 These accessorieswere availablewhen this lawn mowerwas produced. They are not shipped with your mower. They are also availableat most Sears retailoutlets and service centers. Some of these accessoriesmay not apply to your lawn mower. LAWN MOWER PERFORMANCE CLIPPING DEFLECTORS STABILIZER REAR DISCHARGE LAWN MOWERS GRASS...
- Page 6 HOWTO SET UPYOU R LAWN MOWER TO ASSEMBLE GRASS CATCHER 1. Slide grass catcher bag over the frame. TO UNFOLD HANDLE Make sure the rear handle is on top IMPORTANT: Unfold handle carefully (the same side as the front handle) as not to pinch or damage control cables.
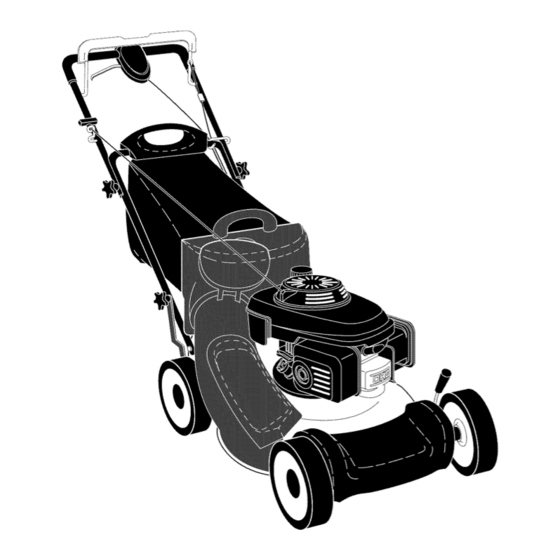
- Page 7 KNOWYOUR LAWN MOWER READ THIS OWNER'S MANUAL AND ALL SAFETY RULES BEFORE OPERATING YOUR LAWN MOWER. Compare the illustrations with your lawn mower to familiarize yourself with the location of various controls and adjustments. Save this manual future reference. These symbols may appear on your...
- Page 8 • To keep drive control engaged when The operationof any lawn turning corners, push down on the SAFETY GLASSES mowercan result in foreign handle to lift the front wheels off the objectsthrown into the ground while turning lawn mower. eyes, which can result in DRIVE...
- Page 9 SIDE DISCHARGING • Grass catcher and discharge chute must be removed. • Open mulcher door and install front of side discharge deflector beneath door and position rear over threaded stud. • Secure rear of side discharge deflector to lawn mower housing with knob.
- Page 10 EMPTY GRASS CATCHER A CAUTION: DO NOT overfill engine with Open round door of discharge chute to oil, or it will smoke heavily from the muffler move starter rope out and away from on startup. Be sure lawnmower is level. grass catcher.
- Page 11 TO STOP ENGINE Keep top of engine around starter clear and clean of grass clippings and chaff. • To stop engine, release operator pres- This will help engine air flow and extend ence control bar. Wait until blade and engine life.
- Page 12 MAINTENANCE BEFORE AFTER EVERY EVERY EVERY BEFORE EACH EACH 25HOURS SCHEDULE HOURS OR SEASON HOURS STORAGE Check for Loose Fasteners Clean / Inspect Grass Catcher Check Tires Check Drive Wheels Clean Lawn Mower ..Clean under Drive Cover *** Check Drive Belt / Putleys *** Check / Sharpen / Replace Blade...
- Page 13 LAWN MOWER The blade can be sharpened with a file or on a grinding wheel. Do not attempt Always observe safety rules when per- to sharpen while on the mower. forming any maintenance. To check blade balance, drive a nail into TIRES a beam or wall.
- Page 14 LUBRICATION Continue adding small amounts Use only high quality detergent oil rated oil and rechecking the dipstick until it with API service classification SG-SL. reads full. DO NOT overfill, or engine Selecttheoil'sSAEviscositygradeaccording will smoke on startup. to your expectedoperatingtemperature. 8. Always be sure to retighten oil fill cap/ dipstick...
- Page 15 • Clean the undersideof your lawn mower electrical system, muffler,air filter and by scrapingto removebuild-upof grass carburetorare coveredto keepwater and trash. out. Waterin enginecan result in short- • Clean engineoften to keeptrash from ened enginelife. accumulating.A cloggedengine runs CLEAN UNDER DRIVECOVER hotter and shortens enginelife.
- Page 16 Use a wood block between blade and Install new drive belt into idler arm mower housing to prevent blade from assembly, then around the drive pulley. turning when removing blade bolt. Be sure belt is inside of belt keepers NOTE: Protect your hands with gloves (See Figure...
- Page 17 ENGINE SPEED mower to a Sears or other qualified service Your engine speed has been factory set. center for repair and/or adjustment. Do not attempt to increase engine speed IMPORTANT: Never tamper with the or it may result in personal injury.
- Page 18 ENGINE reach the carburetor. Do not empty the gas tank and carburetor if using fuel stabilizer. Maintenance, repair, or replacement of the ENGINE emission control devices and systems, which are being done at the customers expense, Drain oil (with engine warm) and replace may be performed...
- Page 19 TROUBLESHOOTING - See appropriate section in manual unless directed to a Sears Parts & Repair Center, PROBLEM CAUSE CORRECTION 1. Raise cutting height. Loss of power Rear of mower housing blade dragging in grass. Cutting too much grass. Raise cutting height.
- Page 20 Contratapa GARANTiA LIMITADA DE DOS ANOS PARA LA SEGADORA A MOTOR CRAFTSMAN Por dos (2) a5os, a partir de la fecha de compra, cuando esta Segadora Craftsman se mantenga, lubrique y afine segQn las instrucciones para la operaci6n y el mantenimiento en el manual del due5o, Sears reparara gratis todo defecto en el material y la mano de obra.
- Page 21 • Norecortecuestas demasiado i nclinadas. • Noopere lamaquina sinzapatos o consanda- liasabiertas. P6ngase s iempre z apatos s 61idos. • Norecorte enhierba mojada. Lareducci6n e nla • Notirede lasegadora hacia atrasa menos tracci6n delapisada puede causar r esbalones. queseaabsolutamente necesario. Mire III.
- Page 22 Congratulaciones por su buena compra. Ayuda r&pida por telefono - soporte tele- nuevo producto Craftsman® esta diseSado f6nico por parte de un tecnico Sears sobre y fabricado para funcionar de modo fiable por productos que requieren un arreglo en casa, muchos a5os.
- Page 23 Estos accesorios estaban disponibles cuando se produjo la segadora. No son facilitados junto al cortacesped. Tambien estan disponibles en la mayoda de las tiendas de Sears yen los centros de servicio. AIgunos de estos accesorios tal vez no se apliquen a su segadora. RENDIMIENTO DE LA SEGADORA DESVIADOR...
- Page 24 PARA MONTAR EL RECOGEDOR COMO PREPARAR SU SEGADORA CO:SPED PARA DESDOBLAR EL MANGO Deslizar el saco de la hierba sobre el IMPORTANTE: Despliegue el mango con armaz6n. Asegurarse de que el mango mucho cuidado para no pellizcar o daSar los trasero este arriba (el mismo lado que el cables de control.
- Page 25 FAMILIARICESE CON SU SEGADORA LEA ESTE MANUAL DEL DUENOY LAS REGLAS DE SEGURtDAD ANTES DE OPARAR SU SEGADORA. Compare las ilustraciones con su segadora para familiarizarse con la ubicacion de los diversos controles y ajustes. Guarde este manual para referencia en el futuro. Estos simbolos pueden apareser sobre su segadora o en la literatura proporcionada con el producto.
- Page 26 AJUSTE DEL MANDO La operacion de cualquier Ocasionalmente, el sistema de mando puede segadora puede hacer que "aflojarse", provocando una disminucion de la salten objetos extraSos dentro de velocidad. Hay un bot6n en la parte trasera de sus ojos, Io que puede producir la sede del mando para apretar la tension del daSos graves en estos.
- Page 27 • Fijar la parte trasera del canal de descarga al • Fijar la parte trasera del deflector de des- bastidor del cortacesped a traves del pomo. carga lateral al bastidor del cortacesped a • Colocar el mango trasero del dep6sito de traves del pomo.
- Page 28 PARA VAClAR EL RECOGEDOR DE ClaSPED Remueva la varila medidora de aceite del 1. Abierto ]a puerta redonda de] canal inc]i- tubo de desarga de aceite. Usted recibe un envase de aceite con la nado de ]a descarga para mover ]a cuerda unidad.
- Page 29 PARA PARAR EL MOTOR el uso y los recogedores recaudaran menos cesped. Para evitar este, rocie el recogedor * Para parar el motor y si no intenta ponerlo en con la manguera de agua, regularmente, marcha de nuevo, alivie la barra de control dejelo secarse antes de usarlo.
- Page 30 PROGRAMA ANTEs DESPUES cADA CADA CADA ANTESDEL DE CADA DE CADA 25 HORAS O ALMACEo MANTENIMIENTO uso .oRAsTEMPORADA,ORAS .AMmE.TO Revisar si hay Sujetadores Sueltos Limpiar/Inspeccionar el Recogedor de C6sped * Controlar los Neum_:_ticos Controlar las Ruedas Motrices *** Limpiar la Segadora ..
- Page 31 SEGADORA mantenerla balanceada. Una cuchilla que no Siempre observe las reglas de seguridad cu- esta balanceada va a producir eventualmente dafio en la segadora o en el motor. ando haga el mantenimiento. Borde de LLANTAS Adaptador • Mantenga las Ilantas sin gasolina, aceite o de la cuchilla substancias quimicas para control de insec- tos que pueden dafiar la goma.
- Page 32 LUBRICACION ContinQe agregando cantidades pequeas Use solamente aceite de detergente de alta call- de aceite y vuelva a inspeccionar la varilla dad clasificado con la clasificaci6n SG-SL de ser- medidora hasta que lea Ileno (FULL). vicio API. Seleccione la calidad de viscosidad SAE sobrellene el motor con aceite, o fumara cuando Io valla a arrancar.
- Page 33 LIMPIE DEBAJO DELA CUBIERTA DELA Limpie el motor a menudo paraevitarque seacumule labasura. U nmotortapado fun- IMPULSION cionamascaliente y seacortasu duraci6n. Limpie debajo de la cubierta de la impulsi6n Mantenga lassuperficies p ulidas y lasrue- por Io menos dos veces cada temporada. dassingasolina, aceite, e tc.
- Page 34 Instalar la nueva correa de mando en el Use un bloque de madera entre la cuchilla y la caja de la segadora para evitar que la conjunto de la palanca de transmisi6n, cuchilla gire cuando se le quite el perno. luego alrededor de la polea de mando.
- Page 35 cree que el motor esta funcionando demasiado IMPORTANTE" Nunca manipule el regulador rapido o demasiado lento, Ileve su segadora a del motor, el que ha sido ajustado en la fabrica mas con su centro de servicio Sears o con un para la velocidad del motor adecuada.
- Page 36 SISTEMA DE COMBUSTIBLE ACEITE DEL MOTOR Drene el aceite (con el motor caliente) y IMPORTANTE: Es importante evitar cambielo con aceite de motor limpio. (Vea "MO- se formen depositos de coma en partes TOR" en la seccion de Mantenimento de este fundamentales del sistemade combustible tales manual.)
- Page 37 SOLUCION DE PROBLEMAS -Yea la seccibn apropiada en el manual amenos est_ dirigido a un centro de servico Sears. PROBLEMA CAUSA CORRECCION Falta de 1. Eleve la altura de corte. Cuchilla desgastada, doblada fuerza o suelta. Eleve la altura de corte. AItura de las ruedas dispareja.
- Page 38 CRAFTSMAN ROTARY LAWN MOWER - - MODEL NUMBER 917.377842...
- Page 39 CRAFTSMAN ROTARY LAWN MOWER - - MODEL NUMBER 917.377842 PART PART DESCRIPTION DESCRIPTION 188505X428 Bolt, Shoulder Handle, Grassbag, Rear 183465 65322 Hairpin Cotter 183613 Deflector, Discharge 183483 Rod, Rear Handle, Grassbag 187064X479 Adjustment Bracket, Lower Handle, 189471 Grassbag 184568 Bolt, Handle...
- Page 40 34 _\...
- Page 41 CRAFTSMAN ROTARY LAWN MOWER- - MODEL NUMBER 917.377842 PART PART DESCRIPTION DESCRIPTION 183705 Drive Control Assembly, Complete 88348 Washer, Flat (Consists of Key Numbers 2 through 192229 Wheel Assembly, Rear 9 x 2-1/4 186297 Cover, Drive Control, 83923 Nut, Hex, Flangelock...
- Page 42 CRAFTSMAN ROTARY LAWN MOWER - - MODEL NUMBER 917.377842 GEAR CASE ASSEMBLY - - PART NUMBER 188294 ..5 ....PART DESCRIPTION 187530 Case, Lower 191245 Case, Upper 187532 Gear, 24 Teeth 191246 Shaft, Worm 183505 Wireform 183506 Bearing, Ball...
- Page 43 HONDA 4-CYCLE ENGINE MODEL NUMBER GCV190-AS3A LABEL CHOKE CAMSHAFT PULLEY 1 14--4_ CARBURETOR J...
- Page 44 HONDA 4-CYCLE ENGINE MODEL NUMBER GCV190-AS3A COVERJ RECOIL STARTER E-14 AIR CLEANERJ FLYWHEEL...
- Page 45 HONDA 4-CYCLE ENGINE MODEL NUMBER GCV190-AS3A CYLINDER BARREL J PISTON CONNECTING ROD I CRANKSHAFT ;° CONTROL MUFFLER...
- Page 46 HONDA 4-CYCLE ENGINE MODEL NUMBER GCV190-AS3A CARBURETOR LABELS KEY PART PART DESCRIPTION DESCRIPTION 3088416 Gasket 7357650 Mark, Emblem (6.5) 5580162 Float Set 7229917 Mark, Choke Indication 3465879 Chamber Set, Float Screw 4481818 1672187 Screw Set, Drain CHOKE 1441518 Screw Set B 5580170 Screw PART...
- Page 47 HONDA 4-CYCLE ENGINE MODEL NUMBER GCV190-AS3A CLEANER CRANKSHAFT PART PART DESCRIPTION DESCRIPTION 5580154 Tube, Breather 7357312 Crankshaft (N3-type) Element, Air Cleaner 6718159 5581012 Washer, Thrust 5580410 Case Assembly, Air Cleaner Gasket, Air Cleaner 5664560 PISTON /CONNECTING 7356025 Cover, Air Cleaner 7399397 Cover, Air Cleaner...
- Page 48 Your Home For repair - in your home - of all major brand appliances, lawn and garden equipment, or heating and cooling systems, no matter who made it, no matter who sold it! For the replacement parts, accessories owner's manuals that you need to do-it-yourself.
Need help?
Do you have a question about the 917.377842 and is the answer not in the manual?
Questions and answers