Table of Contents

Related Manuals for Farenheit DVD-19

Summary of Contents for Farenheit DVD-19
- Page 1 MODEL : DVD-19 OWNER’S MANUAL Before operating the unit, please read this manual carefully and completely, and retain it for future reference. NOTE : THE DESIGNS & SPECIFICATIONS ARE SUBJECT TO CHANGE WITHOUT NOTICE FOR IMPROVEMENT...
-
Page 2: Table Of Contents
INTRODUCTION Table of Contents INTRODUCTION INITIAL SETUP OPERATION Table of contents...............2 Main Page ...............19 Safety Instructions.............3 How to Setup..............19 Parts Name General Setup ..............21 -Front Panel ..............5 -Setting for TV Display ............21 -Rear Panel ..............5 -Setting for Angle Mark............22 -Remote Control ...............6 -Setting for OSD Language ..........22 Using the Remote Control ..........7 -Setting for Captions............23... -
Page 3: Introduction
INTRODUCTION Safety Instructions The lightning flash with arrowhead symbol, WARNING within ane quilateral triangle, is intended to alert the user to the presence of uninsulated RISK OF ELECTRIC “dangerous voltage” within the product’s SHOCK DO NOT OPEN enclosure that may be of sufficient magnitude to constitute a risk of electric shock to persons. - Page 4 INTRODUCTION Safety Instructions 12. Damage Requiring Service a) When the power-supply cord is damaged. 14. Replacement parts b) If liquid has been spilled, or objects have fallen When replacement parts are required, be sure the into the product. service technician has used replacement parts c) If the product has been exposed to rain or water.
-
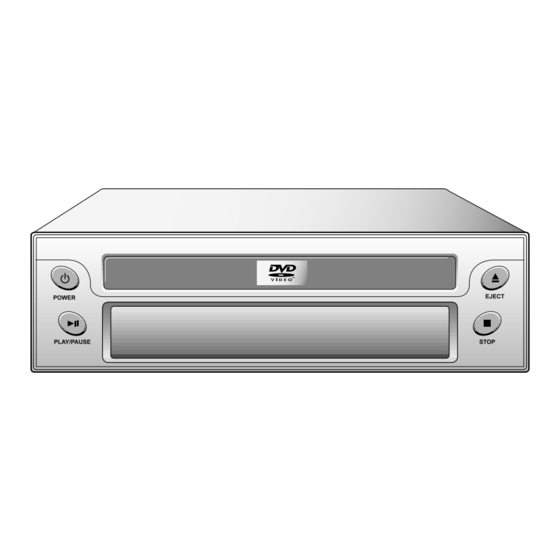
Page 5: Front Panel
INTRODUCTION Front Panel POWER button DISC tray EJECT button PLAY/PAUSE Remote sensor STOP button button Rear Panel AUDIO IN VIDEO IN DC 12V jacks jack INPUT jack REMOTE INPUT AUDIO OUT VIDEO OUT DC 12V jack jacks jack OUTPUT jack Coaxial DIGITAL AUDIO OUT jack... -
Page 6: Remote Control
INTRODUCTION Remote Control NTSC/PAL button SETUP button Open/Close POWER SETUP NTSL/PAL POWER button Open/Close button FUNCTION FUNCTION button ANGLE NUMERIC buttons ANGLE button AUDIO AUDIO button SUBTITLE SUBTITLE button CLEAR button CLEAR PROGRAM button PROGRAM VOLUME +/- button KEY CONTROL +/- button PAUSE SEARCH PAUSE button... -
Page 7: Using The Remote Control
INTRODUCTION Using the Remote Control Inserting Batteries When operating the remote control, point it at Open the battery cover. the remote control sensor as shown on the diagram. Insert batteries(AAA size). The remote control can be used from a direct Make sure to match the + and - on the distance of approximately 4~5 meters. -
Page 8: Connections
CONNECTIONS Connection to a TV You can connect the player to your TV. Video cable To Video Output To Audio To Video Input Input Audio cable To Audio Output(R/L) TFT WIDE COLOR MONITOR TV or monitor with Audio/Video Inputs Notes Refer to the owner's manual of your TV as well. -
Page 9: Connection To An Audio System
CONNECTIONS Connection to an Audio System You can connect the player to your audio system and TV. To Video Output To Audio Input Audio cable To Audio Output(R/L) Audio System TFT WIDE COLOR MONITOR Video cable To Video Input TV or monitor with Audio/Video Inputs Notes Refer to the owner's manual of your car audio system as well. -
Page 10: Connection To Optional Audio System
CONNECTIONS Connection to Optional Audio System Dolby Digital Sound You can enjoy the high quality dynamic sound of Dolby Digital, Dolby Pro Logic, and 2 Channel Digital Stereo. Dolby Digital Dolby Digital is the surround sound technology used in theaters showing the latest movies, and is now available to reproduce this realistic effect in the car and home. -
Page 11: Dolby Surround Sound
CONNECTIONS Connection to Optional Audio System Dolby Surround Sound Dolby Surround You can still enjoy the excitement of Surround Sound even if your A/V receiver does not offer Dolby Digital decoding. If your A/V receiver has a Dolby Surround decoder. Refer to the following connection diagram. Audio cable TFT WIDE COLOR MONITOR Video cable... -
Page 12: Basic Operation
BASIC OPERATION Basic Playback Preparations When you want to playback DVD video discs, turn on the TV and select the video input source connected to the player. When you want to enjoy the sound of DVD video discs or audio CDs from the audio system, turn on the audio system and select the input source connected to the player. -
Page 13: Stopping Playback
BASIC OPERATION Basic Playback Still Picture(Pause) Press PAUSE button during playback. DVD : The player will be placed in the still picture mode. CD : The player will be placed in the pause mode. Open/Close POWER SETUP NTSL/PAL To return to normal playback, press PLAY or PAUSE FUNCTION button. -
Page 14: Selecting Tv Systems
BASIC OPERATION Basic Playback High speed Playback When playing DVD discs Press SCAN( ) button to see high speed picture during playback or pause. Open/Close POWER - By pressing forward SCAN( ) button or backward SETUP NTSL/PAL NTSC/PAL SCAN( ) button, you can see variable speed picture. FUNCTION FUNCTION - To return to normal playback, press PLAY button. -
Page 15: Advanced Operation
ADVANCED OPERATION Zoom feature Press ZOOM button during normal playback or Open/Close POWER still playback. SETUP NTSL/PAL The Zoom feature allows to enlarge the picture on FUNCTION ANGLE the screen. ANGLE AUDIO SUBTITLE CLEAR PROGRAM PAUSE SEARCH Each time you press buttons, the zoom ENTER PLAY... -
Page 16: Program Playback(Audio-Cd)
ADVANCED OPERATION Program playback ( Audio-CD ) Program playback lets to set up a specific order for playback of tracks on a disc. Press the PROGRAM button during stop mode. Press the NUMERIC buttons as you want. To start the program play, press the PLAY button. To cancel the play, press the STOP button and the PROGRAM button twice. -
Page 17: Search Function
ADVANCED OPERATION POWER Open/Close SETUP NTSL/PAL Press TITLE button in stop or playback FUNCTION mode. ANGLE A list of titles on the disc is displayed. AUDIO Press TITLE again to resume play from the SUBTITLE CLEAR PROGRAM scene when TITLE was first pressed. PAUSE SEARCH Resume play may not be possible on certain... -
Page 18: Changing Audio Language(Dvd)
ADVANCED OPERATION Changing audio language(DVD) It is possible to change the audio language to a POWER Open/Close different language from the one selected at the SETUP NTSL/PAL initial settings. FUNCTION This operation works olny with discs on which ANGLE multiple audio languages are recorded. AUDIO AUDIO SUBTITLE... -
Page 19: Initial Setup Operation
INITIAL SETUP OPERATION Main Page If pressing "SETUP Button" on the remote control, you can see the followings on the TV screen. SETUP Open/Close POWER SETUP MENU - - MAIN PAGE SETUP NTSL/PAL Button GENERAL SETUP FUNCTION SPEAKER SETUP ANGLE AUDIO SETUP KARAOKE SETUP AUDIO... -
Page 20: Enter Button
INITIAL SETUP OPERATION How to Setup If using "Arrow Buttons" at the menu you want to set up, you can scroll to sub-items. - - GENERAL PAGE - - PAUSE SEARCH TV DISPLAY NORMAL / PS ANGLE MARK NORMAL / LB Arrow OSD LANG WIDE... -
Page 21: General Setup
INITIAL SETUP OPERATION General Setup You can scroll to the "General Setup" menu using "Arrow Buttons" on the remote control as shown in the main page. PROGRAM SETUP MENU - - MAIN PAGE PAUSE SEARCH GENERAL SETUP SPEAKER SETUP Arrow AUDIO SETUP ENTER Buttons... -
Page 22: Setting For Angle Mark
INITIAL SETUP OPERATION General Setup Setting for Angle Mark - - GENERAL PAGE - - TURN ANGLE MARK ON TV DISPLAY ANGLE MARK OSD LANG CAPTIONS SCR SAVER MAIN PAGE TURN ANGLE MARK OFF ANGEL MARK ON/OFF Setting for Angle Mark is available only if the disc contains the multi-angled scenes. Setting for OSD Language - - GENERAL PAGE - - TV DISPLAY... -
Page 23: Setting For Captions
INITIAL SETUP OPERATION General Setup Setting for Captions - - GENERAL PAGE - - CLOSED CAPTION ON TV DISPLAY ANGLE MARK OSD LANG CAPTIONS SCR SAVER MAIN PAGE CLOSED CAPTIONS OFF CLOSED CAPTION Setting for Screen Saver - - GENERAL PAGE - - TV DISPLAY ANGLE MARK SCREEN SAVER ON - Turn Screen Saver on. -
Page 24: Speaker Setup
INITIAL SETUP OPERATION Speaker Setup You can scroll to the "Speaker Setup" menu using "Arrow Buttons" on the remote control as shown in the main page. PROGRAM SETUP MENU - - MAIN PAGE PAUSE SEARCH GENERAL SETUP SPEAKER SETUP Arrow AUDIO SETUP ENTER Buttons... -
Page 25: Audio Setup
INITIAL SETUP OPERATION Audio Setup You can scroll to the "Audio Setup" menu using "Arrow Buttons" on the remote control as shown in the main page. PROGRAM SETUP MENU - - MAIN PAGE PAUSE SEARCH GENERAL SETUP SPEAKER SETUP Arrow ENTER AUDIO SETUP Buttons... -
Page 26: Setting For Dual Mono
INITIAL SETUP OPERATION Audio Setup Setting for Dual Mono STEREO - - AUDIO SETUP - - SET STEREO MODE SPDIF DUAL MONO STEREO DYNAMIC L-MONO L-MONO R-MONO MAIN PAGE MIX-MONO SET LEFT MONO MODE R-MONO SET RIGHT MONO MODE DUAL MONO (1+1) SETUP MIX-MONO SET MIXED MONO MODE "DUAL MONO"... -
Page 27: Karaoke Setup
INITIAL SETUP OPERATION Karaoke Setup - - KARAOKE SETUP - - KARAOKE MODE OFF KARAOKE MODE KARAOKE KARAOKE MAIN PAGE KARAOKE MODE ON -27-... -
Page 28: Preferences
INITIAL SETUP OPERATION Preferences If the disc doesn't support "PREFERENCES", you - - PREFERENCES PAGE - - can't set it up. For example, when you play some disc. TV TYPE AUDIO SUBTITLE "LOCALITY CODE" refers to allocating each DISC MENU locality code per all the players and the DVD titles LOCALE with the world divided into 6 zones. -
Page 29: Reference
REFERENCE Troubleshooting Guide Check the following guide for the possible cause of a problem before contacting service. Symptom Cause Correction Plug the power cord into the battery outlet securely. No Power The power cord is disconnected. Insert a disc. (Check that the DVD or audio CD The power is on, but the No disc is inserted. -
Page 30: Specifications
REFERENCE Specifications Power Source DC 12V Power Consumption Weight 1.4 kg Dimensions(Widthx Height x Depth) 178mm (W) x 51mm (H) x 217mm (D) Signal System NTSC/PAL Frequency Response 20 Hz - 20 kHz Audio Output level (Analog) 2.0 V(rms) S/N Ratio 90 dB(1kHz JIS-A Filter) Video Output level...
Need help?
Do you have a question about the DVD-19 and is the answer not in the manual?
Questions and answers