Advertisement
Available languages
Available languages
Quick Links
Owner's Manual
JCRHFTSMRN°J
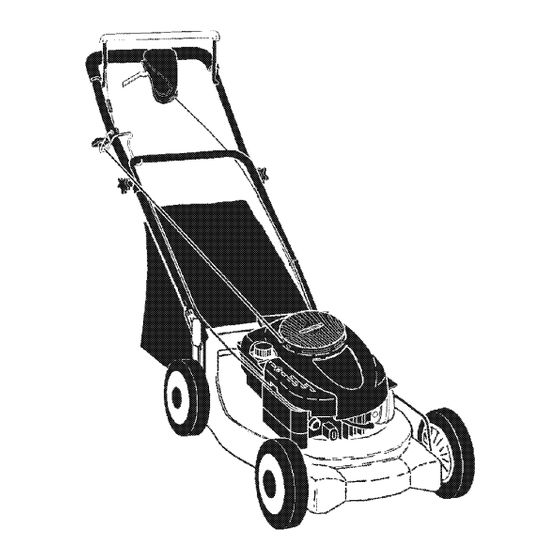
ROTARY LAWN MOWER
6.5 Horsepower
Power-Propelled
21" Rear Discharge
Model No.
917.377664
• EspaSol, p. 19
CAUTION:
Read and follow all
Safety Rules and Instructions
before operating this equipment
Sears, Roebuck and Co., Hoffman Estates, IL 60179
U.S.A.
Visit our Craftsman website: www.sears.com/craftsman
Advertisement

Related Manuals for Craftsman 917.377664


Summary of Contents for Craftsman 917.377664
- Page 1 6.5 Horsepower Power-Propelled 21" Rear Discharge Model No. 917.377664 • EspaSol, p. 19 CAUTION: Read and follow all Safety Rules and Instructions before operating this equipment Sears, Roebuck and Co., Hoffman Estates, IL 60179 U.S.A. Visit our Craftsman website: www.sears.com/craftsman...
-
Page 2: Table Of Contents
Warranty service is available by returning the Craftsman power mower to the nearest Sears Parts & Repair Center in the United States. This warranty applies only while this product is used in the United States. - Page 3 I. GENERAL OPERATION II. SLOPE OPERATION • Read, understand, and follow all Slopes are a major factor related to slip instructions on the machine and in the and fall accidents which can result in manual(s) before starting. Be thoroughly severe injury. All slopes require extra cau- familiar with the controls and the proper tion.
- Page 4 Record both serial number and date of purchase in space provided above. Repair Protection Agreements Congratulations on making a smart pur- Fast help by phone - phone support chase. Your new Craftsman® product is from a Sears technician on products designed and manufactured for years of requiring in-home repair, plus conve- dependable operation.
- Page 5 These accessories were available when this lawn mower was produced. They are not shipped with your mower. They are also available at most Sears retail outlets and service centers. Some of these accessories may not apply to your lawn mower. LAWN MOWER PERFORMANCE CLIPPING...
- Page 6 Read these instructions and this manual in Operator presence its entirety before you attempt to assemble control bar or operate your new lawn mower. IMPORTANT: This lawn mower is shipped WITHOUT OIL OR GASOLINE in the engine. Your new lawn mower has been as- LIFT sembled at the factory with the excep- tion of those parts left unassembled...
- Page 7 KNOW YOUR LAWN MOWER READ THIS OWNER'S MANUAL AND ALL SAFETY RULES BEFORE OPERATING YOUR LAWN MOWER. Compare the illustrations with your lawn mower to familiarize yourself with the location of various controls and adjustments. Save this manual for future reference. These symbols may appear on your lawn mower or in literature supplied with the product.
- Page 8 peating the above steps will return your The operationof any lawn unit to the proper adjustment and speed. mowercan result in foreign 4. If condition fails to improve after the objectsthrown into the above steps (forward speed remains eyes, which can result in the same), your drive belt is worn and severeeye damage.Always should be replaced.
- Page 9 1. Be sure lawnmower is level. TO EMPTY GRASS CATCHER 2. Remove oil dipstick from oil fill spout. 1. Lift up on grass catcher using the 3. You receive a container of oil with the frame handle. unit. Slowly pour the entire container 2.
-
Page 10: Warranty
TO STOP ENGINE • Keep top of engine around starter clear and clean of grass clippings and chaff. • To stop engine, release operator pres- This will help engine air flow and extend ence control bar. engine life. TO START ENGINE MULCHING MOWING TIPS... -
Page 11: Maintenance Schedule
MAINTENANCE BEFORE APTER EVERY EVERY EVERY BEFORE EACH EACH 25HOURS SCHEDULE HOURS ORSEASON HOURS STORAGE Check for Loose Fasteners Clean / Inspect Grass Catcher * Check Tires Check Drive Wheels Clean Lawn Mower ..M Clean under Drive Cover *** O Check Drive Belt / Pulleys *** Check / Sharpen / Replace Blade R Lubrication... - Page 12 LAWN MOWER Blade adapter Crankshaft Always observe safety rules when per- Key _ keyway forming any maintenance. TIRES Blade • Keep tires free of gasoline, oil, or insect control chemicals which can harm rub- ber. • Avoid stumps, stones, deep ruts, sharp objects and other hazards that may cause tire damage.
- Page 13 ENGINE 6. Stop adding oil when you reach the FULL mark on the dipstick. Wait a LUBRICATION minute to allow oil to settle. Use only high quality detergent oil rated with 7. Continue adding small amounts of oil, API service classification SF-SJ. Select the rechecking the dipstick until oil level oil's SAE viscosity grade according to your settles at FULL.
- Page 14 CLEANING • Keep finished surfaces and wheels free of all gasoline, oil, etc. IMPORTANT: For best performance, keep • We do not recommend using a garden mower housing free of built-grass and hose to clean lawn mower unless the trash. Clean the underside of your mower electrical system, muffler, air filter and after each use.
- Page 15 9. Be sure the trailing edge of blade (op- posite sharp edge) is up toward the engine as shown. 10. Install the blade bolt with the lock washer and hardened washer into blade adapter and crankshaft. 11. Use block of wood between blade and Handle bracket lawn mower housing and tighten the...
-
Page 16: Storage
HANDLE gum deposits from forming in essential fuel system parts such as carburetor, fuel You can fold your lawn mower handle for storage. filter, fuel hose, or tank during storage. NOTE: The upper handle has an "anti-fold" Also, alcohol blended fuels (called gasohol bracket located on the right side of the or using ethanol or methanol) can attract handle. -
Page 17: Troubleshooting
TROUBLESHOOTING - See appropriate section in manual unless directed to a Sears Parts & Repair Center. PROBLEM CAUSE CORRECTION Does not start 1. Dirty air filter. 1. Clean/replace air filter. 2. Out of fuel. Fill fuel tank. 3. Stale fuel. Empty fuel tank and refill tank with fresh, clean gasoline. - Page 18 TROUBLESHOOTING - See appropriate section in manual unless directed to a Sears Parts & Repair Center. PROBLEM CAUSE CORRECTION Poor cut - 1. Worn, bent or loose blade. 1. Replace blade. Tighten blade bolt. uneven 2. Set all wheels at same 2.
- Page 19 Contratapa GARANTfA LIMITADA DE DOS AI_IOS PARA LA SEGADORA A MOTOR CRAFTSMAN Per dos (2) ai_os, a partir de la fecha de compra, cuando esta Segadora Craftsman se mantenga, lubrique y afine segt]n las instrucciones para la operaci6n y el mantenimiento en el manual del dueiSo, Sears repararA gratis todo defecto en el material y la mano de obra.
- Page 20 HACER: I. OPERAClON • Antes de empezar, debe familiarizarse comple- • Puede recortar a trav6s de la superficie de tamente con los controles y el uso correcto de la cuesta, nunca hacia ardba y hacia abajo. la maquina. Para esto, debe leer y comprender Proceda con extrema precauci6n cuando todas las instrucciones que aparecen en la ma- cambie de direcci6n en las cuestas.
- Page 21 • Nunca manipule deforma indebida los • Loscomponentes delreceptor d ela hierba dispositivos d eseguddad. Controle regular- vansujetos a desgaste, daSos y deterioro, mentesufuncionamiento correcto. quepueden exponer l aspartesenmov- • Mantenga lamAquina libredehierba, h ojas imiento o permitir q ueobjetos seandispara- u otrasacumulaciones dedesperdicio.
- Page 22 Estos accesorios estaban disponibles cuando se produjo la segadora. No son facilitados junto al cortacesped. Tambi6n est&n disponibles en la mayorfa de las tiendas de Sears y en los centros de servicio. Algunos de estos accesorios tal vez no se apliquen a su segadora. RENDIMIENTO DE LA SEGADORA DE RECORTES...
- Page 23 Lea estas instrucciones y este manual comple- Barra de control c la presencia del operador tamente antes de tratar de montar u operar su Mango superior segadora nueva. IMPORTANTE: Este cortac_sped viene SIN ACEITE O GASOLINA en el motor. Mango Inferior Su segadora nueva ha side montada en la LEVANTAR f&brica con la excepci6n de aquellas partes que...
- Page 24 FAMILIARICESE CON SU SEGADORA LEA ESTE MANUAL DEL DUENO Y LAS REGLAS DE SEGURIDAD ANTES DE OPARAR SU SEGADORA. Compare las ilustraciones con su segadora para familiarizarse con la ubicaci6n de los diversos controles y ajustes. Guarde este manual para referencia en el futuro. Estos simbolos pueden apareser sobre su segadora o en la literatura proporcionada con el producto.
- Page 25 1. Apagar la unidad y desconectar el cable de La operaci6n de cualquier bujfa de la bujfa. segadora puede hacer que Tirar el bot6n en la parte inferior del mando satten objetos extraSos dentro de de transmisi6n, luego empujarlo otra vez. sus ojos, Io que puede producir Opere la segadora para probar la velocidad daSos graves en _stos.
- Page 26 PARA VAClAR EL RECOGEDOR DE CIeSPED Usted recibe un envase de aceite con la unidad. Vierta lentamente el envase entero Levante el recogedor de c_sped usando el de aceite en el tubo de relleno del motor. mango del bastidor. Remueva el recogedor de c_sped, con los AVISO: El terrapl6n inicial del aceite requiere sola- mente 18 onzas debido al aceite residual en el mo-...
- Page 27 PARA PARAR EL MOTOR • Mantenga la parte superior del motor, alred- • Para parar el motor, suelte la barra de con- edor del arrancador, despejada y sin recortes troles que exigen la presencia del operador. de c_sped y paja. Esto ayudarA el flujo del aire del motor y extenderA su duraci6n.
- Page 28 PROGRAMA DESPUES CADA ANTES DE CADA 25 HORAS O ALMACE- MANTENIMIENTO TEMPORADA Umpiadlnspeccionar el Recogedor de C_sped Controlar tos Neum_ticos Controlar tas Ruedas Mortices Umpiar la Segadora ..Umpiar debajo la Cubierta de la TransmisiSn Revisar las Correas y las Poteas Impulsadas Revisar / Afitar / Cambiar la Cuchilta Lubricaci6n...
- Page 29 SEGADORA / ciguenal Siempre observe las reglas de seguridad cu- Rant ando haga el mantenimiento. LLANTAS Cuchilla • Mantenga las llantas sin gasolina, aceite o substancias qu[micas para control de insec- tos que pueden dai_ar la goma. • Evite los tocones, las piedras, las gdetas pro- fundas, los objetos afilados y otros peligros que pueden daSar a las Ilantas.
- Page 30 Parar de aSadir aceite cuando se alcanza la MOTOR seSal de Ileno (FULL) en la varilla. Esperar LUBRICACI(_N un minute para dejar que el aceite se ar- Use solamente aceite de detergente de alta regle. calidad clasificado con la clasificaci6n SF-SJ de Contint]e agregando cantidades pequeas servicio API.
- Page 31 LIMPIEZA • Mantenga las superficies pulidas y las rue- das sin gasolina, aceite, etc. IMPORTANTE: Para obtener el mejor rendimineto, • No recomendamos el uso de una manguera mantenga la caja de la segadora sin acumulacion de jardin para limpiar la segadora a menos de cesped y basura.
- Page 32 PARA CAMBIAR LA CORREA DE IMPULSION PARA AJUSTAR EL MANGO Colocar la nueva correa de polea del motor. Elmangodesusegadoracuentacontres (3) posicio- Colocar la otra extremidad de la nueva nes de altura- aj_stelo a Ia altura que le acomode. correa de mando a trav#s del orificio en el •...
- Page 33 MANGO durante el almacenamiento, Los combustibles Puede doblar el mango de su segadora para el mezclados con alcohol (conocido come almacenamiento. gasohol o que tienen etanol o metanol) NOTA: El mango superior tiene un soporte "con- Pueden atraer humedad, Io que conduce a la tra-dobla _situado en el lado derecho del mango, separacion y a la formaciCn de acidos durante Este soporte evita que el mango superior doble...
- Page 34 SOLUCION DE PROBLEMAS -Vea la secci6n apropiada en el manual amenos que este dirigido a un centre de service Sears. PROBLEMA CAUSA CORRECCION No arranca Filtro de aire sucio, Limpieicambie el filtro de aire. Sin combustible, Llene el estanque de combustible. Combustible rancio.
- Page 35 PROBLEMA CAUSA CORRECCION 1. Eleve la altura de torte. iRecogedorde Altura de corte demasiado baja. Levantamiento de la cuchilla Cambie las cuchittas. cesped no se illena(siviene desgastado, iequipado) Recogedor sin ventitaci6n de aire. Limpie el recogedor de c_sped, Dificil de 1.
- Page 36 CRAFTSMAN ROTARY LAWN MOWER - - MODEL NUMBER 917,377664 • 77 76...
- Page 37 CRAFTSMAN ROTARY LAWN MOWER - - MODEL NUMBER 917,377664 PART PART DESCRIPTION DESCRIPTION t 82724 Handle, Upper, with Grip t 88816 Grassbag 16I 105X479 Handle Lower 1888I 7 Frame, Grassbag 182748 Grip, Foam 85463 Danger Decat 186079 Rope Guide / Anti-Fold Bracket...
- Page 38 CRAFTSMAN ROTARY LAWN MOWER - - MODEL NUMBER 917,377664 •...
- Page 39 CRAFTSMAN ROTARY LAWN MOWER - - MODEL NUMBER 917,377664 PART PART DESCRIPTION DESCRIPTION 181232 Decat Drive Control I80607 Spring, Puitey Adjuster 181233 Decal, Drive Controt Operation 180626 Hubcap, Mag, Platinum 180612 CabIe, Drive t 89t 80)(004 Shaft Assembly, Rear 182494...
- Page 40 BRIGGS & STRATTON 4-CYCLE ENGINE MODEL NUMBER 123K02-0258-E1 I 1019 LABEL KI'I1 _ 84_zj 383_ 52511 635 _ 718_ 27 _=_...
- Page 41 BRIGGS & STRATTON 4-CYCLE ENGINE MODEL NUMBER 123K02-0258-E1 443_ 2221 358 ENGINE GASKET SET 3© 842_ 6680 977 CARBURETOR GASKET SET 633® 633 O 276_ 121 CARBURETOR OVERHAUL KIT 276_ 127_ 130 95 8330 276 _...
- Page 42 BRIGGS & STRATTON 4-CYCLE ENGINE MODEL NUMBER 123K02-0258-E1 969 ! 615 O 505 8 _305 5928 597_ 1036 EMISSIONS LABEL KEY PART PART DESCRIPTION DESCRIPTION 690912 697322 Cylinder Assembly Screw (Cylinder Head) 691680 399269 Kit-BushingfSea_ Plug-Oil Drain Crankshaft 691450 29981g •...
- Page 43 BRIGGS & STRATTON 4-CYCLE ENGINE MODEL NUMBER 123K02-0258-E1 PART PART DESCRIPTION DESCRIPTION Screw (Air CIeaner Primer Base) 499425 Ring Set-Piston (Standard) 692523 499426 Ring Set-Piston (.010" Oversize) 491588 Filter-Air CIeaner Cartridge 499427 Ring Set-Piston (.020" Oversize) 691219 Cup-Flywheel P_ate-Pawl Friction 499428 Ring Set-Piston (.030"...
- Page 44 Your Home For repair - in your home - of all major brand appliances, lawn and garden equipment, or heating and cooling systems, no matter who made it, no matter who sold it! For the replacement parts, accessories owner's manuals that you need to do-it-yourself. For Sears professional installation of home appliances...
Need help?
Do you have a question about the 917.377664 and is the answer not in the manual?
Questions and answers