Table of Contents
Advertisement
Available languages
Available languages
Quick Links
Owner's Manual
ICReFTSMnN ,I
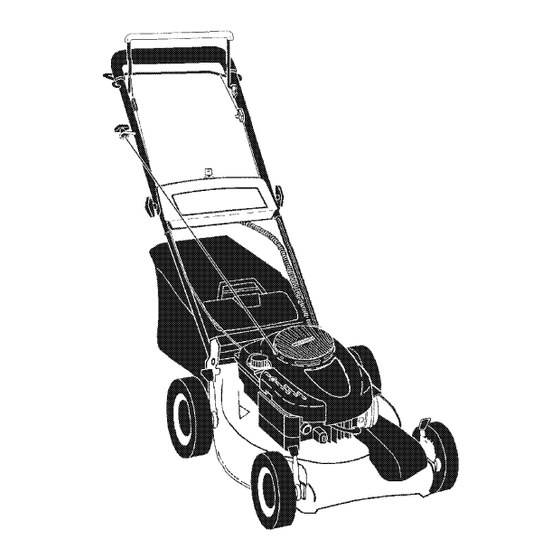
ROTARY LAWN MOWER
6.75 Horsepower
Power-Propelled
21" Rear Discharge
Model No.
917.378404
• Espa5ol, p. 18
CAUTION:
Read and follow all
Safety Rulesand Instructions
before operating thisequipment
Sears, Roebuck and Co., Hoffman Estates, IL 60179 U.S.A.
Visit our Craftsman website: www.sears,com/craftsman
Advertisement
Table of Contents

Related Manuals for Craftsman 917.378404


Summary of Contents for Craftsman 917.378404
- Page 1 ROTARY LAWN MOWER 6.75 Horsepower Power-Propelled 21" Rear Discharge Model No. 917.378404 • Espa5ol, p. 18 CAUTION: Read and follow all Safety Rulesand Instructions before operating thisequipment Sears, Roebuck and Co., Hoffman Estates, IL 60179 U.S.A. Visit our Craftsman website: www.sears,com/craftsman...
-
Page 2: Table Of Contents
Warranty service is available by returning the Craftsman power mower to the nearest Sears Parts & Repair Center in the United States. This warranty applies only while this product is used in the United States. -
Page 3: Operation
I. GENERAL OPERATION II. SLOPE OPERATION • Read, understand, and follow all Slopes are a major factor related to slip instructions on the machine and in the and fall accidents which can result in manual(s) before starting. Be thoroughly severe injury. All slopes require extra cau- familiar with the controls and the proper tion. -
Page 4: Product Specifications
Record both serial number and date of purchase in space provided above. Repair Protection Agreements Congratulations on making a smart pur- Fast help by phone - phone support chase. Your new Craftsman® product is from a Sears technician on products designed and manufactured for years of requiring in-home repair, plus conve- dependable operation. -
Page 5: Assembly / Pre-Operation
These accessories were available when this lawn mower was produced. They are not shipped with your mower. They are also available at most Sears retail outlets and service centers. Some of these accessories may not apply to your lawn mower. LAWN MOWER PERFORMANCE CLIPPING DEFLECTORS... - Page 6 HOWTO SET UPYOUR LAWN TO INSTALL ATTACHMENTS MOWER Your lawn mower was shipped ready to be used as a mulcher. To convert mower to TO UNFOLD HANDLE bagging, see "TO CONVERT MOWER" in IMPORTANT: Unfold handle carefully so the Operation section of this manual. as not to pinch or damage control cables.
- Page 7 KNOWYOUR LAWN MOWER READ THIS OWNER'S MANUAL AND ALL SAFETY RULES BEFORE OPERATING YOUR LAWN MOWER. Compare the illustrations with your lawn mower to familiarize yourself with the location of various controls and adjustments. Save this manual for future reference. These symbols may appear on your lawn mower or in literature supplied with the product.
- Page 8 1. Turn unit off and disconnect spark plug The operationof any lawn wire from spark plug. mowercan result in foreign 2. Rotate thumbscrew counter-clockwise objectsthrown into the to tighten the drive cable. eyes, which can result in 3. Operate mower to test drive speed. severeeye damage.Always 4.
- Page 9 Pivot )ins Rear Grass IMPORTANT: catcher • Check oil level before each use. Add oil handle if needed. Fill to full line on dipstick. ° Change the oil after every 25 hours of operation or each season. You may need to change the oil more often under dusty, dirty conditions.
- Page 10 TO STOP ENGINE with water and let dry before using. • Keep top of engine around starter clear • To stop engine, release operator pres- and clean of grass clippings and chaff. ence control bar. This will help engine air flow and extend TO START ENGINE engine life.
-
Page 11: Maintenance Schedule
MAINTENANCE SCHEDULE /_:;,_°_'__y AS YOU COMPLETE Lubrication Ill' CheckTires Check Drive Wheels (Power-Propelled M_ Check for Loose Fasteners l# # Clean/Inspect Grass Catcher (If Equipped) Clean Lawn Mower t# _ RE Clean Under Drive Cover (Power-Propelled Mowers) Check drive belt/pulleys (Power-Propelled Mowers) Check/Sharpen/Replace Blade Clean Battery/Recharge... - Page 12 IMPORTANT: Blade bolt is heat treated. LAWN MOWER Always observe safety rules when per- If bolt needs replacing, replace only with approved bolt shown in the Repair Parts forming any maintenance. section of this manual. TIRES ° Keep tires free of gasoline, oil, or insect Blade adapter Crankshaft control chemicals which can harm rubber.
- Page 13 ENGINE 6. Stop adding oil when you reach the FULL mark on the dipstick. Wait a LU BRICATION minute to allow oil to settle. Use only high quality detergent oil rated with 7. Continue adding small amounts of oil, API service classification SF-SJ. Select the rechecking the dipstick until oil level oil's SAE viscosity grade according to your settles at FULL.
-
Page 14: Service And Adjustments
CLEANING • Keep finished surfaces and wheels free of all gasoline, oil, etc. IMPORTANT: For best performance, keep • We do not recommend using a garden mower housing free of built-grass and hose to clean lawn mower unless the trash. Clean the underside of your mower electrical system, muffler, air filter and after each use. -
Page 15: Storage
ENGINE ENGINE SPEED Your engine speed has been factory set. Do not attempt to increase engine speed ;late or it may result in personal injury. If you believe that engine is running too fast or too slow, take your mower to a Sears or other qualified service center for repair and adjustment. -
Page 16: Troubleshooting
CYLINDER ENGINE 1. Remove spark plug. FUEL SYSTEM 2. Pour one ounce (29 ml) of oil through IMPORTANT: It is important to prevent spark plug hole into cylinder. gum deposits from forming in essential 3. Pull starter handle slowly a few times fuel system parts such as carburetor, fuel to distribute oil. - Page 17 TROUBLESHOOTING - See appropriate section in manual unless directed to a Sears Service Center. PROBLEM CAUSE CORRECTION Loss of power 1. Rear of mower housing or Raise cutting height. blade dragging in grass. 2. Cutting toe much grass. Raise cutting height. 3.
- Page 18 GARANTfA LIMITADA DE DOS AltOS PARA LA SEGADORA A MOTOR CRAFTSMAN Pot dos (2) aSos, a partir de la fecha de compra, cuando esta Segadora Craftsman se mantenga, Iubrique y aline segL_n las instrucciones para la operaci6n y e! mantenimiento en el manual del dueSo, Sears repararA gratis todo defeeto en el material y Ia mano de obra.
- Page 19 HACER: I, OPERAClON • Antes de empezar, debe famitiarizarse • Puede recortar a tray,s de Ia superfieie de completamente con los controles y el use la cuesta, nunca hacia arriba y hacia abajo. correeto de la maquina. Para esto, debe leer Prcceda con extrema precauci6n cuando y comprender todas las instrucciones cambie de direcci6n en las cuestas.
- Page 20 • Ayuda rdpida pot teldfono - soporte tele- nuevo producto Craftsman@ est_ diseSado f6nico per parte de un t_cnico Sears sobre y fabricado para funcionar de mode fiable per productos que requieren un arreglo en casa, touches aSos.
- Page 21 Estos accesorios estaban disponibles cuando se produjo la segadora. No son facilitados junto al cortaeesped. Tambi6n est_n disponibles en la mayoria de las tiendas de Sears yen los centros de servicio. Algunos de estos accesorios taI vez no se apliquen a su segadora. RENDIMIENTO DE LA SEGADORA DESVIADOR...
- Page 22 PARA REMOVER LA SEGADORA LA CAJA DE CARTON Mango det Remueva las partes sueltas que se inctuyen bastidor del con la segadora. recogedor Corte las dos esquinas de los extremos de la caja de cartSn y tienda el panel del extremo piano.
- Page 23 FAMILIARICESE CON SU SEGADORA LEA ESTE MANUAL DEL DUENOY LAS REGLAS DE SEGURIDAD ANTES DE OPARAR SU SEGADORA. Compare las Uustraciones con su segadora para famitiarizarse con la ubicaciSn de los diversos controles y ajustes. Guarde este manual para referencia en el futuro. Estos sfmbolos pueden apareser sobre su segadora o en la literatura proporcionada con el...
- Page 24 Si tas condiciones no mejoran despu_s de los Laoperaci6n d ecualquier pasos descritos (la velocidad hacia adeiante segadora puedehacerque queda Ia misma), la correa de transmisi6n saltenobjetos extraSos d entrode est_ desgastada y tiene que set sustituida. susojos,Ioquepuedeproducir daSos graves AVI80: Si el segadora comienza "a arrastrarse °...
- Page 25 AGREGUE GASOLINA .Pasador det ¢ " Mango det trasera bastidor det • Llene el estanque de combustible hasta "" recogedor Ia parte inferior del euello de retleno del de c_sped estanque de gasolina. No Io Ilene demasiado. Use gasotina regular, sin plomo, nueva y Iim- pia con el minimo de 87 octanos.
- Page 26 2. Sujete la barradecontrol q ueexigela CONSEJOS PARA SEGAR Y ACOL- presencia d eloperador a bajoenelmango y CHAR girela Ilaveparael arranque el_ctrico enel IMPORTANTE: Para obtener el mejor sentido deIasmanillas delrelojparahacer rendimiento mantenga la caja de la segadora arranear el motor. sin acumulacion de cesped y basura.
- Page 27 PROGRAMA MANTENIMIENTO //// -/._'_"_ o u oo. L Ouo .v.o.o. ou . Lubdcaci_n Controlat Io8 neum_co_ Controlar las ruedas mo_dc_ (segadoms con poder propuNsor) Revisar si hay sujetadores sueltos I€/ Limpisr/inspeccionar el recogedor de c_sped (si viene equipado) Limpiarlassgadora Limpiar debajo de la cubierta de la trans- misi6n(segadoras con poderpropulsor) sadas(segadorasconpoderpropulsor) Revisar las correas y las poleas impul-...
- Page 28 SEGADORA Use un bloque de madera entre la cuchitta y la caja de la segadora y apriete el perno Siempre observe las reglas de seguridad cu- de la cuchilla girAndolo en el sentido en que ando haga el mantenimiento. giran las manillas del reloj. LLANTAS •...
- Page 29 • Lacajadeengranajes s e Ilenaconlubricante Echar aceite despacio en el conducto del hastaei nivel a decuado enlafabric&La aceite, parAndose a intervaIos regulates L_nica vezque el lubricante necesita atenciSn para controlar el nivel del aceite con Ia varitla. es cuando se le ha prestado servicio a la Parar de aSadir aceite cuando se alcanza la caja de engranajes.
- Page 30 LIMPIEZA • Mantenga las superficies pulidas y las rue- das sin gasolina, aceite, etc. IMPORTANTE: Para obtener el mejor • No recomendamos el uso de una manguera rendimineto, mantenga ta caja de la segadora de jardfn para limpiar la segadora a menos sin acumulacion de cesped y basura.
- Page 31 MOTOR VELOCIDAD DEL MOTOR La velocidad del motor ha sido ajustada en la f_,- Panelde brica. No trate de aumentar la velocidad del motor mango pues se pueden producir lesiones personales. Si cree que el motor est#, funcionando demasiado rApido o demasiado lento, Ileve su segadora mas con su centro de servicio Sears o con un otro centro de servicio cualificado.
- Page 32 ACEITE DEL MOTOR MOTOR Drene el aceite (con el motor caliente) y cAmbielo SISTEMA DE COMBUSTIBLE con aceite de motor limpio. (Vea "MOTOR" en la IMPORTANTE: Es importante evitar que secci6n de Mantenimento de este manual.) se formen depositos de coma en partes CILINDRO fundamentales det sistemade combustible tales...
- Page 33 SOLUCION DE PROBLEMAS - Vea la secci6n apropiada en el manual amenos que estd dirigido a un centro de servico Sears. CORRECCI()N PROBLEMA CAUSA Falta de Eleve la attura de corte. 1. Cuchilla desgastada, doblada fuerza o suelta. Eleve la altura de corte. Altura de las ruedas dispareja.
-
Page 34: Repair Parts
CRAFTSMAN ROTARY LAWN MOWER - - MODEL NUMBER 917.378404... - Page 35 CRAFTSMAN ROTARY LAWN MOWER - - MODEL NUMBER 917.378404 PART PART DESCRIPTION DESCRIPTION Bolt 186111 Upper Handle (Includes Grip) 184193 175245X479 Lower Handle 176185 Washer 182815 Control Bar 53998 Washer 182755 Screw Engine Zone Control Cable 173715 131959 Handle Bolt...
- Page 36 CRAFTSMAN ROTARY LAWN MOWER - - MODEL NUMBER 917.378404 ,lltl...
- Page 37 CRAFTSMAN ROTARY LAWN MOWER - - MODEL NUMBER 917.378404 PART PART DESCRIPTION DESCRIPTION 185685 Pawl Vari-Speed Drive Control Assembly 175098 169911 Retainer, Drive, LH Bearing, Wheel Adjuster 175105 175262 Pan Head Tapping Screw #10-24 x 2-3/4 175103 Gear, Pinion 185681...
- Page 38 CRAFTSMAN ROTARY LAWN MOWER - - MODEL NUMBER 917.378404 GEAR CASE ASSEMBLY - - PART NUMBER 185566 KEY PART NO. NO. DESCRIPTION 17060410 Screw, Tapping 1/4-20 x .62 174917 Gear Case, Upper, FWSS 57072 Seal 77881 Bearing 57079 Washer 174918 Drive Shaft, 21"...
- Page 39 BRIGGS & STRATTON 4-CYCLE ENGINE MODEL NUMBER 125K07-0263-E1 I 1019 LABEL KI_ 52511 10%_...
- Page 40 BRIGGS & STRATTON 4-CYCLE ENGINE MODEL NUMBER 125K07-0263-E1 443_ 163_ 977 CARBURETOR GASKET SET 276_ 127_ 276 _...
- Page 41 BRIGGS & STRATTON 4-CYCLE ENGINE MODEL NUMBER 125K07-0263-E1 969 W 332 _ 592_ 689 O 697_ 1036 EMISSIONS LABEL I...
- Page 42 BRIGGS & STRATTON 4-CYCLE ENGINE MODEL NUMBER 125K07-0263-E1 358 ENGINE GASKET SET 20 @ 842_ 524'_ 334_ 562_ 5O5 _ 5101 742 _ 937_ 783_ 784_ 651 t '_ 1119 910_ PART PART DESCRIPTION DESCRIPTION 697322 499425 Cylinder Assembly Ring Set-Piston (Standard) 399269 499426 Kit-Bushing/Seal...
- Page 43 BRIGGS & STRATTON 4-CYCLE ENGINE MODEL NUMBER 125K07-0263-E1 PART PART DESCRIPTION DESCRIPTION 698588 Cover-Control 691421 Housing-Rewind Starter 497680 Starter-Rewind 692259 Rope-Starter (Cut to Length) 281434 Grip-Starter Rope 691340 Screw (Muffler) 690340 Retainer-Governor Shaft 690837 Screw (Rewind Starter) 698881 Crank-Governor 691740 Lock-Muffler Screw 691636 Screw (Throttle Valve)
- Page 44 Your Home For repair - in your home - of all major brand appliances, lawn and garden equipment, or heating and cooling systems, no matter who made it, no matter who sold it! For the replacement parts, accessories owner's manuals that you need to do-it-yourself. For Sears professional installation of home appliances...
Need help?
Do you have a question about the 917.378404 and is the answer not in the manual?
Questions and answers