Miele cva 610 Operating Instructions Manual
Coffee system
Hide thumbs
Also See for cva 610:
- Technical information (107 pages) ,
- Operating instructions manual (72 pages) ,
- Technical information (85 pages)

Subscribe to Our Youtube Channel
Related Manuals for Miele cva 610


Summary of Contents for Miele cva 610
-
Page 1: Operating Instructions
Operating instructions Coffee System CVA 610 To prevent accidents and machine damage, read these instructions installation or use. M.-Nr. 05 766 570... -
Page 2: Table Of Contents
Contents ....... . . 4 ......... . 7 . - Page 3 ..........34 Daily care .
- Page 4 Please read these instructions care- Before connecting the appliance to fully to prevent accidents and the electrical supply, make sure machine damage. that the voltage and frequency listed on the data plate correspond with the This appliance is for household use household electrical supply.
- Page 5 Pressurized steam applications. Please contact the near- could damage electrical components est Miele Dealer or the Miele Technical and cause a short circuit. Service Department with specific requirements. To protect against fire, electric...
- Page 6 The use of accessory attachments not recommended by the The coffee system must be cleaned appliance manufacturer may result in daily to prevent the growth of harm- fire, electric shock or injury to persons. ful bacteria and mold. Please read In areas subject to infestation by the "Coffee system care"...
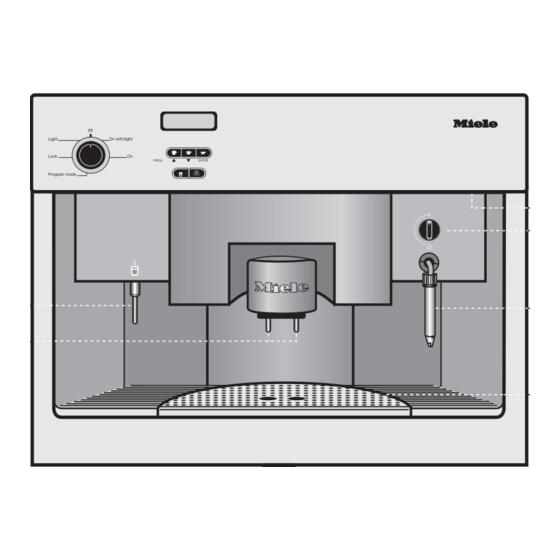
- Page 7 a Hot water dispenser b Coffee dispensers (height-adjustable) c Handle to open appliance front d Steam selector e Steam nozzle with milk frother f Drip catch g Program selector h Message window i Coffee serving buttons j Rinse/ pre-warm button k Hot water button...
- Page 8 l Coffee bean container m Slide control to select fineness of ground coffee n Slide control to select quantity of ground coffee o Water tank p Waste unit q Brew unit...
-
Page 9: The Program Mode
The coffee system can be customized to each household through the "program mode." To program the appliance: If a setting is accidentally changed, turn the program selector to "0ff". The changed setting will not be saved and the original setting will be retained. ^ Turn the program selector to "Program mode". -
Page 10: Choosing A Language
The language for the commands in the message window should be selected before the machine is used. ^ Press the e button until the desired The following languages are available: language appears (deutsch, German, Dutch, Portuguese, Spanish, nederlands, portugues, espanol, English, Italian, French. -
Page 11: Rinsing Feature
The rinsing feature flushes out coffee residue and pre-warms the coffee system. When "Rinsing - On" is selected ^ Press button e, to turn the "Rinsing" the system will automatically be flushed feature on or off. and pre-warmed when the appliance is turned on. -
Page 12: Determining The Water Hardness
If the water hardness is greater than 40 gr/gal (700 ppm), the water The hardness of the water (tap or bot- be mixed in equal parts with tled) used in the coffee system must be non-carbonated mineral water to determined and programmed into the prevent excessive scale build-up. -
Page 13: Setting The Water Hardness
^ Press ENTER to this setting, or turn the program selector to "0ff" to if a mistake has been made. ^ Turn the program selector counter- clockwise to "Program mode". ^ Press the e button to highlight "WATER HARDN." with an asterisk. ^ Press ENTER to select this program- ming option. -
Page 14: Setting The Drink Temperatures
Depending on the programming option selected, the sub-menu is shown in the The appliance can be set at different message window as follows: temperatures to suit varying coffee drinking preferences. Five temperature levels are available for each drink option. ^ Press the e button to set the temp- erature to minimum, low, medium, high or maximum. -
Page 15: Pre-Brewing Feature
When the pre-brewing feature is on, the freshly ground coffee is moistened with a little hot water to allow the aroma and The sub-menu will appear in the crema of the coffee to fully develop. message window. When the pre-brewing feature is off, the hot water is forced through the coffee immediately. -
Page 16: Pre-Grinding Feature
The pre-grinding feature allows a new portion of beans to be ground after each coffee is dispensed, so there is ^ Press the e button to turn the always ground coffee ready. This saves pre-grinding feature on or off. time if coffee is dispensed frequently. To preserve aroma, the pre-grinding feature should be turned off when only preparing coffee occasionally. -
Page 17: Hot Water Feature
When the feature "Programmed hot water" is turned on, the machine will dispense a precise, pre-programmed ^ Press the e button to set the feature quantity of hot water when the hot water on or off. button d is pressed. When the feature is turned off, the machine will dispense hot water until the hot water button d is pressed again. -
Page 18: Total Coffee Counter
The feature "Total coffee" will display the number of cups of coffee (espresso, coffee, long coffee) that have been ^ Press ENTER to return to the main dispensed to date. menu. ^ Turn the program selector counter- clockwise to "Program mode". ^ Press the e button to highlight "TOTAL COFFEE"... -
Page 19: Setting The Standby Timer
For energy efficiency the coffee system can be set to power down after a programmed time interval. ^ Press the e or - button to select the The time is measured from the last time required length of time (e counts down, - counts up). - Page 20 The coffee system can be locked so that it can not be used by children or those not familiar with the operating instructions. ^ Turn the program selector counter- clockwise to the "Lock" position. The following will appear in the message window: ^ Turn the program selector counter- clockwise to the "Lock"...
- Page 21 The appliance must be correctly installed and connected before the first use. Please see the “Installation instructions.” Before using the coffee system, certain parts need to be cleaned and the water lines need to be flushed. ^ Hand wash with hot water and liquid dish soap: –...
- Page 22 The water tank must be washed and filled with fresh drinking water before each day of use. A reminder will appear in the message window when the unit is first turned on. ^ Open the lid and fill the container with cold drinking water to within about 1"...
- Page 23 Only put pure espresso or coffee beans in the container. Anything else, including ground coffee, hot cocoa, instant coffee, or treated coffee beans (flavorings, caramel, or sugar) will damage the grinder. Do not remove the coffee bean container from the appliance unless it is completely empty, otherwise coffee beans will spill out.
- Page 24 eo1002cq The flavor of the coffee depends on the type of coffee, how finely the beans are The height of the coffee dispensers are ground and the quantity of water used. adjustable to suit different cup sizes. To ensure the machine uses exactly the amount of water to suit your taste and your cups, there is a choice of three serving sizes for espresso/coffee.
-
Page 25: Coffee And Espresso
^ Turn the program selector clockwise to the "On" position (with or without lighting). ^ Place a cup under the two coffee The following will appear in the dispensers. message window: Coffee is always dispensed simultaneously from spouts. ^ Press and hold the coffee serving If the machine is cold and the rinsing button appropriate to the size of cup feature has been selected, the following... -
Page 26: Hot Water
Once the water is hot, the following appears in the message window: To program the volume of hot water dispensed, the hot water feature must be programmed "on". (See "Programming/ Hot water feature"). ^ Turn the program selector clockwise to the "On" position (with or without lighting). -
Page 27: Pre-Warming
The pre-warm feature allows the system and the cups to be pre-warmed to fully develop the flavor and aroma of your coffee. ^ Place a cup or container under the two coffee dispensers. ^ Press the rinse/ pre-warm button e. ^ Place the cup under the hot water dispenser. -
Page 28: Preparing Two Cups Simultaneously
^ Place a cup under ^ Place a cup under each of the coffee coffee dispensers. dispensers. ^ Press the desired coffee button twice ^ Press the desired coffee button once. in quick succession to bring up two The coffee will be prepared. cups g in the message window. -
Page 29: Cappuccino
Cold, 2% milk is best for creating froth. Ideally it should be prepared in a cold, stainless steel pitcher. ^ As soon as steam appears from the nozzle, shut the steam off by turning the steam selector clockwise, to the "o"... - Page 30 ^ Turn the steam off by turning the steam selector clockwise to the "o" position. ^ Pull the pitcher away from the steam nozzle. Carefully pour the milk into the coffee and spoon some froth onto the surface. Always clean the steam nozzle immediately after use, as it is harder to clean once milk has dried.
- Page 31 ^ Place a cup under the hot water dispenser. ^ Press the hot water button d. Hot water will be dispensed. ^ Press the hot water button d again to stop the hot water flow. The machine will stop automatically if a volume has been programmed in for hot water and feature "Prog.
-
Page 32: Adjusting The Coffee Grinder
To prevent machine damage, the slide control for the coffee grinder setting should be moved carefully and in small adjustments. – If the espresso flows too quickly into the cup, the beans have been ^ Push the upper slide control to the ground too coarsely. -
Page 33: Setting The Quantity
Both the flavor and crema of the coffee depend on the quantity of ground coffee used. The greater the quantity, the stronger the flavor will be. The quality of the crema is also affected by the quantity: ^ Push the lower slide control to the left –... - Page 34 The components of the coffee system must be cleaned after each day of use At the end of each day, the coffee dis- to prevent mold and bacteria growth. pensers and the brew unit must be ^ Hand wash with hot water and liquid flushed clean.
-
Page 35: Exterior
^ The exterior can be cleaned with hot The interior can be cleaned with hot water and liquid dish soap applied water and liquid dish soap. Wipe dry with a soft sponge. Do not use using a soft cloth. abrasive cleansers or scrubbers. ^ Wipe dry using a soft cloth. -
Page 36: Drip Catch
^ Take the drip catch out of the appliance. Clean it by hand with The drip catch has a red float that will warm water and liquid dish soap. rise when the catch is full. The catch ^ Dry all parts and replace in reverse should be cleaned when the float rises and at the end of each day to prevent order. -
Page 37: Waste Unit
Clean the steam nozzle after every use as dried milk residues are difficult to clean. ^ Lift the waste unit up and out. ^ Clean the waste unit by hand with hot water and liquid dish soap and dry ^ Loosen the upper screw, a, and pull with a soft cloth. -
Page 38: Brew Unit
^ Dry the funnel to prevent ground coffee from sticking. Clean the brew unit by hand only. ^ After cleaning press "PRESS". The moving parts and the rubber gaskets can not be cleaned in a dishwasher. Lubricate the brew unit with the enclosed silicon every 500 cups (see "Lubricating the brew unit"). - Page 39 500 cups to remind you to clean the unit with the enclosed detergent tablets. These speciality cleaning tablets can be purchased from your Miele dealer or the Technical Service Department. ^ Press ENTER. The display will read: ^ Remove the waste unit.
- Page 40 ^ Wipe away coffee residues from the of the brew unit with a sponge. can be removed for thorough cleaning. Check and clean the chrome filter regularly. ^ Remove the brew unit. ^ Fit the enclosed allen wrench to the connection point in the brew unit.
- Page 41 ^ Remove the brew unit. ^ Clean the bolt, a. Lubricate the bolt, a, and the joints, b. ^ Return the brew unit into the Check that the brew unit is in the basic appliance. position with the funnel slightly lifted and the socket in vertical position (see illustration.) ^ Lubricate the joints a, the axle b,...
-
Page 42: Change The Gaskets
^ Press on the latch, a, and press the funnel down, b. ^ Change the gaskets if a leak occurs. Three gaskets are enclosed with the machine. One gasket is located between the steam nozzle and the ^ Push the connection piece to the far sleeve. - Page 43 ^ Disconnect power to the appliance by unplugging the appliance, trip- ping the circuit breaker or removing the fuse. ^ Open the appliance door. ^ Carefully push the bulb into position until it clicks into the holder, a, and turn it upwards, b. ^ Close the lamp cover.
- Page 44 Other agents may damage the machine and affect the taste of the coffee and hot water. The descaling tablets can be purchased from the Miele Technical Service Department. To prevent damage to the exterior...
- Page 45 The coffee system will begin the automatic descaling. The display will read: ^ Press ENTER. The message window will read: Do not open the door during descaling and do not turn the program selector to "0". This will interrupt the descaling process. If the process is interrupted, add water to the reservoir, turn the program selector back to "Program mode"...
- Page 46 ^ Turn the steam selector clockwise to position "0" and press ENTER. ^ If the program selector is on "Progam mode", the display will read: ^ Turn the steam selector clockwise to position "o". The unit is now descaled and ready for use.
- Page 47 . . . Light is off. press ENTER Watersystem There is a problem in the water lines. Call Miele Technical Service. fault Fill watertank The water tank is empty or missing or Empty water tank, rinse, fill with fresh the float in the water tank is stuck.
-
Page 48: Changing The Light Bulb
Carefully poke the opening with clogged. a thin, short needle or toothpick. There could be Immediately turn off the unit. pebbles among the Call the Miele Technical Service coffee beans. Department. The coffee bean Wait until the sound stops. Refill container is empty. A the coffee bean container. - Page 49 The grinder is set to Select a finer setting. too coarse of a setting. The grinder is set to Select a coarser setting. too fine of a setting. Was the system Pre-warm the system and cups. warmed? Check the temperature setting of the coffee selected.
- Page 50 The brew unit is clogged. Clean the brew unit filters. Check if the grinder is set Adjust the coffee grinder to the coarsest or to the setting. finest setting. The coffee is not fresh. Use fresh coffee beans. The coffee dispensers are Lower the height adjust- set too high.
- Page 51 In the event of a fault which you cannot correct yourself please contact: – Your Miele Dealer – The Miele Technical Service Department 1-800-999-1360 techserv@mieleusa.com 1-800-565-6435 service@miele.ca When contacting the Technical Service Department, please quote the model and serial number of your appliance given on the data plate inside the appliance.
- Page 53 Installation instructions...
-
Page 54: Disposal Of The Packing Materials
Contents ......... 57 Disposal of the packing materials . - Page 55 Old appliances may contain materials that can be recycled. Please contact The cardboard box and packing your local recycling authority about the materials protect the appliance during possibilty of recycling these materials. shipping. They have been designed to be biodegradable and recyclable. Ensure that the appliance presents no Please recycle.
- Page 56 If there is any question concerning the electrical connection of this appliance to your power supply, please consult a licensed electrician or call Miele’s Technical Service Department. 1-800-999-1360 1-800-565-6435...
- Page 57 The coffee system is designed to be built into cabinetry.
- Page 58 The coffee system can be installed above another appliance but, there must be a solid, closed shelf between the base of the coffee machine and the top of the appliance below (The shelf is not necessary when installation is in combination with the Miele built-in plate warmer).
- Page 59 A speciality display cabinet is also available from your dealer or Miele’s Technical Service Department, as an installation option. Please quote part # 29996001 when ordering.
- Page 60 Make sure power is not supplied to the appliance while installation or maintenance work is performed. Disconnect the power supply to the work area by unplugging the unit, tripping the circuit breaker or removing the fuse. The coffee system must be installed into cabinetry before being operated.
- Page 61 is a high quality coffee bean. It is a "dark" is long and flat with a groove running cappucino with more espresso and less around it. The caffeine content is milk. between 0.8 - 1.3%. It is strong and is a aromatic, but less bitter than the cappucino without the froth.
- Page 64 Alteration rights reserved / 44 / 000 / CDN / USA - 4902 M.-Nr. 05 766 570 / V This paper consists of cellulose bleached without the use of chlorine.
Need help?
Do you have a question about the cva 610 and is the answer not in the manual?
Questions and answers