Advertisement
Quick Links
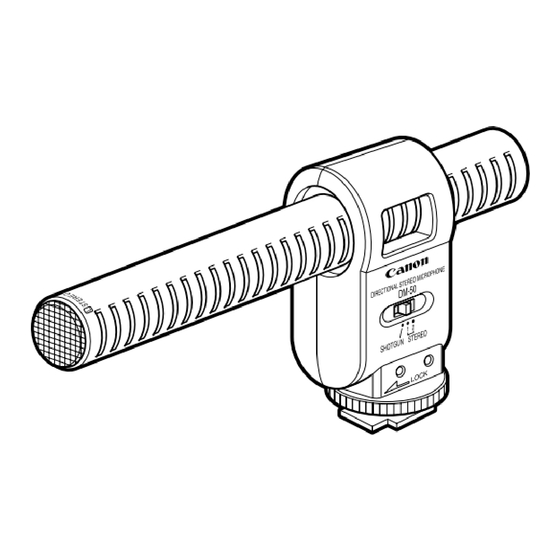
Canon Directional Stereo Microphone
Microphone stéréo directionnel Canon
Canon-Stereo-Richtmikrofon
Micrófono estereofónico direccional Canon
Microfono stereo direzionale Canon
DM-50
q
w
e
Nomenclature
q Directivity switch
w Shoe lock
e Wind shields (1 large, 1 small)
e
Nomenclature
q Commutateur de directivité
w Bague de verrouillage
DIRECTIONAL STEREO MICROPHONE
e Bonnettes antivent
DM-50
(1 grande, 1 petite)
1 2
SHOTGUN STEREO
w
Attaching the microphone
Fixation du microphone
1
2
¡
¡
¡
C
¡
¡
¡
q
¡
¡
¡
¡
¡
¡
¡
¡
¡
¡
¡
Instructions
J
Thank you for purchasing the Canon Directional Stereo Microphone DM-50.
This product has been designed exclusively for camcorders equipped with an
accessory shoe. It is a highly sensitive microphone that can be switched between functioning as
a directional microphone (monaural) or a stereo microphone that also clearly picks up sounds
arriving from the front of the microphone, for full recorded sound. Select the sound pick up range,
depending on the situation and your recording goals. The microphone is powered by the
camcorder's power supply.
Before using the DM-50, read these instructions thoroughly and keep them in a safe place for
future reference.
The microphone is powered by the camcorder's battery pack or power adapter. Use the
microphone when the camcorder is in record or record pause mode. You can use the
microphone for audio dubbing.
About the wind shields
The wind shields reduce wind noise without interfering with the microphone's sound pick up abilities.
Use the wind shields regularly.
The illustration at the left shows how to attach the wind shields (Fig. 1).
Attaching the microphone
Refer to your camcorder instruction manual for more information.
¡ Turn the camcorder's power off before attaching/removing the microphone.
1
Slide the microphone straight onto the camcorder's accessory shoe (Fig. 1).
¡ Slide in the direction of the arrow on the bottom of the microphone until it clicks
securely into place.
2
Tighten by turning the shoe lock in the direction of the LOCK arrow (Fig. 2).
¡ Make sure that the microphone does not come disconnected when turning the shoe
lock.
3
Turn the camcorder's power on.
•
C
(Connection) appears in the camcorder's display when the camcorder is in record or
record pause mode.
¡ The camcorder's built-in microphone automatically turns off.
4
Set the microphone's directivity switch.
• SHOTGUN : Clearly picks up sound arriving from the front of the microphone. (Monaural)
• STEREO 1 : Picks up sound arriving from the front of, as well as sound surrounding the
microphone.
• STEREO 2 : Picks up sound surrounding the microphone in a wider range than STEREO 1.
Before use
¡ Make sure that nothing is connected to the camcorder's microphone terminal.
¡ If you are using headphones to monitor sound, confirm the sound with headphones before you start
recording.
After use
1
Turn the camcorder's power off.
2
Turn the shoe lock in the opposite direction from the LOCK arrow.
3
Slide and remove the microphone.
Precautions
¡ The DM-50 will not pick up any sound if another microphone is attached to the camcorder's
microphone terminal.
¡ Refer to your camcorder's instruction manual for information on how to use the microphone for
audio dubbing.
¡ When carrying the camcorder with the micropone attached, be sure to support the camera body.
Never carry the camera holding the microphone.
¡ Test the microphone by speaking into it. Do not tap the microphone or blow into it.
¡ Do not drop or jolt the microphone. This may damage the microphone or impair its performance.
Handle the microphone carefully.
¡ Do not disassemble or touch the interior parts of the microphone. Consult your Canon dealer or
service outlet if problems persist.
¡ Do not use or leave the microphone in hot, humid places such as inside a closed vehicle in hot
weather or in direct sunlight.
¡ Ensure that no foreign material such as metal fragments, gets inside the camcorder's accessory
shoe. Be careful not to deform the plug or the bottom of the microphone by using excessive force.
¡ Do not store the camcorder with the microphone attached.
Care of the microphone
¡ Clean the microphone by dusting it lightly with a soft, dry cloth. Never use thinner, benzene,
alcohol or other volatile cleaners or solvents.
¡ The microphone will not work properly if the terminals are dirty. Check them before use, and wipe
them with a dry cloth if necessary.
Specifications:
Type
: Back electret stereo condenser shotgun microphone
Directivity
: Super-directional / Unidirectional stereo
Sensitivity
: -40 dB / Pa (0 dB = 1V / 1Pa, 1 kHz front, along axis)
Frequency
: 150 – 15,000 Hz
: 200 Ω (1kHz)
Output impedance
Operating temperature range : 0 °C – 40 °C (32 °F to 104 °F)
: (W × H × L) 32 × 81 × 150 mm (1
× 3
Dimensions
1
/
1
/
4
Weight
: 120 g (4
1
/
oz)
4
Weight and dimensions are approximate. Errors and omissions excepted.
Subject to change without notice.
Mode d'emploi
E
Merci pour l'achat du microphone stéréo directionnel Canon DM-50. Ce microphone a été conçu
advanced
exclusivement pour les camescopes munis d'une griffe d'accessoires
sensible et peut, selon le réglage, fonctionner comme microphone directionnel (mono) ou
comme microphone stéréo, tout en captant aussi clairement les sons venant de l'avant du
microphone. La portée du microphone peut être sélectionnée en fonction de la situation et du but
visé. Ce microphone est alimenté par la source d'alimentation du camescope.
Avant d'utiliser le DM-50, veuillez lire ces instructions avec attention et les garder en lieu sûr
pour toute référence future.
Ce microphone est alimenté par la batterie rechargeable ou l'adaptateur d'alimentation secteur
du camescope. Utilisez-le lorsque le camescope est en mode d'enregistrement ou de pause
d'enregistrement. Vous pouvez aussi utiliser le microphone pour le doublage audio.
A propos des bonnettes antivent
Les bonnettes antivent réduisent le bruit du vent mais n'ont pas d'influence négative sur la capture
du son proprement dite. Utilisez régulièrement les bonnettes antivent.
L'illustration de gauche montre comment attacher les bonnettes antivent (figure 1).
Fixation du microphone
Consultez le mode d'emploi du camescope pour de plus amples informations.
¡ Mettez le camescope hors tension avant de rattacher/enlever le microphone.
1
Faites glisser le microphone tout droit dans la griffe d'accessoires du camescope (figure 1).
¡ Faites glisser le microphone dans le sens de la flèche au bas du microphone jusqu'à ce
qu'il s'encliquette.
2
Serrez la bague de verrouillage en la tournant dans le sens de la flèche LOCK (figure 2).
¡ Assurez-vous que le microphone ne se débranche pas lorsque vous tournez la bague
de verrouillage.
3
Mettez le camescope sous tension.
•
C
(connexion) apparaît sur l'afficheur du camescope lorsque le camescope est en mode
d'enregistrement ou de pause d'enregistrement.
¡ Le microphone intégré du camescope se désactive automatiquement.
4
Réglez le commutateur de directivité du microphone.
• SHOTGUN : Capture claire du son venant de l'avant du microphone. (Monophonique)
• STEREO 1 : Capture du son venant de l'avant et des autres côtés du microphone.
• STEREO 2 : Plage de capture du son environnant plus large que STEREO 1.
Avant l'utilisation
¡ Assurez-vous que rien n'est raccordé à la borne de microphone du camescope.
¡ Si vous utilisez un casque pour écouter le son, contrôlez le son par le casque avant d'enregistrer.
Après l'utilisation
1
Mettez le camescope hors tension.
2
Tournez la bague de verrouillage dans le sens opposé de la flèche LOCK.
3
Faites glisser le microphone et enlevez-le.
Précautions
¡ Le DM-50 ne captera pas de son si un autre microphone est rattaché à la borne de microphone
du camescope.
¡ Consultez le mode d'emploi du camescope pour de plus amples informations sur l'emploi du
microphone pour le doublage audio.
¡ Lorsque vous portez le camescope avec le microphone fixé dessus, soutenez le boîtier du
camescope. Ne saisissez jamais le camescope par le microphone.
¡ Pour essayer le microphone il suffit de parler devant. Ne tapez pas sur le microphone et ne
soufflez pas dedans.
¡ Ne laissez pas tomber et ne cognez pas le microphone. Il pourrait être endommagé ou ses
performances pourraient être réduites. Manipulez le microphone avec précaution.
¡ Ne démontez pas et ne touchez pas les pièces internes du microphone. Pour toute réparation
consultez un revendeur ou un service après-vente.
¡ N'utilisez pas et ne laissez pas le microphone dans des lieux chauds et humides, comme dans un
véhicule fermé par temps chaud ou en plein soleil.
¡ Assurez-vous qu'aucune matière étrangère, morceaux de métal, etc., ne rentre dans la griffe
porte-accessoires du camescope. Veillez à ne pas déformer la fiche ou le bas du microphone en
insérant le microphone de force.
¡ Ne laissez par le microphone sur le camescope lorsque vous rangez celui-ci.
Entretien du microphone
¡ Nettoyez le microphone avec un chiffon doux et sec. Ne jamais utiliser de diluant, benzène ou
autres produits ou solvants volatils.
¡ Le microphone ne fonctionnera pas normalement si les bornes sont sales. Avant de l'utiliser,
vérifiez les bornes et essuyez-les avec un chiffon sec, si nécessaire.
Fiche technique
Type
: Microphone électrostatique stéréo, de type canon, à
électret arrière
Directivité
: Superdirectionnel/Unidirectionnel stéréo
Sensibilité
: -40 dB / Pa (0 dB = 1 V / 1 Pa, 1 kHz avant, dans l'axe)
Fréquence
: 150 à 15.000 Hz
× 5
: 200 Ω (1 kHz)
7
/
in)
Impédance de sortie
4
8
Plage de température de fonctionnement : 0 °C à 40 °C
: (L × H × P) 32 × 81 × 150 mm
Dimensions
Poids
: 120 g
Le poids et les dimensions sont approximatifs. Sauf erreurs et omissions.
Sujet à changements sans préavis.
F
. Il est extrêmement
Advertisement

Related Manuals for Canon DM-50


Summary of Contents for Canon DM-50
- Page 1 Handle the microphone carefully. consultez un revendeur ou un service après-vente. ¡ Do not disassemble or touch the interior parts of the microphone. Consult your Canon dealer or ¡ ¡ N’utilisez pas et ne laissez pas le microphone dans des lieux chauds et humides, comme dans un service outlet if problems persist.
- Page 2 ¡ Prima di montare/scollegare il microfono, disattivate la videocamera. Wir danken Ihnen für das Vertrauen, das Sie Canon mit dem Kauf des Stereo-Richtmikrofons DM-50 El micrófono se alimenta mediante la batería de la videocámara o el adaptador de alimentación.
Need help?
Do you have a question about the DM-50 and is the answer not in the manual?
Questions and answers