Table of Contents
Advertisement
Quick Links
Advertisement
Table of Contents

Related Manuals for Cobra Digital DC4330


Summary of Contents for Cobra Digital DC4330
- Page 1 Cobra DC4330 Digital Camera User’s Guide...
- Page 2 Preface Please read this manual carefully before any operation This Manual covers all proper way of operation of the camera and relevant important notes. We sincerely hope that you read this manual carefully so as to operate the camera properly. 20 minutes’ reading may save you a lot of time.
- Page 3 Special Attention: Before you can use MP3 player function, please let the camera build a directory of “MP3”. Simply move the function switch to the position of “MP3” when the camera is on. You must follow the installation steps of this manual to complete the driver installation. Then follow the instruction of “Image downloading”...
-
Page 4: Table Of Contents
Contents 1. Brief Introduction ……………………………………………………………… 4 Outlook TFT Screen Definition of buttons Storage medium 2. Preparation before use ………………………………………………………… 5 Loading battery Loading SD/MMC card 3. Features and specifications …………………………………………………..… 6 Image / video clips Main Menu Playback image / video clips Others 4. -
Page 5: Brief Introduction
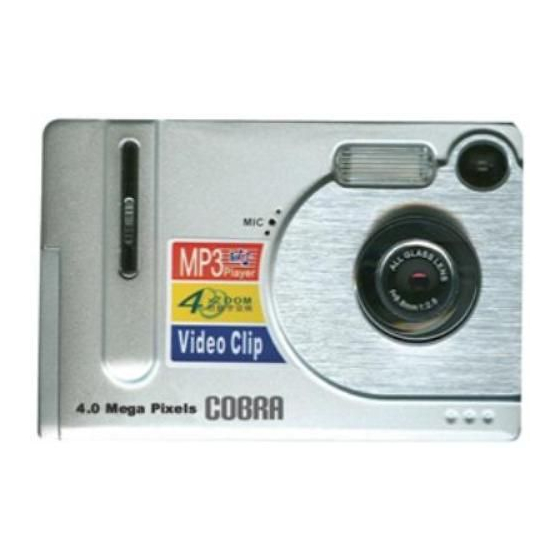
1. Brief Introduction 1. Outlook As per Figure-1 Lens Flash lamp Figure-1 2. TFT Screen As per Figure-2 1) Shooting mode 2) Battery level Indicator 3) Image resolution mode 4) Flash mode 5) Self-timer mode 6) Focus Frame Figure-2 7) White balance mode 8) Indicator of free space left in number of image 3. -
Page 6: Storage Medium
5) Arrow button: Left arrow (“ ”): In playback mode, it is used to select image; In menu mode, it is used for selecting menu; In MP3 mode, it is used to select previous song. Right arrow (“ ”): In playback mode, it is used to toggle white-balance mode; in menu mode, it is used to select menu;... -
Page 7: Loading Sd/Mmc Card
2. Loading SD/MMC Open the battery tank cover Insert the SD/MMC card into the slot in the indicated direction Close the battery tank cover 3. Feature and specifications of camera 1. Shoot of images / video clips Single Shoot: Shoot of single image Video Shoot: Shoot of video clips Continuous Shoot: Continuous shoot of 3 images Flash: Force no flash, force flash, auto flash... -
Page 8: Operations
4. Operations 1. Power on/off Make sure that you have loaded the batteries. Press and hold the power button for 1~2 seconds, the camera is powered on with flash of power indicator and TFT screen on. Please press and hold the power button for 1~2 seconds again to power off. - Page 9 Flash Mode Under browser mode, press “OK” button to toggle flash mode (“ ”, “ ”and “ ”): : Force No Flash : Auto Flash : Force Flash The default mode is Force No Flash White Balance Mode SETUP Under Browser mode, press arrow button (“ ”) to toggle white balance mode: QUALITY...
- Page 10 move the pointer to “Exposure compensation” and press confirm button to pop up sub-menu: +1.5 → For low brightness environment. Exposure compensation increases by 1.5 units +1.0 → For low brightness environment. Exposure compensation increases by 1.0 units +0.5 → For low brightness environment. Exposure compensation increases by 0.5 unit 0 →...
- Page 11 EXIT Use up and down button to move the pointer to select the desired language and press OK button to confirm. The sub-menu will close automatically and the setting is saved. Driver Setting Digital camera driver: 2 different download methods are available to download the images from the camera.
- Page 12 Notes: Video clip can not record voice . 2)Delete and Format: Use “left” and “right” key to select“ ”,and press OK button or “down” button,TFT screen display interface as per figure-14: Delete method DELETE THIS → Delete the current file in memory or SD/MMC card.
-
Page 13: Software Installation
5. Software Installation 1. WIN98/2000 1)Driver for PC camera mode Connect with power, and turn it on. On the menu screen, select “driver settings”, press menu button to trigger main menu. Use up and down button to select “driver settings” from the advanced setting menu. Then select “PC camera mode”... - Page 14 Figure-22 Figure-23 2)Driver of removable disk Set driver of camera as removable disk, and rest operation is same as above. Note:WINME, WIN2000 and XP can upgrade driver for removable disk automatically, so it does no need driver. 2. WINME/XP 1)Driver for PC camera mode Turn on camera.
-
Page 15: Image Downloading
Figure-26 Figure-27 Figure-28 2)Driver of removable disk Set driver as removable disk driver, and rest operation is same as point 1. Note:WINXP system can upgrade driver for removable disk automatically. So it does not need driver under WINXP. 6. Image downloading 1. -
Page 16: Specification
7. Features and specification 1. Maximum pixels: 2432 X 1824 2. Actual pixels: 1600 X 1200 3. Color: 24 Bits 4. Sensitivity of Light: ISO100-400 5. Shutter: 1/10~1/1000 6. Self-timer: 10s 7. Digital zoom: 4X 8. Flash index: GN4 9. Flash restore time: 5s 10.
Need help?
Do you have a question about the DC4330 and is the answer not in the manual?
Questions and answers