Rockford Fosgate 3Sixty Installation & Operation Manual
Interactive signal processor
Hide thumbs
Also See for 3Sixty:
- Datasheet (1 page) ,
- Installation & operation manual (25 pages) ,
- Setup manual (6 pages)

Related Manuals for Rockford Fosgate 3Sixty

Summary of Contents for Rockford Fosgate 3Sixty
- Page 1 Installation & Operation Installation et fonctionnement Instalación y funcionamiento...
-
Page 2: Table Of Contents
Connecting Punch has everything from RCA cables and speaker wire to Power line and battery connectors. Insist on it! After all, your new system deserves nothing but the best. To add the finishing touch to your new Rockford Fosgate image order your Rockford accessories, which include everything from T-shirts to jackets and hats. -
Page 3: Getting Started
Installation Section of this manual. Other information can be located by using the Table of Contents.We, at Rockford Fosgate, have worked very hard to make sure all the information in this manual is current. But, as we are constantly finding new ways to improve our product, this information is subject to change without notice. -
Page 4: Design Features
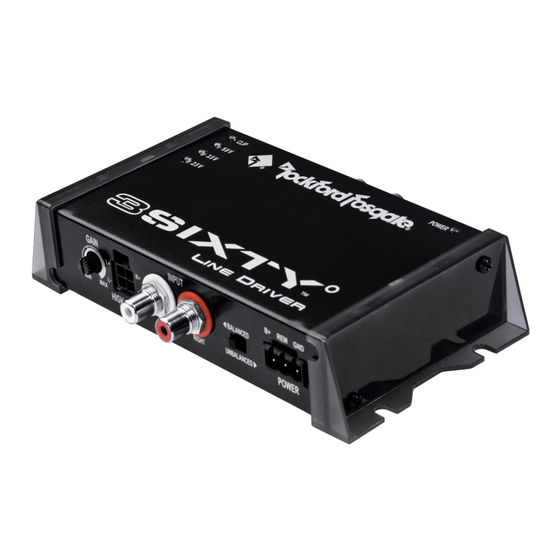
ESIGN EATURES Top View Interactive Signal Processor Left Side View Right Side View Front View INPUT FRONT REAR FRONT REAR HIGH LEVEL INPUT COMM PORT POWER FRONT REAR LEFT RIGHT LEFT RIGHT CENTER B+ REM OUTPUT LEVEL LEVEL LEVEL RESET CENTER + –... -
Page 5: Installation
NSTALLATION INSTALLATION CONSIDERATIONS As the automotive manufacturers increasingly make their source units (radios) an integral part of the vehicle, it becomes harder to change them out and upgrade your system.The 3Sixty makes it possible to utilize the vehicle source unit and still create the sound experience that fits you.With easy to use menus, the 3Sixty connected to your vehicle’s source unit and an amplifier, you can create a sound stage that is personally tuned to your vehicle.The 3Sixty gives you all the benefits of creating the best system possible without compromising the manufacturer’s integrated source system. -
Page 6: Mounting Locations
WIRING THE SYSTEM CAUTION: If you do not feel comfortable with wiring your new unit, please see your local Authorized Rockford Fosgate Dealer for installation. CAUTION: Before installation, disconnect the battery negative (-) terminal to prevent damage to the unit, fire and/or possible injury. - Page 7 NSTALLATION Prepare the REM (remote) wire for for attachment to the power connector by stripping 1/4" (6.4mm) of insulation from the end of the wire. Insert the bared wire into the REM terminal and tighten the setscrew to secure the wire in place. Used as an input: Connect the other end of the REM wire to a switched 12 volt positive source.The switched voltage is usually taken from the source unit's remote amp on lead.
-
Page 8: Initial Setup
NITIAL ETUP PALM REQUIREMENTS AND SOFTWARE INSTALLATION While 3Sixty will run without an external controller, a Palm OS device (not included) is required for initial ® setup and adjustments for the 3Sixty unit to properly work with your system. Palm Requirements •... -
Page 9: Operation-Setup
PERATION ETUP OPERATION NOTE:Due to the different Palm models available for use with the 3Sixty, the following instructions takes into account that you have an understanding of the operation of the Palm device you are using. BLUETOOTH CONNECTION The 3Sixty unit is controlled wirelessly using Bluetooth technology. - Page 10 PERATION ETUP Follow the instructions to adjust your amplifier for system setup. A: Set the all the gains on the amplifier to minimum. B: Insert the “3Sixty Setup Disc” CD into the vehicle’s main CD player C: Play track 1 and set the player to repeat the track. NOTE:If you do not have a repeat function on your CD player, ensure track 1 plays during the entire setup process.
- Page 11 PERATION ETUP New Setup Click on the inputs you have connected to your 3Sixty unit. Clicking the Cancel icon will return you to the main screen. NOTE:The 3Sixty can be set up to create a 6-channel output with only 2-channels (Left and Right) of input.
-
Page 12: Operation-Tuning
PERATION UNING TUNING YOUR SYSTEM - EQ If you are continuing from the previous section then continue to step 1. If you need to load a file or are connecting to a 3Sixty unit, see Loading a File in section Operation-Files, or Bluetooth Connection at the beginning of section Operation-Setup. -
Page 13: Tuning Your System-Xover
Select the crossover slope you want, either 12dB/octave or 24dB/octave. The steeper then slope, the faster the roll-off, resulting in less content passing through the device from the unwanted frequency range. NOTE: If you are unsure as to the correct setting, consult your local Authorized Rockford Fosgate dealer for correct recommended setting for your specific system. -
Page 14: Tuning Your System-Output Level
PERATION UNING Xover Link (Crossover Link) - Front and Rear Channels Each channel may have unique crossover settings; this flexibility is left up to the user. For a novice user, it is recommended that the check box labeled “Xover Link” is left checked (default). When this box has a check mark in it, it links the stereo channels. -
Page 15: Tuning Your System-Auxiliary
PERATION UNING TUNING YOUR SYSTEM - AUXILIARY (3SIXTY.2 ONLY) If you are continuing from the previous section then continue to step 1. If you need to load a file or are connecting to a 3Sixty unit, see Loading a File in section Operation-Files, or Bluetooth Connection at the beginning of section Operation-Setup. -
Page 16: Operation-Files
PERATION ILES SAVING, LOADING AND DELETING FILES (3SIXTY.2 ONLY) IMPORTANT: If you are connected to a 3Sixty unit via Bluetooth when you load a file, any settings currently on the 3Sixty unit will be overwritten.We suggest you save your settings before loading a new file. -
Page 17: Hardware Information
PERATION ILES HARDWARE INFORMATION Each 3Sixty contains system information. This information includes the devices name, serial number, Bluetooth® PIN (Personal Identification Number) and other important information. NOTE:As new features become available for your 3Sixty unit, this is the section you will use to update your firmware. To view the information on your 3Sixty unit, choose the Hardware Info icon on the main screen. -
Page 18: Operation-Remote
PERATION EMOTE REMOTE CONTROL IMPORTANT: Have the remote disconnected from the 3Sixty unit when doing New Setup or OEM Integration. Doing so may cause undesirable operation of the 3Sixty unit. Comm Port (Communications Port) The 3Sixty unit has the ability to control the master volume or the Subwoofer output level, and switch the 3Sixty unit to use the Aux (auxiliary) inputs by pressing the knob on the remote. -
Page 19: Troubleshooting
ROUBLESHOOTING 3Sixty Unit Device doesn’t turn on. A. Verify connections. B. Verify there is 10.5 - 15.5 Volts present at the power B+ connection to the 3Sixty unit. C. Contact Customer service. Power Indicator (Red LED) does not stop blinking. A. -
Page 20: Specifications
ROUBLESHOOTING Palm Device Palm locks up or freezes. A. Perform a soft reset on your Palm by locating the RESET button on the Palm. Please see Palm owner’s manual for location of this button as it varies from device to device. When installing the 3Sixty programs onto my Palm, I do not see them listed in the available applications. -
Page 21: Limited Warranty Information
Some states do not allow limitations on the length of an implied warranty, so this limitation may not apply. No person is authorized to assume for Rockford Fosgate any other liability in connection with the sale of the product. How to Obtain Service Contact the Authorized Rockford Fosgate Dealer you purchased this product from. -
Page 22: Introduction
NTRODUCTION Cher client, Toutes nos félicitations pour avoir acheté le 3Sixty de Rockford Fosgate. Le 3Sixty utilise une technologie en instance de brevet qui permet de l'intégrer dans les systèmes OEM sans qu'il soit nécessaire de retirer l'unité source. Chez Rockford Fosgate, nous sommes des mordus de la reproduction musicale à son meilleur. C'est pourquoi nous sommes heureux que vous ayez choisi notre produit. -
Page 23: Consignes De Sécurité
AVANT DE COMMENCER Bienvenue à Rockford Fosgate ! Ce manuel vise à informer le propriétaire, le vendeur et l’installateur de l’appareil. Si vous désirez apprendre rapidement comment installer ce produit, consultez la section Installation du manuel. Reportez-vous à la Table des matières pour d’autres informations. Nous nous efforçons de faire en sorte que toutes les informations contenues dans ce manuel soient à... -
Page 24: Particularités Techniques
ARTICULARITÉS TECHNIQUES Top View Interactive Signal Processor Left Side View Right Side View Front View INPUT FRONT REAR FRONT REAR HIGH LEVEL INPUT COMM PORT POWER FRONT REAR LEFT RIGHT LEFT RIGHT CENTER B+ REM OUTPUT LEVEL LEVEL LEVEL RESET CENTER CENTER + –... -
Page 25: Installation
NSTALLATION CONSIDÉRATIONS CONCERNANT L'INSTALLATION À mesure que les fabricants automobiles intègrent de plus en plus leurs unités source (radios) à leurs véhicules, il devient de plus en plus difficile de les changer et mettre à jour votre système. Le 3Sixty permet d'utiliser l'unité source du véhicule et de produire l'ambiance sonore qui vous convient.Avec des menus faciles à... -
Page 26: Emplacements De Montage
NSTALLATION EMPLACEMENTS DE MONTAGE Compartiment du moteur Ne montez jamais l'appareil dans le compartiment moteur car cela entraînera l'annulation de la garantie. Montage dans le coffre Il est recommandé d'orienter l'appareil au sol car cela offre la meilleur portée au contrôleur Bluetooth. L'appareil peut être monté... - Page 27 NSTALLATION Préparez le fil REM (télécommande) qui devra être relié au connecteur d'alimentation en dénudant 6,4 mm (1/4 po) de son extrémité. Insérez la partie dénudée dans la borne REM, puis fixez le fil en vissant la vis sans tête. Utilisation comme entrée : Connectez l'autre extrémité...
-
Page 28: Configuration Initiale
ONFIGURATION INITIALE EXIGENCES DU PALM ET INSTALLATION DU LOGICIEL Bien que le 3Sixty puisse fonctionner sans contrôleur externe, un appareil Palm® OS (non inclus) est requis pour la configuration et les réglages initiaux afin que le 3Sixty puisse fonctionner correctement avec votre système. Exigences du Palm •... -
Page 29: Fonctionnement - Configuration
ONCTIONNEMENT ONFIGURATION FONCTIONNEMENT REMARQUE : Étant donné les différents modèles de Palm compatibles avec le 3Sixty, les instructions suivantes présupposent que vous maîtrisez le fonctionnement de votre périphérique Palm. CONNEXION BLUETOOTH Le 3Sixty est contrôlé sans fil à l'aide de la technologie Bluetooth®. Ceci permet à l'utilisateur de contrôler l'appareil n'importe où à... - Page 30 ONCTIONNEMENT ONFIGURATION Suivez les instructions pour régler votre amplificateur pour la configuration du système. A : Réglez tous les gains de l'amplificateur à minimum. B : Insérez le CD « 3Sixty Setup Disc » dans le lecteur CD principal du véhicule. C : Jouez la piste 1 et réglez le lecteur pour qu'il la répète.
- Page 31 ONCTIONNEMENT ONFIGURATION New Setup Cliquez sur les entrées que vous avez connectées au 3Sixty.Cliquez sur l'icône Cancel (Annuler) pour retourner à l'écran principal. Le 3Sixty peut être configuré de façon à créer une sortie à 6 voies avec une REMARQUE : entrée à...
-
Page 32: Fonctionnement - Réglage
ONCTIONNEMENT ÉGLAGE RÉGLAGE DU SYSTÈME - ÉGALISEUR Si vous continuez de la section précédente, passez à l'étape 1. Si vous devez charger un fichier ou que vous vous connectez à un appareil 3Sixty, reportez-vous à la rubrique Chargement d'un fichier dans la section Fonctionnement - Fichiers, ou Connexion Bluetooth au début de la section Fonctionnement - Configuration. -
Page 33: Réglage Du Système - Xover
REMARQUE : Si vous n'êtes pas sûr du bon réglage, consultez votre distributeur agréé Rockford Fosgate pour ce qui est du réglage recommandé pour votre système. -
Page 34: Réglage Du Système - Niveau De Sortie
ONCTIONNEMENT ÉGLAGE Délai On peut appliquer un délai à chaque voie. Celui-ci va de 0 à 1,5 m (0 à 5 pi) par incréments de 5 cm (2 po). Cette fonction permet de manipuler l'image du champ sonore au sein du véhicule. Cliquez sur les touches à flèche vers le haut et vers le bas pour régler le délai. -
Page 35: Réglage Du Système - Auxiliaire
ONCTIONNEMENT ÉGLAGE RÉGLAGE DU SYSTÈME - AUXILIAIRE (3SIXTY.2 SEULEMENT) Si vous continuez de la section précédente, passez à l'étape 1. Si vous devez charger un fichier ou que vous vous connectez à un appareil 3Sixty, reportez-vous à la rubrique Chargement d'un fichier dans la section Fonctionnement - Fichiers, ou Connexion Bluetooth au début de la section Fonctionnement - Configuration. -
Page 36: Fonctionnement - Fichiers
ONCTIONNEMENT ICHIERS ENREGISTREMENT,CHARGEMENT ET SUPPRESSION DE FICHIERS (3SIXTY.2 SEULEMENT) Si vous êtes connecté à un appareil 3Sixty via Bluetooth lorsque vous chargez un fichier, tous les paramètres IMPORTANT: du 3Sixty sont remplacés. Nous vous suggérons de sauvegarder vos paramètres avant de charger un nouveau fichier. -
Page 37: Informations Sur Le Matériel
ONCTIONNEMENT ICHIERS INFORMATIONS SUR LE MATÉRIEL Chaque 3Sixty contient des informations système. Celles-ci comprennent le nom de l'appareil, son numéro de série, son NIP Bluetooth® (Numéro d'identification personnel) et d'autres données importantes. REMARQUE : Ceci est la section que vous devrez utiliser pour mettre à jour votre microprogramme à... -
Page 38: Fonctionnement - Télécommande
ONCTIONNEMENT ÉLÉCOMMANDE TÉLÉCOMMANDE IMPORTANT: Déconnectez la télécommande du 3Sixty lorsque vous utilisez les fonctions New Setup ou OEM Integration. Ceci peut produire un fonctionnement indésirable du 3Sixty. Comm Port (port de communication) Le 3Sixty a la capacité de contrôler le réglage principal du volume ou le niveau de sortie du subwoofer, ainsi que de permettre au 3Sixty d'utiliser les entrées Aux (auxiliaires) en appuyant sur le bouton de la télécommande. -
Page 39: Dépannage
ÉPANNAGE Le 3Sixty L'appareil ne s'allume pas. A. Vérifiez les connexions. Vérifiez la présence d'une tension de 10,5 à 15,5 V au niveau de la connexion d'alimentation B+ du 3Sixty. C. Contactez le service à la clientèle. Le voyant d'alimentation (DEL rouge) n'arrête pas de clignoter. A. - Page 40 ÉPANNAGE Périphérique Palm Le Palm se bloque ou gèle. A. Effectuez une réinitialisation logicielle sur votre Palm en repérant le bouton RESET sur le Palm. Reportez-vous au manuel de l'utilisateur du Palm pour repérer l'emplacement de ce bouton car il varie d'un appareil à l'autre. Lorsque j'installe les programmes du 3Sixty sur mon Palm, je ne les vois pas indiqués parmi les applications disponibles.
-
Page 41: Informations Sur La Garantie Limitée
Certaines juridictions ne permettent pas de limitation sur la durée des garanties implicites. En conséquence, l'exclusion ci-dessus peut ne pas vous être applicable.Aucune personne n’est autorisée à assumer une quelconque autre responsabilité au nom de Rockford Fosgate relative à la vente de ce produit. -
Page 42: Introducción
(OEM) de fábrica sin la necesidad de extraer la unidad fuente. En Rockford Fosgate somos fanáticos en cuanto a la reproducción musical con la mejor calidad y nos complace que haya seleccionado nuestro producto. -
Page 43: Instrucciones De Seguridad
INICIO ¡Bienvenidos a Rockford Fosgate! Este manual ha sido creado para proporcionarle información al dueño, vendedor y técnico de instalación. Para quienes desean información rápida sobre cómo instalar este producto, por favor vean la Sección Instalación de este manual. El resto de la información puede encontrarse usando el Índice de Materias. -
Page 44: Características Del Diseño
ARACTERÍSTICAS DEL ISEÑO Top View Interactive Signal Processor Left Side View Right Side View Front View INPUT FRONT REAR FRONT REAR HIGH LEVEL INPUT COMM PORT POWER FRONT REAR LEFT RIGHT LEFT RIGHT CENTER B+ REM OUTPUT LEVEL LEVEL LEVEL RESET CENTER CENTER... -
Page 45: Instalación
NSTALACIÓN CONSIDERACIONES DE LA INSTALACIÓN: Como los fabricantes de automóviles cada vez más hacen que sus unidades fuente (radios) sean parte integral del vehículo, se hace cada vez más difícil cambiarlos y actualizar el sistema. El 3Sixty permite que utilice la unidad fuente del vehículo y sin embargo crear una experiencia sonora adecuada a usted. -
Page 46: Ubicación Para El Montaje
Si no se siente seguro haciendo el cableado de su nueva unidad, consulte con su PRECAUCIÓN: distribuidor local Autorizado de Rockford Fosgate para que le haga la instalación. Antes de efectuar la instalación, desconecte el terminal negativo (-) de la batería para PRECAUCIÓN:... - Page 47 NSTALACIÓN Prepare el cable REM (remoto) para fijarlo al conector de alimentación pelando 1/4 pulg. (6.4 mm) de aislamiento del extremo del cable. Inserte el cable desnudo en el terminal REM y apriete el tornillo de fijación para fijar el cable en su sitio.
-
Page 48: Paso Inicial
ASO INICIAL REQUISITOS DEL PALM E INSTALACIÓN DEL SOFTWARE Si bien el 3Sixty funcionará sin tener un controlador externo, se necesita un dispositivo Palm® OS (no incluido) para la configuración inicial y para los ajustes para que la unidad 3Sixty funcione correctamente con su sistema. Requisitos del Palm •... -
Page 49: Operación-Configuración
PERACIÓN ONFIGURACIÓN OPERACIÓN NOTA: Debido a los distintos modelos de Palm disponibles para usar con el 3Sixty, estas instrucciones suponen que usted entiende el funcionamiento del dispositivo Palm que está usando. CONEXIÓN BLUETOOTH La unidad 3Sixty se controla de manera inalámbrica por medio de la tecnología Bluetooth®. Esto permite que el usuario controle la unidad desde cualquier lugar dentro del alcance de la antena Bluetooth. - Page 50 PERACIÓN ONFIGURACIÓN Siga las instrucciones para ajustar su amplificador para la configuración del sistema. Ajuste todas las ganancias del amplificador a mínimo. Inserte el CD “3Sixty Setup Disc” (disco de configuración del 3Sixty) en el reproductor principal de CD del vehículo C: Reproduzca la pista 1 y configure el reproductor para que repita la pista.
- Page 51 PERACIÓN ONFIGURACIÓN Configuración nueva Haga clic en las entradas que tenga conectadas a su unidad 3Sixty. Si hace clic en el icono Cancel (Cancelar) se le regresará a la pantalla principal. NOTA: El 3Sixty se puede configurar para crear una salida de 6 canales con sólo 2 canales (izquierdo y derecho) de entrada.
-
Page 52: Operación-Puesta A Punto
PERACIÓN UESTA A PUNTO PUESTA A PUNTO DE SU SISTEMA-EQ Si está continuando de la sección anterior siga al paso 1. Si tiene que cargar un archivo o se está conectando a una unidad 3Sixty, consulte Carga de un archivo en la sección Operación-Archivos, o en Conexión Bluetooth al comienzo de la sección Operación-Configuración.. -
Page 53: Puesta A Punto De Su Sistema-Xover
“descuelga” mas rápido lo que resulta en que un menor contenido de la gama de frecuencias no deseadas pasa a través del dispositivo. NOTA: Si no está seguro de la configuración correcta, consulte con su distribuidor local autorizado de Rockford Fosgate para obtener la configuración recomendada para su sistema específico. -
Page 54: Puesta A Punto De Su Sistema-Nivel De Salida
PERACIÓN UESTA A PUNTO Xover Link (Enlace de cruce) – Canales delanteros y traseros Es posible que cada canal tenga ajustes de cruce independiente; esta flexibilidad se deja al criterio del usuario. Para un usuario novicio, se recomienda que la casilla de selección rotulada “Xover Link” (Enlace de cruce) se deje seleccionada (predeterminación). -
Page 55: Puesta A Punto De Su Sistema-Auxiliar
PERACIÓN UESTA A PUNTO PUESTA A PUNTO DE SU SISTEMA – AUXILIAR (SÓLO 3SIXTY.2) Si está continuando de la sección anterior siga al paso 1. Si tiene que cargar un archivo o se está conectando a una unidad 3Sixty, consulte Carga de un archivo en la sección Operación-Archivos, o en Conexión Bluetooth al comienzo de la sección Operación-Configuración. -
Page 56: Operación-Archivos
PERACIÓN RCHIVOS PARA GUARDAR, CARGAR Y BORRAR ARCHIVOS (SÓLO 3SIXTY.2) IMPORTANTE: Si está conectado a un 3Sixty por medio de Bluetooth cuando carga un archivo, se sobre escribirá todas las configuraciones de la unidad 3Sixty. Le sugerimos que guarde sus ajustes antes de cargar un archivo nuevo. -
Page 57: Información Del Hardware
PERACIÓN RCHIVOS INFORMACIÓN DEL HARDWARE Cada 3Sixty contiene información del sistema. Esta información incluye el nombre de los dispositivos, el número de serie, Bluetooth® PIN (número de identificación personal) y otra información importante. NOTA: A medida que se pongan a disposición características nuevas para su 3Sixty, esta es la sección que usará... -
Page 58: Operación-Remoto
PERACIÓN EMOTO CONTROL REMOTO IMPORTANTE: Haga que se desconecte el remoto de la unidad 3Sixty al hacer una New Setup (Configuración nueva) o OEM Integration (Integración OEM). Es posible que hacerlo cause el funcionamiento no deseado de la unidad 3Sixty. Comm Port (Puerto de comunicaciones) La unidad 3Sixty tiene la capacidad de controlar el volumen maestro o el nivel de salida del subwoofer, y conmutar la unidad 3Sixty para que use las entradas Aux... -
Page 59: Solución De Problemas
OLUCIÓN DE ROBLEMAS Unidad 3Sixty No se enciende el dispositivo. A. Compruebe las conexiones. B. Compruebe que haya 10.5 - 15.5 voltios en la conexión de alimentación B+ a la unidad 3Sixty. C. Comuníquese con Servicio al Cliente. El indicador de encendido (LED rojo) no deja de destellar. A. -
Page 60: Especificaciones
OLUCIÓN DE ROBLEMAS Dispositivo Palm El Palm se bloquea o congela. A. Haga una reposición del software de su Palm por medio del botón RESET (REPONER) del Palm. Por favor consulte en el manual del Palm adónde se encuentra este botón pues varía de un dispositivo a otro. Al instalar programas 3Sixty en mi Palm, no los veo listados en las aplicaciones disponibles. -
Page 61: Información De La Garantía Limitada
2. Cualquier costo o gasto relacionado con la desinstalación o nueva instalación del producto 3. Servicios prestados por alguien que no sea un Centro de Servicio Autorizado por Rockford Fosgate 4. Cualquier producto que tenga el número de serie borrado, alterado o removido 5. - Page 64 Rockford Fosgate Rockford Corporation 546 South Rockford Drive Tempe, Arizona 85281 U.S.A. In U.S.A., (480) 967-3565 In Europe, Fax (49) 8503-934014 In Japan, Fax (81) 559-79-1265 www.rockfordfosgate.com 12/05 B.M. Printed in U.S.A 1230-52040-01...
Need help?
Do you have a question about the 3Sixty and is the answer not in the manual?
Questions and answers