Table of Contents
Advertisement
Advertisement
Table of Contents

Related Manuals for Brookstone Virtual Keyboard


Summary of Contents for Brookstone Virtual Keyboard
- Page 1 Virtual Keyboard YOu’Ve NeVer tYPed lIKe tHIS BefOre...
-
Page 2: Table Of Contents
Table of conTenTs Warnings and Cautions . . . . . . . . . . . . . . . . . . . . . . . . . . . . . . . . . . . . . . . . . . . . . . . . . . . . 2 Location of Controls . -
Page 3: Important Safety Instructions
caUTIon • TO REDUCE THE RISK OF ELECTRIC SHOCK, DO NOT REMOVE COVER . THERE ARE NO SERVICEABLE PARTS INSIDE . • TO REDUCE THE RISK OF FIRE OR ELECTRIC SHOCK, DO NOT EXPOSE THIS UNIT TO RAIN OR MOISTURE . The lightning flash with arrow-head symbol within an equilateral triangle is intended to alert the user to the presence of uninsulated “dangerous voltage”... - Page 4 DanGeR To reduce the risk of electric shock, burns, fire or injury: Do not use while bathing or in a shower . 2 . Do not place or store unit where it can fall or be pulled into a tub or sink . 3 .
- Page 5 8 . Never operate this unit if it has a damaged cord or plug, if it is not working properly, or if it has been dropped or damaged, or dropped into water . If the unit’s power supply cord or plug is damaged, do not attempt to fix it yourself . 9 .
-
Page 6: Safety Precautions
safeTY PRecaUTIons 1 . Avoid exposing this product to direct sunlight for extended periods of time, and keep it away from heat sources . 2 . There is a risk of malfunction if product is used in places where sudden or extreme temperature changes occur . - Page 7 caUTIons 1 . For safety reasons, be sure to use only the mini USB to USB cable specified for this product . 2 . Make sure to fully charge the battery before using the product for the first time . 3 .
-
Page 8: Fcc Statement
fcc sTaTeMenT This equipment has been tested and found to comply with the limits for a Class B digital device, pursuant to part 15 of the FCC Rules . These limits are designed to provide reasonable protection against harmful interference in a residential installation . - Page 9 Rf exPosURe InfoRMaTIon The antenna used for this transmitter must be installed to provide a separation distance of at least 20 cm from all persons and must not be co-located or operating in conjunction with any other antenna or transmitter . caUTIon 1 .
-
Page 10: Adjusting Sensitivity
noTes foR oPTIMal PRoDUcT UsaGe CONdItIONS tO AVOId: 1 . Avoid direct sunlight . 2 . Avoid low color temperature light source, such as tungsten, halogen, or incandescent lamp . 3 . Avoid uneven or irregular surfaces . Place the product on flat surfaces . 4 . -
Page 11: Location Of Controls
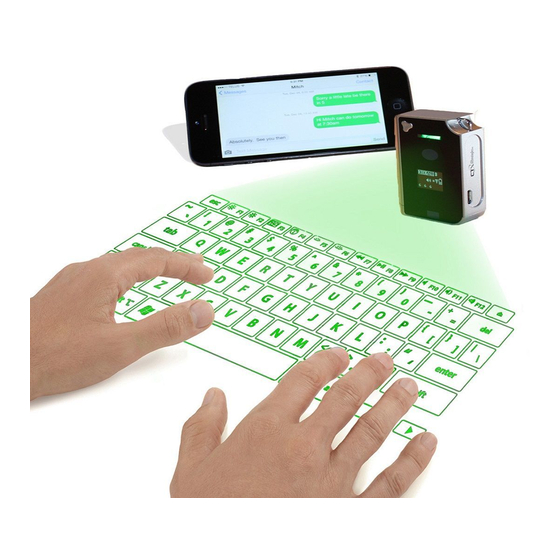
locaTIon of conTRols 1 . Power Switch 2 . Keyboard Pattern Projector 3 . Sensor 4 . OLED Screen Showing: Battery/Bluetooth /Keyboard/ ® Mouse/Charging/Operating Settings 5 . Infrared Beam 6 . Key Ring Strap 7 . Micro USB Port IdeNtIfYINg PArtS ANd tHeIr fuNCtIONS. -
Page 12: Charging
chaRGInG The Virtual Keyboard has a built-in Rechargeable Lithium-ion Polymer Battery . The Battery Operating Time is approximately 120 minutes . Use the USB cable (included) to charge the Virtual Keyboard’s battery . Simply connect the Virtual Keyboard to a 2 . 1 USB outlet to charge . Charging time is approximately 240 minutes . - Page 13 Bluetooth CONNeCtION 1 . Power on Virtual Keyboard . 2 . Bluetooth icon will blink, indicating the device is searching for a new or previously paired device within its proximity . This will last 30 seconds . 3 . Upon successful pairing, the Bluetooth icon will stop blinking . Note: If the Virtual Keyboard cannot locate a new or previously paired host device within 30 seconds, it will discontinue the Bluetooth search and the Bluetooth icon will disappear.
- Page 14 Connecting to Android devices Some Android 2 . 0 and later devices support Bluetooth and do not require installation of a separate driver . Please visit our Website Brookstone . c om for more information on Android drivers . 1 . Turn on Virtual Keyboard by pressing and holding the power button . A blinking Bluetooth icon indicates that the device is ready to pair .
- Page 15 CONNeCtINg tO PC (BluetOOtH/uSB) Connecting via Bluetooth If your computer supports Bluetooth installation, a separate driver is not required . 1 . Turn on Virtual Keyboard by holding the power button for 2 seconds . A blinking Bluetooth icon indicates that the device is ready to pair . 2 .
-
Page 16: Changing Keyboard Mode To Mouse Mode
CONNeCtINg VIA uSB fOr Windows & mac (Plug-n-play) 1 . Connect the host device and Virtual Keyboard using the Micro-USB to USB cable provided . 2 . Turn on Virtual Keyboard . 3 . Successful connection is indicated by the virtual keyboard screen displaying a “U”... - Page 17 Below are examples of how to operate the Virtual Keyboard in Mouse Mode . Click & Right Click Control the Curser Forward & Back Zoom In & Out Drag & Scroll Note: Special keys Not all keys displayed on projection keyboard layout correspond to input keys on host device.
-
Page 18: Adjusting Key Stroke Sound Level
AdjuStINg KeY StrOKe SOuNd leVel Press and hold FN key and press S key . Continually pressing the FN key and pressing the S key will cycle through all available sound levels . There are 4 levels of sound, including mute . You will see your current sound level displayed on the screen . The sound level remains as adjusted when device is turned off and on . -
Page 19: Quick Key Reference Guide
Note: to exit calibration mode at any time, press the fN and C key, again. No calibration information will be saved until the entire calibration mode has been completed. QuICK KeY refereNCe guIde Bluetooth: 1 . Searching Last Device (Bluetooth icon blinking) . 2 . -
Page 20: Specifications
QuICK KeY refereNCe guIde (CONtINued) reset (FN and R): Must press R twice . Switching Between mouse/Keyboard mode: (FN and M) . turning Keyboard display (On/Off): Tap three keys at once . sPecIfIcaTIons PAtterN PrOjeCtOr Light Source . . . . . . . . . . . . . . . . . . . . . . . . . . . . . . . . . Red Laser Diode Keyboard Layout . - Page 21 sPecIfIcaTIons eleCtrICAl CHArACterIStICS External Power Supply . . . . . . . . . . . . . . . . . . . . . . . . USB Power/less than 5V 500mA Battery and Capacity .
-
Page 22: Warranty
(“Warranty Period”) . If a defect arises and a valid claim is received within the Warranty Period, at its option, Brookstone will either 1) repair the defect at no charge, using new or refurbished replacement parts, or 2) replace the product with a new product that is at least functionally equivalent to the original product, or 3) provide a store credit in the amount of the purchase price of the original product . - Page 23 Brookstone may provide their own warranties to the purchaser, but Brookstone, in so far as permitted by law, provides these products “as is . ” This warranty does not apply to: a) damage caused by failure to follow instructions relating to product’s use or the installation of components;...
- Page 24 Find thousands more great ideas online 796246 Merrimack, New Hampshire USA 03054 • 800-846-3000 • Brookstone . c om...
Need help?
Do you have a question about the Virtual Keyboard and is the answer not in the manual?
Questions and answers