Table of Contents
Advertisement
Advertisement
Table of Contents

Subscribe to Our Youtube Channel
Related Manuals for SANTO 72398 KA


Summary of Contents for SANTO 72398 KA
- Page 1 SANTO 72398 KA User manual Electronic-Fridge...
-
Page 2: Dear Customer
Dear Customer Thank you for choosing one of our high-quality products. With this appliance you will experience the perfect combination of functional design and cutting edge technology. Convince yourself that our appliances are engineered to deliver the best performance and control - indeed we are setting the highest standards of excellence. -
Page 3: Table Of Contents
Contents Safety ..........4 Disposal . -
Page 4: Safety
Intended use • The refrigerator is intended for use in the home. It is suitable for cooling food. If the appliance is used for purposes other than those intended or used incorrectly, no liability can be accepted by the manufacturer for any damage that may be caused. -
Page 5: Daily Operation
Daily Operation • Do not operate any electrical appliances in the refrigerator/freezer (e.g. electric ice cream makers, mixers etc.). • Before cleaning the appliance, always switch it off and unplug it, or pull the house fuse or switch off the circuit breaker. -
Page 6: Remove Transport Safeguard
• The symbol this product may not be treated as household waste. Instead it should be handed over to the appropriate collection point for the recycling of electrical and electronic equipment. By ensuring this product is disposed of correctly, you will help prevent potential negative consequences for the environment and human health, which could otherwise be caused by inappropriate waste handling of this product. -
Page 7: Fitting The Door Handle
Fitting the Door Handle Screw the top handle bracket to the handle rod (1). Fit the bottom handle bracket on the lower left- hand side of the door (2). Fit the top handle bracket on the top left-hand side of the door (3) and screw the handle rod to the bottom handle bracket (4). -
Page 8: Electrical Connection
Electrical connection Before initial start-up, refer to the appliance rating plate to ascertain if supply voltage and current values correspond with those of the mains at the installation location. e.g.: 230 ... 240 V~ (i.e. 230 to 240 volts alternating current, 50 Hertz) The rating plate is inside the appliance on the left. -
Page 9: Temperature Setting Buttons
Temperature setting buttons The temperature is adjusted using the “B“ and “D“ buttons. These buttons are connected to the temperature display. • The temperature display is switched over from the display of the ACTUAL temperature (Temperature display is illuminated) to the display of the DESIRED temperature (Temperature display flashes) by pressing one of the two buttons, “B“... -
Page 10: Quick Chill
COOLMATIC The COOLMATIC function is suited for quick cooling of large quantities of goods in the refrigerator. The COOLMATIC function is switched on by pressing the COOLMATIC button. The yellow light illuminates. The COOLMATIC function now provides for intensive cooling. -
Page 11: Holiday Mode
3 To switch the fridge back to normal operation, press the “-“ (COLDER) button. Important! Do not store any goods in the refrigerator when the holiday mode is in operation. The temperature is regulated at about +15 °C when the holiday mode is in operation. This is too warm for food products. -
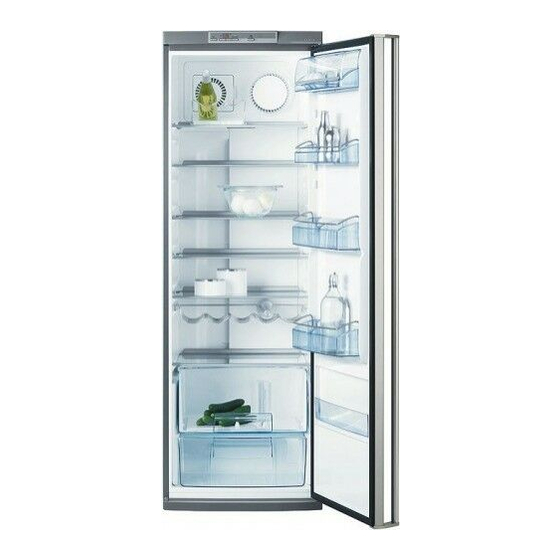
Page 12: Interior Accessories
Interior Accessories Storage shelves • You should always slide one of the full size glass storage shelf into the lowest set of guides, above the fruit and the vegetable containers, and keep it in this position. • The height of the storage shelves can be adjusted: •... -
Page 13: Quick Chill Shelf
Quick Chill Shelf The quick chill shelf can be placed in the upper groove. Bottle and Can Holder The side of the bottle and can holder is moveable to enable a more flexible placement of cans and bottles in front of the grid. To allow the holder to be moved easier when moving sideways, press the shelf backwards. -
Page 14: Installation Of The Carbon Filter
Installation of the carbon filter On delivery the carbon filter is placed in a plastic bag to secure its length of life. The filter should be placed behind the grill before the cabinet is turned on. 1. The cover can be opened by simultaneously pressing the lever on the right of grill (1) and turning the cover outward (2). -
Page 15: Fresh Food Refrigeration
Fresh food refrigeration To obtain the best performance: • do not store warm food or evaporating liquid in the refrigerator • do cover or wrap the food, particularly if it has a strong flavour. • Position food so that air can circulate freely round it. -
Page 16: Switching Off The Appliance
Switching off the appliance 1. To switch off, press the ON/OFF button. This will result in a countdown from "3" to "1" taking place in the temperature display. On reaching "1" the fridge will switch off. The temperature display will go off. The appliance is only completely disconnected from the electricity supply when the power plug has been removed from the power outlet. -
Page 17: Energy Saving Tips
Do not allow such substances to come into contact with appliance parts. • Do not use any abrasive cleansers. Remove the food from the refrigerator. Switch the appliance off and remove the plug from the mains, or switch off or turn out the circuit breaker or fuse. -
Page 18: What To Do If
What to do if ... Correcting Malfunctions A malfunction may be caused by only a minor fault that you can rectify yourself using the following instructions. Do not perform any other work on the appliance if the following information does not provide assistance in your specific case. -
Page 19: Changing The Light Bulb
Change the defective light bulb with one of the some power (the maximum power is shown on the light diffuser). Refit the light bulb cover. Put the refrigerator back into operation. Possible Cause Appliance is not level. The appliance is touching the wall or other objects. -
Page 20: Service And Spare Parts
Please note that a valid purchase receipt or guarantee documentation is required for in-guarantee service calls. Customer Care Department For general enquiries concerning your AEG-Electrolux appliance or for futher information on AEG-Electrolux products, please contact our Customer Care Department by letter or telephone at the address below or visit our website at www.aeg-electrolux.co.uk. -
Page 21: Guarantee Conditions
GUARANTEE CONDITIONS Standard guarantee conditions We, AEG-Electrolux, undertake that if within 12 months of the date of the purchase this AEG-Electrolux appliance or any part thereof is proved to be defective by reason only of faulty workmanship or materials, we will, at our discretion repair or replace the same FREE OF CHARGE for labour, materials or carriage on condition that: ·... -
Page 22: Installation - Electrical Connection
Installation Electrical Connection Any electrical work required to install this appliance should be carried out by a qualified electrician or competent person. WARNING – THIS APPLIANCE MUST BE EARTHED The manufacturer declines any liability should these safety measures not be observed. Before switching on, make sure the electricity supply voltage is the same as that indicated on the appliance rating plate. -
Page 23: Positioning
Positioning This appliance should only be installed at a location where the ambient temperature corresponds to the climate classification indicated on the rating plate, which is located at the left on the inside of the appliance. The following table shows which ambient temperature is correct for each climate classification: SN +10°C to + 32°C +16°C to + 32°C... -
Page 24: Rehingeing The Door
Rehingeing the door The side at which the door opens can be changed from the right side (factory adjustment) to the left side, if the installation site requires. Warning! When changing the side at which the door opens, the appliance may not be connected to the mains. - Page 25 Unscrew the top handle bracket from the handle rod (1). Unscrew the bottom handle bracket from the door (2). Unscrew the top handle bracket from the door (3) and screw onto the bottom right- hand side of the door (4). Turn the handle bracket with the handle rod 180°...
-
Page 26: Regulations, Standards, Guidelines
Regulations, Standards, Guidelines This appliance was designed for household use and was manufactured in accordance with the appropriate standards. The necessary measures in accordance with appliance safety legislation regulations (GSG), accident prevention regulations for refrigeration appliances (VBG 20) and the regulations of the German Society of Electrical Engineers (VDE) were observed in the manufacture of this appliance. - Page 28 2223 421-52-00-31072007 Subject to change without notice...
Need help?
Do you have a question about the 72398 KA and is the answer not in the manual?
Questions and answers
Porque mi frigorífico no enfría?