Table of Contents
Advertisement
M-Audio FireWire 1814 - Users Manual
1 Introduction
2 What's in the Box
Windows
•
Mac OS
•
Front Panel Diagram
•
•
Rear Panel Diagram
•
•
7
Windows XP
•
Windows 2000
•
•
Mac OS 9
•
•
•
•
•
•
•
About Page
•
Advertisement
Table of Contents
Troubleshooting

Related Manuals for M-Audio Firewire 1814

Summary of Contents for M-Audio Firewire 1814
-
Page 1: Minimum System Requirements
M-Audio FireWire 1814 - Users Manual 1 Introduction 2 What’s in the Box 3 About the FireWire 1814 4 FireWire 1814 Features 5 Minimum System Requirements Windows • Mac OS • 6 Controls and Connectors Front Panel Diagram • Front Panel Descriptions •... -
Page 2: Troubleshooting
10 Using the FireWire 1814 Monitoring Live Playback • Using the Headphone Source Selector • Setting Up Your Recording Levels • Monitoring Your Inputs for Recording • General Recording Instructions • Setting the Sample Rate • Adding Effects While Direct Monitoring •... - Page 3 1 Introduction Thank you for choosing the M-Audio FireWire 1814. The FireWire 1814 has been designed to give you a professional, portable audio and MIDI interface for your laptop or desktop computer. Using the convenience and dependability of the IEEE 1394 (FireWire) bus, the FireWire 1814 provides your computer with a high-performance,...
- Page 4 2 What’s in the Box Your FireWire 1814 package contains the following: FireWire 1814 mobile recording interface Breakout cable for MIDI, coaxial S/PDIF and word clock I/O CD-ROM containing driver software and user manual in PDF format ...
- Page 5 (including the computer). There are rare occurrences when, after hot-plugging, either the FireWire peripheral or the host computers FireWire port are rendered permanently inoperable. While M-Audio products adhere rigidly to the FireWire industry standard and pass stringent internal testing, the possibility remains that hot-plugging your M-Audio FireWire interface to some computers may result in the this type of problem.
- Page 6 Please consult the Knowledge Base in the Support section at www.m-audio.com for updates on this important issue. In case your M-Audio FireWire device is not detected by your computer on startup, try one or more of the following troubleshooting steps instead of hot-plugging it: 1.
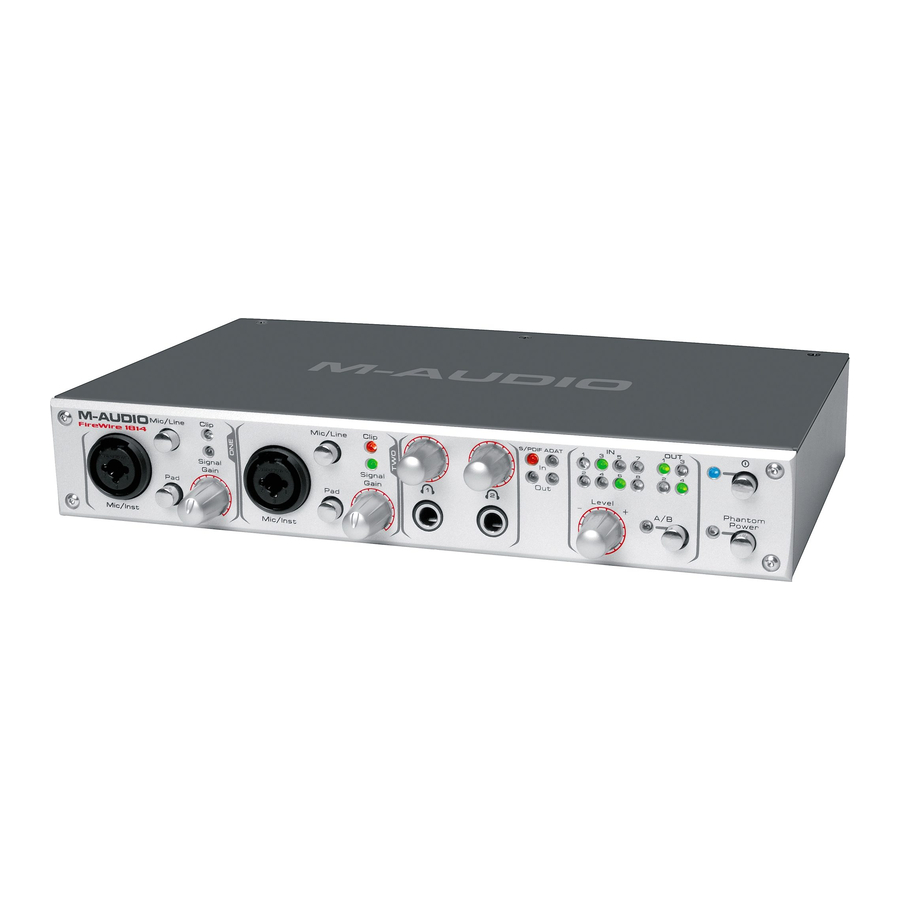
- Page 7 Two headphone outputs are provided on the front panel with dedicated rotary level controls. The front panel A/B selector switch is designed to give you control over your input monitoring, or give you immediate access to selectable stereo monitor sources—you make the choice from the software Control Panel. The main front panel rotary encoder can be assigned via the Control Panel to adjust a variety of software or hardware levels, while the FireWire 1814 can be powered via the FireWire bus for total portability.
- Page 8 4 FireWire 1814 Features 8 unbalanced analog 1/4” TS inputs 4 balanced/unbalanced analog 1/4” TRS outputs 1 x 1 ADAT Optical Lightpipe I/O; ADAT Optical is S/MUX-compatible for 4- channel 96kHz operation 1 x 1 Coaxial or Optical S/PDIF operation. Output signal will be mirrored on both S/PDIF ports ...
- Page 9 OS X 10.3 or greater w/ 512MB RAM * M-Audio suggests that you also check the minimum system requirements for your software, as they may greater than the above. ** G3/G4 accelerator cards not supported; native FireWire ports required.
-
Page 10: Front Panel
6 Controls and Connectors Front Panel Front Panel Descriptions 1. Mic/Inst Inputs – These Neutrik hybrid connectors will accept a low-impedance mic level signal on a standard three-pin balanced XLR or TRS plug, or a high- impedance instrument level signal on an unbalanced 1/4” TS plug. 2. - Page 11 7. Headphone Output Level 1 & 2 – These rotary encoders control the levels of the individual headphone outputs. These controls are independent of output levels. 8. S/PDIF Input and Output Indicator LEDs – The green S/PDIF In LED will glow steadily to indicate the presence of a valid S/PDIF signal at the active S/PDIF input.
- Page 12 Rear Panel Rear Panel Descriptions 18. Power Supply Connector – Connect the 12VDC 1000mA power supply to this jack when using the FireWire 1814 with a four-pin FireWire connection. Use only the power supply provided with the unit or a power supply of an equivalent quality, with a positive center pin.
- Page 13 23. Line Inputs 1–8 – These are unbalanced analog inputs on 1/4” TS jacks operating at signals up to 2.1dBV line level. Line inputs 1 and 2 are active only when the front panel “Mic/Line” selector switches are set to “Line.” 24.
- Page 14 Currently, M-Audio’s FireWire drivers are not digitally signed. However, M-Audio is committed to providing the best possible drivers for our products and we constantly evaluate and test our drivers to ensure that they work properly.
- Page 15 After you’ve read the license agreement, please click the “I accept...” circle if you agree to the terms. Then click “Next” to continue. Click “Install” to continue.
- Page 16 The installer will prompt you to enable DVD/CD performance enhancement settings. In most cases, you should leave these in their default (selected) settings. While Windows is most likely already configured in this way, these settings will ensure that you will be able to hear your DVD/CD player’s playback through the FireWire 1814.
- Page 17 Once the installer has finished copying the files, you will see the Installation Complete screen. You will then be prompted to shut down your computer. Click “Finish” to proceed. After the computer has powered off, connect the FireWire 1814 to your computer’s FireWire port and power it on.
- Page 18 During the installation, you will be prompted with a message warning that the driver software has not passed Windows Logo testing. Select “Continue Anyway” and proceed with the installation. The New Hardware Wizard will run a second time to install the FireWire 1814 driver software.
- Page 19 You will again be prompted by the “Windows Logo testing” notice. Again, click “Continue Anyway” and proceed with the installation. Click “Finish” to complete the installation. Your FireWire 1814 is now ready to use.
- Page 20 You will see the M-Audio FireWire 1814 control panel icon in your system tray (lower right corner of your desktop). Click on the icon to open the control panel. Mac OS X Never connect or disconnect the FireWire 1814 while the computer is on. Also, if you’re going to use bus power, we recommend that you connect the FireWire cable before turning on the FireWire 1814’s power button.
- Page 21 5. The next screen is the release NOTEs. There are buttons to print or save at this point. When you are done reading them, click “Continue” to proceed. 6. The next screen displays the software license agreement. There are buttons to print or save this agreement.
- Page 22 7. Once you click “Continue,” a notice will appear asking you to agree or disagree. If you agree, then installation will proceed. If you choose to disagree, the installation will not proceed. 8. Select your OS X hard drive. Click "Continue."...
- Page 23 9. The next screen provides you with options for installing the Firewire 1814 driver. We recommend that you perform the Basic Installation. To do so, click “Install.” If you wish to customize your installation, click on the “Customize” button. 10. Enter your administrator name and password, and click “OK” to continue.
- Page 24 Once the FireWire 1814 is connected, turn the computer back on. 14. Once the operating system has loaded, go to "System Preferences" in the Apple Menu. Select the "Sound" preference panel, and click the "Output" tab. Select "M-Audio FireWire 1814" to choose the FireWire 1814 as your default output device.
- Page 25 1. Insert the Driver CD-ROM into your CD-ROM drive and open the CD-ROM to view its contents. Locate and open the “FireWire 1814” folder, then open the folder for OS 9. 2. Double click on the M-Audio FireWire 1814 Installer icon. 3. Click “Continue” in the Firewire 1814 splash screen.
- Page 26 4. The next screen displays the software license agreement. There are buttons to print or save this agreement. Read the agreement and select “Agree” if you wish to continue with the installation. 5. Select your install location, or just choose the default, OS 9 boot drive. Click “Choose.”...
- Page 27 8. Once the operating system is loaded, enter the Control Panel under the Apple Menu, and select “Sound.” Then select the “Output” tab. Click on M-Audio FireWire 1814 to select FireWire 1814 as your default audio device. First Time OMS Configuration Instructions...
- Page 28 Just click "Search." OMS begins searching. IMPORTANT: If the FireWire cable is not correctly connected to the FireWire 1814, setup will fail. 5. "OMS Driver Setup" shows the FireWire 1814 in a list when OMS successfully finds the driver. Click “OK.” OMS will now define (shows "Identifying") the FireWire 1814 output port.
- Page 29 8 Hardware Connections Audio ATTENTION: You must shut down your computer any time you wish to connect or disconnect the FireWire 1814 from the system. Failure to do so may cause damage to your computer’s or FireWire 1814’s FireWire ports. Connect the FireWire 1814’s Line Outputs 1 and 2 to your amplifier, powered monitors or mixer.
- Page 30 MIDI Connect your MIDI device’s MIDI Output to the FireWire 1814’s MIDI Input. Connect your MIDI device’s MIDI Input to the FireWire 1814’s MIDI Output. Shown in the illustration below is a MIDI controller keyboard plugged into the FireWire 1814’s MIDI input. A MIDI sound module is connected to the FireWire 1814’s MIDI output.
- Page 31 9 The Software Control Panel This section will explain the features of the FireWire 1814’s control panel. This device operates under the following three modes, based on the selected sample rate: 44.1kHz & 48kHz mode: All control panel descriptions below apply. 88.2kHz &...
- Page 32 Global Menus The following Control Panel features are available on all pages of the Control Panel: Mixer Settings – The reset button returns the Control Panel settings to their default values. These default values can be found in this manual’s section 14, “Default Mixer and Output Configuration.”...
- Page 33 you want to have a quick conversation without losing the groove, then return to your previous listening level. Mixer Page The mixer page provides output routing and control of the FireWire 1814’s analog inputs. There are up to twelve virtual channels returning from your Digital Audio Workstation software.
- Page 34 Mixer page (left scroll) – spdif sw rtn enabled Mixer page (right scroll) – spdif in, adat rtn enabled...
- Page 35 Mixer page (right scroll) – adat inputs enabled @ 44.1 kHz Mixer page display grayed out @ 88.2kHz and higher...
- Page 36 Software Returns – The mixer page provides up to twelve virtual audio “returns” from your audio application. These returns will appear in your audio program’s output assignment and mixer settings as available audio outputs. Most likely, you will control the software output monitor levels from your audio program’s mixer, and will want to keep the Control Panel mixer faders at their maximum level.
- Page 37 Panning - The input channel pairs also offer virtual pan pots. As with any typical mixer, the pan works in conjunction with the Output Routing assign buttons to enable you to route the signal as you wish. Ctrl button – When aux send is selected under the panel’s right-side level controller assignment, the ctrl button will appear under the aux output master channel faders.
- Page 38 Output page – adat bus enabled, aux grayed out @ 88.2kHz and higher Output page – spdif out enabled...
- Page 39 Output Channels – Virtual faders control the individual channel output levels. The output faders correspond to their respective analog hardware outputs. When the main/aux button is set to main, the Output Channel gets its signal from the bus assignments selected on the mixer page. (See “Main/Aux Button,” below.) Balance Controls –...
- Page 40 Headphone Source Assigns – You can monitor the FireWire 1814’s analog 1/2, 3/4, or aux output busses via the headphone outputs. Using the Headphone Source Assigns you can select any one of these three output buses to route to the headphones. Headphone Mute button - Selecting the mute button (the button turns red) will cause the headphone channels to cease audio output.
- Page 41 Hardware page – spdif coaxial input, adat output enabled Hardware page – spdif coaxial input, spdif outputs enabled...
- Page 42 Sample Rate Detected – This field displays the detected sample rate that is being received from the currently selected sync source. When the sync source is set to internal, the FireWire 1814 will detect and display the sampling rate as set by your audio software or your computer’s operating system via the IEEE 1394 (FireWire) bus.
- Page 43 Digital Port Selection – This field allows you to set up the input and output digital ports for either ADAT Optical or S/PDIF operation. The default setting is “adat” for both the input and output, and all of these channels will appear in the mixer and output pages of the Control Panel.
- Page 44 This information may be helpful if you ever have to update the driver software or need to call for technical support. Clicking the M-AUDIO logo in the lower right hand corner will link you directly to our website if you are currently online.
- Page 45 The following sections address a number of real-life situations that you may encounter while using your FireWire 1814. These brief tutorials should help guide you. Also check the M-Audio website from time to time for additional tutorials or FAQs. Setting Up Your Recording Levels Using the Mic/Inst Inputs –...
- Page 46 Using the Coaxial S/PDIF Input – Connect the coaxial S/PDIF output of your external digital audio device to the FireWire 1814’s rear panel coaxial (RCA) digital input. Make sure that spdif is selected as the input under the digital port selection, and that coaxial is selected for the spdif input port.
- Page 47 If your audio application supports ASIO Direct Monitoring, you can enable it in your audio software’s ASIO or audio control panel or setup page. Please refer to your audio software’s documentation for additional information. Also see the section above, “Direct Monitoring On/Off,”...
- Page 48 Open your audio software and the FireWire 1814 Control Panel. 1. In the FireWire 1814 Control Panel, click the mixer tab. (Let’s assume that we’re recording with the analog Line Inputs 1 and 2, and that we’re monitoring from the line outputs 1/2 in stereo.) Assign the analog in 1/2 channel output routing to bus 1/2, and bring up the channel’s faders until you begin to hear the source that is connected to the line inputs.
- Page 49 correct active spdif input (coaxial or optical) in the Control Panel’s hardware page. Refer to the hardware page description above. Setting the Sample Rate In most cases, you will want to set the sample rate from within your audio software. When the sync source in the hardware page of the FireWire 1814’s Control Panel is set to internal, it will receive the sample rate from your audio application.
- Page 50 to a mono instrument, set the aux output master channel’s pan knobs to <C>, or center panned (on the output page). As you play the synth, you should start to see level appear on the aux output master channel as you add level to aux L control on the analog 1 in. You should also start to see level appearing at the input of your effects unit, and hear the effect level at the FireWire 1814’s S/PDIF In.
- Page 51 Using the Level Controller Assignments The Level controller on the FireWire 1814’s front panel is a rotary encoder, and its function is completely software assignable from the FireWire 1814 Control Panel. When the Control Panel is first installed, the default setting for the Level controller is to control the Outputs—perfect for most of your monitoring needs.
- Page 52 altered), open your FireWire 1814 Control Panel and click the hardware tab. Clicking the “direct monitoring” radio button will change the momentary switch from a Headphone Source Selector to a Direct Monitoring On/Off switch. Now, the momentary switch will mute or unmute your FireWire 1814’s input channels. This is useful when you want to manually control the monitoring of your hardware inputs.
- Page 53 1. In the mixer page, sw rtn 1/2 is routed to output 1/2. This means that the tracks in your DJ program that are set to the “FireWire 1814 Analog Outs 1/2” will be heard from Line Outputs 1/2. Your main speakers are connected to Line Outputs 1/2. 2.
- Page 54 11 Troubleshooting The FireWire 1814 has been designed to give you high performance and professional quality audio. It has been tested under a wide range of systems and operating conditions. However, there are a virtually limitless number of operating scenarios, any of which could affect your system’s performance.
- Page 55 You might want to try using a larger buffer size. Larger buffer sizes can increase • input latency time, but if you’re mixing, for example, this is not an issue. Increasing the buffer size can be helpful, particularly in the case of older or lower-powered systems.
- Page 56 0820 00 731 Technical Support (email): support@m-audio-france.com Fax: 44 (0) 144 224 6832 Internet Home Page: http://www.maudio.co.uk M-AUDIO Deutschland (Germany) Kuhallmand 34, D-74613, Ohringen, Germany Sales Information: 49 7941 98 7000 Sales Information (email): info@m-audio.de Technical Support: 49 7941 98 70030 Technical Support (email): support@m-audio.de...
- Page 57 M-AUDIO Canada 1400 St-Jean Baptiste Ave., #150 Quebec City, QC G2E 5B7, Canada Tel: 418-872-0444 Fax: 418-872-0034 Email: midimancanada@m-audio.com Internet Home Page: http://www.m-audio.ca M-AUDIO Japan Annex Buliding 6F, 2-18-10 Marunouchi Naka-Ku, Nagoya 460-0002, Japan Tel: 81 52 218 3375 Fax:...
- Page 58 13 Product Specs All audio spec measured at 48kHz sample rate, unless otherwise stated: Line Inputs 1-8 (TS): Frequency Response +/- 0.1dB, 22Hz to 22kHz Dynamic Range 105dB, A-weighted Signal-to-Noise Ratio -105dB, A-weighted THD+N <0.00281% (-91dB) Crosstalk -107dB @ 1kHz Nominal Input Level -10dBV Maximum Input level...
- Page 59 Word Clock: Output up to 192kHz Input up to 96kHz Pass-through I/O up to 96kHz Impedance 75 Ohms Analog sampling rates: 44.1kHz-192kHz for analog input 1/2 and all analog outputs (44.1kHz-96kHz input on channels 3-8) Digital sampling rates (kHz): 44.1, 48, 88.2, & 96 for coaxial S/PDIF in and out 44.1 &...
- Page 60 14 Default Mixer and Output Configuration Settings mixer faders output faders output channels assignments “main” phones 1 & 2 sources sw rtn 1/2 & 3/4 routing to buses 1/2 & 3/4 spdif sw rtn hardwired to spdif out adat rtn bus hardwired to adat output bus aux send knobs turned all the way down...
- Page 61 15 Warranty Terms & Registration Terms M-Audio warrants products to be free from defects in materials and workmanship, under normal use and provided that the product is owned by the original, registered user. Visit www.m-audio.com/warranty for terms and limitations applying to your specific product.
Need help?
Do you have a question about the Firewire 1814 and is the answer not in the manual?
Questions and answers