Table of Contents
Advertisement
Quick Links
GV-R557OC-1GI/
GV-R557-1GH/
GV-R557D5-1GI
ATI Radeon
HD 5570 Graphics Accelerator
TM
User's Manual
Rev. 102
12MM-R557OGI-102R
Copyright
© 2010 GIGABYTE TECHNOLOGY CO., LTD
Copyright by GIGA-BYTE TECHNOLOGY CO., LTD. ("GBT"). No part of this manual may be reproduced or transmitted
in any form without the expressed, written permission of GBT.
Trademarks
Third-party brands and names are the properties of their respective owners.
Notice
Please do not remove any labels on this graphics card. Doing so may void the warranty of this card.
Due to rapid change in technology, some of the specifications might be out of date before publication of this this manual.
The author assumes no responsibility for any errors or omissions that may appear in this document nor does the author
make a commitment to update the information contained herein.
Rovi Product Notice:
This product incorporates copyright protection technology that is protected by U.S. patents and other intellectual property rights.
Use of this copyright protection technology must be authorized by Rovi Corporation, and is intended for home and other limited
viewing uses only unless otherwise authorized by Rovi Corporation. Reverse engineering or disassembly is prohibited.
Advertisement
Table of Contents

Related Manuals for Gigabyte GV-R555D5-1GI


Summary of Contents for Gigabyte GV-R555D5-1GI
- Page 1 User's Manual Rev. 102 12MM-R557OGI-102R Copyright © 2010 GIGABYTE TECHNOLOGY CO., LTD Copyright by GIGA-BYTE TECHNOLOGY CO., LTD. ("GBT"). No part of this manual may be reproduced or transmitted in any form without the expressed, written permission of GBT. Trademarks Third-party brands and names are the properties of their respective owners.
-
Page 4: Table Of Contents
Table of Contents 1. Introduction ........................ 5 1.1. Features ......................... 5 1.2. Minimum System Requirements ..................5 2. Hardware Installation ....................6 2.1. Board Layout ......................... 6 2.2. Hardware Installation ....................10 3. Software Installation ....................11 3.1. Driver and Utility Installation ..................11 3.1.1. -
Page 5: Introduction
1. Introduction 1.1. Features • Powered by ATI Radeon HD 5570 Graphics Processing Unit (GPU) • Supports PCI Express 2.1 • Integrated with 1 GB GDDR5 memory (For GV-R557D5-1GI only) • Integrated with 1 GB DDR3 memory (For GV-R557OC-1GI/GV-R557-1GH only) •... -
Page 6: Hardware Installation
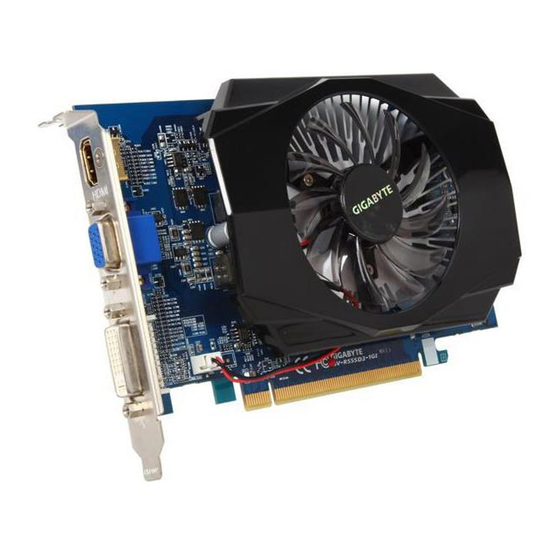
2. Hardware Installation 2.1. Board Layout 1. GV-R557D5-1GI HDMI Connector D-Sub monitor Connector (15-pin) DVI-I Connector HDMI HDMI TV Connector HDMI TV D-Sub monitor D-Sub Output Connector (15-pin) Analog LCD Monitor Analog CRT Monitor DVI-I DVI Output Connector Digital LCD Monitor D-Sub DVI-I to D-Sub Output... - Page 7 2. GV-R557OC-1GI HDMI Connector D-Sub monitor Connector (15-pin) DVI-I Connector HDMI HDMI TV Connector HDMI TV D-Sub monitor D-Sub Output Connector (15-pin) Analog LCD Monitor Analog CRT Monitor DVI-I DVI Output Connector Digital LCD Monitor D-Sub DVI-I to D-Sub Output Adapter Analog LCD Monitor Analog Monitor...
- Page 8 3. GV-R557-1GH D-Sub monitor Connector (15-pin) DVI-I Connector D-Sub monitor D-Sub Output Connector (15-pin) Analog LCD Monitor Analog CRT Monitor DVI-I DVI Output Connector Digital LCD Monitor D-Sub DVI-I to D-Sub Output Adapter Analog LCD Monitor Analog Monitor GV-R557 Series Graphics Accelerator - 8 -...
- Page 9 DO NOT APPLY POWER TO YOUR SYSTEM IF THE GRAPHICS CARD IS DAMAGED. In order to ensure that your graphics card can work correctly, please use official GIGABYTE BIOS only. Using non-official GIGABYTE BIOS might cause problem(s) on the graphics card. - 9 -...
-
Page 10: Hardware Installation
2.2. Hardware Installation Now that you have prepared your computer, you are ready to install your graphics card. Step 1. Locate the PCI Express x16 slot. If necessary, remove the metal cover from this slot; then align your graphics card with the PCI Express x16 slot, and press it in firmly until the card is fully seated. -
Page 11: Software Installation
3. Software Installation Notice the following guidelines before installing the drivers: 1. First make sure your system has installed DirectX 9 or later version. 2. Make sure your system has installed the appropriate motherboard drivers (for the motherboard drivers, please contact the motherboard manufacturer.) 3.1. - Page 12 Step 5: Click the Accept button. Setp 4: Click the Express or Custom icon and then click Next. Step 6: The system is installing the components. Click the Finish button to restart the computer. Then the driver installation is completed. GV-R557 Series Graphics Accelerator - 12 -...
-
Page 13: Taskbar Icon
3.2. Taskbar Icon After installation of the display driver, you will find an ATI icon in the notification area. Right-click the icon to enter the ATI Catalyst Control Center. The ATI Catalyst Control Center is used to configure all your graphics card settings. Right-click the ATI icon to enter the ATI Catalyst Control Center. - Page 14 Configuring Audio Output Configure the default audio output device based upon your needs. Step 1: Go to Start > Control Panel > Hardware and Sound > Manage audio devices. Figure 2 Figure 1 Figure 3 Step 2: In the Manage audio devices dialog box, click the Playback tab. Using the picture to the left as the example, to set HDMI audio to be the default Sound Playback device, select Digital Output Device (HDMI).
-
Page 15: Display Properties
3.3. Display Properties Pages Display Settings (Resolutions and Color Quality for Windows) To access Display Settings page, right-click on desktop and select Personalize, then the Personalization windows will show up. Select Display Settings to adjust the screen resolution and color quality settings. You can move the slider to change the resolution. -
Page 16: Avivo Video Converter
ATI Catalyst Control Center Basic View : ® The Basic View is the default view when ATI Catalyst Control Center is launched for the first time. This interface provides access to the basic settings and advanced features of your ATI graphics products. You can switch between Basic View and Advanced View at any time. - Page 17 Step 4: The video file has been successfully converted. In the Output Video Format list, select a file format for the new file. If you wish to change the name of the new file, enter the new name in the Output File area.
-
Page 18: Information Center
Quick Settings: The Quick Settings page provides access to three main settings. 3D Quality 3D Performance and Quality Settings allows your 3D games and applications to get faster perfor- mance and better quality with a more balanced setting. Video Playback Use this option to optimize video playback in different room environment or to select how video playback appears on the second display. - Page 19 ATI Catalyst Control Center Advanced View The Advanced page allows you to configure all of the many available settings of your ATI graphics card. View Properties: The CATALYST Control Center dashboard supports three types of views. Hotkeys Properties: The Hotkeys Manager allows you to create shortcut key combinations to quickly perform tasks such as changing a graphics setting or opening an application.
- Page 20 Profiles Properties: You can use profiles to create customized environments for your desktop, video, and 3D applications. Define and save your own personal video settings that can be quickly activated manually, through a Hotkey, or by file association. Note: A profile applies to a specific graphics card. If there is more than one graphics card installed in your computer, you need to select the appropriate card before creating, loading, or activating a Profile.
- Page 21 Help Properties: The Catalyst Control Center Help feature allows you to access the comprehensive online help, register your product, or generate a problem report should you require technical support. The Catalyst Control Center Help feature offers the following options: Help for this Page Help Contents ...
-
Page 22: Display Options
Desktop Properties: Use Desktop Properties to change your desktop setup. Mode Use Mode to set up desktop area,color quality, Refresh rate and Rotation. Color Adjust the overall richness of color by using the Gamma control. To adjust the overall bright- ness use the Brightness control, and the over- all contrast use the Contrast control. - Page 23 Standard Settings The Standard Settings page provides access to a universal slider control where you can simulta- neously adjust all of the standard 3D settings for any type of 3D application. The slider enables you to adjust for overall system performance, overall 3D image quality, or a balance between the two.
- Page 24 Anisotropic Filtering Anisotropic Filtering is a technique that preserves detail on surfaces that have three-dimensional per- spective and fade away into the background. It works best when used in conjunction with Mipmapping. Anisotropic Filtering can be set to favor either an increase in system processing performance or im- proved image quality: •...
- Page 25 All Settings The All Settings page combines all of the princi- pal 3D features onto a single page, without any preview window, allowing for quick access and adjustment. This page is useful when it is not necessary to preview the adjusted settings be- cause the effect is already known or understood.
-
Page 26: Avivo Video
Avivo Video: Presets To quickly adjust your video settings choose one of the video presets. Note: These settings will only affect applications with video overlay support. Basic Color Use the Avivo Color: Basic option to manually set Gamma, Brightness, Contrast, Saturation, and Tint for video playback. - Page 27 Basic Quality You can control the deinterlacing settings by checking the Use automatic deinterlacing item. The bar determines how the two inter- laced video fields are converted into a non- interlaced form. Note: These settings will only affect applications with video overlay support.
-
Page 28: Troubleshooting Tips
4. Troubleshooting Tips The following troubleshooting tips may help if you experience problems. Contact your dealer or GIGABYTE for more advanced troubleshooting information. Check that the card is seated properly in the PCI Express x16 slot. Ensure that the display cable is securely fastened to the card's display connector. -
Page 29: Appendix
5. Appendix 5.1. Resolutions and Color Depth Tables Radeon HD 5570 Series 2D Single Display Modes Display Refresh Color Depth (bpp) Screen Rate 8bpp(256 color) 16bpp(65K color) 32bpp(16.7M) Resolution (Hz) Standard mode High mode True mode 640 x 480 800 x 600 1024 x 768 1152 x 864 1280 x 768... -
Page 30: Regulatory Statements
"end of life" product. Restriction of Hazardous Substances (RoHS) Directive Statement GIGABYTE products have not intended to add and safe from hazardous substances (Cd, Pb, Hg, Cr+6, PBDE and PBB). The parts and components have been carefully selected to meet RoHS requirement. - Page 31 Finally, we suggest that you practice other environmentally friendly actions by understanding and using the energy-saving features of this product (where applicable), recycling the inner and outer packaging (including shipping containers) this product was delivered in, and by disposing of or recycling used batteries properly.
- Page 32 GV-R557 Series Graphics Accelerator - 32 -...
Need help?
Do you have a question about the GV-R555D5-1GI and is the answer not in the manual?
Questions and answers