Optoma Pico PK320 User Manual
Pico pocket projector
Hide thumbs
Also See for Pico PK320:
- Quick start manual (7 pages) ,
- Specifications (4 pages) ,
- Service manual (51 pages)
Table of Contents
Advertisement
Advertisement
Table of Contents

Related Manuals for Optoma Pico PK320


Summary of Contents for Optoma Pico PK320
- Page 1 ocket rojector anUal...
-
Page 2: I Mportant S Afety I
mportant afety nStructIon 1. Do not block any ventilation openings. 19. Only use attachments/accessories CLASS 1 LED PRODUCT To ensure reliable operation of the specified by the manufacturer. projector and to protect from over 20. Do not use the unit if it has been heating, it is recommended to install physically damaged or abused. -
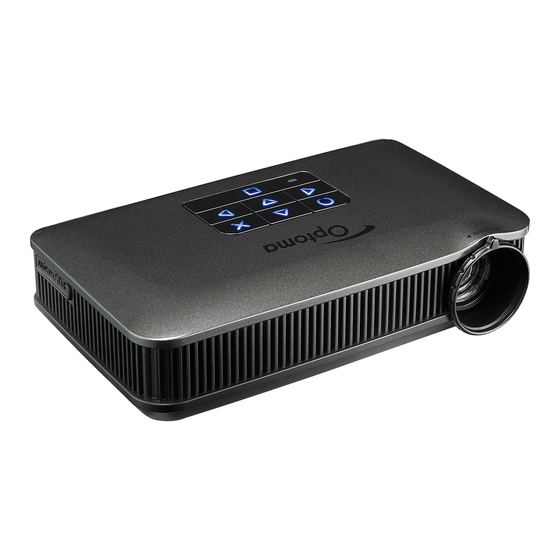
Page 3: Product Overview
roDuct roDuct vervIeW vervIeW 1. Lens 2. Right Button ( ) 3. Cancel / ESC Button ( ) 4. Up Button ( ) 5. OK Button ( ) 6. Left Button ( ) 7. Focus Dial 8. Down Button ( ) 9. -
Page 4: Charge The Battery
harge the attery oWer When the LED indicator lights red, Press the Power button to turn the the battery is low. Replace the battery projector on or off. immediately or connect the power adapter to charge the battery. For first time use, the Language screen appears. 1. - Page 5 SD c onnect omputer for ranSfer nSert ource Icro You can transfer data to the projector By default, the projector displays from internal memory or the microSD the internal memory. However if a card. microSD card is inserted, the projector reads from the microSD card first. 1. If turned on, turn off the projector. 2.
-
Page 6: How To Use The Menu
oW to Se the Enter Office Viewer menu Enter Music menu • Press the corresponding button of the desired option. • Press to go back a previous screen. Enter Video menu Enter Photo menu <Note> Select input Enter Setup menu A button guide appears on the lower left corner of most screens (see below). The guide source signal varies depending on the current mode. Press the corresponding button to select the option or Return to the Home operation. - Page 7 SD c oW to IDeoS ource nternal emory Icro xternal ource Playing Videos from the Internal Memory, MicroSD Card, or External Source If an external source (USB) is inserted, the external memory is read first. If you want to read data from the microSD card or internal memory, press in the appropriate screen to change the data source.
-
Page 8: Ideo S Ettings
oW to IDeoS IDeo layBacK <Note> The button guide disappears when the keypad is not used for 3 seconds. To display the button guide, press any key except or . Repeat Icons Rewind Repeat all Adjust volume Back to previous Repeat current video screen Pause/Play Repeat off Return to Home menu Fast forward... - Page 9 SD c oW to uSIc ource nternal emory Icro xternal ource Playing Music from the Internal Memory, MicroSD Card, or External Source If an external source (USB) is inserted, the external memory is read first. If you want to read data from the microSD card or internal memory, press in the appropriate screen to change the data source.
-
Page 10: Music Settings
oW to uSIc layBacK <Note> The button guide disappears when the keypad is not used for 3 seconds. To display the button guide, press any key except or . Summer Unknow Unknow Next Song: Rainbow.mp3 Repeat / Shuffle Icons Repeat all Back to previous Adjust volume screen Repeat current music Repeat off... - Page 11 SD c oW to hotoS ource nternal emory Icro xternal ource Viewing Photos from the Internal Memory, MicroSD Card, or External Source If an external source (USB) is inserted, the external memory is read first. If you want to read data from the microSD card or internal memory, press in the appropriate screen to change the select Data source...
- Page 12 oW to hotoS creen <Note> The button guide disappears when the keypad is not used for 3 seconds. To display the button guide, press any key except or . Play slideshow Rotate 90° clockwise Rotate 90° Next photo counter-clockwise Previous photo Return to Home menu oW to hotoS...
- Page 13 lIDeShoW ettIngS select "setup" select "slideshow" Adjust settings Video Music Photo Video Setting Music Setting Back Timer Background Music Back Slide Show Setup Input Office Viewer Setup Display Setting Slideshow System Press matched symbol to enter specific function directly Timer: 2-second interval Timer: 5-second interval...
-
Page 14: View File
SD c oW to ocumentS ource nternal emory Icro xternal ource Viewing Documents from the Internal Memory, MicroSD Card, or External Source If an external source (USB) is inserted, the external memory is read first. If you want to read data from the microSD card or internal memory, press in the appropriate screen to change the data source. -
Page 15: Display Settings
oW to ocumentS <Note> The button guide disappears when the keypad is not used for 3 seconds. To display the button guide, press any key except or . Zoom in 1x ~ 4x Move left Page up Move right Page down Exit View mode Pan up, down, Return to Home menu... -
Page 16: S Elect M Enu L Anguage
elect anguage select "setup" select "system" select "Language" Video Music Photo Video Setting Music Setting Back Language Information Back Setup System Input Office Viewer Setup Firmware Update Reset Display Setting Slideshow System Press matched symbol to enter specific function directly select Language Confirm language / Return to Home menu... -
Page 17: Upgrade Firmware
IrmWare Software updates can be obtained from the OPTOMA website (www.optoma.com www.optoma.eu /www.optoma.com.tw). 1. On your computer, create a folder named "upgrade". 2. Download the latest firmware from www.optoma.com and save it in the "upgrade" folder. 3. Copy the "upgrade" folder to the root folder of the microSD card. 4. Insert the microSD card into the microSD card slot of the projector. - Page 18 eSet the yStem Resetting the System by Reset Menu <Note> When the system is reset, all files stored in the internal memory will be deleted. Ensure all files are backed up before resetting. select "setup" select "system" Video Music Photo Video Setting Music Setting Back Setup Input Office Viewer Setup Display Setting Slideshow System Press matched symbol to enter specific function directly Confirm Reset select "Reset"...
-
Page 19: Select Input Source
: vga / c av / hDmI oW to xternal nput ource ompoSIte Selecting Input Source Manually If more than one external devices are connected to the projector or the projector cannot automatically detect the external device. You have to manually select the input source. To do this, perform the following steps below. Select Input Source select "input" select input source Video Video Music Photo... - Page 20 nput ource ettIngS Changing Aspect Ratio Settings Display View source Content button guide select "Aspect Ratio" scroll Aspect Ratio setting Display mode 16:9 16:9 Scroll option Confirm setting <Note> When no key is pressed within 10 seconds, the Scroll option aspect ratio icon automatically disappears and its setting is applied.
-
Page 21: I Nput S Ource S Ettings
nput ource ettIngS Adjusting Brightness Settings View source Content Display button guide select "settings" select "Brightness" Display mode Adjust setting Exit brightness settings Scroll other settings: Contrast, Sharpness, Color Mode, LED Mode, Brightness Return to Home menu <Note> When no key is pressed within 10 seconds, the brightness icon automatically disappears and its setting is applied. - Page 22 nput ource ettIngS Selecting Color Mode Settings Display View source Content button guide select "settings" select "Color Mode" Display mode Adjust setting Exit color mode settings Scroll other settings: LED Mode, Brightness, Contrast, Sharpness, Color, LED Return to Home menu Color Mode settings Extended: Use to project more <Note>...
-
Page 23: Troubleshooting
oW to ploaD IleS to nternal emory When a computer is connected via USB, the projector automatically detects the connection and the message below appears on screen. Upload Files by Computer Confirm Transfer Unplug the UsB Cable Video Music Photo Input Office Viewer Setup Returns to the previous screen <Note> Press matched symbol to enter specific function directly Displayed screen varies depending on the last session. - Page 24 eDIa pecS efInItIonS eDIa pecS IDeo ontaInerS Video Containers Term Description Video Audio or Speech Video Audio or Speech HE-AAC Container Container Decoder Decoder Decoder Decoder HE-AAC HE-AAC H.263 HE-AAC H.263 AMR-NB HE-AAC H.264 AMR-NB .3gp H.264 PCM/G.711 MJPEG AMR-WB .mov MJPEG G.726...
-
Page 25: C Opyright / T Rademark
Clause for Office / Document Viewer Copyright © Optoma Company Other brands or logos are trademarks Limited. or registered trademarks of their The End User may not: All rights reserved. respective companies. • make copies of the Picsel Products or make them available for use by third Optoma reserves the right to make parties. technical changes. Optoma assumes This device is not intended for use in • reverse engineer, disassemble, reverse...
Need help?
Do you have a question about the Pico PK320 and is the answer not in the manual?
Questions and answers