Table of Contents
Advertisement
Quick Links
Advertisement
Chapters
Table of Contents

Related Manuals for Western Digital WDBABZ0010BBK-NESN


Summary of Contents for Western Digital WDBABZ0010BBK-NESN
- Page 1 WD TV ® Live Hub ™ Media Center User Manual...
-
Page 2: Table Of Contents
Table of Contents Important User Information ....1 Important Safety Instructions ......1 ®... - Page 3 Playing Music ......49 Music Playback ........49 Music Menu Options .
- Page 4 Flingo..........118 Flixster .
- Page 5 System Maintenance ..... . . 203 System Firmware Upgrade......203 Troubleshooting .
-
Page 6: Important User Information
WD TV Live Hub Media Center User Manual Important User Information Important Safety Instructions This device is designed and manufactured to assure personal safety. Improper use can result in electric shock or fire hazard. The safeguards incorporated into this unit will protect you if you observe the following procedures for installation, use, and servicing. -
Page 7: Wd Service And Support
WD TV Live Hub Media Center User Manual Service and Support ® Should you encounter any problem, please give us an opportunity to address it before returning this product. Most technical support questions can be answered through our knowledge base or e-mail support service at http://support.wdc.com. If the answer is not available or, if you prefer, please contact WD at the best telephone number shown below. -
Page 8: Recording Your Wd Product Information
WD TV Live Hub Media Center User Manual Recording Your WD Product Information In the following table, write the serial and model numbers of your new WD product. You can find this information on the label on the bottom of the device. You should also note the date of purchase. -
Page 9: Product Overview
WD TV Live Hub Media Center User Manual Product Overview Thank you for purchasing a WD TV Live Hub Media Center. This user manual provides step-by-step instructions for installing and using your new media center. For the latest WD product information and news, visit our website at www.westerndigital.com. - Page 10 WD TV Live Hub Media Center User Manual Transfer files easily – Copy, move or delete files stored on a USB drive, a network drive, your camcorder, or a camera to the Live Hub built-in drive using the on-screen menus. It’s a multi-room media server streaming to any TV in your house –...
-
Page 11: Features And Functions
WD TV Live Hub Media Center User Manual Features and Functions Features Menus Your media is organized, categorized and ready to play – The WD TV Live Hub media center finds and categorizes all the media on the built-in drive and any connected USB drives and displays it in one easy-to-view menu system. -
Page 12: Connections
WD TV Live Hub Media Center User Manual Video output resolution includes 480i, 576i, 480p, 576p, 720i, 720p, 1080i, 1080p. Stereo or multi-channel digital surround audio output (digital surround sound is only available when using the HDMI or S/PDIF interfaces). Wired or wireless Internet connection for access to online media content. -
Page 13: Power Button And Led Indicator
WD TV Live Hub Media Center User Manual Power Button and LED Indicator Item Component Description Power button • When power LED is on: Press the power button to power down the media center. The internal drive is put in sleep mode and other devices can still access it. -
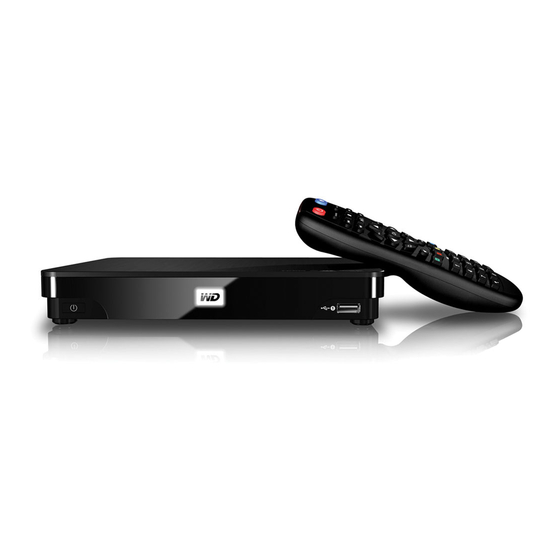
Page 14: Remote Control
WD TV Live Hub Media Center User Manual Remote Control CAUTION: Do not expose the batteries or the remote control with batteries installed to excessive heat (direct sunlight, fire, etc.). 1. Infrared transmitter POWER 3. Subtitle 4. PREV (track), STOP, NEXT (track) 5. -
Page 15: Getting Started
WD TV Live Hub Media Center User Manual Getting Started Package Contents WD TV Live Hub Media Center Remote control and Two AAA batteries AC power adapter Quick Install Guide Installation Requirements Standard or HDTV with a composite (standard A/V), component (YPbPr), or HDMI input An available network connection for online content and services Optional: TV, stereo, or AV receiver with an optical digital (S/PDIF) or stereo audio... -
Page 16: Installation Procedure
WD TV Live Hub Media Center User Manual Installation Procedure The media center installation procedure is outlined below: 1. Connect the power cable. 2. Establish a network connection. 3. Transfer content from your computer to the media center. 4. Connect the media center to your TV or entertainment unit through the desired interface option. - Page 17 WD TV Live Hub Media Center User Manual Step 2 - Connecting the Media Center The following figures illustrate the cable connections supported by the media center. The standard connection uses the included composite-to-mini AV cables. Note: HDMI and S/PDIF (optical) cables are sold separately. Important: Configure the media center’s Audio/Video settings depending on the type of connection you choose.
- Page 18 WD TV Live Hub Media Center User Manual HDMI Video and Audio (High-Definition) HDMI combines high-definition video, multi-channel audio, and inter-component control in a single digital cable. This interface provides video quality resolution of up to 1080p. To connect your media center using an HDMI cable: 1.
- Page 19 WD TV Live Hub Media Center User Manual Component Video and Audio (High Definition) The component connection only provides video signals. You will also need to connect the composite audio cables to provide sound. This interface provides video quality resolution of up to 1080i. To connect your media center using component and audio cables: 1.
- Page 20 WD TV Live Hub Media Center User Manual Composite AV Connection (Standard Definition) To use a composite connection: 1. Plug the composite connectors into the composite jacks on the media center. 2. Plug the opposite ends into the composite input ports on your TV, yellow to yellow, red to red, and white to white.
- Page 21 WD TV Live Hub Media Center User Manual Home Theater (High-Definition) To connect a home theater system using HDMI: 1. Plug an HDMI cable into the HDMI connector on the media center. 2. Plug the opposite end into the HDMI In port on your A/V receiver. 3.
- Page 22 WD TV Live Hub Media Center User Manual Step 3 - Connecting to Your Network The media center can be connected to your home network so you can transfer files back and forth from your networked computer to the media center, and access the Internet and network storage using a wired or wireless network connection.
- Page 23 WD TV Live Hub Media Center User Manual Step 3 - Loading Content On Your Media Center Transfer your favorite content from your computer to your media center. You can also transfer files from your media center to your computer. 1.
- Page 24 WD TV Live Hub Media Center User Manual 7. Click Map Drive. 8. Click OK. 9. Close the WD Link Tool. 10. Click or Start and then (My) Computer. The media center root displays. You can now drag and drop files and folders into the media center’s internal hard drive using (My) Computer or Windows Explorer.
- Page 25 WD TV Live Hub Media Center User Manual 3. Mac OS X Leopard/Snow Leopard: Click the WDTVLiveHub icon under SHARED. 4. Drag and drop your media files from your computer to the media center or from the media center to your computer. GETTING STARTED –...
- Page 26 WD TV Live Hub Media Center User Manual Step 5 - Connecting a USB Device (Optional) The media center has two USB ports that support playback from WD USB external drives.* * For a list of supported WD external drives, see article #5688 in or knowledge base at http://support.wdc.com.
- Page 27 WD TV Live Hub Media Center User Manual To unlock a locked WD USB device: A USB device must be unlocked for the media center to access its contents. 1. Navigate to the Home screen, and select the menu for the media content you wish to access.
-
Page 28: Operating The Media Center
WD TV Live Hub Media Center User Manual Operating the Media Center Using the Remote Control The media center’s ergonomic remote control lets you navigate the Home screen, browse for media files, enable playback options, and customize the system settings. The infrared sensor detects signals from the remote. -
Page 29: Using A Usb Keyboard
WD TV Live Hub Media Center User Manual Button Function EJECT Switches to safe mode so you can safely remove a USB device. MUTE Turns off the volume output Subtitle Switches a video’s subtitles (if applicable) Audio Switches a video’s audio stream (if applicable) Setup Brings up the Setup menu Alpha-numeric... - Page 30 WD TV Live Hub Media Center User Manual Key or key Function sequence • Press once to jump to the start of the audio/video file. P (Previous) • Press twice to jump to the previous audio/video/image file. • Press to page up. •...
-
Page 31: Using The Media Center Menu
WD TV Live Hub Media Center User Manual Using the Media Center Menu The Home screen displays when turn on your media center or press HOME on the remote control. The menu options in this screen let you browse your media library and configure the media center’s settings. - Page 32 WD TV Live Hub Media Center User Manual Home Screen Navigation Use the following keys to navigate through the menu screens. Button Function Move from one option to the next Left/Right arrows View the dashboard Down arrow Launches your selection Media Center Dashboard Press at the home screen or navigate to...
- Page 33 WD TV Live Hub Media Center User Manual Press Use the navigation buttons, then press OK in the dashboard to display your media files by the following categories: Favorites (see “Favorite” on page 39) New Items (displays media files you have added within a certain date range. See “Show New Items”...
-
Page 34: Media Library Compilation
WD TV Live Hub Media Center User Manual Dashboard Options With a file selected in any of the dashboard categories, press Options. Dashboard Options - Favorites Dashboard Options - Last 30 Days or Recently Viewed Dashboard Options - Queue Use the navigation buttons to select from the following options, then press Add to Queue (when a file in Favorites, Last 30 Days, or Recently Viewed is selected - see “Add to Queue”... - Page 35 WD TV Live Hub Media Center User Manual Media Library Compilation Exemptions The following conditions will prevent the media library compilation process. The USB device has read-only protection. There is not enough storage space on the media center, network attached storage, or USB device.
-
Page 36: Locating Your Contents On The Drive
WD TV Live Hub Media Center User Manual Media Type Category Description Video All Video Displays a list of all video files arranged in alphabetical order. Date Content is organized by date modified. Folders Contents are displayed in video file folders. Recent Displays a list of video folders/files that have been played recently. -
Page 37: Search Function
WD TV Live Hub Media Center User Manual To add an external thumbnail: With an individual file or music album selected, press Options, then select Get Content Info (see “Get Content Info” on page 38). As an alternative, or if the database did not find any info: 1. - Page 38 WD TV Live Hub Media Center User Manual 3. Select Title, Director, or Actor (Videos); Title, File Name, Album or Artist (Music); or Title (Photos). Press OK, then to select the . Press OK. Search Options - Videos Search Options - Music Search Options - Photos 4.
- Page 39 WD TV Live Hub Media Center User Manual 5. Using the on-screen keyboard: Use the navigation buttons to select a character, then press OK to input it in the search bar. Alternatives to this method are as follows: - Use the alpha-numeric keys on the remote control to enter search terms. For example, press the 2 button a number of times to enter a, b, or c;...
- Page 40 WD TV Live Hub Media Center User Manual If media files matching the search parameters you set are found, they will be listed as shown below (the result of entering ‘bea’ in Photos). Use the navigation buttons to select the media file you are looking for, and then press OK or to initiate playback.
-
Page 41: Watching Video
WD TV Live Hub Media Center User Manual Watching Video You can watch videos on your TV using the media center. Supported Video Formats The following video file formats are supported. AVI (Xvid, AVC, MPEG1/2/4) MPG/MPEG VOB/ISO MKV (h.264, x.264, AVC, MPEG1/2/4) TS/TP/M2T (MPEG1/2/4, AVC, VC-1) MP4/MOV (MPEG4, h.264) M2TS... - Page 42 WD TV Live Hub Media Center User Manual If Media Library is enabled, you can choose to navigate using sorting (Alphabetical, Date, Ratings, Recently Viewed) and filter options (All Video, Genre, Playlists, Folder, Favorites) See “Supported Categories for Media Library Compilation”...
-
Page 43: Videos Menu Options
WD TV Live Hub Media Center User Manual Sorting 1. Press or navigate to the sort and filter content icon , and press OK. 2. Press , then to select Sorting by Date, Alphabetically, by Ratings, or by Recently Viewed. Press OK to display videos by the criteria selected in either ascending (arrow up) or descending (arrow down) order. - Page 44 WD TV Live Hub Media Center User Manual If a No Content Info Found message displays, navigate to the keyboard icon then press OK. Enter the whole title or a portion of the title using the on-screen keyboard, select Submit, then press OK to associate info with the content. Select a title from the list, then press OK.
- Page 45 WD TV Live Hub Media Center User Manual Move & Copy 1. Press and select Move or Copy from the list of options, then press OK. 2. Select a storage destination for the file you want to move or copy, then press 3.
- Page 46 WD TV Live Hub Media Center User Manual 3. The screen below displays. Press OK to select “Don’t ask me again!” if you do not want this screen to appear again, then press to select the green check mark . Press OK. Select Multiple Select multiple files then press Options to apply changes to more than file.
-
Page 47: Video Playback Controls
WD TV Live Hub Media Center User Manual Video Playback Controls Use these buttons on the remote control to control video playback: Button Function STOP Discontinues video playback PAUSE/PLAY Pauses or resumes video playback 1. Press FF (fast forward) or REV Scans the video playback forward or backward (reverse) to scan video (press repeatedly to select the scan speed) -
Page 48: Video Playback Options
WD TV Live Hub Media Center User Manual Video Playback Options To display the video playback options while playing a video, press Options. To return to the video, press Back. Get Content Info See “Get Content Info” on page 38. View Chapter If you are viewing a multichapter video file, you can select which chapter to play. - Page 49 WD TV Live Hub Media Center User Manual To view subtitles: 1. During video playback, press Subtitle repeatedly until your desired subtitles display or “Subtitle Off” appears. Or, press Options, highlight Subtitles, then press OK and follow the steps below. 2.
- Page 50 WD TV Live Hub Media Center User Manual Repeat All – All the video files in the current video folder are played in sequence and repeatedly until you press STOP or Back. Repeat One – The current video file is played repeatedly until you press STOP or Back.
- Page 51 WD TV Live Hub Media Center User Manual Displaying the Video Playback Panel Use this option to display the Video Playback Panel on the bottom of the screen. This panel shows the following information about the current video: Elapsed and total Video playback progress bar playback times To view the Video Playback Panel:...
-
Page 52: Dvd Navigation
WD TV Live Hub Media Center User Manual DVD Navigation In most cases, when the contents of an entire DVD have been successfully saved and stored in the media center’s internal drive or on an attached USB hard drive or a networked hard drive connected to the media center, you will experience the same DVD menu navigation functionality using the buttons on the media center remote as you would using a DVD remote for a DVD player connected to a television. - Page 53 WD TV Live Hub Media Center User Manual Button Function • At the main menu, move between selections such Left arrow as Play Movie, Scene Selection, Set Up, Special Features, etc. • Reduce subtitle display speed during video playback. • At the main menu, move between selections such Right arrow as Play Movie, Scene Selection, Set Up, Special Features, etc.
-
Page 54: Playing Music
WD TV Live Hub Media Center User Manual Playing Music You can listen to audio files on your TV/audio system using the media center. Supported Audio Formats WAV/PCM/LPCM FLAC AIF/AIFF Dolby Digital Plus Music Playback 1. Navigate to the Home | Music menu, then press OK. 2. - Page 55 WD TV Live Hub Media Center User Manual Genre, Artist, Album, Playlists, Favorites) See “Supported Categories for Media Library Compilation” on page 30 for details. 3. Locate the audio file you want to play. To begin playback of a single audio file, highlight the file, then press OK. To begin playback of an album, highlight the album, then press OK.
-
Page 56: Music Menu Options
WD TV Live Hub Media Center User Manual Sorting 1. Press or navigate to the sort and filter content icon , and press OK. 2. Press , then to select Sorting by Date, Alphabetically, Ratings, or by Recently Viewed. Press OK to display music by the criteria selected in either ascending (arrow up) or descending (arrow down) order. - Page 57 WD TV Live Hub Media Center User Manual Favorite The Music favorite function is the same as the Videos favorite function. See “Favorite” on page 39. Rate The Music rate function is the same as the Videos rate function. See “Rate” on page 39.
-
Page 58: Music Playback Controls
WD TV Live Hub Media Center User Manual Music Playback Controls Use these buttons on the remote control to control music playback when in the music playback screen: Button Function STOP Stop audio playback PAUSE/PLAY Pause or resume audio playback 1. -
Page 59: Music Playback Options
WD TV Live Hub Media Center User Manual Music Playback Screen The music playback screen displays the following information about the currently playing album and/or audio file: Album art (if available) Album name Audio filename(s) Track number/ total tracks Elapsed time and total playback time Artist... - Page 60 WD TV Live Hub Media Center User Manual Get Content Info The Music get content info function is the same as the Videos get content info function. See “Get Content Info” on page 38. Rescan Info The Music rescan info function is the same as the Videos rescan info function. See “Rescan Info”...
-
Page 61: Playing Music From Your Ipod
WD TV Live Hub Media Center User Manual Shuffle Use this option to set the audio tracks in the current music folder/playlist to play in random order. To enable music shuffle mode: 1. During music playback, press Options. 2. Select Play Mode, then press OK repeatedly until the repeat icon you want is displayed. -
Page 62: Viewing Photos
WD TV Live Hub Media Center User Manual Viewing Photos You can view your digital photos both individually and in slideshow mode on your TV using the media center. Supported Image File Formats GIF (Animated GIFs are not supported) BMP (non-compressed) JPEG (grayscale, RGB, YCbCy) (does not support CMYK or YCCK) TIF/TIFF (RGB) (does not support CMYK, YMC, YMCK, or KCMY) PNG (Non-alpha channel only) - Page 63 WD TV Live Hub Media Center User Manual Date, Folders, Recent). See “Supported Categories for Media Library Compilation” on page 30 for details. 4. Locate the picture file you want to view. To open a single picture file for viewing, select the file, and then press OK. To view the next picture file in the photo folder, press (next).
-
Page 64: Digital Camera Support
WD TV Live Hub Media Center User Manual Sorting 1. Press or navigate to the sort and filter content icon , and press OK. 2. Press , then to select Sorting by Date, Alphabetically, Ratings, or by Recently Viewed. Press OK to display photos by the criteria selected in either ascending (arrow up) or descending (arrow down) order. -
Page 65: Photos Menu Options
WD TV Live Hub Media Center User Manual Photos Menu Options In the main photo screen, press Options. The Photos menu options display. Press Back when complete to return to the main menu. Add to Queue The Photos add to queue function is the same as the Videos add to queue function. See “Add to Queue”... - Page 66 WD TV Live Hub Media Center User Manual 3. The screen below displays. Press OK. Set as Background You can set any photo as the system background to replace the default grass field and sunny sky photo or other photo you have previously selected. 1.
-
Page 67: Photo Display Options
WD TV Live Hub Media Center User Manual Photo Display Options To display the photo options while viewing a photo, press Options. To return to the photo you were viewing, press Back or Options again. Play Mode Use the play mode option to set repeat and shuffle options. 1. -
Page 68: Displaying Photo Thumbnails
WD TV Live Hub Media Center User Manual Rate See “Rate” on page 39. Favorite See “Favorite” on page 39. Add to Queue See “Add to Queue” on page 39. Delete See “Delete” on page 40. Displaying Photo Thumbnails While viewing a photo or slideshow, press to display thumbnails of all your photos Use the navigation buttons to select another photo to view, then press OK. -
Page 69: Displaying Photo Information
WD TV Live Hub Media Center User Manual Displaying Photo Information Use this option to display the Picture Information Panel on the bottom of the screen. This panel shows the following information about the current picture: Image filename Source Image file size and resolution Image’s sequence number and the total number of image files in the current photo folder To view the photo information panel:... - Page 70 WD TV Live Hub Media Center User Manual Slideshow Playback Controls Use these buttons on the remote control to control slideshow playback: Button Function STOP Discontinue the slideshow PAUSE/PLAY Pause or resume the slideshow NEXT Display the next picture file in the slideshow PREV Play the previous picture file in the slideshow Repeating and/or Shuffling a Slideshow...
-
Page 71: Files
WD TV Live Hub Media Center User Manual Files You can view and manage all of your media files in one place using the Files menu. Files Display 1. Navigate to the Home | Files menu, then press OK. 2. The screen displays all available media files and folders in the media center’s local drive by default. -
Page 72: Files Options
WD TV Live Hub Media Center User Manual Files Options To manage files (move, copy, delete, rename, and select multiple), do the following: With an individual file or folder selected, press Options. Move & Copy The Files move and copy functions are the same as the Videos move and copy functions. -
Page 73: Network Setup
WD TV Live Hub Media Center User Manual Network Setup The media center can be connected to the local area network using a wired or wireless network connection for access to streaming video and online and offline media content. Ethernet Network (Wired) Setup 1. - Page 74 WD TV Live Hub Media Center User Manual 5. Press to select Network setup, then press OK. 6. Select a setup configuration option, then press OK. Select Automatic to have the device attempt to detect your network connection automatically, then go to step 11. Select Manual to manually set your network connection, then proceed to step 7.
- Page 75 WD TV Live Hub Media Center User Manual 8. Press to key in your IP address using the on-screen keyboard. Select Submit, then press OK. 9. Repeat the step above to key in values for the subnet mask, gateway, and DNS settings.
-
Page 76: Wireless Network Setup
WD TV Live Hub Media Center User Manual Wireless Network Setup Important: Streaming over wi-fi may be unstable due to various reasons such as a weak network connection, signal strength, variable speeds, or other environmental factors. You can create instant high-speed, wired network connections and gain fast, reliable access to the Internet without running wires all over your house using WD Livewire Powerline AV Network kit (sold separately). -
Page 77: Checking The Network Connection
WD TV Live Hub Media Center User Manual 4. Press to select the access point you want to connect to, then press OK. Proceed to step 6 to continue Auto search. 5. Use the navigation buttons to type in the network name for the access point you want to connect to, select Submit, then press OK . - Page 78 WD TV Live Hub Media Center User Manual 3. Press to select Check connection, then press OK. The unit will automatically check the network connection. Once the check is completed, the results display. A green check mark on these items indicate that there is no problem with your network settings.
-
Page 79: Network Services
WD TV Live Hub Media Center User Manual Network Services Accessing Media Content from the Network Once the media player has an active network connection, you can access media content from a Network Attached Storage (NAS) device or shared computer located on the same network as your media player. -
Page 80: My Media Library
WD TV Live Hub Media Center User Manual My Media Library The benefit of selecting this option is that it shows all the aggregated content on your network attached and USB storage together in one view. However, it does take longer to scan all the storage content compared to selecting a more specific option for content retrieval. -
Page 81: Media Server
WD TV Live Hub Media Center User Manual Media Server This menu displays network attached UPnP media servers connected to your network and usage is optimized with DLNA compliant devices such as WD My Book Live personal cloud storage and other WD TV Live Hub media centers. The benefit of using a media server is that it aggregates the content together from the device that is hosting it. - Page 82 WD TV Live Hub Media Center User Manual Windows Shares display shared computers and network attached storage devices (such as WD’s My Book Live personal cloud storage NAS drive) connected to your network via the Samba protocol. Linux Shares Linux Shares uses NFS, which is popular with power users and Linux users because of the increased speed and performance it can provide.
-
Page 83: Share A Folder On Your Computer
WD TV Live Hub Media Center User Manual Accessing Network Attached Storage Follow the steps above under “Accessing a Shared Folder,” selecting the name of your NAS device and referencing your NAS device documentation for password setup and administration. Online Service This menu allows you to connect to media content stored in your Facebook and Picasa online accounts. - Page 84 WD TV Live Hub Media Center User Manual Make sure the media player and your computer are both attached to the network, then follow the instructions below for your operating system (Windows 7/Vista/XP or Mac). Important: Be sure to update your operating system to the latest update or service pack.
- Page 85 WD TV Live Hub Media Center User Manual 5. Click Work network. 6. Click the Choose homegroup and sharing options link. 7. Click the Change advanced sharing settings... link. 8. Ensure that the following options are selected: Turn on network discovery, Turn on file and printer sharing, Media streaming is off, and Allow Windows to manage homegroup connections (recommended).
- Page 86 WD TV Live Hub Media Center User Manual 5. Enter the name you would like this folder to appear on the network as in the Share name box. 6. Click the Permissions box. 7. Select the users you would like to give access to and the permissions you would like to assign to that user, then click OK.
- Page 87 WD TV Live Hub Media Center User Manual Windows Vista Change Settings to Allow Folder Sharing Follow the instructions below to configure your computer for folder sharing in Windows Vista. 1. Open the Network And Sharing Center from the Control Panel. 2.
- Page 88 WD TV Live Hub Media Center User Manual Share a Folder Follow the instructions below to share a folder in Windows Vista. 1. Navigate to the folder you want to share. Once found, right-click on the folder and click Share. 2.
- Page 89 WD TV Live Hub Media Center User Manual Windows XP Follow the instructions below to share a folder in Windows XP. 1. Right-click on the folder you want to share and select Sharing and Security. 2. Click Share this folder. 3.
- Page 90 WD TV Live Hub Media Center User Manual 3. Choose a name for your computer on the network and type it in the Computer Name field. 4. Click the box next to File Sharing to turn on the file sharing service. Then click on the + sign button below the Shared Folders box.
-
Page 91: Using The Web Ui
WD TV Live Hub Media Center User Manual Using the Web UI The media center provides a Web-based user interface (UI) that can be used to control certain functions. You must use a network-connected computer or smart phone to use the Web UI. Important: Your media center must be set up on the network (see “Network Setup”... - Page 92 WD TV Live Hub Media Center User Manual System Click System in the Web UI home page to manage the system status of your media center and view general network information. You can change the password, set system preferences, and choose date and time settings using these options. Remote Click Remote in the Web UI home page to control the media center using your computer.
- Page 93 WD TV Live Hub Media Center User Manual Media Click Media to enable the Twonky service, launch the Twonky media browser, and enable the iTunes server to access media on iTunes. TwonkyMedia ™ Click Enabled, then Launch Twonky to launch the TwonkyMedia server media browser in a separate browser window.
- Page 94 WD TV Live Hub Media Center User Manual Click to upload a file from your computer to the media center. Click Browse to locate a file, then send to upload it to the media center. Click to open the TwonkyMedia server status screen. Here, you can restart the server, view server status, perform basic and advanced setup, and access support resources.
-
Page 95: Status Bar
WD TV Live Hub Media Center User Manual Click RSS to view your RSS subscriptions and category folders. Here, you can add a new subscription or a new folder to categorize your subscriptions. Support Click Support to access Express Customer Support (includes diagnostic test) and Support Documentation including product documentation, FAQ’s, and a WD TV user forum. -
Page 96: Internet Services
WD TV Live Hub Media Center User Manual Internet Services Important: A broadband Internet connection (e.g., DSL or cable) is required to use Internet services. Availability varies by country. These services may be changed, terminated, or interrupted at any time. After connecting to a network, you can use the media center to access media content from the following Internet services: ®... - Page 97 WD TV Live Hub Media Center User Manual ® Netflix – Enjoy popular movies, classics, and TV episodes instantly. Access your Netflix unlimited membership and instantly watch TV episodes and movies on your big screen.* *Netflix is available in certain countries. Unlimited membership required. More information at www.netflix.com.
- Page 98 WD TV Live Hub Media Center User Manual Economy, Space, Sports, Science, Technology, Travel and Video Game categories. XOS College Sports – XOS College Sports offers college sports fans multi- sport, multi-conference access to full games and historic documentaries including many of the nation’s top schools and teams. Free access to a large collection of rare content, championship season highlights and select full games past and present.
-
Page 99: Adding A Service To Favorites
WD TV Live Hub Media Center User Manual Adding a Service to Favorites You can add a Service to your Favorites so that it’s quickly available via the dashboard when you are in the Home screen or other screens (when you press or navigate to in certain screens then press OK). -
Page 100: Accuweather.com
WD TV Live Hub Media Center User Manual AccuWeather.com The Weather service provided by AccuWeather.com provides local forecasts for everywhere in the United States and over two million locations worldwide. Upon your first use of AccuWeather.com, you are prompted to enter your location (city of residence or nearest city) to set the temperature/weather indicator on your media center. - Page 101 WD TV Live Hub Media Center User Manual 7. The AccuWeather.com home screen displays current temperature, conditions, and other weather details at your location. Options include: Settings Maps (press Options, then OK to zoom & pan the weather map in your area using the navigation buttons) Lifestyle (provides forecasts from Poor to Excellent for various health and sporting conditions)
- Page 102 WD TV Live Hub Media Center User Manual Set/Add Favorite City To add one or more cities so that you can view weather information for more than one location, do the following: 1. Press to select Settings in the AccuWeather.com home screen. 2.
-
Page 103: Blockbuster On Demand
WD TV Live Hub Media Center User Manual BLOCKBUSTER On Demand ® The BLOCKBUSTER On Demand service lets you order and instantly watch movies ® from BLOCKBUSTER right on your TV!* Rent or buy the newest releases from your couch No monthly fees New releases available the same day as DVD/Blu-ray Choose from thousands of the movies you love... -
Page 104: Cinemanow
WD TV Live Hub Media Center User Manual CinemaNow With over 11,000 titles to choose from, CinemaNow gives you instant access to new release movies the same day they come out on DVD and brings you TV episodes for many popular shows the day after they air.* No subscription required and no need to drive to a kiosk or wait for movies in the mail! New release movies available the same day as Blu-ray/DVD Popular TV shows available the day after they air... -
Page 105: Comedy Time
WD TV Live Hub Media Center User Manual Comedy Time The Comedy Time Network launched as the comedy channel for Sprint TV and MobiTV in July, 2004 and has since expanded on to all major carrier decks as well as cable/satellite/IP television, broadband video and traditional media. -
Page 106: Deezer
WD TV Live Hub Media Center User Manual Deezer Deezer is a personalized on-demand music service to listen to seven million tracks anytime, anywhere and one of the most popular Internet and mobile music offerings in Europe. To access Deezer: 1. - Page 107 WD TV Live Hub Media Center User Manual Signing in to Your Deezer Account Sign in to your Deezer account to access My Music (your playlists and favorites) and Top Charts. Note: If you do not have a Deezer account and want to create one, go to http://www.deezer.com. 1.
- Page 108 WD TV Live Hub Media Center User Manual Radios You can choose from a variety of radios by music genre and subgenre. 1. In the Deezer main screen, press to select Radios, then press OK. 2. Press OK to select a radio. 3.
- Page 109 WD TV Live Hub Media Center User Manual 3. Select Playlists, then press OK. 4. Press Options, then select Create Your Playlist. Press OK. 5. Type in the name of your playlist using the on-screen keyboard, select Submit, then press OK. Favorite Radios Accessing a favorite radio station in My Music: 1.
- Page 110 WD TV Live Hub Media Center User Manual 2. Press to select Delete from Favorite, then press OK. 3. Select OK, then press OK. Top Charts These are songs deemed most popular by Deezer users by country. 1. In the Deezer main screen, press to select Top Charts, then press OK.
-
Page 111: Facebook
WD TV Live Hub Media Center User Manual Facebook Share your status, photos, videos, and your favorite links on Facebook. Find out the latest news from your social network or the world and so much more. Access it all on your big screen TV. You must have have a valid Facebook account to use this service. - Page 112 WD TV Live Hub Media Center User Manual Photos You can view the photos or photo albums you and others users have posted to Facebook either individually or as a slideshow. 1. In the Facebook main menu, select Photos then press OK. 2.
- Page 113 WD TV Live Hub Media Center User Manual Newsfeed The Facebook news feed displays all of your friends’ comments and allows you to “Like” or comment. The number of people who like or have commented on each entry displays inside the corresponding icons to the right of the news feed entry. 1.
- Page 114 WD TV Live Hub Media Center User Manual Videos Player With a video playing, press OK to bring up the videos player info panel. You can choose to Like or Comment on a video in the info panel, then press OK. Number of “likes”...
- Page 115 WD TV Live Hub Media Center User Manual 2. Select an event you’ve been invited to, then press OK. 3. Select Write a Comment... or View More Info to write a comment about or view more info for the event. 4.
-
Page 116: Flickr
WD TV Live Hub Media Center User Manual Flickr Flickr is an online image and video management and sharing website. Flickr content is organized based on tags—a keyword or category label that describes content. Tags help users to search for contents that have something in common. Each content file can have as many as 75 tags associated with it. - Page 117 WD TV Live Hub Media Center User Manual To explore based on the upload date: Press to select Recent Upload in the Flickr home screen, then press OK. A photostream showing the most recently uploaded content displays. Go to “Flickr Photostream”...
- Page 118 WD TV Live Hub Media Center User Manual 1. Press to select Search in the Flickr home screen, then press OK. 2. Press to select Keywords, then press OK. 3. Use the navigation buttons to type a search word using the on-screen keyboard.
- Page 119 WD TV Live Hub Media Center User Manual Searching for a Flickr Member To search for a Flickr member: 1. Press to select Search in the Explore screen, then press OK. 2. Press to select Flickr member, then press OK. 3.
- Page 120 WD TV Live Hub Media Center User Manual 3. To remove a contact from the list, select the contact name and press Options. Select Delete or Delete All Items, then press OK. My Tags My Tags shows a list of Flickr tags you have searched for. To view My Tags: 1.
- Page 121 WD TV Live Hub Media Center User Manual Flickr Photostream The Flickr photostream layout is the same as that of a Photos directory in thumbnail mode. You can use the navigation buttons to select content. To view content in fullscreen mode, select the file and press OK. To view a slideshow using all the current photostream’s content, press OK.
- Page 122 WD TV Live Hub Media Center User Manual Player Options As with a regular photo slideshow, you can customize the way content is displayed in the Flickr Player. To do this, press Options. Note: To view photos enlarged in fit to screen or full screen mode, access the Setup menu and follow the instructions under “Photo Scaling”...
-
Page 123: Flingo
WD TV Live Hub Media Center User Manual Flingo Flingo offers free Internet Television from leading studios, TV networks, and video websites. It also allows you to turn the Web into your remote control. You can simply "fling" your favorite videos to the Queue in the Flingo application on your media player. -
Page 124: Flixster
WD TV Live Hub Media Center User Manual Flixster Watch the latest theatrical movie trailers and get critic reviews from Rotten Tomatoes. Preview movies that are opening this week and see what’s hot at the box office. See what’s new on DVD and Blu-ray and the top rentals. Search a catalog of over 40,000 films. -
Page 125: Hulu Plus (Us Only)
WD TV Live Hub Media Center User Manual Hulu Plus (US only) Hulu Plus offers current hit TV shows and award-winning movies anytime in HD . Watch any current season episode of top shows like Modern Family, Glee, 30 Rock and many others, enjoy classic series, or explore acclaimed movies from The Criterion Collection and Miramax. -
Page 126: Live365
WD TV Live Hub Media Center User Manual Live365 Use Live365 to create your own online radio station or listen to other Live365 broadcasters’ online stations. Music selections are compiled based on user ratings. Some small AM and FM stations also utilize Live365 to stream audio over the Internet. - Page 127 WD TV Live Hub Media Center User Manual 2. Press to select Sign In or Don’t have an account?, then press OK. If you don’t have an account, follow the on-screen instructions to create your Live365 account online. 3. Use the navigation buttons to key in your Live365 user name on the on- screen keyboard.
- Page 128 WD TV Live Hub Media Center User Manual Listening to a Live365 Station New Live365 users can browse for a radio station. You can access the last station you’ve listened to if you’ve already accessed Live365 from the media player. Registered Live365 users can access My Preset List and listen to favorite stations.
- Page 129 WD TV Live Hub Media Center User Manual The Live365 Station screen: The Live365 station screen provides view and sorting and audio quality filtering options. 1. Press , select the view icon , and press OK to switch between Grid and List views.
- Page 130 WD TV Live Hub Media Center User Manual To listen to a favorite station: 1. On the Live365 main screen, press to select My Presets, then press OK. Press to select a station from your preset list. 2. Press or OK to start listening to the selected radio station. To listen to a VIP station: 1.
- Page 131 WD TV Live Hub Media Center User Manual 2. Press to select Search, then press OK. 3. On the on-screen keyboard, use the navigation buttons to key in a search keyword, then press OK. 4. Press to select a station from the search result. 5.
- Page 132 WD TV Live Hub Media Center User Manual Providing Song Feedback Music selections in Live365 are compiled based on their user ratings. You can participate in the selection process by giving a song the “thumbs up” or “thumbs down” vote. To provide song feedback: 1.
-
Page 133: Netflix
WD TV Live Hub Media Center User Manual Netflix Enjoy new releases, classics, and TV episodes instantly on your WD TV Live Hub Media Center. Don’t wait for the mailman to deliver your movies and don’t settle for streaming to your small computer screen. Access your Netflix unlimited membership and instantly watch TV episodes and movies on your big screen.* *Netflix is available in certain countries. -
Page 134: Pandora (Us Only)
WD TV Live Hub Media Center User Manual Pandora (US only) Pandora is an automated music recommendation and Internet radio service. With Pandora, you can input a song title or artist name and the service responds by playing selections that are musically similar. You can provide feedback (approved/not approved) on individual songs, which Pandora takes into account for future selections. - Page 135 WD TV Live Hub Media Center User Manual Signing in to Pandora for the First Time 1. Navigate to the Home | Services menu bar and press OK. 2. The list of Internet services display in alphabetical order. Press to select Pandora , then press OK.
- Page 136 WD TV Live Hub Media Center User Manual Once you have successfully signed in to Pandora, the Stations screen appears. From this screen you can create new stations, start listening to previously created stations and Quickmix playlist, and define profile preferences for your account.
- Page 137 WD TV Live Hub Media Center User Manual To create a Pandora station: 1. Navigate to Create Station or press Options to select Create station. Press 2. Use the navigation buttons to type the name of an artist or song title using the on-screen keyboard.
- Page 138 WD TV Live Hub Media Center User Manual QuickMix QuickMix is a feature that allows you to listen to more than one of your stations at once. QuickMix will play only one song based on particular musical characteristics at a time (unlike regular Pandora stations, which play four related songs in a row), so the mood changes more often.
-
Page 139: Bookmarking A Song Or Artist
WD TV Live Hub Media Center User Manual Bookmarking a Song or Artist You have the option to bookmark a song or an artist for later reference. You can later refer to this bookmark if you want buy the track when you’ve sign in to Pandora from your computer or mobile computing device, or if you want to share your musical preferences with other Pandora users. -
Page 140: Picasa
WD TV Live Hub Media Center User Manual Picasa View, share and enjoy your photographs right from your television. To learn more about Picasa services, and the options and limitations related to them, go to http://www.picasa.google.com. To access Picasa: 1. Navigate to the Home | Services menu bar and and press OK. 2. - Page 141 WD TV Live Hub Media Center User Manual 2. Select Add Account, then press OK. 3. Use the navigation buttons to type your Picasa user name in the on-screen keyboard. Select Submit, then press OK. 4. Use the navigation buttons to type your Picasa account password in the on-screen keyboard.
-
Page 142: Searching For Content
WD TV Live Hub Media Center User Manual You can sort and filter content on this page by showing all content (All) or your Unlisted Gallery or Public Gallery. Press or navigate to , and press OK, then press and OK twice to switch that selection. Searching for Content You can search Picasa for photos and videos of particular interest to you. -
Page 143: My Photos
WD TV Live Hub Media Center User Manual The content search begins (this may take a few seconds). Content matching your search word appears in a Search result screen. 3. Use the navigation buttons to select a photo or video from the display. 4. - Page 144 WD TV Live Hub Media Center User Manual Photo Menu Options With a photo thumbnail in a web album selected, press Options. The My Photos menu options display. Press Back when complete to return to the web album menu. Information Use this option to display the following information about the current picture: Date Camera make and model...
- Page 145 WD TV Live Hub Media Center User Manual Photo Display Options To display the photo options while viewing a photo, press Options. To return to the photo you were viewing, press Back or Options again. Information See “Information” on page 139. Play Mode See “Play Mode”...
-
Page 146: Sec Digital Network
WD TV Live Hub Media Center User Manual Video Player The Picasa video layer layout is similar to the regular video playback screen. It displays the playback status bar and the elapsed and total playback times. Press to pause and resume playback. People I’m Following People I’m Following contains thumbnails showing icons for the people you are following on Picasa. -
Page 147: Shoutcast Radio
WD TV Live Hub Media Center User Manual SHOUTcast Radio SHOUTcast Radio is the ultimate directory of online radio stations featuring over 45,000 music, talk, sports, and community radio stations from around the world. To access SHOUTcast: 1. Navigate to the Home | Services menu and press OK. 2. - Page 148 WD TV Live Hub Media Center User Manual 4. Press to select a radio station. 5. Press Options, then press to select Add to Favorite if you want to add the station to Favorites. Press OK. 6. Press or OK to start listening to the selected radio station. You can view information about the currently playing station and song such as title, artist, genre, number of listeners, etc.
- Page 149 WD TV Live Hub Media Center User Manual To add to a station, program, or podcast to your favorites: 1. Go to the station list showing the station you want to add. 2. Press to select the station you want to add or begin playing a station. 3.
- Page 150 WD TV Live Hub Media Center User Manual Removing a Station from Your Preset List You can remove stations you no longer want from your preset list. To remove a station from your preset list: 1. On the SHOUTcast Radio main screen, press to select Favorites, then press OK.
-
Page 151: Snagfilms
WD TV Live Hub Media Center User Manual SnagFilms ® SnagFilms offers a broad collection of great independent movies you can watch right now, on demand, for free – films that entertain and inform, engage and inspire, and satisfy every taste. These are movies worth watching – documentaries, comedies, dramas and thrillers, award winners and rare finds –... -
Page 152: Spotify
WD TV Live Hub Media Center User Manual Spotify Enjoy on-demand access to over 15 million tracks and albums. Any artist, any album, any genre - available instantly on your media player.* Spotify is available in: USA, UK, Sweden, Finland, Norway, France, The Netherlands, Spain, Austria, Belgium, Switzerland and Denmark. - Page 153 WD TV Live Hub Media Center User Manual Searching for a Spotify Artist, Album, or Track To search for a Spotify artist, album, or track: 1. On the Spotify main screen, press to select Search, then press OK. 2. On the on-screen keyboard, use the navigation buttons to key in a search keyword, then press OK.
- Page 154 WD TV Live Hub Media Center User Manual To add a track to a playlist: 1. Go to the track list showing the track you want to add. 2. Press to select the track you want to add or begin playing a track. 3.
- Page 155 WD TV Live Hub Media Center User Manual 3. Select Collaborate, then press OK. 4. The playlist is now set to Collaborate, and the playlist appears with a dot next to it. You can reverse this setting by pressing Options with the playlist selected, then select Uncollaborate.
- Page 156 WD TV Live Hub Media Center User Manual Star You can “star” a track for quick access in the future via the Starred menu on the Spotify home screen. 1. With the track you want to star selected, press Options, then press select Star, then press OK.
- Page 157 WD TV Live Hub Media Center User Manual 2. Press to select a new or most listened to artist album, or artist radio station. 3. Press or OK to start listening to the selected album or radio station. In the Radios screen, you can select Create New Station to add an artist radio station using the on-screen keyboard.
-
Page 158: Tunein
WD TV Live Hub Media Center User Manual TuneIn The world’s largest Internet radio guide with access to over 30,000 free radio stations searchable by location, genre, or format. To access TuneIn: 1. Navigate to the Home | Services menu and press OK. 2. - Page 159 WD TV Live Hub Media Center User Manual 3. Write down the activation code and follow the onscreen instructions (go to http://radiotime.com/mydevice to associate the media player with your account). When finished, choose Continue, then press OK. 4. Select Enter RadioTime.com account, then press OK. 5.
- Page 160 WD TV Live Hub Media Center User Manual 2. On the on-screen keyboard, use the navigation buttons to key in a search keyword, then press OK. Note: You can also press on the remote control to toggle to the results list after entering several characters in the search field.
- Page 161 WD TV Live Hub Media Center User Manual 3. Press Options, then press to select Remove Preset, then press OK. 4. A confirmation prompt appears. Select OK, then press OK. Getting Station Information You can view information about the currently playing station and song. 1.
-
Page 162: Vimeo
WD TV Live Hub Media Center User Manual Signing Out from TuneIn Sign out of TuneIn after a listening session to ensure that nobody can make changes to your TuneIn settings and stations without your permission. To sign out from TuneIn: 1. -
Page 163: Vudu
WD TV Live Hub Media Center User Manual Vudu ™ VUDU delivers a cinema-like experience at home with the hottest new releases and the largest HD library. There are no subscription fees or late fees, simply pay for what you watch. Choose to rent or own from thousands of titles available in vibrant 1080p with rich Dolby Digital 5.1 Surround Sound. -
Page 164: Watchmojo
WD TV Live Hub Media Center User Manual WatchMojo WatchMojo produces original video programming on the people, places and things that people are passionate about, covering the Automotive, Business, Education, Fashion, Film, Food, Health, Music, Parenting, Politics & Economy, Space, Sports, Science, Technology, Travel and Video Game categories. -
Page 165: Youtube
WD TV Live Hub Media Center User Manual YouTube YouTube is a video hosting website where you can upload and share videos. To access YouTube: 1. Navigate to the Home | Services menu bar and and press OK. 2. The list of Internet services display in alphabetical order. Press to select YouTube , then press OK to display the YouTube home screen. - Page 166 WD TV Live Hub Media Center User Manual 2. Select Sign in, then press OK. 3. Use the navigation buttons to type your YouTube user name in the on-screen keyboard. Select Submit, then press OK. 4. Use the navigation buttons to type your YouTube account password in the on-screen keyboard.
- Page 167 WD TV Live Hub Media Center User Manual This page also contains links to your uploaded videos (Videos) and video playlists (Playlists). Press or navigate to , and press OK, then press and OK twice to switch that selection. Searching for Videos You can search YouTube for videos of particular interest to you.
- Page 168 WD TV Live Hub Media Center User Manual The video search begins (this may take a few seconds). Videos matching your search word appear in a Search result screen. 3. Use the navigation buttons to select a video from the display. 4.
-
Page 169: Featured Videos
WD TV Live Hub Media Center User Manual Go to page 166 for more information on using the YouTube Player. Featured Videos This video category is primarily populated with videos from YouTube’s commercial partners, but might also include select user videos that are currently popular or have been previously showcased in YouTube’s Spotlight Videos section. -
Page 170: Most Popular
WD TV Live Hub Media Center User Manual Most Popular These are videos deemed most popular by YouTube users. To access Most Popular: 1. Press to select Most Popular in the YouTube home screen, then press 2. The list of most popular videos display. To refine this list, press to select , and press OK. - Page 171 WD TV Live Hub Media Center User Manual YouTube Options When you select a video in any of the YouTube submenu screens described above (i.e., User > My Favorites, Search, Top Favorites, Featured Videos, Most Popular, Most Viewed, and Top Rated), pressing Options brings up the following screen: Like or Dislike this Video - see “Like or Dislike Videos”...
- Page 172 WD TV Live Hub Media Center User Manual YouTube Player Options As with a regular video playback screen, you can the customize the way content displays in the YouTube Player. To do this, press Options. Like or Dislike this Video - see “Like or Dislike Videos” on page 168. Add to favorites - see “Adding Videos to Favorites”...
-
Page 173: Like Or Dislike Videos
WD TV Live Hub Media Center User Manual Press the navigation buttons to select a video from the list, then press or OK to start watching the selected video. The other options on this screen allow you to: Replay the recently playbacked video – Play Again Add the video to your My Favorites list –... -
Page 174: Adding Videos To A Playlist
WD TV Live Hub Media Center User Manual Adding Videos to a Playlist Use this option if you enjoyed a particular video and want to add it to one of your playlists. To add a video to My Favorites from the Related Videos screen: 1. -
Page 175: Youtube Leanback
WD TV Live Hub Media Center User Manual To set the media player’s additional encoding setting: 1. Navigate to Home | Setup menu bar. 2. Press to select System, then press OK. 3. Press to select Additional Encoding Support, then press OK. 4. -
Page 176: Games
WD TV Live Hub Media Center User Manual Games You can access games and use the remote control to play them using the Games menu. Games Display 1. Navigate to the Home | Games menu, then press OK. 2. The screen displays all available game services. The display is in grid view. - Funspot —Swap gems with Rockswap, try your luck with Texas Hold’Em, or test your math skills with Sudoku –... -
Page 177: Rss
WD TV Live Hub Media Center User Manual RSS (Really Simple Syndication) provides you with a list of current news items in a brief format so you can scan headlines and choose the items that interest you most without visiting websites. Reading RSS Feeds 1. -
Page 178: Setup And Advanced Features
WD TV Live Hub Media Center User Manual Setup and Advanced Features The Setup menu lets you customize the way you use the media center and set preferences for media playback. To select a Setup category: 1. Press Setup, or navigate to the Home | Setup menu and press OK. 2. -
Page 179: Setup Navigation Buttons
WD TV Live Hub Media Center User Manual Setup Navigation Buttons Use these buttons on the remote control to navigate within and between the Settings screens. Button Function • Select a menu Up/Down arrows • Select a menu setting in an option screen Displays the option screen for the selected menu... -
Page 180: Aspect Ratio
WD TV Live Hub Media Center User Manual You will be prompted to select the TV standard applicable to your device. This setting depends on your regional location. Options include: NTSC – United States, Canada, Japan, Mexico, the Philippines, South Korea, and Taiwan. - Page 181 WD TV Live Hub Media Center User Manual Use this menu to select the audio output mode. Options include: Stereo (Analog, S/PDIF, HDMI) This is the default setting that decodes all audio streams into 2-channel output via analog (RCA connectors), S/PDIF (optical connector), or HDMI. Recommended if you are using a 2- or 4-speaker entertainment unit.
- Page 182 WD TV Live Hub Media Center User Manual select Auto Detect to have the media player detect receiver settings automatically. Or, select Manual Setup. Auto Detect If you select Auto Detect a summary of your auto detect settings display. Press then, with the selected, press OK again.
- Page 183 WD TV Live Hub Media Center User Manual WMA Pro capable receiver Note: Changed settings are not applicable during DVD video playback. Dolby Dynamic Range Control (DRC) Setting Use this menu to set the dynamic range control, which reduces or increases sound levels.
-
Page 184: Appearance
WD TV Live Hub Media Center User Manual Appearance Use the menus in the Appearance screen to set user interface display options for the media center. Language Press to select the display language, then press OK. Video Calibration Use this menu to correct any issues with overscan (the display is cropped in the TV screen). - Page 185 WD TV Live Hub Media Center User Manual User Interface Backgrounds You can use this menu to set a different photo as the system background to replace the default grass field and sunny sky photo. You can choose from the WD Creative Masters backgrounds or your own backgrounds.
- Page 186 WD TV Live Hub Media Center User Manual Your Backgounds Your Backgrounds shows the default background as well as other photos you have set as the background (see “Set as Background” on page 61). Navigate to a background photo and press OK, then press OK again to Set as Background. Screensaver Delay Use this menu to set the time of system inactivity before the screensaver display is enabled.
-
Page 187: Video Settings
WD TV Live Hub Media Center User Manual RSS Ticker Set RSS Ticker to Show to stream your RSS feeds on the home page. Default setting is Hide. Video Settings Use the menus in the Video Settings screen to configure the display and sequence option for video files. -
Page 188: Subtitle Font Size
WD TV Live Hub Media Center User Manual Video Playback Sequence Use this menu to select the video playback mode. The default setting is Normal . Go to “Play Mode” on page 44 for a description of these video playback modes. Subtitle Font Size Use this menu to set the default font size (24 to 68 points, 40 points is default) for displaying video subtitles. -
Page 189: Music Settings
WD TV Live Hub Media Center User Manual Music Settings Use the menus in the Music settings screen to configure the display and sequence option for audio files. Music Playback Sequence Use this menu to select the audio playback mode. The default setting is Normal . Go to “To set the music repeat mode:”... -
Page 190: Photo Settings
WD TV Live Hub Media Center User Manual Browser Display Use this menu to select the default display mode for the audio browser screen. The default setting is Grid View . Examples of both grid and list views are shown below. Grid View List View Photo Settings... -
Page 191: Slideshow Interval Time
WD TV Live Hub Media Center User Manual Slideshow Interval Time Use this menu to set the time interval between pictures in the slideshow. You can select from 3 seconds (default) to 5 minutes. Photo Scaling Use this menu to define how pictures are scaled when you view them. This also applies when pictures are viewed in a slideshow. -
Page 192: Network
WD TV Live Hub Media Center User Manual Network Use the menus in this category to configure and view the media center’s network settings. Press to make a selection from the list of options, then press OK. Network Setup See “Network Setup” on page 68 for information and instructions. Previously Connected Wireless Network This menu displays a record of your wireless network settings. -
Page 193: Operation
WD TV Live Hub Media Center User Manual Network Share Server Must be set to On to use network services. See “Network Services” on page 74 for information and instructions. Workgroup Allows you to join a specific workgroup on your network. Windows-based computers and devices in the same workgroup may allow each other access to their files, printers, or Internet connection. - Page 194 WD TV Live Hub Media Center User Manual Remote Settings Select a function for the A, B, C, and D function buttons on the remote controller. The remote settings menu displays the functions currently assigned to each button. To change functions, press to select a function button, then press OK.
-
Page 195: System
WD TV Live Hub Media Center User Manual Sync From USB Storage This option allows you to turn the USB sync feature Off, Sync All Files, or Sync Supported Media Files Only. See “Step 5 - Connecting a USB Device (Optional)” on page 21. - Page 196 WD TV Live Hub Media Center User Manual files based on metadata information. See “Media Library” on page 201 for more information. Media Library Manager for Network Share Use this option to manually add individual share folders to the media library. Select Add network share to media library to connect to a Windows or Linux Share (see “Network Share”...
-
Page 197: Meta-Source Manager
WD TV Live Hub Media Center User Manual Meta-Source Manager Use this menu to select a meta-source that provides metadata information and artwork for your media files. Select Movie, Music, or TV Show to display and select available meta-sources for the media type. Select Add New Meta-Source and select the meta-source XML file from the network or attached USB storage. -
Page 198: Additional Encoding Support
WD TV Live Hub Media Center User Manual prevent access to the folder, Unlock to provide access to the folder, or Disable to disable the feature. Parental Control Parental control allows you to password protect an Internet service so the user can access it only if the correct password is entered. - Page 199 WD TV Live Hub Media Center User Manual Disk Manager This option displays information about the media center and attached drives when you select the drive then press OK, including: Storage Type Free Space Total Size File System Disk Manager also allows you to format the internal drive. Select WDTVLiveHub, then press OK.
- Page 200 WD TV Live Hub Media Center User Manual 3. Press to select System, then press OK. 4. Press to select Device Registration, then press OK. 5. On the Register Product screen, press to select First Name, then press 6. Use the navigation buttons to type in your first name using the on-screen keyboard.
-
Page 201: Device Restart
WD TV Live Hub Media Center User Manual Reset All Settings Except Online Service Accounts – restores all media center system preferences and playback settings to their default factory values with the exception of your internet Services personal account information. Reset All Online Service Accounts –... -
Page 202: Mobile Access/Wd Photos
WD TV Live Hub Media Center User Manual Mobile Access/WD Photos Use this menu to share files on the media center with mobile devices that have the WD Photos app loaded. You can provide access for up to four mobile devices. For further information on WD Photos, go to http://wdphotos.wdc.com. - Page 203 WD TV Live Hub Media Center User Manual 4. Launch WD Photos and tap Connect Now. 5. Tap WD TV Live Hub. 6. Select Get Code on the media center screen. Press OK. 7. Enter the activation code shown on the media center’s screen on your mobile device (code expires after 24 hours) then tap Activate.
- Page 204 WD TV Live Hub Media Center User Manual Upload Content to the Media Center You can take a photo or video clip with your mobile device and upload it directly to the built-in hard drive on your media center. To upload content: 1.
-
Page 205: About
WD TV Live Hub Media Center User Manual About Select this option to display the network info, firmware version currently installed, part number, and serial number of the device as well as online service info. Select Network Info then press OK to view info such as the device’s MAC and IP addresses, mobile access type, etc. -
Page 206: Media Library
WD TV Live Hub Media Center User Manual Media Library Media Library scans and consolidates the media contents of the internal hard drive, USB drive, and network drives into a database through which you can easily locate media files. This feature is set to on by default. The following conditions will prevent the Media Library from processing your media. - Page 207 WD TV Live Hub Media Center User Manual Converting The Content Into A Usable Format There are several fast, easy-to-use applications available online that can convert photos, videos, and music files into formats optimized for use on your media center. The software also allows simultaneous conversion of multiple files in batches regardless of their original formats.
-
Page 208: System Maintenance
WD TV Live Hub Media Center User Manual System Maintenance The system software of your media center can be upgraded to the latest release, which can improve support for media file playback and includes bug fixes and product enhancements. To ensure that you receive the latest update, we recommend registering your product at http://register.wdc.com. - Page 209 WD TV Live Hub Media Center User Manual To update the firmware automatically: 1. Press HOME, then select New Firmware. Press OK. 2. Select Update device on the firmware update prompt, and then press OK. This restarts the system. You can also select What’s New in This Update? to see the changes.
-
Page 210: Troubleshooting
WD TV Live Hub Media Center User Manual Troubleshooting Problem Solution DISPLAY The TV screen is blank and the media • Make sure the TV is turned on. center power LED remains off. • Make sure that the power adapter and power outlet are okay. - Page 211 WD TV Live Hub Media Center User Manual Problem Solution The slideshow pictures are distorted. Navigate to the Home | Settings | Photo screen and select Keep as original or Fit to screen in the Photo Scaling field. FILES File does not play. •...
- Page 212 WD TV Live Hub Media Center User Manual Problem Solution The media center remote control does • Press only one button at a time. not work. • Make sure the batteries are properly inserted. • The batteries may already be drained out. Replace batteries with new ones.
-
Page 213: Common Error Messages
WD TV Live Hub Media Center User Manual Common Error Messages If this message appears Perform this action HOME Hard drive cannot aggregate. There are different conditions under which this error message may appear. The message will specify the issue. For example, not enough space is used on the storage or a journaled file system. -
Page 214: Faqs
WD TV Live Hub Media Center User Manual If this message appears Perform this action Unable to play the selected file. Please 1. Eject and disconnect the USB device from the see the User Manual for a list of media center or map a drive to the media center supported file formats. -
Page 215: Appendix
WD TV Live Hub Media Center User Manual Appendix Multiformat Content Playback Multiformat is a file type that groups other files of the same digital content but may be encoded in different digital formats. For example, a single video file may actually include a few components such as video, audio, and photo grouped together. -
Page 216: Supported Formats
WD TV Live Hub Media Center User Manual Supported Formats Filename extension Codec Format/container VIDEO .AVI Video: Xvid MPEG1/2/4 WMV9 VC-1 Audio: MPEG Audio Dolby Digital .MPG/.MPEG Video: mpeg ps MPEG1/2 Audio: MPEG Audio Dolby Digital .MKV Video: h.264 x.264 MPEG1/2/4 WMV9 VC-1... - Page 217 WD TV Live Hub Media Center User Manual Filename extension Codec Format/container .MP4/.MOV Video: Quicktime MPEG4 Audio: MPEG Audio Dolby Digital/Dolby Digital Plus .ASF/.DVR-MS/.WMV Video: MPEG2 WMV9 VC-1 Audio: WMA/WMA Pro Dolby Digital .VOB/.ISO Video: VOB/ISO MPEG1/2 Audio: MPEG Audio Dolby Digital .M2TS Video:...
- Page 218 WD TV Live Hub Media Center User Manual File Codec Format/container AUDIO MP1/2/3/a MPEG audio None MPEG 2/4 AAC LC/HE 1. ADTS 2. ADIF M4A/MP4A MPEG 2/4 AAC LC/HE Quicktime FLAC FLAC FLAC WAVE ® PCM (Microsoft LPCM/PCM None OGG VORBIS AIF/AIFF AIFF 1.
- Page 219 WD TV Live Hub Media Center User Manual File Type Codec Resolution Other limitation name PHOTOS Compressed RGB JPEG formats only and progressive JPEG up to 2048. Single layer TIFF files only. Uncompressed BMP only. Not available indicates that no other limitations are known at this time.
-
Page 220: Regulatory Compliance
Die Markierung mit dem CE-Symbol zeigt an, dass dieses Gerät mit den anwendbaren Richtlinien der Europäischen Union übereinstimmt. Hierzu zählen auch die EMV-Richtlinie (2004/108/EG) sowie die Niederspannungsrichtlinie (2006/95/ EG). Eine "Konformitätserklärung" in Übereinstimmung mit den anwendbaren Richtlinien ist erstellt worden und kann bei Western Digital Europe eingesehen werden. APPENDIX – 215... - Page 221 Märkning av CE-symbolen anger att detta systemet uppfyller kraven enligt det Euro- peiska Parlamentet och Rådets direktiv, inklusive EMC-direktivet (2004/108/EC) och Direktivet om Lågspänning (2006/95/EC). En "Försäkran om Överensstämmelse" har gjorts enligt de gällande direktiven och har registrerats hos Western Digital Europa. Merking med CE-symbolet indikerer dette systemets overholdelse av gjeldende direktiver for EU, inkludert EMC-direktivet (2004/108/EC) og lavspenningsdirektivet (2006/95/EC).
-
Page 222: Warranty Information (All Regions Except Australia/New Zealand)
WD TV Live Hub Media Center User Manual KC Notice (Republic of Korea only) 기종별 사용자 안내문 B 급기기 이기기는가정용 (B 급 ) 전자파적합기기로서주로가 (가정용방송통신기자재) 정에서사용하는것을목적으로하며, 모든지역에서사 용할수있습니다 Environmental Compliance (China) Warranty Information (All Regions Except Australia/New Zealand) Obtaining Service WD values your business and always attempts to provide you the very best of service. -
Page 223: Warranty Information (Australia/New Zealand Only)
WD TV Live Hub Media Center User Manual or statutory, including but not limited to, any implied warranty of merchantability or fitness for a particular purpose, and b) any and all obligations and liabilities of WD for damages including, but not limited to accidental, consequential, or special damages, or any financial loss, lost profits or expenses, or lost data arising out of or in connection with the purchase, use, or performance of the Product, even if WD has been advised of the possibility of such damages. -
Page 224: Gnu General Public License ("Gpl")
Modification of or tampering with the Software, including but not limited to any Open Source Software, is solely at your own risk. Western Digital is not responsible for any such modification or tampering. Western Digital will not support any product in which you have or have attempted to modify the Software supplied by Western Digital. - Page 225 WD TV Live Hub Media Center User Manual CONTRACT, TORT OR OTHERWISE, ARISING FROM, OUT OF OR IN CONNECTION WITH THE SOFTWARE OR THE USE OR OTHER DEALINGS IN THE SOFTWARE. Expat http://www.jclark.com/xml/expat.html Expat License. Copyright (c) 1998, 1999, 2000 Thai Open Source Software Center Ltd Permission is hereby granted, free of charge, to any person obtaining a copy of this software and associated documentation files (the "Software"), to deal in the Software without restriction, including without limitation the rights to use, copy, modify, merge, publish, distribute, sublicense, and/or sell copies of the Software, and to...
- Page 226 WD TV Live Hub Media Center User Manual 4. Patent License. Subject to the terms and conditions of this License, each Author hereby grants to You a perpetual, worldwide, non-exclusive, no-charge, royalty-free, irrevocable (except as stated in this section) patent license to make, have made, use, import, and otherwise transfer the Work. 5.
- Page 227 WD TV Live Hub Media Center User Manual communication from You. This License may not be modified without the mutual written agreement of the Author and You libogg http://www.xiph.org/ogg/ Copyright (c) 2002, Xiph.org Foundation Redistribution and use in source and binary forms, with or without modification, are permitted provided that the following conditions are met: •...
- Page 228 WD TV Live Hub Media Center User Manual zlib http://www.zlib.net/ zlib.h -- interface of the 'zlib' general purpose compression library version 1.2.3, July 18th, 2005 Copyright (C) 1995-2004 Jean-loup Gailly and Mark Adler This software is provided 'as-is', without any express or implied warranty. In no event will the authors be held liable for any damages arising from the use of this software.
- Page 229 Western Digital, WD, the WD logo, WD TV, My Book, and My Passport are registered trademarks in the U.S. and other countries: and WD TV Live Hub, WD Livewire, WD Remote, and WD Photos are trademarks of Western Digital Technologies, Inc.
- Page 230 WD TV Live Hub Media Center User Manual Index radios 103 search 105 Accessories 3 signing in 102 AccuWeather.com 95 top charts 105 advanced features 173 digital camera support 59 aspect ratio disk manager 194 normal 175 display troubleshooting 205 troubleshooting 205 DLNA media server 187 widescreen 175...
- Page 231 WD TV Live Hub Media Center User Manual Files Videos 36 options 67 Home Theater sorting 66 connection 16 view 66 Hulu Plus 120 firmware auto detect new 196 check latest 196 I/O connectors firmware upgrade composite AV 7 procedure 203 HDMI 7 troubleshooting 207 Toslink 7...
- Page 232 WD TV Live Hub Media Center User Manual system 203 previously connected wireless media library network 187 clear 30 proxy 188 exemptions 201 workgroup 188 media library compilation Network setup categories 30 Ethernet 68 enable 30 wireless 71 error messages 208 network share 76 exemptions 30 network share (Linux) 77...
- Page 233 WD TV Live Hub Media Center User Manual menu options 60 virtual 87 pan options 62 Web UI 87 rotate 62 repeat mode set as background 61 music 55 sort & filter 58 reset switch 7 supported formats 210 reset to factory defaults 195 view 57 restart device 196 zoom options 62...
- Page 234 WD TV Live Hub Media Center User Manual device security 192 adding a track to a playlist 148 disk manager 194 adding a track to the play queue 150 get content info 191 browse album artist 148 language 179 collaborate on a playlist 149 LED light control 195 delete account 152 media library 190...
- Page 235 WD TV Live Hub Media Center User Manual removing a station from your preset settings 182 list 155 sort & filter 37 reporting problems 156 subtitles 43 searching 154 supported formats 210 sign in 153 video calibration 179 signing out 157 video output setting 174 TwonkyMedia 88 view chapter 43...
- Page 236 WD TV Live Hub Media Center User Manual player 166 preferences 166 related videos 167 restricted video content 169 search history 138, 163 searching for videos 162 signing in 135, 160 top favorites 163 top rated 165 zoom options photos 62 videos 45 INDEX –...
Need help?
Do you have a question about the WDBABZ0010BBK-NESN and is the answer not in the manual?
Questions and answers