AUTOTECH 10.202.3012K 3022K Installation Instructions
Mk3 obdii cold air intake 1996 jetta 2.0l; 1997 jetta 2.0l; 1998 jetta 2.0l; 1999 jetta 2.0l; 1996 golf 2.0l; 1997 golf 2.0l; 1998 golf 2.0l; 1999 golf 2.0l; 1995 golf vr6; 1996 golf vr6; 1997 golf vr6; 1998 golf vr6; 1999 golf vr6; 1995 jetta vr6; 1996 j
Advertisement
Table of Contents
Installation Instructions
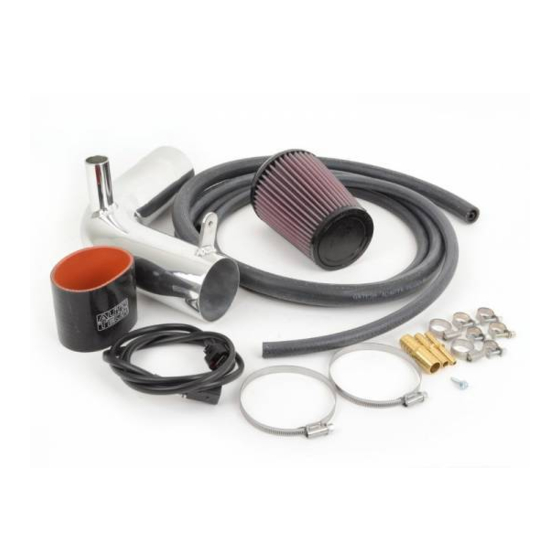
Part Number: 10.202.3012K 2.0L Golf/ Jetta 1996-1999
10.202.3022K VR6 Golf/ Jetta 1995-99
Description: Mk3 OBDII COLD AIR INTAKE INSTRUCTIONS
Notes:
Before starting the installation of you new Autotech Cold Air Intake System there are a few things that you should be aware
of and a couple of basic tools that will help in the installation process.
1.) be aware that you will be removing some parts and not reusing them due to the fact that they will be in the way of the
new intake system.
2.) be aware that this kit requires you to drill on small 1/8" hole that will not cause any problems should you decide to
return your vehicle to stock at a later date.
Tools Required:
7mm. and 8mm. sockets
Ratchet
12" extension
Phillips head screwdriver
(small #20 Torx bit may be required on some cars)
Procedure:
1. Remove the two bolts that hold the airflow meter to the airbox.
2. Remove airbox lid (two finger clamps)
3. Remove the air horn from the front of the stock airbox (#2 phillips screwdriver)
4. Separate the solenoid from the rear of the airbox (leave attached to hoses, and in the car)(some cars don't have a solenoid
attached to the airbox)
5. Remove the lower half of the airbox from the car (held down by 2 rubber retainers on the inside of the framerail.)
6. Remove all three splash shields under the front of the car (some models have phillips head screws, while some are torx head
screws.)
7. Remove small vacuum line from middle of the vacuum "T" under the mass-air meter, and install supplied vacuum hose (the
thinnest size) using our clamp.
8. Remove the leak detection pump inlet hose at the inlet of the pump. (Hose is coming from filter near the mass-air meter)
9. Install supplied hose union and 5/8" vacuum hose to the end of the original hose for the leak detection pump filter, using
supplied 13-20mm. clamps. (once the pump is re-mounted this hose will need to be re-attached to the pump)
10.Remove the harness plug from the leak detection pump.
11.Remove the suction hose from the leak detection pump (be carefull to remove the elbow/ hose without damaging the
plastic locking ring) (this step requires no tools, just pinch the fitting and remove)
12.Remove the leak detection pump (slide up in slots)
13.Cut the suction hose 2" from the plastic elbow.
14.Extend the clear suction hose with the supplied hose (3/8") and secure with supplied 17mm. clamps
15.Install the supplied Autotech silicone coupler and clamps to the long end of the inlet tube.
16.Install the complete inlet tube into the car
17.Install K&N filter to the Autotech CAI inlet tube (on the end near the holddown tab), from underneath the airbox area. (be
careful not to overtighten the clamp.)
18.Drill 1/8" hole through the hole in the mounting tab of the inlet tube. (tab mounts to top of frame)
19.Install the supplied self-tapping screw into the 1/8" hole, through the tab on the inlet tube
20.Install leak detection pump on the driver's side of the car in the same manner and location it was installed on the passenger
side from the factory. (only the two top studs will be used, the single bottom stud will not be used with new mounting
location)
Advertisement
Table of Contents

Related Manuals for AUTOTECH 10.202.3012K 3022K


Summary of Contents for AUTOTECH 10.202.3012K 3022K
- Page 1 Description: Mk3 OBDII COLD AIR INTAKE INSTRUCTIONS Notes: Before starting the installation of you new Autotech Cold Air Intake System there are a few things that you should be aware of and a couple of basic tools that will help in the installation process.
- Page 2 21.Rotate the inlet side of the leak detection pump (marked “inlet” , or “filter”) so it points towards the bottom of the front bumper skin. 22.Install extension harness to the plug removed from the leak detection pump. 23.Route the vacuum hoses and harness extension along the lower radiator core support and attach to the leak detection pump.
Need help?
Do you have a question about the 10.202.3012K 3022K and is the answer not in the manual?
Questions and answers