Table of Contents
Advertisement
Quick Links
Download this manual
See also:
Manual
What you will need:
•
Philips head screw driver
•
Needle nose pliers
•
Small flat head screw driver
1
PreSonus Audio Electronics | 7257 Florida Blvd, Baton Rouge, LA USA | Tel: 225‐216‐7887 | Fax: 225‐926‐8347 | www.presonus.com | sales@presonus.com
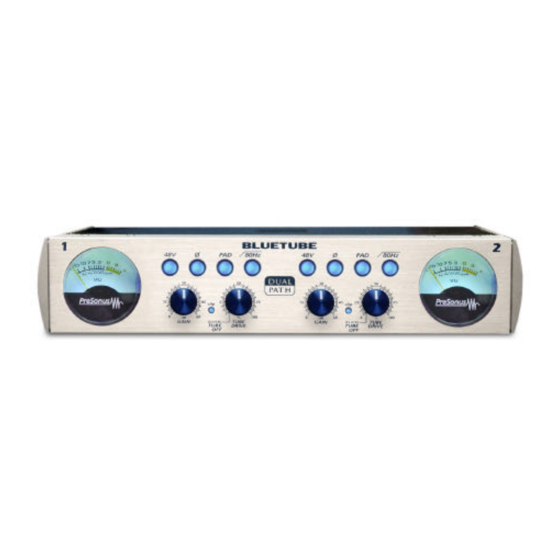
BlueTube DP
How to change the tube
STEP 1:
Remove the two screws on either side on the
top of your BlueTube DP
STEP 2:
Turn your BlueTube DP over and remove the
two screws on either side on the bottom of the
unit
STEP 3:
Remove the side panels
Advertisement
Table of Contents

Related Manuals for PRESONUS BLUETUBE DP


Summary of Contents for PRESONUS BLUETUBE DP
- Page 1 Remove the two screws on either side on the top of your BlueTube DP STEP 2: Turn your BlueTube DP over and remove the two screws on either side on the bottom of the unit STEP 3: Remove the side panels PreSonus Audio Electronics | 7257 Florida Blvd, Baton Rouge, LA USA | Tel: 225‐216‐7887 | Fax: 225‐926‐8347 | www.presonus.com | sales@presonus.com ...
- Page 2 TRS connections STEP 6: Remove the knobs on the front panel of your BlueTube DP. If necessary, you may need to use a small flat head screw driver to push them PreSonus Audio Electronics | 7257 Florida Blvd, Baton Rouge, LA USA | Tel: 225‐216‐7887 | Fax: 225‐926‐8347 | www.presonus.com | sales@presonus.com ...
- Page 3 Input 1 XLR jack. Push the jacks through the chassis until you hear a pop. This is the peg sliding to the unlocked position. PLEASE NOTE: This may take a bit of force. PreSonus Audio Electronics | 7257 Florida Blvd, Baton Rouge, LA USA | Tel: 225‐216‐7887 | Fax: 225‐926‐8347 | www.presonus.com | sales@presonus.com ...
- Page 4 STEP 14: It’s now time to put your BlueTube DP back together. To begin, slide the circuit board back into the chassis and align the pegs to the unlocked position on the circuit board PreSonus Audio Electronics | 7257 Florida Blvd, Baton Rouge, LA USA | Tel: 225‐216‐7887 | Fax: 225‐926‐8347 | www.presonus.com | sales@presonus.com ...
- Page 5 Put the knobs pack on making sure they are properly aligned. The knobs on both Tube Drive potentiometers will be at the 6 o’clock position. The knobs on the Gain potentiometers should point to “0” on the silk screen. PreSonus Audio Electronics | 7257 Florida Blvd, Baton Rouge, LA USA | Tel: 225‐216‐7887 | Fax: 225‐926‐8347 | www.presonus.com | sales@presonus.com ...
- Page 6 STEP 20: Reattach the pair of screws to each of the XLR connections on the back of the unit. Congratulations! Your BlueTube DP is now ready to be enjoyed once more. PreSonus Audio Electronics | 7257 Florida Blvd, Baton Rouge, LA USA | Tel: 225‐216‐7887 | Fax: 225‐926‐8347 | www.presonus.com | sales@presonus.com ...
Need help?
Do you have a question about the BLUETUBE DP and is the answer not in the manual?
Questions and answers