Table of Contents
Advertisement
Quick Links
Advertisement
Table of Contents

Related Manuals for Visioneer PhotoPort 7700


Summary of Contents for Visioneer PhotoPort 7700
- Page 1 Visioneer PhotoPort ® ® 7700 USB Scanner Installation Guide...
- Page 2 Visioneer's Limited Product Warranty If you find physical defects in the materials or the workmanship used in making the product described in this document, Visioneer will repair, or at its option, replace, the product at no charge to you, provided you return it (postage prepaid, with proof of your purchase from the original reseller) during the 12-month period after the date of your original purchase of the product.
-
Page 3: Table Of Contents
What’s in the Box ........1 The Visioneer PhotoPort 7700 USB Scanner ....2 What You Need . - Page 4 Cleaning the Scanner Glass ....... 68 Visioneer PhotoPort 7700 USB Scanner Specifications ..69...
-
Page 5: Welcome
ELCOME Congratulations on purchasing your Visioneer PhotoPort 7700 USB scanner. In addition to quickly scanning paper items such as letters, forms, photos, and magazine articles, your PhotoPort scanner also transfers images from CompactFlash™ and SmartMedia™ removable memory cards from digital cameras. -
Page 6: The Visioneer Photoport 7700 Usb Scanner
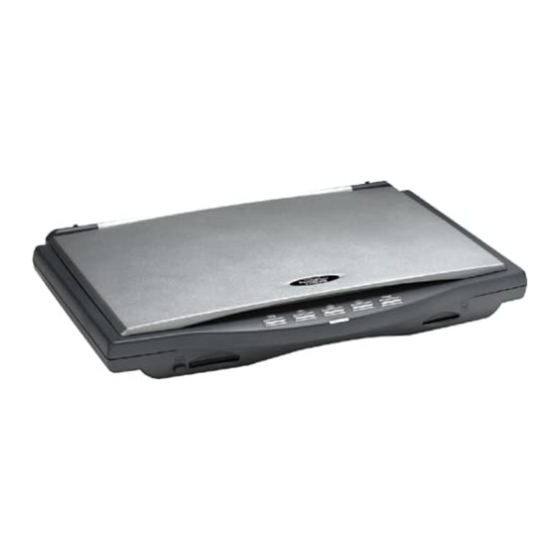
7700 USB S ISIONEER HOTO CANNER 7700 USB S ISIONEER HOTO CANNER Document cover Glass Reference marks Slot for SmartMedia memory card OneTouch buttons panel Slot for CompactFlash memory card OneTouch buttons Status light Power jack USB port... - Page 7 7700 USB S ISIONEER HOTO CANNER NSTALLATION UIDE Document cover. Close the document cover after placing items on the scanner glass. Glass. Place items face down on the glass aligned at the arrow symbol in the upper left corner. Reference marks. Marks on the border of the glass show where to align various paper sizes. OneTouch button panel.
-
Page 8: What You Need
To use the PhotoPort scanner and software, you need the following: IBM PC (or 100-percent compatible) Pentium or equivalent Microsoft Windows 98, Windows 2000, or Windows Me One available Universal Serial Bus (USB) port Available internal memory (RAM): Windows 98—32 megabytes (MB) or more Windows 2000 or Windows Me—64 megabytes (MB) or more 160 MB of free hard disk space A VGA or SVGA monitor. -
Page 9: Installing
7700 USB S ISIONEER HOTO CANNER NSTALLATION UIDE Installing This section of the guide explains how to connect your PhotoPort 7700 scanner to a USB port. The PaperPort CD includes all the necessary installation files, as well as the PaperPort software files and other software files. Note: If your computer is connected to a Novell network, see “Renaming Network Drives”... - Page 10 STEP 1: I NSTALLING THE APER OFTWARE Note: If the PaperPort CD does not automatically start, make sure the CD drive’s door is completely shut. If the CD still doesn’t start, the Autorun option on your computer is turned off. Click the Windows icon named My Computer.
-
Page 11: Step 2: Connecting The Scanner
7700 USB S ISIONEER HOTO CANNER NSTALLATION UIDE STEP 2: C ONNECTING THE CANNER Your PhotoPort 7700 scanner connects to any available USB port. Check your computer’s user’s guide for its USB port locations. Note: You do not have to shut off the power to your computer when connecting the scanner to a USB port. - Page 12 STEP 2: C ONNECTING THE CANNER 3. Turn the scanner over to see the locking tab on the bottom. Slide the locking tab to the unlocked position. Unlocked position 4. Plug the power adapter cable into the power jack on the back of the scanner.
-
Page 13: Step 3: Checking Out Your Scanner
7700 USB S ISIONEER HOTO CANNER NSTALLATION UIDE The orange light on the front of the scanner comes on indicating the scanner is receiving power. Your computer recognizes that a scanner has been plugged into the USB port and automatically loads the appropriate software from the CD to run the scanner. -
Page 14: If The Scanner Is Not Properly Connected
STEP 3: C HECKING CANNER To check the status of the scanner: 1. Place the mouse pointer on the scanner icon in the Windows taskbar. 2. Right-click the icon. The shortcut menu appears. 3. Choose About from the shortcut menu. A dialog box confirms that the scanner is properly connected. - Page 15 7700 USB S ISIONEER HOTO CANNER NSTALLATION UIDE • Is a cable loose or not plugged in securely? Inspect all cable connections. Make sure all the cables are plugged in securely. • Is the scanner’s power light on? If the light does not come on, plug the power adapter into another electrical outlet.
-
Page 16: Renaming Network Drives
Readme file, and the scanner icon still has a red X through it, you may have a malfunctioning scanner. Please see the technical support card that you received with your scanner for technical assistance telephone numbers. Also visit our web site at www.visioneer.com for additional technical information. ENAMING... -
Page 17: Scanning
7700 USB S ISIONEER HOTO CANNER NSTALLATION UIDE Scanning HREE AYS TO APER TEMS You can scan paper items by pressing a OneTouch button, by clicking a button on the screen, or from the PaperPort software. Note: To transfer images from a CompactFlash or SmartMedia removable memory card see “Transferring Images from Digital Memory Cards”... -
Page 18: Scanning Paper Items With The Onetouch Buttons
CANNING APER TEMS WITH THE OUCH UTTONS CANNING APER TEMS WITH THE OUCH UTTONS Pressing a scanner button scans the item, and then sends the image either to the printer or to a software application on your computer. To scan by pressing a OneTouch button on the scanner: 1. - Page 19 7700 USB S ISIONEER HOTO CANNER NSTALLATION UIDE When scanning is complete, a status message shows the destination application for the image. For example, if you pressed the Fax button, the destination application is your fax software. In the sample below, the scanned image appears on the PaperPort Desktop.
-
Page 20: About The Onetouch Buttons
CANNING APER TEMS WITH THE OUCH UTTONS BOUT THE OUCH UTTONS The OneTouch buttons are preconfigured for typical scanning tasks. To change the settings for the buttons, see “About the Configuration Dialog Box” on page 36. The following table lists the OneTouch buttons’ preconfigured settings: Button Function Preconfigured Settings... -
Page 21: Scanning Paper Items From The Button Panel On The Screen
7700 USB S ISIONEER HOTO CANNER NSTALLATION UIDE CANNING APER TEMS FROM THE UTTON ANEL ON CREEN Scanning from the button panel on the screen is just like pressing a scanner button, except you click the button on the screen. The scanner scans the item, and then sends the image either to the printer, or to a software application on your computer. -
Page 22: Transferring Images From Digital Memory Cards
RANSFERRING MAGES FROM IGITAL EMORY ARDS RANSFERRING MAGES FROM IGITAL EMORY ARDS Digital cameras save photographs on various types of removable memory cards. Using the slots on the front of the PhotoPort 7700 scanner, you can transfer images directly into your computer from the CompactFlash and SmartMedia cards without having to connect the camera to the computer. - Page 23 7700 USB S ISIONEER HOTO CANNER NSTALLATION UIDE RANSFERRING MAGES FROM OMPACT LASH AND MART EDIA ARDS The slot on the left side of the scanner is for CompactFlash cards. The slot on the right side of the scanner is for SmartMedia cards. To transfer images from the cards: 1.
- Page 24 RANSFERRING MAGES FROM IGITAL EMORY ARDS 2. Gently push the card into its slot until you feel it lock into place. If you are inserting a CompactFlash card, the release button pops out when the card is properly in place. The slot for SmartMedia cards does not have a release button.
- Page 25 7700 USB S ISIONEER HOTO CANNER NSTALLATION UIDE All of the images on the card are scanned to the PaperPort Desktop as thumbnail images. PaperPort automatically stores the images in a folder named with the date of the transfer. Each one has its own folder.
-
Page 26: Using Digital Media As A Hard Drive
RANSFERRING MAGES FROM IGITAL EMORY ARDS SING IGITAL EDIA AS A RIVE Your computer uses digital memory cards as external hard drives. After transferring the images, for example, you can erase them from the card so you can re-use it in your camera. On this Windows Desktop, Removable Disks G and H are the drive names assigned to... -
Page 27: Sending Your Images To Photoworks.com
7700 USB S ISIONEER HOTO CANNER NSTALLATION UIDE ENDING MAGES TO HOTO ORKS Using the Camera button on your scanner, you can transmit images over the internet to PhotoWorks.com, a photographic printing business. PhotoWorks.com will print the images on high-quality photographic paper and mail them back to you. - Page 28 RANSFERRING MAGES FROM IGITAL EMORY ARDS 3. Type a password in the Password box, then retype it in exactly the same form in the Reenter Password box. Typing it twice confirms your password. You may want to write your new password on a piece of paper in case you forget it. 4.
- Page 29 7700 USB S ISIONEER HOTO CANNER NSTALLATION UIDE 5. Fill in the fields with the appropriate information. The yellow fields are for required information. The other fields are for optional information. Red text indicates incorrectly entered information. For the expiration date of your credit card, enter a two digit number.
- Page 30 RANSFERRING MAGES FROM IGITAL EMORY ARDS The example above shows a set of images from a removable memory card, but the images to send to PhotoWorks.com do not have to be on a card. You can send any suitable images on your computer to PhotoWorks.com for printing.
- Page 31 7700 USB S ISIONEER HOTO CANNER NSTALLATION UIDE Information on the dialog box shows the estimated time to send your images over the internet to PhotoWorks.com. In the example above, the estimated time to send four images is 6 minutes. 6.
-
Page 32: Setting The Print Size, Print Area, And Number Of Prints
RANSFERRING MAGES FROM IGITAL EMORY ARDS ETTING THE RINT RINT UMBER OF RINTS PhotoWorks.com can print images on several different sizes of photographic paper. In addition to selecting a new size, you can also crop and rotate an image, and order additional prints. To change an image’s settings: 1. - Page 33 7700 USB S ISIONEER HOTO CANNER NSTALLATION UIDE 6. To crop the image, drag one of the cropping handles. Drag a cropping handle to select the portion of the image to print. Notice that the print area retains its length-to-width proportions based on the selected print size.
-
Page 34: Setting Photoworks.com Preferences
RANSFERRING MAGES FROM IGITAL EMORY ARDS 8. Click OK. Note: If you click Apply but then decide you want to uncrop the image, remove it from the PhotoWorks.com application, add the original image again, and start over. ETTING HOTO ORKS REFERENCES The preferences are for the default settings. -
Page 35: Setting Photoport Preferences
7700 USB S ISIONEER HOTO CANNER NSTALLATION UIDE Save images for which no prints were ordered.—select this option if you added images to the PhotoWorks.com application but did not place an order. The next time you open the application, the images are still available so you can order the prints. - Page 36 RANSFERRING MAGES FROM IGITAL EMORY ARDS 5. Click the PhotoPort button. 6. Select the options for the PhotoPort features. Upon insertion send all images to PaperPort—this is the default setting. If this option is selected, your scanner automatically reads the images on a card when it is inserted and transfers those images to the PaperPort Desktop.
-
Page 37: Pre-Selecting Images Before Transferring
7700 USB S ISIONEER HOTO CANNER NSTALLATION UIDE Drive letter assignment of Readers—your computer automatically assigns a drive letter name to the two slots for removable memory cards. To select a new drive letter name for a slot, click the “Change to” drop-down menu and choose a new letter. - Page 38 RANSFERRING MAGES FROM IGITAL EMORY ARDS 3. Select the images you do not want to transfer and click Remove. 4. When the remaining images are those you want to transfer, click Send Images. Your scanner transfers the images from the card and displays them in the appropriate destination application.
-
Page 39: Configuring The Scanner
7700 USB S ISIONEER HOTO CANNER NSTALLATION UIDE ONFIGURING THE CANNER To configure the scanner, display the Configuration dialog box and then select options for the scan buttons. You display the Configuration dialog box from either the shortcut menu or the Button Panel. To display the Configuration dialog box from the shortcut menu: 1. -
Page 40: About The Configuration Dialog Box
ONFIGURING THE CANNER BOUT THE ONFIGURATION IALOG The Configuration dialog box shows the current settings for each scanner button. The tabs across the top of the dialog box correspond to the buttons. Clicking a tab shows the current settings for the corresponding button on the scanner. - Page 41 7700 USB S ISIONEER HOTO CANNER NSTALLATION UIDE Select Configuration—the list of the button’s scan configurations. The configuration settings include: color, black and white, or grayscale, resolution in dots per inch (dpi), page size, brightness, and contrast. To see the details about a configuration, click its icon in the list. Click the icon again to close the detailed information.
-
Page 42: Getting Help
ONFIGURING THE CANNER ETTING You can get help with the scanner’s features or any of the options on the Configuration dialog box using either of the following methods: When the Configuration dialog box is displayed, press the F1 key on the computer’s keyboard. -
Page 43: Creating New Configurations
If you select another application, the configurations are for that application. If you want to scan using the Visioneer Scan Manager Pro, click the option, Configure before Scan. Now when you press the selected scanner button, the Visioneer Scan Manager Pro dialog box appears first and you can use it to scan. -
Page 44: Adjusting Scan Settings And
ONFIGURING THE CANNER DJUSTING ETTINGS AND ETTINGS When scanning using a configuration that you created yourself, you can adjust that configuration’s scan settings and page settings. For example, if the scanned image is too dark, you can adjust the brightness of the scan setting. - Page 45 7700 USB S ISIONEER HOTO CANNER NSTALLATION UIDE 3. Click the Edit button. The dialog box appears for adjusting the scanning settings of the selected configuration. 4. Adjust the scan settings that you want. Mode—Select Black/White to scan in black and white. For example, letters and memos are usually scanned in black and white.
- Page 46 ONFIGURING THE CANNER 5. Click the Page Settings tab to adjust the scan page settings. Page Size—Choose a page size from the drop-down list. The outlines on the picture represent the various page sizes. Clicking one of those outlines also selects it as the page size for the scan. If you select the Custom option from the drop-down list, boxes appear in place of the picture.
- Page 47 7700 USB S ISIONEER HOTO CANNER NSTALLATION UIDE Gamma—Drag the slider to improve how the colors in a scanned image look on your monitor. Gamma correction allows you to achieve precise color matching. Because the computer cannot always transmit the exact color information to the hardware, you may have to make some color adjustments using the Gamma feature.
-
Page 48: Setting Preferences
ONFIGURING THE CANNER ETTING REFERENCES The preferences apply to each button and to the scanner. To set preferences: 1. On the Configuration dialog box, select the tab for a button to set its preferences. 2. Click the Preferences tab on the Configuration dialog box. Preferences tab The Preferences dialog box appears. - Page 49 7700 USB S ISIONEER HOTO CANNER NSTALLATION UIDE fall into these categories. For example, the destination applications for the email button are usually email applications. By selecting the Show All Destinations option as the preference for the email button, all the other types of applications are included in the list of email destination applications.
- Page 50 ONFIGURING THE CANNER Show Scanner Icon in Windows Taskbar—Select this option to see the small icon representing the OneTouch scanner in the Windows taskbar Folder for Temporary Images—Click the Folder button and then select a folder for the scanner’s temporary images. During scanning, a temporary file contains scan information about the image.
-
Page 51: Scanning From The Paperport Software
Desktop appears. 2. From the PaperPort File menu, choose Select Source. The Select Source dialog box appears, and shows the Visioneer Scan Manager Pro (as well as all other Twain devices installed on your computer). 3. Choose Visioneer Scan Manager Pro, and then click Select. -
Page 52: Scanning An Item With The Twain Button
PaperPort software. You can scan many types of paper items, from small business cards to A4-sized pages. Note: Your Visioneer PhotoPort scanner is initially set to scan from the PaperPort software with the setting Color Document—Faster. To scan a black-and-white image, select one of the other settings. To scan at a higher resolution for a color image, select Color Document—... - Page 53 7700 USB S ISIONEER HOTO CANNER NSTALLATION UIDE Scan Reflective Using is for scanning paper items. Click an icon to select a configuration—Color, Grey Scale, or Black&White. This example shows the Color/ Custom configuration is selected. Clicking the “+” sign in front of Custom shows Custom’s scan settings as a list.
- Page 54 CANNING FROM THE APER OFTWARE To scan manually: 1. On the Scan Manager Pro, select a configuration for the scan. For example, select Color/Custom to scan a color item with the preset Custom scan settings. That configuration’s settings appear as a list. Click the “+” sign to see the full list of scan settings.
- Page 55 7700 USB S ISIONEER HOTO CANNER NSTALLATION UIDE Thumbnail image To scan automatically: 1. Click AutoScan. The scanner uses your preselected resolution setting for the configuration you selected. See “Setting Preferences” on page 66 to set the AutoScan settings. In addition, your PhotoPort 7700 scanner has built-in image analysis capabilities that find the optimum combination of settings for the item you’re scanning.
-
Page 56: Getting Help With The Paperport Software
CANNING FROM THE APER OFTWARE The autoscanned image appears as a thumbnail on the PaperPort Desktop. 2. Use the PaperPort software to work with the image. Please see the PaperPort Getting Started Guide and PaperPort User’s Guide on the CD for more information about using the PaperPort software. -
Page 57: Adjusting The Settings On The Scan Manager Pro
DJUSTING THE ETTINGS ON THE ANAGER You can adjust the scan settings on the Visioneer Scan Manager Pro to produce the best possible image. To adjust a setting: 1. Click a setting in the list of settings, or click its corresponding button on the right side of the Scan Manager Pro. -
Page 58: Saving A New Profile
DJUSTING THE ETTINGS ON THE ANAGER Click to close the settings panel Note: The information in the scan settings list and the options that you select on the various settings panels are interactive. That is, as you change the settings on the panel, the numbers in the list on the left also change. - Page 59 7700 USB S ISIONEER HOTO CANNER NSTALLATION UIDE 3. Click Save As. The Save Profile dialog box appears. 4. Type a name for the new profile. 5. Select the options you want: Store the custom output image size in this Profile—you can create a custom image size as part of the settings;...
-
Page 60: Adjusting The Resolution And Sharpness
DJUSTING THE ETTINGS ON THE ANAGER DJUSTING THE ESOLUTION AND HARPNESS Resolution determines the amount of detail you can see in the scanned image. The resolution setting for the scan is in dots-per-inch (dpi). The higher the resolution, the finer the details, however, higher dpi settings also produce larger files sizes. -
Page 61: Adjusting The Brightness And Contrast
7700 USB S ISIONEER HOTO CANNER NSTALLATION UIDE To adjust the resolution and sharpness: 1. To use one of the preset resolutions for typical scanned items, click one of the options in the list. For example, to set the resolution for scanning a business card, select Business Card (OCR). - Page 62 DJUSTING THE ETTINGS ON THE ANAGER The following figure shows the brightness and contrast options: To adjust the brightness and contrast: 1. Drag the Brightness slider to the left to make the item darker or to the right to make the item lighter. You can also type a number directly into the sharpness setting box, or click the up and down arrows next to the box to increase or decrease the setting.
-
Page 63: Adjusting Gamma, Saturation, And Color Hue
7700 USB S ISIONEER HOTO CANNER NSTALLATION UIDE You can also adjust the brightness and contrast by sampling portions of the image in the preview window. The three Sampler buttons correspond to the Black, Mid tones, and White portions of an image. To use the Sampler buttons: 1. - Page 64 DJUSTING THE ETTINGS ON THE ANAGER The following figure shows the color options: To adjust the color settings: 1. From the Channel drop-down menu, choose the individual color (Red, Green, or Blue) that you want to adjust, or choose All to adjust them together.
-
Page 65: Adjusting Output Size
7700 USB S ISIONEER HOTO CANNER NSTALLATION UIDE 3. Drag the Gamma, Saturation, and Color Hue sliders to the left to decrease the settings or to the right to increase the settings. You can also type a number directly into the setting boxes, or click the up and down arrows next to the boxes. - Page 66 DJUSTING THE ETTINGS ON THE ANAGER The following figure shows the output size options: To Auto Trim an item: 1. Click Auto Trim. 2. Click Trim. The scanner senses the edges of the item on the glass and draws a dotted line around the image in the window.
- Page 67 7700 USB S ISIONEER HOTO CANNER NSTALLATION UIDE To use the pointer to drag the line, make sure the pointer button is selected at the top of the window. 4. When the trimmed area is what you want, click Scan. To manually set the output size for an item: 1.
- Page 68 DJUSTING THE ETTINGS ON THE ANAGER Scan Info for the area The area you selected to scan. selected on the image. 4. If the dotted line is not exactly where you want it, put the pointer on the line and drag the mouse. To use the pointer to drag the line, make sure the pointer button is selected at the top of the window.
-
Page 69: Saving A Custom Size
7700 USB S ISIONEER HOTO CANNER NSTALLATION UIDE AVING A USTOM If you have several items of the same size, such as a group of small photographs, you can create a custom size and reuse it whenever scanning those items. To save a custom size setting: 1. -
Page 70: The Scan Info Box
DJUSTING THE ETTINGS ON THE ANAGER The following figure shows the information on the Scan Info box: Physical size of the image to scan. Location of the top left corner of the image in the Preview window. Size of the file of the scanned image Current location of the pointer as you... - Page 71 7700 USB S ISIONEER HOTO CANNER NSTALLATION UIDE To set the Scan Manager Pro preferences: 1. Click the Preferences button. The User Preferences dialog box appears. 2. Select the preferences you want: Enable selection of color bitdepths...—your PhotoPort 7700 scanner supports a tremendous range of colors, but other devices (called the TWAIN clients), such as older cameras that you can use with the Scan Manager Pro support only a 24-bit depth range of colors.
-
Page 72: Getting Help With The Scan Manager Pro
LEANING THE CANNER LASS AutoScan Resolution—you can scan an item by clicking the AutoScan button on the Scan Manager Pro. The scanner uses these resolution settings for the respective configurations: Color, Grey Scale and Black and White. Folder for Temporary Images—when you scan an item, its scanned image is initially stored in a folder before being sent to the PaperPort Desktop or some other application. -
Page 73: Visioneer Photoport 7700 Usb Scanner Specifications
7700 USB S ISIONEER HOTO CANNER NSTALLATION UIDE 7700 USB S ISIONEER HOTO CANNER PECIFICATIONS Bit Depth 42-Bit color (internal), 14-Bit gray (internal), 1-Bit line art/text Scanning resolution Optical resolution: 600 x 1200 dpi Maximum Item sizes 8.5 x 11.69 inches (21.6 x 29.7 cm) Scanner dimensions Height 2.25 inches (5.7 cm) - Page 74 7700 USB S ISIONEER HOTO CANNER PECIFICATIONS...
Need help?
Do you have a question about the PhotoPort 7700 and is the answer not in the manual?
Questions and answers