Table of Contents
Advertisement
Quick Links
Operating and Installation Instructions
Thank you for purchasing this KDK product.
• Please read these instructions carefully in order to use this
product correctly and safely.
• Before using this product, please give your special
attention to the SAFETY PRECAUTIONS.
• Please keep this Operating and Installation Instructions for
future use.
感谢您购买 KDK 储水式热水器。
• 请仔细阅读这些说明,以便正确、安全地使用本产品。
• 在使用本产品之前,请特别注意安全须知。
• 请保留安装和操作说明书以供将来使用。
Storage Water Heater
Model No.
(Household Use)
RG30AHM1
RG20AHM1
TABLE OF CONTENTS
BEFORE USING STORAGE WATER HEATER
SAFETY PRECAUTIONS .............................. EN2
PARTS IDENTIFICATION .............................. EN4
ACCESSORIES .......................................... EN4
HOW TO USE ............................................. EN5
MAINTENANCE .......................................... EN6
TROUBLESHOOTING ................................. EN7
SPECIFICATIONS ....................................... EN7
BEFORE INSTALLATION .............................. EN8
HOW TO INSTALL ....................................... EN9
TEST OPERATION ....................................... EN12
......................................................... CS4
............................................................ CS7
...................................................... CS8
(
)
EN2
EN5
CS2
CS5
CS8
Advertisement
Table of Contents

Related Manuals for KDK RG20AHM1

Summary of Contents for KDK RG20AHM1
-
Page 1: Table Of Contents
BEFORE INSTALLATION ………………………… EN8 HOW TO INSTALL ………………………………… EN9 TEST OPERATION ………………………………… EN12 Thank you for purchasing this KDK product. • Please read these instructions carefully in order to use this product correctly and safely. • Before using this product, please give your special attention to the SAFETY PRECAUTIONS. -
Page 2: Safety Precautions
BEFORE USING STORAGE WATER HEATER SAFETY PRECAUTIONS Make sure to follow these instructions In order to prevent accidents or injuries to the user, other people, and damage to property, please follow the instructions below. The following indications indicate the degree of damage caused by incorrect operation. Indicates risk of WARNING CAUTION... - Page 3 WARNING ● Switch off the Miniature Circuit Breaker (MCB) before any service to avoid electric shock hazards. ● In time of lightning/thunder, switch off the Miniature Circuit Breaker (MCB) in advance to protect the appliance against possible damage. ● When the shower is used by someone such as child, old person, sick person and physically handicapped person, the concern person is kindly requested to pay attention and check the shower temperature by using hand from time to time.
-
Page 4: Parts Identification
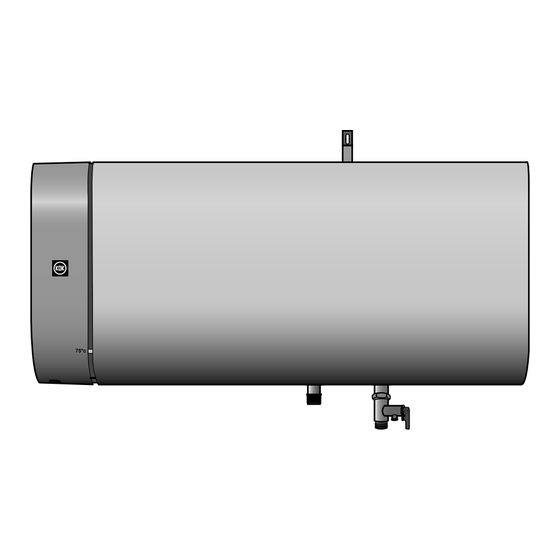
PARTS IDENTIFICATION ON/OFF DP (Double Pole) Switch Electrical Safety Hook Earth Heater Enclosure Hot Outlet Pipe Storage Tank Enclosure Miniature Circuit Breaker (MCB) Insulation Junction Box* Side Cover Parts not included (Brown) L (Blue) N Safety Valve (Green / Yellow Double Pole Auto Drain Valve End... -
Page 5: How To Use Storage Water Heater
The 75 °C LED (orange) remains on until water reaches the setting temperature approximately 75 °C. When the 75 °C LED (orange) is turned off, it indicated that the appliance is ready to use. Model No. Time required to reach a temperature of 75 °C (Approx.) RG30AHM1 60 minutes RG20AHM1 40 minutes Turn on the Cold Water Faucet. -
Page 6: Maintenance
MAINTENANCE 1. Enclosure cleaning Be sure to switch off the Miniature Circuit Breaker (MCB) beforehand. • Clean it with moist cloth. • Never use benzene, thinner, detergent, bleach and such for cleaning purpose. • Do not spray water to the appliance, nor put wet towels on it. •... -
Page 7: Troubleshooting
• No water fl ow out from the Drain Valve End when operate Safety Valve. 3. Special skill is required for repairing. Never try to repair the appliance by yourself. SPECIFICATIONS Model No. RG30AHM1 RG20AHM1 Power Supply 230 V a.c. 50 Hz... -
Page 8: How To Install Storage Water Heater En8
HOW TO INSTALL STORAGE WATER HEATER For Installer WARNING ● Do not install, remove or reinstall the appliance by yourself. • Improper installation will cause leakage, electric shock, fi re or injury. Installation and wiring must be done by competent personnel. ●... -
Page 9: How To Install
28 mm 237 mm 142 mm 237 mm 318 mm 228 mm 228 mm View from the bottom View from the bottom Marking Emboss at Marking Emboss at bottom of the appliance bottom of the appliance RG30AHM1 RG20AHM1 Table 1... - Page 10 Installation Packing. Refer below position. View A Install Safety Hook at this position View A RG30AHM1 Install Safety Hook at this position View A RG20AHM1 Lead the Power Cord from the appliance thru the designated position. Make sure that Power Cord is not trapped between the appliance and wall.
- Page 11 Install the appliance by lifting it and align the Marking Emboss on the bottom to the position C (refer to Table 1), slightly lift up 25 mm (approx.) from the position C and push the appliance towards the Wall Hook, then slowly slide down the appliance until the Wall Hook is fully inserted as illustrated.
-
Page 12: Test Operation
5. Electrical wiring • Make sure rated electrical supply is supplied to this appliance. • Connect the Power Cord to the terminal of Junction Box. • The Power Cord must be fi xed and placed neatly. Do not bend, twist, pull, modify, bundle the Power Cord or place or hang anything on the Power Cord. -
Page 13: Cs2
● ● • 如果电源线损坏,必须由制造商、其服务中心或类似合格人员更换,以避免危险。 ● ● ● • 其他型号的配件将不适合此产品,并可能导致危险情况。 ● ● • 本产品只能由合格的维修技术人员进行维修/保养。 • 请联系您的服务中心进行维修。 ● ● ● ● 异常 / 故障例子: • ELB 复位棒不能还原。请参阅第 CS12 页,测试法。 • 操作期间发现燃烧的气味或冒烟。 • 外壳变形或异常发热。 • 电源线异常发热。 → 请马上通知授权经销商以进行维修 / 修理。 ● ●... - Page 14 ● ● ● ● CS12 ● (MCB) ● ● ● ● ● ● ● ON/OFF ● ● ●...
-
Page 15: Cs4
ON/OFF (大约长度 (L) : 1.5 m) * 确保电源线已连接至接线盒的端子。 * 确保接线盒和电源线不与水接触。 75 ˚C LED ELB LED (M4 × 7.5) (Ø10 × 50) (Ø6 × 25) (M4 × 20) 螺丝螺纹 螺拴 A 螺拴 B 墙钩 螺丝 A 螺丝 B 安全挂钩 (1 件) (2 件) (1 件) (2 件) -
Page 16: Cs5
ELB LED (红色) 和 75 °C LED (橙色) 都会亮起。 这显示供电和加热过程正在进行。 75 °C LED (橙色) 保持亮起,直到水达到大约 75 °C 的设定温度。 当 75 °C LED (橙色) 熄灭时, 表示单元已准备好使用。 型號 达到 75 °C 温度所需的时间 (大约) 60 分钟 RG30AHM1 40 分钟 RG20AHM1 打开冷水水龙头。 逐渐打开热水水龙头以获得所需的水温。 • 使用一段时间后,发现水温下降,请等待储水箱内的水再次加热,直至 75 °C LED(橙色)熄灭。... -
Page 17: Cs6
先要确认电流回路断开器是否关掉。 • 用沾湿棉布来擦净。 • 决不可使用挥发油,信纳水,洗涤剂,漂白剂,等用于清洁目的。 • 不可向产品喷水或挂上湿毛巾。 • 为了避免刮痕,请确保使用合适的布料来清洁外壳表面。 • 请勿在产品上放置任何材料。 在高温条件下,大部分水会沉积水垢 (白色沉积物) 。 为防止储水箱和排水阀端积聚水垢,每月操作一次安全阀排 水。请按照以下说明操作: • 内置安全阀可防止产品内水压过高。 如果压力超过 0.75 ± 0.1 MPa (7.5 ± 1 Bar),安全阀将自动操作并通 过排水阀端排出水,排水阀端不得关闭或堵塞。 • 當進水口使用增壓幫浦或單向閥時,由於水壓過高,安全閥會啟動,從排水閥端滴水是正常現象。 • 每月操作一次安全阀,以防止储水箱和排水阀端部积聚水垢。 关闭或堵塞排水阀端可能会对产品成严重损坏。 • 储水式热水器必须使用符合当地水质标准的水,以避免污染物和其他杂质对热水器及其部件造成腐蚀, 从而造成危险情况。 不遵守将导致保修失效。 关闭电源。 打开调温水龙头的热水水龙头,释放热水并让冷水填满储水箱。 释放大量热水,直至水温逐渐变冷。 关闭主供水系统的主水阀。... -
Page 18: Cs7
• 检查进水源是否连接至安全阀。 2. 使用本品时万一发现下面的各项失常现象,请停止使用储水式热水器及马上通知服务中心。 • 漏水。 • 水温调整不良。 • ELB LED 不亮。 • 操作安全閥時,排水閥端無水流出。 3. 上述各项的修理,必须让专门技术员来修理,更不可自行维修。 RG30AHM1 RG20AHM1 230 V a.c. 50 Hz 2500 W 30 L 20 L 0.75 MPa / 7.5 bar / 108.78 psi 323 mm x 704 mm × 310 mm 323 mm ×... - Page 19 ● • 不正确的安装方式将引起漏电,触电,火患或受伤。安装和接线必须由专业人员操作。 ● ● ● ● ● ● ● ● ● ● ● ● ● ● ● ● ● • 安装必须由合格人员完成。 • 在进行电力连接之前,必须完成所有管道工程,并且储水箱已充满水。 这将防止对产品造成任何损坏。 • 入口和出口连接应使用能承受高温和压力的合适管道。...
-
Page 20: Cs9
ELB 复原控制棒向下滑下不得有任何阻碍。 150 mm 250 mm 250 mm 建议先标记位置 C,然后标记位置 A1 、A2 和 B。位于产品底部的标记浮雕可 作为位置 C 的指导。确保标记浮雕与位 1.7 m 置 C 对齐。 222 mm 28 mm 237 mm 318 mm 237 mm 142 mm 228 mm 228 mm RG30AHM1 RG20AHM1... - Page 21 1 中的标记 B,使用钻头在墙上为安全挂钩钻 根据 一个孔。将螺拴 B 插入孔中。 Ø6 mm 将墙钩插入螺拴 A。确保墙钩的整个螺纹都在墙壁中。 请勿将墙钩拧得过紧。 完全拧紧壁钩后,如果壁钩不在向上位置, 3 所示。 则逆时针旋转壁钩直至其处于向上位置,如 这是为了确保壁钩能够承受满载的重量 并保持器具的稳定性。 将设备挂在墙上之前,请在设备背面安装安全挂钩。 请参考下图: 使用安装包装中提供的螺丝 A 将安全 确保安全挂钩牢固地安装。 以 的力量 1.3 N.m (13 kgf.cm) 拧紧螺丝 A 以固定安全挂钩。 挂钩拧紧在设备背面。 参考下面的位 置。 RG30AHM1 RG20AHM1 将电源线从设备上引出至指定位置。 确保电源线没有夹在设备和墙壁之间。 CS10...
- Page 22 将产品提起安装,并将底部的标记浮雕对准位置 C(请参阅 1), 从位置 C 稍微抬起 25 mm(大约),并将产品推向壁挂挂钩, 然后缓慢滑动向下放下产品,直至壁挂挂钩完全插入,如图所示。 为确保产品牢固地固定在挂钩上,请检查: 将产品推向墙壁。 左右推动产品。 确保产品没有倾斜(如下图所示)。 iii. • 使用合适的工具确保产品 的水平位置。 将螺丝 B 穿过安全挂钩上的孔拧入螺拴 B。 将防水胶带(未提供)缠绕在入口螺纹上。 将安全阀放置在入水口处,拧紧以避免漏水。 安全阀必须安装在入口处并如图所示向下放置。 将橡胶垫圈(未提供)放置在安全阀和主水阀(未提供) 的冷水入口之间。 拧紧以避免漏水。 将橡胶垫圈(未提供)放置在出水口和热水出口之间。 拧紧以避免漏水。 然后,连接到混合水龙头(未提供)。 连接请参阅 CS4 页。 软管(未提供)固定在安全阀的排水阀端,并且必须在开放的大气 中朝排水点向下安装。 请确保软管没有堵塞或扭结。 • 管道安装完成后,确保产品没有处于 8 (iii) 中所示的倾斜位置。 •...
-
Page 23: Cs12
• 确保为本产品提供额定电源。 • 将电源线连接至接线盒的端子。 • 电源线必须固定并放置整齐。 请勿弯曲、扭曲、拉扯、改装、捆绑电源线或在电源线上放置或悬挂任何物品。 ● ● • 在打开电源之前,请打开混合水龙头之一的热水龙头,确保储水箱已充满水,并且水流稳定。 • 启开电流回路断开器。 • 启开及 ON/OFF 关闭挚。 • ELB LED(红色)和 75 °C LED(橙色)都会亮起。 (将 ELB 复原控制棒推上) • 按下 ELB 的测试按钮。 - 如果 ELB LED 熄灭(ELB 复原控制棒落下)并将 ELB 复原控制棒向上推,则属于正常现象。 - 检查内置 ELB(每月一次),以避免对用户造成财产损失、严重伤害或死亡等危险。 •... - Page 24 Printed in Malaysia DH940ARG30AHM1S0 H0924Y0...
Need help?
Do you have a question about the RG20AHM1 and is the answer not in the manual?
Questions and answers