Advertisement
Advertisement
Table of Contents

Related Manuals for AOMEKIE 40070

Summary of Contents for AOMEKIE 40070
- Page 1 AOMEKIE 400X70mm ASTRONOMICAL TELESCOPE INSTRUCTION MANUAL...
-
Page 2: Table Of Contents
Contents Introduction & Warning..................2 Telescope Parts......................3 Assembly........................4 Telescope Use......................7 Tips.........................9 Cleaning & Maintenance of Optics................9 What to Look for in the Sky.................10... -
Page 3: Introduction & Warning
Introduction Congratulations on purchasing your new telescope. We hope it will give you many years of enjoyment as it opens your eyes to some of natures most wondrous sights. Before use, please read this manual carefully and completely. It contains the information you will need to know to use your telescope. Warning TO AVOID DAMAGE TO YOUR EYES, NEVER VIEW THE SUN OR ANY OTHER OPTICAL DEVICE WITH THE TELESCOPE! INSTANT AND IRREVERSIBLE DAMAGE... -
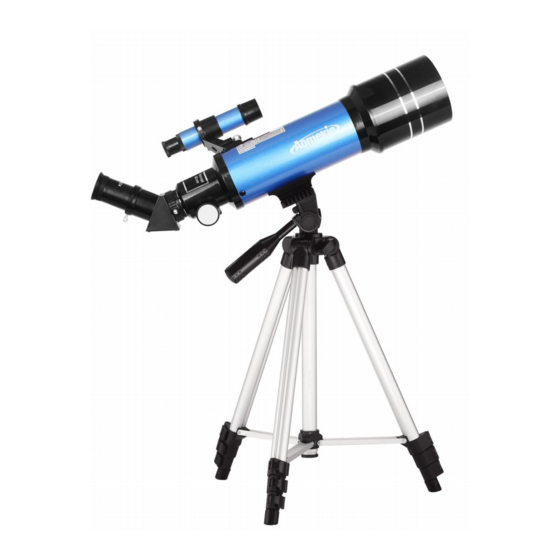
Page 4: Telescope Parts
Telescope Parts 8. Tilt lock knob 1. Main tube 9. Azimuth lock knob 2. Objective 10. Center column lock knob 3. Finderscope 11. Tripod leg 4. Eyepiece 12. Leg clamps 5. Diagonal lens 13. Phone adapter 6. Focusing knob 7. Pan handle Note: Cellphone not include... -
Page 5: Assembly
Assembly 1. Extend the tripod legs to Gently pull the tripod apart and desired length by opening close the leg clamps. the leg clamps. 4. Loosen another lock knob and use 3. Loosen the lock knob and move the pan handle to move the pan head the center column up or down to desired direction. - Page 6 5. Srew the threaded post of the plate 6.Insert the finderscope(14) into into the socket on the main tube the main tube(2) until hear a "click" mounting plate. 7.The horizontal position of the finder mirror 8. Loosen the thumbscrew and and the lens barrel can be adjusted by adjusting the three screws until the same remove the cap.
- Page 7 11. Fold down the eye cup before Mount the phone adapter. mount the phone adpater. Finally mount the cellphone. Assembly is completed...
-
Page 8: Telescope Use
Telescope Use 2. Loosen screw and handle, look into 1. Remove all covers. the eyepiece and turn the telescope to your target. 4. Roll focusing knob to make target Tighten the screw and handle. clear. - Page 9 5. Look into the eyepiece of 6. For calibration, move the finderscope finderscope, roll the eyepiece of until the target is the same as in the finderscope until target get clear. telescope. 7. Look into the eyepiece of 8. Look into the eyepiece of telescope, finderscope, turn the direction of roll the focusing knob to make the telescope to your target, then tighten...
-
Page 10: Tips
Tips 1. Always start viewing with your low power eyepiece since its wide viewing field will make it easier to locate objects. By the way, you will notice that stars, still look like points of light when seen through your telescope. This is because they are so far away. -
Page 11: What To Look For In The Sky
2. After using the telescope there might be dew condensation, on the optical surfaces. When the telescope is brought inside remove the dust caps and allow the moisture to evaporate naturally Point the telescope downwards so as to minimize the collection of airborne dust. 3. - Page 12 The moon The moon is the easiest target to find in the night. When it is in the full position, when the entire face is lit, then it bathes the night with a silvery light washing out the rest of the sky from all but the brightest objects. The best time to view the moon is actually not when it is full but rather anytime up to the first quarter, this is when the face appears to be half lit up.
- Page 13 This gives the planet varying crescent shapes, as if a bite were taken out of it. Mars is the red planet. It is very noticeably red when rising above the horizon and stands out like a beacon in the night sky. The apparent brightness of Mars varies as the planet orbits around the sun so throughout its time being visible to us it will brighten and dim depending on how our two planets are aligned relative to each other.
- Page 14 AOMEKIE Thanks for choosing us. Enjoy yourself!
Need help?
Do you have a question about the 40070 and is the answer not in the manual?
Questions and answers