Table of Contents
Advertisement
1009 507 802
1009 507 805
Item #
1009 507 819
1009 507 829
Model # GB333
GB500
GB750-SL
GB1000-SL
USE AND CARE GUIDE
FOOD WASTE DISPOSER
Questions, problems, missing parts? Before returning to the store,
call Glacier Bay Customer Service
8 a.m. - 7 p.m., EST, Monday - Friday, 9 a.m. - 6 p.m., EST, Saturday
1-855-HD-GLACIER
HOMEDEPOT.COM/GLACIERBAY
THANK YOU
We appreciate the trust and confidence you have placed in Glacier Bay through the purchase of this food waste
disposer. We strive to continually create quality products designed to enhance your home. Visit us online to see our
full line of products available for your home improvement needs. Thank you for choosing Glacier Bay!
IM-GB-231
Advertisement
Table of Contents

Related Manuals for Glacier bay GB500


Summary of Contents for Glacier bay GB500
- Page 1 THANK YOU We appreciate the trust and confidence you have placed in Glacier Bay through the purchase of this food waste disposer. We strive to continually create quality products designed to enhance your home. Visit us online to see our full line of products available for your home improvement needs.
-
Page 2: Table Of Contents
Table of Contents Safety Information .............2 Installation ..............6 Warranty..............3 Operation..............13 Pre-Installation ............4 Continuous Feed ..........13 Planning Installation ..........4 Tips For Successful Operation ......13 Typical Installations ..........4 Care and Cleaning ...........13 Tools Required ............4 Troubleshooting ............14 Package Contents ..........5 Recommended Parts and Accessories ....15 Safety Information INSTRUCTIONS PERTAINING TO A RISK CAUTION: Be sure to review safety instructions... -
Page 3: Warranty
Models that fail to operate during its warranty period, will be repaired or replaced. This Warranty includes In-Home Warranty for Glacier Bay® models that fall into disrepair due to manufacturing defect. This warranty is limited to the original purchaser. Original sales receipt required. -
Page 4: Pre-Installation
DOUBLE BOWL CENTER OUTLET DOUBLE BOWL END OUTLET □ Single bowl □ Double bowl center outlet □ Double bowl end outlet For your specific disposer dimensions, contact Glacier Bay customer service at 1-855-HD-GLACIER. TOOLS REQUIRED Flat head Plumber’s screwdriver putty... -
Page 5: Package Contents
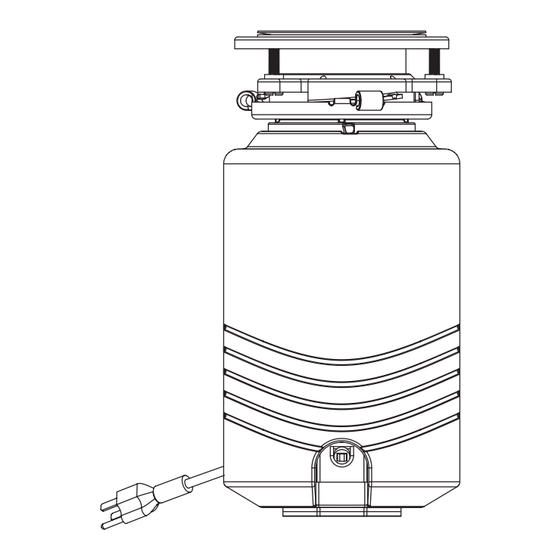
Pre-Installation (continued) PACKAGE CONTENTS Part Description Stopper Removable splash guard Sink flange Fiber gasket Support flange Upper mount ring Mount screws Retaining ring Cushion ring (pre-installed between upper mount ring and lower mount ring) Lower mount ring* (pre-installed on the disposer) Silver Guard magnetic catch ring**... -
Page 6: Installation
Installation Disassembling the Disposer Preparing the Sink Mounting Assembly IMPORTANT: This is a good time to clean out NOTE: The cushion ring and lower mount ring the trap and drain lines by running a drain auger will remain attached to the disposer during or plumber’s snake before installing your new installation. - Page 7 Installation (continued) Installing the Mounting Preparing the Dishwasher Assembly Connection □ □ From under the sink, insert the fiber gasket Using a blunt instrument (2) (steel punch or (D), then the support flange (E), and then the wooden dowel), knock out the entire plug. Do upper mount ring (F).
- Page 8 Installation (continued) Attaching the Disposer IMPORTANT: Before you connect the disposer to the mount assembly under the sink, make sure the lower mount ring is in place and the black cushion ring is still engaged properly to the top of the disposer hopper.
- Page 9 Installation (continued) Mounting the Magnetic Catch Attaching the Discharge Elbow Ring (Included with 3/4 HP and 1 HP Models) NOTE: The enclosed screw set is required for installation. Do not use a previously installed WARNING: This is not a toy. Keep uninstalled screw set.
- Page 10 Installation (continued) Connecting the Dishwasher Hose □ Connect the dishwasher hose (1) to the disposer (L) using a hose clamp. □ Make sure all plumbing connections are tight and in accordance with all plumbing codes and ordinances. □ Run the water and check for leaks. NOTE: An air gap (2) may not be required for all installations.
- Page 11 Installation (continued) Removing Power Cord for Permanent Wiring A. REMOVING THE END PLATE B. REMOVING THE STRAIN C. CUTTING THE ELECTRIC RELIEF CLIP SUPPLY WIRES □ After turning off power supply, unbolt the two nuts and remove □ Using a flat head screwdriver □...
- Page 12 Installation (continued) Making the Electrical Connections Using Permanent Wiring □ Turn off or disconnect all power to the wall WARNING: Electric shock hazard. Turn off junction box serving the disposer. power before installing or servicing the disposer. All wiring must comply with local electrical codes. □...
-
Page 13: Operation
Operation CONTINUOUS FEED NOTE: The anti-jam swivel impellers make a clicking sound as they initially swing into place. This indicates normal operation. □ Remove sink stopper. Turn on a medium flow of cold water. □ Turn switch to ON position; your motor is turning at full speed and ready to use. □... -
Page 14: Troubleshooting
Troubleshooting Problem Possible Cause Solution □ Loud noises (other than These are usually caused Turn off electrical switch and water. those during grinding of by accidental entry of a □ After disposer has stopped, remove splash guard, small bones and fruit pits). spoon, bottle cap or other remove object with long handled tongs, and foreign object. -
Page 15: Recommended Parts And Accessories
Recommended Parts and Accessories Part Description 22-0003Q-00 3-Bolt Garbage Disposer Mount Fits Most Sinks 22-0002G-00 Removable Splash Guard For 3-Bolt Mount Disposers 20-MSAS-65-MW Single Outlet Air Switch For Disposers With Chrome Button 22-0003R-00 Extended Sink Flange With Extended Screws 22-MSELB-2 Outlet Elbow Kit (Elbow, Gasket, Flange, Flange Screws) 22-0001G-00 Stainless Steel Disposer Stopper... - Page 16 Questions, problems, missing parts? Before returning to the store, call Glacier Bay Customer Service 8 a.m. - 7 p.m., EST, Monday-Friday, 9 a.m. - 6 p.m., EST, Saturday 1-855-HD-GLACIER HOMEDEPOT.COM/GLACIERBAY Retain this manual for future use. IM-GB-231...
Need help?
Do you have a question about the GB500 and is the answer not in the manual?
Questions and answers