Table of Contents
Advertisement
Advertisement
Table of Contents

Related Manuals for Sangean DAR-101


Summary of Contents for Sangean DAR-101
- Page 1 Operating instruction DAR-101 Digital MP3 Recorder 3A81TM0S10000...
-
Page 2: Table Of Contents
Table of contents Important security notice ............. 2-3 Introduction ................4 Controls and connections ........... 5-9 Battery operation ..............10 Using the AC adaptor / Charging the batteries ....11 Setting the clock time ............12 Setting the date ..............13 Recording from an external device ........ -
Page 3: Important Security Notice
Important safety instructions 1. Read and understand all safety and operating instructions before the 9. Power sources: The recorder should be operated only from the type recorder is operated. of power source indicated on the marking label. If you are not sure of the type power supply to your home, consult your recorder dealer or power company. - Page 4 15. Never push liquids or objects of any kind into this recorder through opening as they may touch dangerous voltage points or short-out parts that could result in a fire or electric shock. Never spill liquid of any kind on the recorder. 16.
-
Page 5: Introduction
Introduction The Sangean DAR-101 Digital MP3 recorder provides the following range of features: High specification digital voice activation recorder Supports MP3 and WMA media with SD card (up to 32GB compatible) or USB 2.0 interface Built –in 2 higher sensitivity internal microphones with dual AGC... -
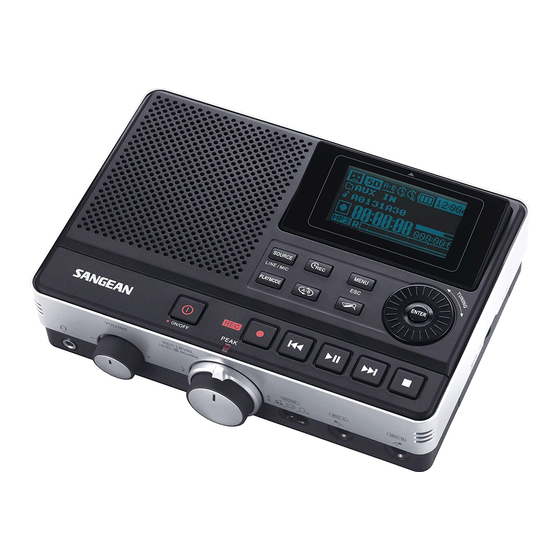
Page 6: Controls And Connections
Controls and connections Speaker Play/pause LCD display Rewind button Pop-up LCD screen Record button Menu / Esc button Peak indicator Enter button Power On/Off button Tuning control Repeat A-B File browser button Playmode button Stop button Source button Fast-forward button Timer record button... - Page 7 Controls and connections Alkaline/NiMH/NiCad rechargeable battery switch USB socket SD card slot...
- Page 8 Controls and connections Battery compartment...
- Page 9 Controls and connections AC in Line out Digital out Phone in Line in Phone in Remote...
- Page 10 Controls and connections Volume control Telephone / recorder / reminder mode switch Recording level control / Balance control Telephone / recorder / reminder mode switch Headphone jack Mic in right Mic in left...
-
Page 11: Battery Operation
4. If the recorder is not to be used for any extended period of time it is recommended that the batteries are removed from the recorder. We would recommend for economy that the DAR-101 is used via the mains adaptor whenever possible with battery operation for occasional or stand-by use only. -
Page 12: Using The Ac Adaptor / Charging The Batteries
Using the AC adaptor Charging the batteries Your recorder is supplied with a Mains Adaptor. Reduced power, distortion and a “stuttering sound” or low battery sign “ ” flashing on the display are all the signs that the batteries need 1. -
Page 13: Setting The Clock Time
Setting the Clock and Date Setting the clock time The clock display of DAR-101 can be set to 12 or 24 hour format. 1. Press the Menu button while the recorder is switched on. 2. Rotate the Tuning control until SYSTEM SETUP is highlighted, and press the Enter button to enter the setting. -
Page 14: Setting The Date
Setting the date 1. Press the Menu button while the recorder is switched on. 2. Rotate the Tuning control until SYSTEM SETUP is highlighted, and press the Enter button to enter the setting. 3. Rotate the Tuning control until TIME & DATE is highlighted, and press the Enter button to enter the setting. -
Page 15: Recording From An External Device
Recording Instructions Recording from an external device The DAR-101 can be used with any audio device that has a headphone jack or Line Out. 1. First press and hold the power button to turn on the recorder. 2. Ensure an SD card with sufficient space is inserted correctly in the SD card slot. -
Page 16: Recording With Timer Record
Recording with timer record The recording function of DAR-101 can be set up with a timer that can start recording and stop at a preset time. 1. First press the Power button to turn on the recorder, and switch the mode switch to Music mode. Press and hold the Timer Record button to enter the setting. - Page 17 6. The hour digits of the STOP TIME will begin flashing. Rotate the Tuning control to select the hour as required, and press the Enter button to confirm the setting. Then the minute digits of the stop time will begin flashing. Rotate the Tuning control to select the minute as required, and press the Enter button to confirm the setting.
-
Page 18: Record Using Voice Reminder Mode
Record using voice reminder mode 1. First press the Power button to switch on the recorder. 2. Switch the mode switch to Reminder mode. 3. Ensure an SD card with sufficient space is inserted correctly into the SD card slot. 4. -
Page 19: Var Function (Voice Activated Recorder)
VAR function (Voice Activated Recording) 1. Press the Menu button to enter the main menu. 2. Rotate the Tuning control until RECORD SETUP is highlighted, and press the Enter button to enter the setting. 3. Rotate the Tuning control until RECORD VAR is highlighted, and press the Enter button to enter the setting. -
Page 20: Recording A Telephone Call
Recording a telephone call A telephone patch cord is included in your DAR-101 You will also need a phone line splitter for recording telephone calls. 1. Connect the dual tip end of your patch cord to the two Phone In sockets on the rear of the DAR-101. - Page 21 7. Rotate the Tuning control to select REC BEEP and press the Enter button to enter the setting. Rotate the Tuning control to choose ON, and press the Enter button to confirm the setting. This will allow you to insert a BEEP tone when the recorder starts recording a phone call.
-
Page 22: Recording With Voice Activated Recorder With Timer
Recording with voice activated recording with timer The DAR-101 may also be set up for a timed and voice activated recording. This might be used to record noises in a room in a certain time of day. It could also be used to record a conference when you can not be there. -
Page 23: Advanced Recording Setup
Advanced recording setting Recording compression ratio 1. To set up the compression ratio of the MP3 files of your recording, first press the Menu button to enter the main menu. 2. Rotate the Tuning control until RECORD SETUP is highlighted, and press the Enter button to enter the setting. - Page 24 Remote switch operation Some radios have a special Remote Switch connection provided. This is for directly recording from a built in timer on the radio. The DAR-101 may be compatible with the remote switch supplied on these receivers. Please refer to the radio or device’s manual for proper operation of this feature.
-
Page 25: Playback Instructions
Playback instructions 1. To play your external audio device, first connect an SD card / USB device to the SD card slot / USB socket on the right hand side of the recorder. Press the File Browser button to enter the menu of the files in your USB device or SD card. -
Page 26: Timer Play Function
Timer play function You can set up a specified time with the timer play function of DAR-101, and your recorder will automatically play your audio tracks when the time is up. 1. Press the Menu button to enter the main menu. - Page 27 Tuning control as before to set the minute as required, and press the Enter button to finish the setting. 6. Now you have set the timer play of your DAR-101. The recorder will automatically start playing the files from your SD card or USB...
-
Page 28: Playback Repeating Modes / Sd Card Operation
Playback repeating modes 1. Press the PlayMode button repeatedly to choose the repeat modes from repeat one / folder / all / random when the recorder is playing audio files from SD card / USB device. 2. You can repeat a certain section of an audio file with your recorder as well. - Page 29 SD card operation 1. Press the Menu button to enter the main menu, and press the Enter button. 2. Rotate the Tuning control until SYSTEM SETUP is highlighted, and press the Enter button to enter the setting. 3. Rotate the Tuning control until SD CARD is highlighted, and press the Enter button to enter the setting.
-
Page 30: Advanced Setting
Advanced setting Contrast & backlight 1. Press the Menu button to enter the main menu. 2. Rotate the Tuning control until SYSTEM SETUP is highlighted, and press the Enter button to enter the setting. Rotate the Tuning control until DISPLAY is highlighted and press the Enter button. 3. - Page 31 Software version 1. To view the software version of your recorder, press the Menu button to enter the main menu. 2. Rotate the Tuning control to highlight SYSTEM SETUP, and press the Enter button. Rotate the Tuning control to highlight UPDATE SERVICE, and press the Enter button to enter the setting.
- Page 32 System reset If your recorder fails to operate correctly, or some digits on the display are missing or incomplete, carry out the following procedure. 1. Switch on your recorder, and press the Menu button to enter the main menu. 2. Rotate the Tuning control until SYSTEM SETUP is shown on the display, and press the Enter button to enter the setting.
-
Page 33: Specifications
Specifications Circuit Features Power Requirements Loudspeaker 8 ohm full range Mains 9V ~/0.7A Output Power Battery 4 X 1.5V Size “AA” / UM-3 / LR6 Headphone socket 3.5mm dia. Line in socket 3.5mm dia. If at any time in the future you should need to dispose of this product please note that: Waste electrical products should not be disposed of with household waste.
Need help?
Do you have a question about the DAR-101 and is the answer not in the manual?
Questions and answers