
Related Manuals for Michelin ML0728

Summary of Contents for Michelin ML0728
- Page 1 Multi-function portable power source xr1 User’s guide CHARGE UNIT FOR 15 HOURS BEFORE FIRST USE.
-
Page 2: Table Of Contents
User’s guide CONTENTS Important Information ���������������������������������������������������������������������������������������������������������������������������������6 General Warnings �����������������������������������������������������������������������������������������������������������������������������������������6 Storage �����������������������������������������������������������������������������������������������������������������������������������������������������������6 Proper Disposal ���������������������������������������������������������������������������������������������������������������������������������������������6 Product Features �������������������������������������������������������������������������������������������������������������������������������������������7 Specifications ������������������������������������������������������������������������������������������������������������������������������������������������7 Front View ������������������������������������������������������������������������������������������������������������������������������������������������������8 Rear View �������������������������������������������������������������������������������������������������������������������������������������������������������9 Battery Status ����������������������������������������������������������������������������������������������������������������������������������������������10 Charging the Unit ����������������������������������������������������������������������������������������������������������������������������������������10 Jump Starter ������������������������������������������������������������������������������������������������������������������������������������������������11 Tire Inflator ��������������������������������������������������������������������������������������������������������������������������������������������������12 Power Inverter ���������������������������������������������������������������������������������������������������������������������������������������������13 DC Output Socket ����������������������������������������������������������������������������������������������������������������������������������������14 USB Power Port �������������������������������������������������������������������������������������������������������������������������������������������14 Work Light ���������������������������������������������������������������������������������������������������������������������������������������������������14... -
Page 3: Important Information
Thank you for purchasing the Michelin Power Source XR1. With normal care and proper treatment ® it will provide years of reliable service. IMPORTANT INFORMATION • Please read and understand all warnings, cautions, and notes included in this manual before using the unit. -
Page 4: Product Features
User’s guide PRODUCT FEATURES • Powerful jump starter with heavy-duty cables and clamps. • Voltmeter for checking battery status. • High pressure air flow inflator for inflating tires and sports equipment with easy-read analog pressure gauge. • Built-in power inverter providing two 115-volt AC outlets. •... -
Page 5: Front View
FRONT VIEW 1. Extendable Antenna 4. Radio LCD Screen 2. Jumper Safety Switch 5. Speakers 3. Red Positive (+) Jumper Cable 6. Bluetooth Microphone 7. Radio Control Panel 8. Auxiliary Input Jack 9. Storage Compartment Audio device and audio input cable not provided. -
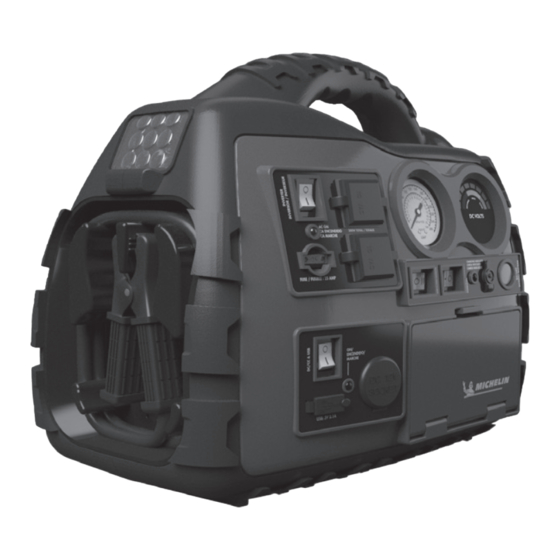
Page 6: Rear View
User’s guide REAR VIEW 10. AC Outlets 21. Pressure Gauge 11. Inverter Switch 22. Voltmeter 12. Work Light / Hazard Flasher 23. Charging Indicator 13. Black Negative (−) Jumper Cable 24. Charging Jack 14. Inverter Power Indicator 25. Battery Status Button 15. -
Page 7: Battery Status
BATTERY STATUS The voltmeter provides the current state of charge on the internal battery. It is the user’s responsibility to periodically monitor the battery’s status and recharge every 3 months in addition to recharging after each use. 1. Disconnect any input or output power cords and turn off all switches. 2. -
Page 8: Jump Starter
User’s guide 6. When charge is complete, disconnect the power cord from the accessory socket first, then from the unit’s charging jack. 7. Replace the dust cover on the charging jack. JUMP STARTER Warnings • Lead-acid batteries can release explosive gases. Failure to follow instructions may cause property damage, explosion hazard, and/or personal injury. -
Page 9: Tire Inflator
b. Next, connect the black (−) clamp to the vehicle chassis or a solid, non-moving, metal vehicle component or body part. DO NOT clamp directly to negative battery terminal or a moving part. • If vehicle to be started has the positive battery terminal connected to chassis (this is rare and usually found in older car models from the 1950s or earlier): a. -
Page 10: Power Inverter
User’s guide c. Remove the valve cap from your inflatable object if there is one. d. Insert the other end of the valve stem adapter into inflatable’s air valve opening as far as possible. 6. Set the Tire Inflator Switch on to the “I” position to start inflation. Monitor the pressure gauge while inflating the tire. -
Page 11: Dc Output Socket
DC OUTPUT SOCKET The DC accessory socket can power a DC load up to 11 Amps. Overloading the socket will result in tripping the self-resetting circuit breaker. Removing the overload automatically restores power to the DC socket. For proper and safe operation of the 12 Volt DC power accessory socket, do not place anything in them except the 12V DC plug of the accessory to be used. -
Page 12: Am/Fm Radio
User’s guide 2. Set the Light Switch to “||” for blinking mode. Attach Hazard Flasher Lens to Light Switch to Blinker Mode 3. Place the unit in a very visible position or area. 4. Turn the light off when it is not in use. AM/FM RADIO The radio can receive frequencies in the standard AM and FM broadcast bands (AM 520–1710 kHz, FM 87.5–108 MHz). -
Page 13: 3�5Mm Audio Input
Turning On and Tuning the Radio 1. Carefully raise and extend the antenna. 2. Press the PWR (power) button to turn the radio on. The current frequency is displayed in the center and the “AM” or “FM” band is shown in the corner of the LCD screen. 3. -
Page 14: Bluetooth Pairing
User’s guide BLUETOOTH PAIRING Pair your Bluetooth enabled phone or tablet to the unit. 1. Press the PWR (power) button to turn on the radio. 2. Press the MODE button to change the input mode until you see “BT” on the LCD screen. 3. -
Page 15: Troubleshooting
TROUBLESHOOTING Problem Cause Solution Tire inflator shut-off. High temperature Allow the unit to cool for about 10 minutes. protection. Lack of power output. Battery voltage is below Recharge immediately. 10 volts. Excessive current drawn Reduce load to maximum wattage. by appliance being 1.
Need help?
Do you have a question about the ML0728 and is the answer not in the manual?
Questions and answers