
Related Manuals for FE PETRO IST

Summary of Contents for FE PETRO IST
- Page 1 STP / IST Fixed & Variable Length Installation and Owner’s Manual ©2009 400604005 Rev. 15 Franklin Fueling Systems • 3760 Marsh Rd. • Madison, WI 53718 USA Tel: +1 608 838 8786 • 800 225 9787 • Fax: +1 608 838 6433 • www.franklinfueling.com...
-
Page 2: Important Safety Messages
Do not modify the STP / IST, modifying any feature of the STP / IST can cause environmental and Caution safety issues. -
Page 3: Installation Instructions
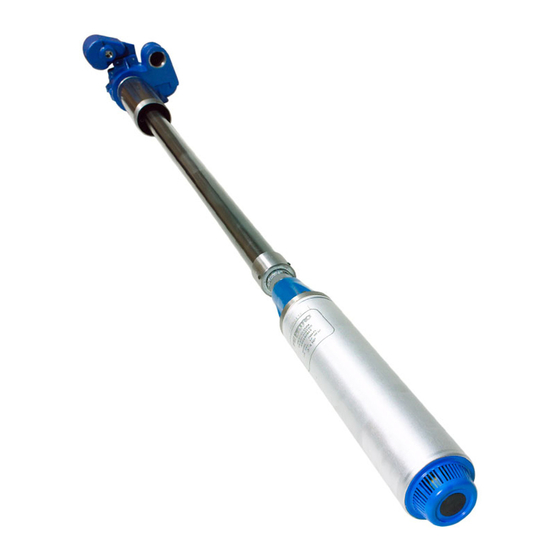
Maximum Run service station at which the equipment is being installed. 10 gauge 650 feet Station Owner: 12 gauge 400 feet Retain these instructions for future use and provide them 14 gauge 250 feet to persons servicing or removing this equipment. Preparation Installation Instructions 1. Fill out the Warranty Registration Card and return it to FE Petro. The piping and underground storage tank must be installed Note: If your STP / IST does not operate correctly or using good standard industry practices. There are several there are any questions concerning installation or publications that can be used for reference, some of which service, please contact FE Petro Technical Service are: at (800) 225-9787. • Automotive and Marine Service Station Code, NFPA 2. Disconnect power to the submersible pump at the 30A, Flammable and Combustible Code, NFPA 30, and electrical supply box (if already installed). National Electrical Code, NFPA 70 (NEC), National Fire Protection Association, Quincy, Mass. 3. Tag and lock out electrical circuit breakers so they are not turned on accidentally. - Page 4 4. Lay packaged pump on a flat, open surface and and aligned in the discharge casting. Improper remove the package. alignment could damage the wire lead or motor 5. Flatten pump packaging and lay the PMA on the pins. Failure to push PMA up snug against the end of the pump in preparation for mounting. discharge casting before tightening cap screws, or 6. The PMA mounting hardware kit (# 152350902) failure to use a cross-pattern while tightening the is attached to the PMA packaging. It contains bolts could break the discharge casting or strip the a gasket, a tube of grease, and four 5 / 16" cap threads in the PMA. screws with lockwashers. Note: IST units without a VS4 suffix and STP units with a 7. Remove the two packaging ends and the VS2 suffix can only be electrically connected to an protective sleeve from the PMA. IST-VFC or MagVFC. 8. Apply grease provided to the inside wall of the pump motor electrical connector, and the rubber of STP or IST units with a VS4 suffix can only be the lead assembly connector. electrically connected to a MagVFC. Unlike FE 9. Place the gasket on the end of the PMA, aligning Petro’s standard pumps, the following pumps locating pin and bolt holes (Figure 1). cannot be interchanged with competitive models: • The variable speed PMA VS2 (which is part of IST units without the VS4 suffix or the STP units suffixed ...
-
Page 5: Length Setting
Example 16. Hold the manifold securely to the surface to prevent damage while setting length. Grade to tank mounting threads (bury depth) 48" To allow movement of the telescoping pipe, Minus manifold height without leak detector -11" verify that none of the pipe coupling setscrews (w / leak detector height = 12.50) are in contact with the pipe. Lay a tape measure out to accurately measure the distance from the Minus 6" for top clearance (2" minimum) -6 bottom of the riser to the bottom of the pump = Maximum riser size 31" motor end bell. 17. Grasp the pump just above the PMA and pull firmly, Length Setting extending to the length required (from Step 15). ... - Page 6 Damage to the electrical conduit wires Warning creates a risk of lethal electrical shock and equipment failure. Do NOT use equipment if electrical wires have been damaged (contact FE Petro for assistance). 2 5. Tighten the discharge head cover (from hardware Figure 9: Measure and Cut Wire pack p / n 400301907) in place using a 3 / 4" ratchet ...
- Page 7 Petro’s warranty. • On single phase units, two power wires, one ground wire and a blank (with celcon rod 2 6. Measure the pump, from the bottom of the supplied to fill forth hole). threaded riser to the bottom of the pump-motor, • For three phase units, three power wires and and compare this to the tank measurement, one ground wire. measured from the mounting flange to the inside of tank bottom. The STP / IST and riser are sized to 32. Verify that the power is still OFF at the supply box. place the intake (at the bottom of the pump-motor) 3 3. Pull wires from power supply into the junction approximately 5 inches off the bottom of the tank. box and feed through the compression seal If the difference between the bottom of the pump (contractors plug). motor and the bottom of the tank is more than 3 4. Replace the compression seal and tighten 6 inches or less than 4 inches, verify that this is into place securely. All wiring must be done in the correct pump for this tank installation. If it is ...
- Page 8 4 0. Visually check for leaks on the manifold head pressure gauge is the correct one. during pump operation and after. 3 5C. IST UNITS or STP units with a VS2 or VS4 suffix: 4 1. Install a pressure gauge in the line test port to Connect the ground wire coming from indoors to ensure that the STP / IST is providing proper line the ground lug in the junction box. Connect any pressure. three wires from the pump connector assembly to 4 2. Turn on the STP / IST. While running, the pressure the three power wires coming from the Variable should be above 24 psi (1.65 bar). PMA size will Frequency Controller (VFC). Capacitors are affect psi. not needed for these units. Detailed installation 4 3. Turn off the STP / IST and verify that the line instructions for the VFC should be referenced pressure is holding. when connecting the VFC. These are supplied 4 4. Remove the pressure gauge and replace the plug. with the VFC.
-
Page 9: Standard Models
† 190 V, 70 Hz, 3 ph power to variable speed units is output from IST-VFC or MagVFC only (VFC’s are powered by 200-250 V, 50 or 60 Hz, single or 3 phase input) ^ Use with IST-VFC or MagVFC controller only, No Capacitor ^^ Use with MagVFC controller only, No Capacitor (3 phase input is required for full VS4 output)) ** No capacitor is used with 3 phase pump motor assemblies Note: The models listed in the table above may contain (ANZ) for ANZEX certified pumps, or (ATX) for ATEX certified pumps. FE Petro’s STPs are designed for use with motor fuels, and they are UL listed for blend Warning concentrations of: Standard Models AG (Alcohol / Gasoline) Models 0% - 15% ethanol or methanol and gasoline 0% - 85% ethanol or methanol and gasoline 20% MTBE with 80% gasoline... - Page 10 The clamp valve (see Figure 14) is located directly above the check valve inside the stationary manifold of When correctly installed, the syphon action between the the submerged pump. It consists of a lead screw with a tanks will continue whether the pump is running or not, as sealing disk attached. The head of the screw is accessible long as the product level in the tanks is higher than the by removing the 1 / 4" line test port pipe plug on the check bottom of the syphon loop vertical piping. The function of valve cover of the STP / IST. the STP / IST in the syphon system is merely to prime the syphon line, removing the air and allowing the syphon to The cavity under the 1 / 4" pipe plug is take place. Warning at full pump pressure and product will be released through this opening. If Note: The syphon port on FE Petro submersible pumps the pump is equipped with a manual was designed to be connected to the syphon piping ...
-
Page 11: Wiring Diagram
Wiring Diagram 1... - Page 12 Wiring Diagram 2 Note: For further wiring diagrams, see installation and owners manuals that came with pump controller. Wiring must conform to all federal, state, and local electrical codes. Contact FE Petro Technical Support for further assistance.
- Page 13 PMA, Riser & Check Valve For VL & Fixed Length Item # Part # Description 400125001 3 / 16 x 1 5 / 8 Spiral Pin 400615001 Manual Relief Plug 400211114 O-Ring, Plug 400627001 Retaining Ring 400616001 Manual Relief Screw 400333012 O-Ring, Relief Screw Top 400333007 O-Ring, Relief Screw Bottom 400628901 Manual Relief Plug Assembly (includes items #2 and #3) 400629901 Manual Relief Screw Assembly (includes item #4, #5, #6, and #7) 400259001 1 / 4 NPT Pipe Plug (may purchase locally) 400137937 Syphon Check Valve –...
- Page 14 Discharge Manifold Assembly Item # Part # Description Item # Part # Description 400192930 Cover, Junction Box 400200930 Wire Connector Kit (includes item #2) (includes male / female connectors, 400210233 O-Ring (2) item #11, (1) each item #6, #12, & #20) 400655001 Boot, Capacitor 400589930 Cover 400170931 Capacitor Assembly (includes item #15) 60Hz, 15 µF, 370V 1Ø 400210229 O-Ring 400170933 Capacitor Assembly 400236903 Plug, Contractors (does 50Hz, 15 µF, 440V 1Ø 400259002 3 / 8 NPT Pipe Plug include ...
- Page 15 Syphon Check Valve Figure 16 Item # Part # Description 400137930 Syphon Check Valve Control Box Assembly (STP-CBS) Enclosure dimensions: 8.5"H x 5"W x 3"D (215mm x 127mm x 76mm) Item # Part # Description 400575001 Power Switch (for CBS and CBBS models) 400574001 Bracket, Power Switch 400158901 Light Assembly, 120V (CBS) 400158902 Light Assembly, 240V (CBBS) 400215931 Relay, 30A, 120V 400215933 Relay, 30A, 240V 400278005 Terminal Strip 402410001 Label, Terminal Strip (CBS) 402410002 Label, Terminal Strip (CBBS)
- Page 16 11.70" 7.55" R Discharge / Leak Detector 10.45" 8.12" R Centerline Line Test port 3.00" ¼" NPT 5.80" 3.63" Vapor Recovery Riser / Column Pipe Centerline Discharge Port 1" NPT 12.50" 10.65" Leak Detector Port 2" NPT Syphon Port ¼" NPT Tank Port ¼"...
Need help?
Do you have a question about the IST and is the answer not in the manual?
Questions and answers