
Related Manuals for Solo 423


Summarization of Contents
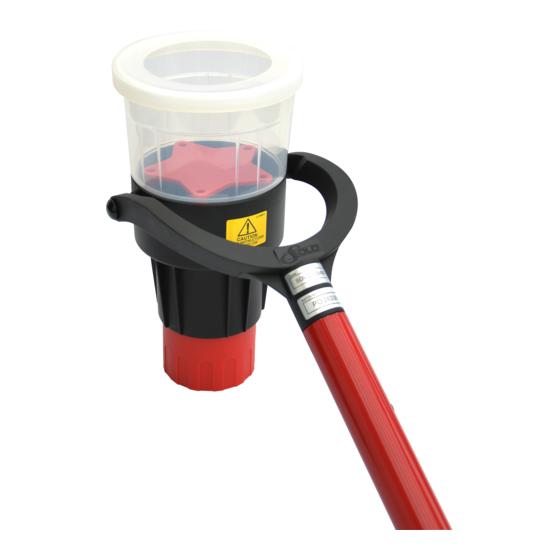
Solo 330/332 Aerosol Dispenser
Important Safety & Preparation Notes
Read important notes on system notification, test mode, and informing personnel before starting work.
Step 1: Prepare Aerosol Can
Unscrew the red cup, remove the aerosol can cap, and place it inside the red cup.
Step 2: Insert & Release Aerosol
Re-insert the red cup, rotate clockwise to release aerosol, then slightly unscrew to stop release.
Step 3: Position & Test Detector
Insert into access pole, raise, position detector in clear cup, and push upwards for smoke burst.
Step 4: Repeat & Monitor Alarm
Repeat test every 10s for 1 min. Remove cup on alarm for particle dispersal.
Solo 460 Cordless Heat Detector Tester
Step 1: Insert Battery & Pole
Insert charged battery baton into unit base and pole, ensuring buttons lock securely. Do not use battery as pole.
Step 2: Adjust Angle & Lock
Press red lever to adjust angle, then release to lock the tester head in desired position.
Step 3: Power On & Position
Press red button to power on. Raise unit, position detector in clear cup, aligning heat output duct.
Step 4: Hold Until Activated
Hold unit until detector activates. Unit enters standby mode; blower cools element.
Solo 423/424 Heat Detector Tester
Safety Information
Do not place hand in cup, touch metal grid, or block air vents during operation.
Step 1: Attach Power Cable
Attach the power cable to the test head and secure the clip for a stable connection.
Step 2: Insert into Access Pole
Insert the Solo 423/424 tester into a compatible Solo access pole for elevated use.
Step 3: Connect Power & Activate
Connect the power cable to mains power and press the green button on the test head to activate.
Step 4: Hold Over Detector
Hold the unit in place over the detector until the detector is activated by heat.
Solo 200 Universal Removal Tool
Important Safety Precautions
Wear protective equipment, ensure clear area when working overhead to avoid injury.
Step 1: Adjust Detector Grips
Lift and rotate each detector grip to adjust them to the desired size for optimal fit.
Step 2: Insert into Access Pole
Insert tool into access pole. Lock lower button for pivot (angle access), lock top button for no pivot (direct access).
Step 3: Remove Detector
Locate detector centrally, twist anti-clockwise to release, and lower carefully.
Step 4: Install Detector
Locate detector correctly aligned, twist clockwise until it locks securely in place.
Need help?
Do you have a question about the 423 and is the answer not in the manual?
Questions and answers