Advertisement
Table of Contents
- 1 Table of Contents
- 2 FLEX GEAR Functions
- 3 Switch
- 4 Control Box & Cable
- 5 Flex Gear
- 6 Goldwing 1800 after 2018Y
- 7 Goldwing 1800 before 2017Y
- 8 Goldwing 1500
- 9 Harley Davidson
- 10 Bmw K1600
- 11 Indian
- 12 Kawasaki VN1700 Voyager
- 13 FLEX GEAR Install
- 14 Control Box & Cable Connection
- 15 Cautions
- Download this manual
Advertisement
Table of Contents

Related Manuals for GLK GLX-FC209

Summary of Contents for GLK GLX-FC209
- Page 1 No. OM-FC209-101 User Manual 글꼴 : Yoon 초록우산어린이 Model: “FLEX GEAR” GLX-FC209 GLK FLEX GEAR 시스템 Version 3.0...
-
Page 2: Table Of Contents
Parts list …………………………….………………. ………………… FLEX GEAR functions Switch ……………………….………………..….….. …….…….… Control Box & Cable …………………………….…. …………………..……..…… Bracket & FLEX GEAR install FLEX GEAR ………………………….…. ………………………...……….. Goldwing 1800 after 2018y ………………….…………….….. …………….. Goldwing 1800 before 2017y ………………….…………….….. ……………. Goldwing 1500…………………………………….…………….….. ……………. - Page 3 Customer Service GLK Co., Ltd. If you have any questions about GLK FLEX GEAR, please contact us or the place of purchase. We will respond to you at the GLK customer center or the place of purchase. Please contact us through the following contact information: 1.
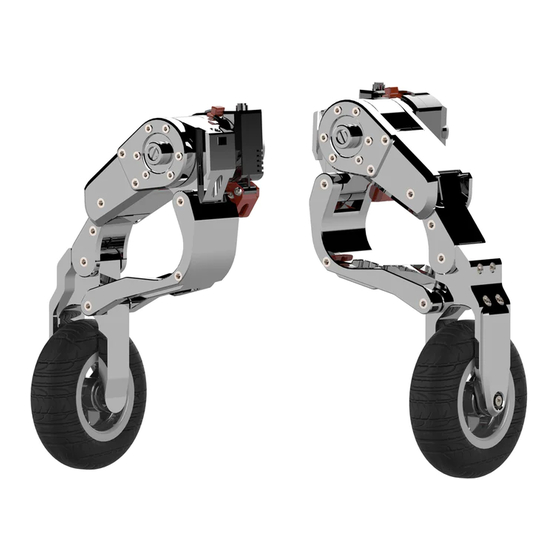
- Page 4 FLEX GEAR Bracket Sliding Bracket Middle Bracket Mount Bracket ※ Brackets have different shapes and names depending on the model and year of the motorcycle. Left Right Control Box Cable Battery Cable Switch Cable FLEX GEAR Cable x 2 ea...
-
Page 5: Flex Gear Functions
GEAR, you can focus more on the external environment to prevent accidents. Since motorcycles can't speed on narrow roads, it's even harder to stay centered. With FLEX GEAR, you can only focus on the direction of the steering wheel when driving slowly on narrow roads. -
Page 6: Switch
A manual switch is used to prevent Image Name unintentional movement of the FLEX GEAR while riding a motorcycle. The FLEX GEAR takes about 2 seconds to 요 complete. Switch 1. When the green button on the switch is pressed, the FLEX GEAR goes up. -
Page 7: Control Box & Cable
FLEX GEAR. If the LED sensor does not light, check the Control Box connection status of each cable. ① Left FLEX GEAR : Lifting ② Left FLEX GEAR : Completed Image Name ③ Left FLEX GEAR : Landing ④... - Page 8 FLEX GEAR will unfold, and more you pull it outward, the less it will unfold. e more you push the lifting limit sensor into the motorcycle, the more the FLEX GEAR folds, and the mo you pull it outward, the less it folds.
- Page 9 If the bolt is re-tightened -> The FLEX GEAR position goes up. After connecting the sliding bracket and the FLEX GEAR, adjust the installation height through the tightening degree of the bolts. After that, use the mood bolts to fix the position.
- Page 10 Please check the installation manual for your motorcycle. Parts of the motorcycle frame may be damaged in order to assemble the bracket (but only for some models). If the installation of the bracket is hindered by accessories other than the FLEX GEAR, please remove the accessory.
-
Page 11: Goldwing 1800 After 2018Y
Goldwing 1800 after 2018y Remove the muffler cover Remove the motorcycle side cover and footrest cover Attach the assembled bracket to the front of the blue circle and the back of Connect the ‘middle bracket’ and the red circle of the motorcycle using ‘bolt A’ and a spring washer. ‘mount bracket’... -
Page 12: Goldwing 1800 Before 2017Y
Goldwing 1800 before 2017y Remove the seat of the motorcycle. Remove the appropriate cover from the motorcycle. Connect the ‘middle bracket’ to the Connect the ‘mount bracket’ using Remove the motorcycle's ‘mount bracket’ using ‘bolt B’. bumper. ‘bolt A’ and ‘nut’ to the bumper position. -
Page 13: Goldwing 1500
Goldwing 1500 Remove the seat, cover, footrest, etc. Connect the blue wire of the switch to ACC The switch is fixed to the handle grip. (Fix it to the left or right.) There is interference in the part marked in red, so I cut it with a grinder Fix the bracket as shown in the picture.(The bracket in the photo may differ from the actual bracket) -
Page 14: Harley Davidson
Harley Davidson Remove the saddle bag, side cover and seat from the motorcycle. Connect ‘Middle bracket’ and Loosen the frame fixing bolts of the motorcycle. ‘Mount bracket’ using ‘Bolt A’. After inserting the ‘Spring washer’ into the blue circle bolt hole of the ‘Mount bracket’, connect the assembled bracket to the motorcycle frame using ‘Bolt C’. -
Page 15: Bmw K1600
Use the bolt hole on the cover of the motorcycle. Use the two bolt holes (red circles) on the motorcycle frame. If you want to fix the FLEX GEAR bracket more firmly, make a hole in the blue circle position on the motorcycle frame a install the bracket with 3 bolts. -
Page 16: Indian
FLEX GEAR in the motorcycle's bump Use the bolt hole (red circle) where you removed the bumper. To further secure the FLEX GEAR bracket, use a drill and tap to drill additional holes in the yellow hole locations on the motorcycle frame. -
Page 17: Kawasaki Vn1700 Voyager
Kawasaki VN1700 Voyager Fix the mount bracket using “A” and “B” bolts at the place where the footrest was removed.(It is recommended to work after removing the muffler cover as there is interference.) Fasten the foot stand bracket using bolt “C” and install the Connect the blue wire of the switch to ACC slide bracket using bolt “D”. -
Page 18: Flex Gear Install
FLEX GEAR install Insert the FLEX GEAR into the slot of the sliding bracket and fasten it. Push up the fastened FLEX GEAR along the sliding bracket. After raising the FLEX GEAR to the top of the Assemble the ‘Bracket cover’ using ‘M6 sliding bracket, insert the ‘Spring washer’... -
Page 19: Control Box & Cable Connection
Control Box & Cable connection Cautions Control box positioning may vary by motorcycle model. You will work by opening the seat or saddle bag of the motorcycle. Please check the manufacturer's manual for details on the contents. but, Even with the same motorcycle model, the manual may differ depending on the situation of the motorcycle you have. - Page 20 Control box install position Position the control box under the seat or inside the saddlebag. ※ Check the most appropriate location according to the motorcycle model you have. Cable connection to Battery Connect the power cable to the battery inside the motorcycle.
- Page 21 When starting the motorcycle, connect the ACC+ line (which is included with the switch cable) to the power line. ※ When the motorcycle ignition is off, the FLEX GEAR should not operate. Connect the switch cable to the switch...
- Page 22 Cable connection to FLEX GEAR Connect the FLEX GEAR cable to the bottom of the motor box of the FLEX GEAR. ※ Check the male/female FLEX GEAR cable before connecting. Connect the FLEX GEAR cable to the control b ※ The FLEX GEAR cable is the same for left an right.
- Page 23 Be sure to use it according to the instructions in the user's manual. Please read all user manuals carefully. Warning To avoid personal injury or property damage, before operating the FLEX GEAR Please read and fully understand all attached instructions, warnings, and instructions before use.
- Page 24 • Depart after confirming that the FLEX GEAR has gone up perfectly (lifting). • Do not use the FLEX GEAR while driving at high speeds. (used under 20km/h) • Please refer to the image below to help you understand. Be sure to ride while wearing safety equipment such as a helmet and protective equipment.
- Page 25 Doesn't the FLEX GEAR cause the motorcycle to discharge? The FLEX GEAR's control device allows current to flow only when the switch is operated. The operation time is less than 2 seconds, and the current is cut off during other times.
- Page 26 FLEX GEAR. ⑤ Cross test: Test the left and right FLEX GEAR cables connected to the control box by crossing them. - If the opposite FLEX GEAR does not work after crossing, replace the control box.
- Page 27 • If both FLEX GEARs do not work ① 1. Check the cable: Check if the yellow power cable is disconnected or missing from the control box. (YES=no problem / NO=disconnection or missing) ② Control box LED check: Check if the red LED of the control box is displayed when the motorcycle is turned on.
- Page 28 Revision Version Revision subject Date Version 1.0 Publish user manual 08.23.2019 Version 2.0 Renewal of bolt dimensions and brackets 02.03.2020 Version 3.0 Integration & renewal of FLEX GEAR name and 11.29.2021 installation manual...
- Page 29 The warranty period includes a period of one year starting from the date of delivery of the product to the customer (A/S period may vary for each part) All parts of the product are guaranteed by GLK. (for any defects that may arise during production, assembly or defective parts)
Need help?
Do you have a question about the GLX-FC209 and is the answer not in the manual?
Questions and answers