Advertisement
Table of Contents
- 1 Table of Contents
- 2 Vehicle Introduction
- 3 Vehicle Parameters
- 4 Show Details
- 5 Assembly Instructions
- 6 Daily Checks
- 7 Battery Charging
- 8 About Charging
- 9 Driving
- 10 Basic Maintenance
- 11 Diagnose and Troubleshooting
- 12 Recommended Torque Values for Threaded Fasteners
- 13 Controller Operating System
- 14 Useful Tips
- 15 Faq
- 16 Customer Review
- Download this manual
Advertisement
Table of Contents

Related Manuals for AOSTIRMOTOR ELECTRIC A20


Summary of Contents for AOSTIRMOTOR ELECTRIC A20
- Page 1 User manual Power Brings Joy...
-
Page 2: Table Of Contents
Table of Contents Table of Contents Vehicle introduction &&&&I& &&&&&1/$-.2.-(*.0"+ &&&&J Vehicle parameters &&&&& !""#$%&'()*"+,-.+/0*" &&&& &&&&& 12/&'(34#.5" &&&& !" Show details &&&&&3(**$)4&56()7."7 &&&& Assembly Instructions &&&&&890:*&56()7."7 &&&& &&&&&,).;."7 &&&& Daily Checks &&&&&3(+.-&<(."*$"("-$ &&&& !& &&&&&,.(7"0+$&("#&=)0:9>$+600*."7 Battery Charging &&&& "' &&&&&?$-0@@$"#$#&=0)A:$&B(>:$+&20)&=6)$(#$#&C(+*$"$)+ &&&&... - Page 3 What is Included in the Box? Keys Bike Charging Cable Battery Tool Box Manual...
-
Page 4: Vehicle Introduction
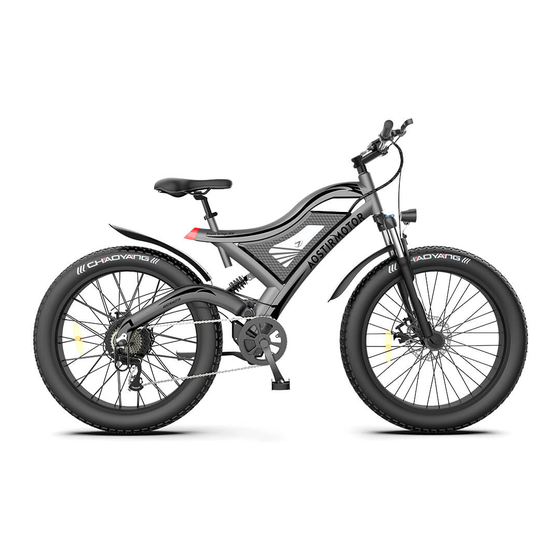
Vehicle introduction Meter Headlights Leather Seat 48V11.6Ah Battery Front shock absorption Rear spring shock Rear disc brake Front disc brake Pedal 750W motor 26”x4.0 Tire... -
Page 5: Vehicle Parameters
Vehicle parameters Battery 48V 11.6AH Li-ion battery SAMSUNG Motor 750w rear motor TRUCK WATT Controller 48V 22A Charge Time 4-6 hours Max Speed 45 km/h Range Distance 60-80 km Brake F/R disc brake Light With F/R light Display LCD display Fork Al alloy suspension fork. - Page 6 S18-1500W Vehicle introduction Color LCD display Leather Seat 48V14Ah Battery Front shock absorption Rear spring shock Front disc brake Pedal 1500W motor 26”x4.0 Tire...
- Page 7 S18-1500W S18-1500W Vehicle parameters 1500 Battery 48V 14AH Li-ion battery SAMSUNG Motor 1500w rear motor WATT Controller 48V 30A Charge Time 4-6 hours Max Speed 47 km/h Range Distance 60-80 km Brake F/R disc brake Light With F/R light Display Color LCD display Fork Al alloy suspension fork.
- Page 8 S07-B Vehicle introduction Comfortable grip Headlights Leather Seat 48V13Ah Rear shelf Battery Front shock absorption Rear disc brake Front disc brake Pedal 750W motor 26”x4.0 Tire...
- Page 9 S07-B Vehicle parameters Frame 6061 aluminum alloy Battery 48V 13AH Li-ion battery WATT Motor 750W Rear brushless hub motor TRUCK Controller 48V 22A Charge Time 4-6 hours Max Speed 35 km/h Range Distance 50-70 km Brake F/R disc brake Light F:Light R:Reflector Display SW-U-LCD display...
- Page 10 Vehicle introduction Color LCD display Comfortable grip Rear spring shock absorption 48V14.5Ah Battery 1500W Motor Shoulder shock absorption Rear Hydraulic disc brake Pedal Front Hydraulic disc brake 26”x3.0 Tire...
- Page 11 Vehicle parameters 1500 Frame 6061 aluminum alloy Battery 48V 14.5AH Li-ion battery Samsung WATT Motor 1500W Rear brushless hub motor Controller 48V 30A Charge Time 6-8 hours Max Speed 45 km/h Range Distance 80-100 km F/R Hydraulic disc brake Brake Light Front light, rear reflector Display...
- Page 12 S07-2 Vehicle introduction Comfortable grip Headlights Leather Seat 48V10.4Ah Battery Front shock absorption Rear disc brake Front disc brake Pedal 750W motor 26”x4.0 Tire...
- Page 13 S07-2 Vehicle parameters Frame 6061 aluminum alloy Battery 48V 10.4Ah lithium battery WATT Motor 750W Rear brushless hub motor TRUCK Controller 48V 22A Charge Time 4-6 hours Max Speed 40 km/h Range Distance 50-70 km Brake F/R disc brake Light F:Light R:Reflector Display SW-U-LCD display...
- Page 14 Vehicle introduction LCD display Comfortable grip 36V13Ah Battery 500W Motor TRUCK Rear disc brake Pedal 20”x4.0 Tire Front disc brake...
- Page 15 Vehicle parameters Frame 6061 aluminum alloy Battery 36V 13 AH Li-ion battery Samsung WATT Motor 500W Rear brushless hub motor TRUCK Controller 36V 15A Charge Time 4-6 hours Max Speed 28 km/h Range Distance 30-40 km F/R disc brake Brake Light With front light, rear reflector Display...
-
Page 17: Assembly Instructions
Assembly Instructions INTRUCTIONS 1. Open Carton. 2. Remove Small Accessories Box- set aside. 3. Remove bike from carton, place on a soft surface to avoid scratches. 4. Cut zip ties attaching front wheel- set aside 5. Remove protective foam and remaining zip ties. 6. -
Page 18: Daily Checks
Daily Checks To Ensure Your Safety, Make the Following Functional Checks Before Driving: 1. Test brake system, throttle, and power system. 2. Tire pressure should be at 30 psi. 3. Check front wheel lug-nuts, securely tighten before every ride. 4. Battery charge level- found on side of battery 5. -
Page 19: Battery Charging
Battery Charging Charging Methods Charge the battery while it is attached to the bike. Or, detach battery from bike and charge separately. Please follow the best practices, listed below, for charging your battery and extending battery lifespan. With Battery Removed 1. -
Page 20: About Charging
About Charging With Battery Attached to Bike 1. Turn off the Battery and LCD Display, Remove Key Charging interface 2. Rotate and pull rubber charging socket to expose charging port 3. Insert input plug into battery first, then plug 120v into wall outlet **Avoid overcharging- do not leave on charger over 24 hours. - Page 21 About Charging Important Charging Information 1. Avoid overcharging- do not leave on charger over 24 hours with wet hands or metallic objects 3. Do not charge the battery in an inverted position. If you do, you risk drastically reducing its lifespan 4.
-
Page 22: Driving
Driving Important Tips While Driving: 1. In order to reduce consumption, increase autonomy and extend the motors lifespan, use the pedals during initial startups and climbs. 2. Tire pressure- Maintain 30 PSI. Low pressure will influence autonomy and decrease speed 3. - Page 23 Driving How to Start Up the Bike: Insert key and turn it to the ON position. At this point, the charge indicator light will turn on, indicating that the bike is powered on. Press mode to select the pedal assistant power with pedals(Low-Med-High).
- Page 24 Driving Maximum mileage on a single charge: 1. Pedal Assist Mode - 43 miles. 2. Electric Throttle Mode- 21 miles. You can enjoy hours and hours of riding between charging and also seamlessly switch between Pedal Assist and Throttle Modes. ,).;."7&50"#.*.0"...
-
Page 25: Basic Maintenance
Basic Maintenance For a safe driving experience, please keep your bike in optimal riding condition, regular maintenance should be performed. Regular Self- Checks 1. Tightening front wheel lug-nut, test for correct tire rotation and alignment 2. Tire pressure, maintain 30 PSI at all times. 3. -
Page 26: Diagnose And Troubleshooting
Diagnose and Troubleshooting Most Common Solutions Possible Causes Symptoms (1) Insuficient battery power (1) Charge the battery (2) Faulty connections (2) Clean the connections (3) Key in wrong position (3) Turn the key into the correct position (1) Insuficient battery power (1) Charge the battery Irregular acceleration (2) Loose throttle magneto... -
Page 27: Recommended Torque Values For Threaded Fasteners
Recommended Torque Values for Threaded Fasteners Parts Torque Required(N.M) Handlebar 18-20 Handlebar-stem 18-20 Saddle 18-20 Seat-pillar 18-20 Front Wheel 16-25 Rear Wheel 25-35 B.B Parts 35-55... -
Page 28: Controller Operating System
Controller Operating System... - Page 29 LCD Operating System...
-
Page 30: Useful Tips
Useful Tips Important Tips While Driving: 1. This User Manual’s only to explain the bike’s use and functions and should not be used as reference for it’s inspection. 2. The images shown may di er from the actual model. 3. We reserve the right to change the model without prior notice due to technical improvements. 4. -
Page 31: Faq
How do you control the motor? The Aostirmotor bike is equipped with both a throttle and a pedal sensor. You can use either system to control the speed of the electric motor. If you want to cruise without pedaling the twist throttle can be used or if you enjoy pedaling and want to feel more like you are riding a regular bike (with an awesome silent electric motor) you can use the pedal sensor by entering one of the 5 levels of pedal assist. - Page 32 No, you do not need to pedal! There is both a twist throttle and a pedal assist system. You can pedal and the electric motor will kick in and provide you with assistance, and there is also a twist throttle that will override the pedal assist and allow you to ride the Aostirmotor more like a motorcycle, only silent! The level of pedal assistance will determine how much boost power the motor provides based on your pedaling input.
- Page 33 Does the Aostirmotor bike have regenerative braking? No, instead of using a direct drive hub motor which would allow the Aostirmotor to have regenerative braking enabled, we opted for a brushless geared hub motor which increases the e ciency on hills and at lower speeds. The geared hub motor also freewheels when you are coasting or just pedaling making it feel more like pedaling a regular bike without ghting cogging/magnetic resistance.
- Page 34 Does it come in a women's specific version? The Aostirmotor bike uses a unisex design frame meaning it works well for men and women. We are also pleased to introduce A20 designed for women. What is the weight limit? The recommended weight limit for the Aostirmotor bike is 60 lbs including rider and extra gear.
- Page 35 How do I lock it up and what can I do to help minimize the chance of it being stolen? The Aostirmotor Bike has some great anti-theft features including a locking battery pack that can either be locked onto the frame or removed and brought inside for charging and safekeeping and a rear wheel which is bolted down to the dropouts to reduce the chances of a thief stealing the wheel from the bike.
- Page 36 Can I replace or add parts to the Aostirmotor? If you require replacement parts check with your local bike experts or reach out to Aostirmotor Bikes if you have any questions about compatibility. Adding unapproved after market parts may void the warranty. The motor and controller were programed to work together and perfectly balance energy loads, adding additional parts may conflict with this balance.
- Page 37 Is assembly required? The Aostirmotor bike will arrive mostly assembled, and you will just need to attach the handlebars and the front wheel and screw on pedals. Traveling by air and want to take your Aostirmotor Bike? At the moment, Department of Transportation regulations prohibit our bikes from being transported as your checked luggage.
-
Page 38: Customer Review
Customer Review Mani Versatile, classy and comfortable bike. Happy with the purchase. SLEO Very sturdy and powerful bike, easy to use This is a awesome bike. Very powerful and fast. Can't wait to ride it in the snow Thomas j ostrowski Good mileage, about 30 miles on a charge. - Page 39 Customer Review John P I took this beast of a bike out after a quick and simple assembly session. I would say I am at the end of the spectrum when it comes to height/inseam. I'm 5' 6" with a 29" in seam and there is a narrow margin for error on this bad boy. We had a light dusting of snow on my rst run and I scooted around my acre yard at a good pace.
- Page 40 Power Brings Joy...
- Page 41 www.aostirmotor.com...
Need help?
Do you have a question about the ELECTRIC A20 and is the answer not in the manual?
Questions and answers