Table of Contents
Advertisement
Quick Links
Advertisement
Table of Contents

Related Manuals for Steelman 60605


Summary of Contents for Steelman 60605
- Page 1 60605 INSTRUCTION MANUAL...
-
Page 2: Table Of Contents
TABLE OF CONTENTS Safety Instructions Overview Main Components Component Description Charging Diagnostic Use Main Screen Location Settings Screen System Setting Screen Transmitter Channel Adjustment Accessories and Replacement Parts Notes SAFETY INSTRUCTIONS NOTE: Please heed the following safety warnings and precautions: To prevent personal injury or vehicle damage please read safety precautions and warnings before working on vehicle. -
Page 3: Overview
The STEELMAN PRO Wireless ChassisEAR2 is a versatile noise, vibration, and harshness ™ ® (NVH) diagnostic tool. The STEELMAN PRO Wireless ChassisEAR2 Digital Control Unit ™ ® receives NVH sounds from up to six transmitters that are connected to precision piezo microphones embedded inside of the included sensor clamps. -
Page 4: Main Components
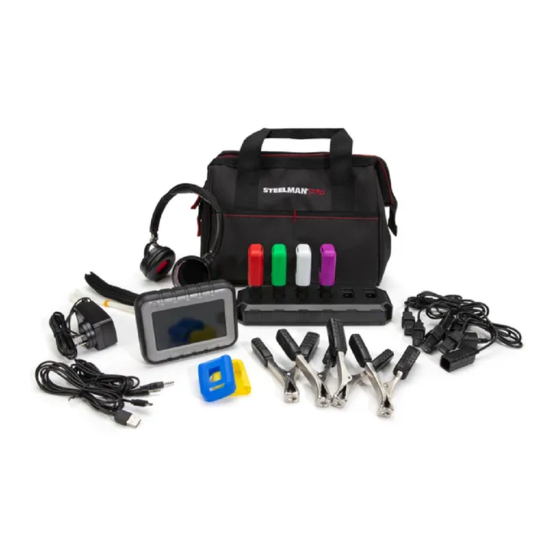
MAIN COMPONENTS Rechargeable Sensor Rechargeable Transmitter Clamp Control Unit Transmitter Headphones Charging Station COMPONENT DESCRIPTION Description Quantity Rechargeable Control Unit Rechargeable Transmitters Sensor Clamps Transmitter Extension Jumpers Nylon Ties Velcro Straps Transmitter Charging Station 120V AC Power Adapter for Charging Station Mini-USB to USB Charging Cable for Control Unit Canvas Storage Bag... -
Page 5: Charging
CHARGING 1.) To charge the Control Unit, use the included micro USB/USB cable. Plug the small end into the micro USB port on the left side of the Control Unit. Plug the large end into a USB/ DC converter (not included) or into a USB charging receptacle. An LED on the power button will illuminate RED while the Control Unit is charging. -
Page 6: Main Screen
MAIN SCREEN Main Screen The Main Screen is the landing screen when Wireless ChassisEAR2 is powered on. ® The use and functions of the main screen are described below: To select a channel to listen to, tap on the desired channel number button. -
Page 7: Location Settings Screen
LOCATION SETTINGS SCREEN Location Settings Screen To edit Transmitter location information, tap the location text box under the channel location you wish to edit. A digital keyboard will be displayed, allowing the user to type the Transmitter’s location. Press “ENTER” to return to the Location Settings screen. -
Page 8: System Setting Screen
SYSTEM SETTINGS SCREEN System Settings Screen 1.) The “Signal Sampling Rate” box allows the user to select the speed at which the Wireless ChassisEAR2 samples the signal strength. Default is “Fast”. A slower rate will ® slow the speed at which the signal strength bar graph moves in real time. 2.) The “Measurement Type”... -
Page 9: Transmitter Channel Adjustment
TRANSMITTER CHANNEL ADJUSTMENT Wireless ChassisEAR2 has six dedicated frequencies for receiving NVH noises that ® correspond to a dedicated channel on the receiver. Four pre-set Transmitters are included and up to 2 more channels can be added. The Transmitter channel can be adjusted using the dipswitches, located behind the TPR plug on each Transmitter unit. -
Page 10: Accessories And Replacement Parts
ACCESSORIES AND REPLACEMENT PARTS Part Number Description Quantity 61001 Custom Screen Protector 60901 Wireless ChassisEAR2 Control Unit ® 60902 Sensor Clamp 60903 Transmitter Wireless ChassisEAR2 ® 60904 Canvas Storage Bag 60905 Headphones 60906 Color-coded Rubber Boots for Transmitters 90915 Velcro Straps 90916 Nylon Ties 60685... -
Page 11: Notes
NOTES... - Page 12 ONE YEAR LIMITED WARRANTY When charging the product, the transmitter needs to be placed in the charging base, and the wireless function cannot be used normally. You need to wait until the charging is complete before you can use the wireless function.
Need help?
Do you have a question about the 60605 and is the answer not in the manual?
Questions and answers