Advertisement
Advertisement
Table of Contents

Related Manuals for Robert Sorby PED01A


Summary of Contents for Robert Sorby PED01A
- Page 1 THE ULTIMATE SHARPENING SYSTEM INSTRUCTION MANUAL...
-
Page 2: Ec Declaration Of Conformity
Thank you for purchasing the Robert Sorby ProEdge sharpening system, it has been designed using hundreds of years of tool manufacturing experience. The simple set-up and operation of the ProEdge makes sharpening tools a pleasure and gives the woodworker great satisfaction in achieving a perfect sharp edge every time. -
Page 3: Grounding Instructions
WARNING THESE INSTRUCTIONS MUST BE READ AND UNDERSTOOD BEFORE OPERATING THE MACHINE GROUNDING INSTRUCTIONS All grounded, cord-connected tools: In the event of a malfunction or breakdown, grounding provides a path of least resistance for electric current to reduce the risk of electric shock. This tool is equipped with an electric cord having an equipment grounding conductor and a grounding plug. - Page 4 WARNING • RISK OF INJURY DUE TO ACCIDENTAL STARTING - Do not use in an area where children may be present • KEEP GUARDS IN PLACE and in working order • REMOVE ADJUSTING KEYS AND WRENCHES. Form habit of checking to see that keys and wrenches are removed from tool before turning it on • KEEP WORK AREA CLEAN. Cluttered areas and benches invite accidents • DON’T USE IN DANGEROUS ENVIRONMENT. Don’t use power tools in damp or wet locations, or expose them to rain.
- Page 5 WARNING • SECURE WORK. Use clamps or a vice to hold work when practical. It’s safer than using your hand and it frees both hands to operate tool • DON’T OVERREACH. Keep proper footing and balance at all times • MAINTAIN TOOLS WITH CARE. Keep tools sharp and clean for best and safest performance.
-
Page 6: Residual Hazards
6. Inhalation of dust arising from the abrasive coating on the belt and the tool being sharpened. Precautions - the normal usage of the ProEdge is such that it is highly unlikely that the dust hazard would become a health risk. Not withstanding this, repeated and consistent use may lead to significant volumes of dust arising and it is therefore recommended that for high levels of usage, the machines should be connected to an appropriate local exhaust ventilation system (LEV) via the port at the bottom of the existing enclosure guard. -
Page 7: Technical Details
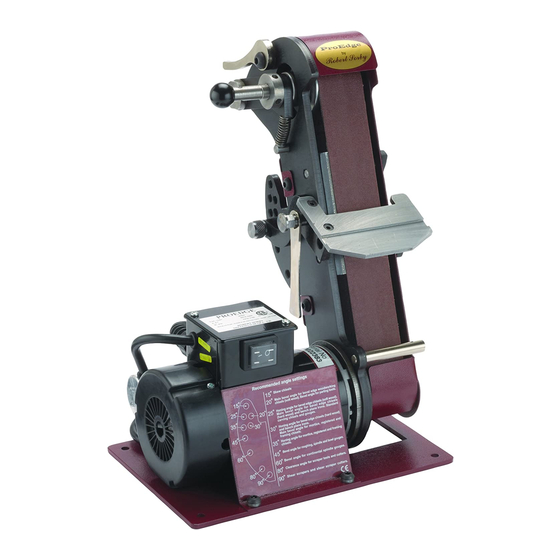
Technical Details Motor: 1/2hp Belt Width: 2” Belt Speed 1400ft (440m) per minute to achieve the best results from your system, please familiarise yourself with all of its parts and accessories. Abrasive sharpening belt Jig location slot Platform locking lever Large tool platform Accessory On/Off switch attachment hub Fingernail boss bar (Drive pulley) Belt assembly Angle setter swivel information guide screws Sharpening belt Angle setter release lever Angle selection pin Belt tracking spindle shaft and collar... - Page 8 Accessories A full list of all the accessories and sharpening belts is on the back page of this booklet. All the accessories are available from Robert Sorby dealers. Those marked* are included in the ProEdge Plus. Skew Chisel Jig* Standard Profile Gouge Jig*...
-
Page 9: Preparing For Use
Those marked* are included in the ProEdge Plus. How to adjust the Belt Alignment While the system is running, place the two tracking adjustment bars into the holes in the spindle shaft and the locking collar. - Page 10 Tilting the Sharpening Belt Assembly To assist in sharpening tools the ProEdge has a very useful feature in that the sharpening belt assembly can be angled backwards to allow for a much more comfortable position when sharpening at shallow angles.
- Page 11 Using the Angle Setter The unique Angle Setter allows the large tool platform to be set at any angle. The Angle Setter The angle with the angle selection pin in selection pin in the the 4th hole from top hole, which sets the top, setting the the tool platform at tool platform at...
- Page 12 Return the electric plug into the wall socket and switch on. Now switch on the ProEdge and check for the belt alignment. If it is not correct, adjust as described on page 9.
-
Page 13: Using The Accessories
The relevant jigs fit into the slot of the tool platform. This allows the jig to slide from side to side so that all of the sharpening belt can be utilised. The accessories marked * are included in the ProEdge Plus. Sharpening a Skew Chisel The skew chisel needs to be extremely sharp to work correctly and safely, using the skew jig* makes this achievable in seconds. - Page 14 ProEdge. If a different bevel angle is required it is just a matter of sliding the tool further through the clamp and more material will be taken from the heel of the tool making the bevel angle shallower.
- Page 15 Check that the slot in the tool rest is clean and place the key of the straight edge jig into it. Switch on the ProEdge and carefully place the tool to be sharpened against the guide bar of the jig.
- Page 16 80 degrees (80˚) and tighten the platform locking lever to secure. Switch on the ProEdge and lay the cutter holder flat onto the platform and slowly push the cutting edge up to the abrasive belt and carefully follow the profile of the cutter.
- Page 17 As the wheel is manufactured in a rubber compound it is easy to shape the edge using a sharp tool or abrasive paper such as the belts from the ProEdge. This is ideal for honing the flutes of gouges. When sharpening tools on the outside diameter ensure...
- Page 18 The Robert Sorby Knife Sharpening Jig The Robert Sorby Knife Sharpening Jig will enable the sharpening of carving, hunting, pocket and everyday kitchen knives. There are two models available each consisting of a new back plate with a raised wear plattern attached, a universal arm and a choice of either a small or a large knife holder.
- Page 19 Woodturning Tool Bevel & Clearance Angles The diagrams on this page show details of the angles and profiles supplied on Robert Sorby tools. The images are broken into four sections from left to right. 1. A general view 2. An end view showing the actual cutting edge profile...
- Page 20 For all the latest tools and products as well as a large selection of useful and informative video clips and information on demonstrations, log on to our website: www.robert-sorby.co.uk For more details on additional accessories as well as replacement and additional sharpening belts, contact your local stockist or Robert Sorby. Robert Sorby Ltd, Athol Road, Sheffield, S8 0PA, England. Tel: +44(0) 114 225 0700 Fax: +44(0) 114 225 0710...
Need help?
Do you have a question about the PED01A and is the answer not in the manual?
Questions and answers