Advertisement
Quick Links
8868 Clairemont Mesa Bl. Ste. N San Diego, CA 92123
858-285-0831 info@starrlabs.com
Getting Started Guide
for Ztar Models Z55,
Z5S, Z6/S, Z7S,
MiniZ/S/X, and
BabyZ
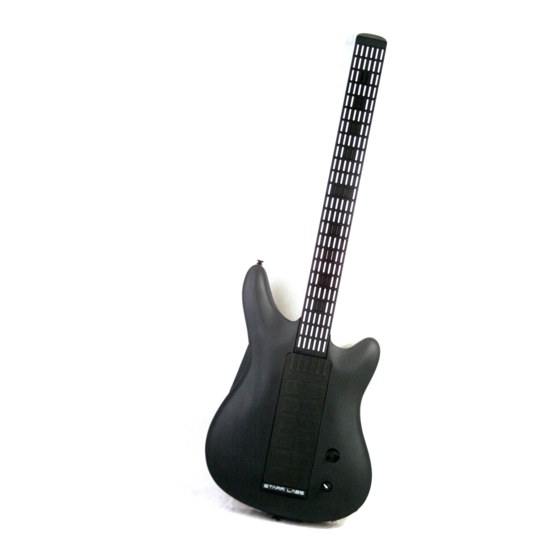
The Ztar MIDI Guitar controller is manufactured in a variety of formats, body styles
and with a variety of installed options. The installed options will generally concern
hardware that is programmed in the onboard Sensors menu. That portion of the
software is generally the same for all of our instruments, whether or not all of the
options are installed.
Z5S, Z6S, Z7S, and MiniZS instruments all have String Triggers.
Z5, Z6, Z7 instruments all have Trigger Bars.
The BabyZ is a reduced size instrument with six programmable sections per
rubber Trigger Bar.
The MarkIII Ztars have String Triggers and a trapezoid-shaped front panel
with 12 Pads.
In general, models marked "-S" have String Triggers, "-X" have a bank of
Pads, and "-P" have a bank of Pots.
The newer Z7/Z7S instruments use the same rear connector panel as the
babyZ instrument.
Starr Labs © 2013-2020
Starr Labs, Inc.
Model Configurations
Advertisement

Related Manuals for Starr Labs Ztar Z6S


Summary of Contents for Starr Labs Ztar Z6S
- Page 1 In general, models marked “-S” have String Triggers, “-X” have a bank of Pads, and “-P” have a bank of Pots. The newer Z7/Z7S instruments use the same rear connector panel as the babyZ instrument. Starr Labs © 2013-2020...
-
Page 2: Table Of Contents
MIDI I/O – PB-1 Phantom Power Adapter Page 10 Mini-Z Jack Panel Page 11 Z6 Rear Panel Page 12 How to Charge Starr Labs Battery Pack Page 13 Z7S Rear Panel Connections Page 14 Baby Z Read Panel Connections Page 15... -
Page 3: Getting Started
`Starr Labs, Inc. 8868 Clairemont Mesa Bl. Ste. N San Diego, CA 92123 858-285-0831 info@starrlabs.com GETTING STARTED If you’re absolutely new to MIDI and want to know more, you can find the MIDI specifications at www.midi.org Congratulations on your purchase of the Ztar. No matter which hardware configuration you have, you can... -
Page 4: Power Up
PB1 to your Ztar MIDI Out Port will power the Ztar and route MIDI data to your synth. Move the 3-position rocker switch to the DC position. If you have a Starr Labs Phantom Battery Supply for use with your onboard MIDI wireless transmitter, connect it to the Ztar input port instead of the MIDI cable. -
Page 5: Basic Performance Setup
`Starr Labs, Inc. 8868 Clairemont Mesa Bl. Ste. N San Diego, CA 92123 858-285-0831 info@starrlabs.com She’s Up and Running when you see the first bank of 8 presets showing on the Display Screen. Note: In the startup Display menu you will see the first bank of eight presets or zTar “Songs”. -
Page 6: String Triggers
`Starr Labs, Inc. 8868 Clairemont Mesa Bl. Ste. N San Diego, CA 92123 858-285-0831 info@starrlabs.com Use the Sensor Menu to program the Pads, Triggers, Joystick, and Pedals for MIDI effects, chords, and sequences. Use the Fretboard/Tuning Menu to set the tuning for the fingerboard, the Open Strings, Right/Left switch and Enable the HammerOns/PullOffs, Tuning Map selection, and more. - Page 7 `Starr Labs, Inc. 8868 Clairemont Mesa Bl. Ste. N San Diego, CA 92123 858-285-0831 info@starrlabs.com Also, the fingerboard response may be altered by changing the Curve assignment in the RESPONSE/FRETBOARD menu. Refer to the manual for more details on setting...
-
Page 8: Ztar Embedded Rf Transceiver Instructions
In order to be completely free of cables, when the Ztar is using the AirPower wireless data connection, you can supply main power to the Ztar system by means of the special Starr Labs MIDI Battery. Simply plug the battery into the Ztar’s MIDI Output port and it will supply phantom power through its MIDI cable... -
Page 9: Ztar Trigger Cap Assembly Expressionpad Option
`Starr Labs, Inc. 8868 Clairemont Mesa Bl. Ste. N San Diego, CA 92123 858-285-0831 info@starrlabs.com To charge the MIDI battery: Connect the Smart charger to the PB1 DC input jack. Connect the MIDI battery to the PB1 Controller jack. - Page 10 `Starr Labs, Inc. 8868 Clairemont Mesa Bl. Ste. N San Diego, CA 92123 858-285-0831 info@starrlabs.com b. TIMED when the Events’ duration is set in terms of milliseconds or MIDI clocks (governed by the MIDI clock source such as the internal metronome or external clock) or, c.
- Page 11 `Starr Labs, Inc. 8868 Clairemont Mesa Bl. Ste. N San Diego, CA 92123 858-285-0831 info@starrlabs.com...
- Page 12 `Starr Labs, Inc. 8868 Clairemont Mesa Bl. Ste. N San Diego, CA 92123 858-285-0831 info@starrlabs.com...
- Page 13 `Starr Labs, Inc. 8868 Clairemont Mesa Bl. Ste. N San Diego, CA 92123 858-285-0831 info@starrlabs.com...
- Page 14 `Starr Labs, Inc. 8868 Clairemont Mesa Bl. Ste. N San Diego, CA 92123 858-285-0831 info@starrlabs.com...
- Page 15 `Starr Labs, Inc. 8868 Clairemont Mesa Bl. Ste. N San Diego, CA 92123 858-285-0831 info@starrlabs.com...
Need help?
Do you have a question about the Ztar Z6S and is the answer not in the manual?
Questions and answers